Every day when we look at photos and admire the quality, we tend to overlook how the photographer mastered the art of clicking that shot. A lot has to do with the artistic and technicalities involved in photography. Let’s talk about one of those aspects today – camera aperture.
Aperture is one of the most important controls on your camera, but it is also one of the most misunderstood. It’s not exactly rocket science, but Aperture does require a little more understanding than some other aspects of photography.
In this article, we’ll explain everything you need to know about Aperture – what it does, why it does it, and how you can use it.
In a nutshell, you will learn –
What you’ll learn in this article
What is Aperture in Photography?
The word Aperture comes from a Latin word meaning “open” or “to open.”
Aperture is a setting on a camera that controls the amount of light that enters the lens. It’s also used to control how much (or how little) focus there is on a particular shot, affecting the depth of field (more on that below).
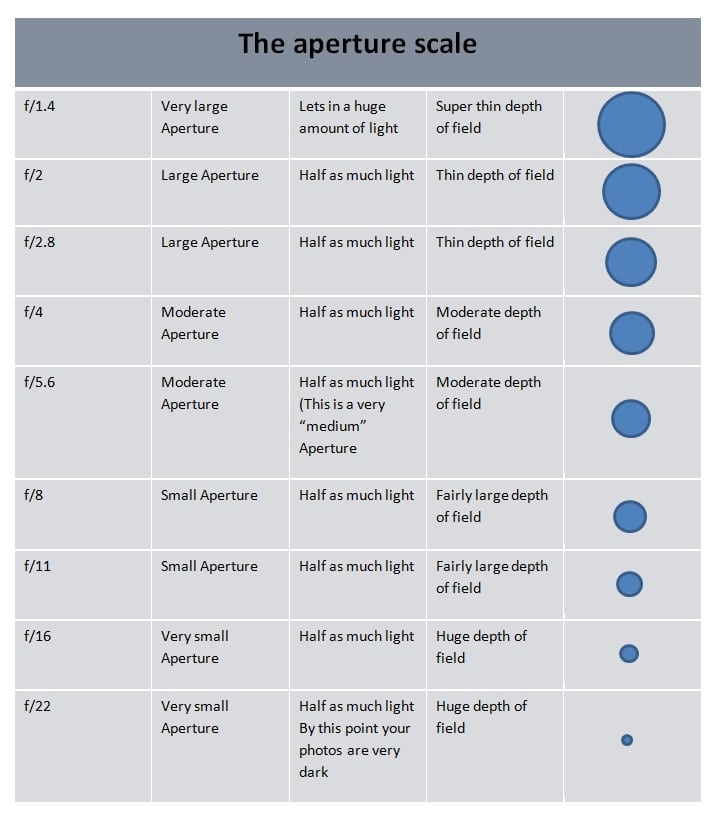
The “f-number” of a lens denotes the aperture. An aperture set to f/4 or f/2.8 lets twice as much light onto the sensor as an aperture of f/5.6 (a common street shooting setting) or f/8. This type of aperture is called “wide open” because it allows more light onto the sensor than mid sized apertures such as f/8.
➜ An increase in the number under “f” (e.g. switching from f/2 to f/4) means decreasing the aperture.
➜ A decrease in the number under “f” (e.g. switching from f/4 to f/2) means increasing the aperture.
Aperture is a very important element that helps a photographer control what is in focus in their photos and how the background fades into a blur, alongside controlling how much light passes through onto the sensor.
Aperture Scale
How does Aperture Affect a Photo?
Understanding how aperture affects a photo is one of the most fundamental things to understand when learning photography. It’s also one of the most challenging.
Aperture affects so much in your photography, whether that be the depth of field, whether or not you have enough light, flare and ghosting, bokeh, and many more factors.
Understanding how aperture impacts a photograph helps maximize your camera’s potential and take better photos. Let’s see how.
How Aperture Affects Exposure?
Aperture is one of the three factors that determine exposure in a camera. The others are shutter speed and ISO.
➜ Increasing the aperture increases the exposure, and decreasing the aperture decreases the exposure.
➜ This means that the aperture can be adjusted to take pictures in low-light conditions or in brighter environments to control how much light is let in.
How Aperture Affects Depth of Field?
Depth of field describes the range (plane) of distance from a camera that appears to be in focus in an image.
➜ The smaller the aperture, the greater your depth of field will be. Meaning, more of the image will be in focus. This refers to a “deep” depth of field.
➜ The bigger the aperture, the lesser your depth of field will be. Meaning, less of the image will be in focus. This refers to a “shallow” depth of field. For example, if you want to show
Q: ➜just the background behind your subject or want the viewer’s attention to be drawn only towards your subject, then you would use a wide aperture.
Widening the aperture will make your depth of field appear more shallow, which will blur out your background and foreground more. Then, you can position anything you want to be in the focus zone, whether it be a subject or the background itself. The depth of field is also determined by three factors: the aperture setting, the focal length of the lens, and the distance between subject and camera.
Which is Better – Lower or Higher Aperture?
The aperture size will affect your photos greatly, particularly if you are trying to take pictures of an object that is relatively close to the camera. A wide aperture, with a small number like f/2.0, will allow more light into the lens than a narrow aperture, like f/5.6.
Then, why isn’t every photo taken with a wide aperture and a large number? As with most things in photography, it depends on what you are trying to achieve.
1. Wide-open apertures (i.e., the lowest F stops), allow for large amounts of light to pass through the lens and onto the sensor or film, resulting in shallow depth-of-field shots.
2. A wider aperture will enable you to create more atmosphere and for isolating subjects from their background more successfully.
3. If you’re looking for effects like Bokeh, you would certainly need a wide aperture.
4. A large aperture will gather more light in darker surroundings. This is why you need such a large aperture as a low-light photographer (night shots, fireworks, etc.).
However, using a large aperture comes with its own set of disadvantages.
1. Photos will unavoidably have a shallower depth of field, which may put important things out of focus.
2. Widening it too much also risks overexposing your photos in well-lit environments.
Using a smaller aperture can bring a large array of benefits.
1. Narrow apertures (i.e., high F stops) limit light transmission resulting in a larger area in focus with fewer distractions, creating a deep depth of field.
2. With a narrow aperture, you will be able to achieve greater detail and clarity.
3. If you’re looking to take shots where lines or paths vanish into infinity, a smaller aperture is needed.
4. A smaller aperture will collect less light in bright environments. Which is ideal for taking pictures in sunkissed landscapes or blown-out studio lights.
As with all things in life, small apertures have their disadvantages as well.
1. You cannot focus on any specific zone to emphasize a focal point. However, this can be done by using photo composition techniques or post-processing.
2. Narrowing the aperture too much may underexpose your images, especially if the environment is not well-lit.
So, which setting is best? It depends. There is no single, perfect aperture for every situation, so knowing how to choose the right one is essential.
Higher aperture settings are generally better in low-light situations, plus they narrow the depth of field and thus make your subject stand out from the background more easily.
Lower aperture settings tend to give you a better sense of your scene because they create a deep depth of field and capture everything clearly. It is typically best when shooting landscapes or cityscapes.
Overall, if you’re wondering whether a low or high f-stop will work better for your shot, just keep in mind what you’re trying to accomplish with each one.
How to Adjust The Aperture On a DSLR?
Adjusting the aperture on a DSLR is an easy process that can be carried out in minutes. The better your DSLR, the better results you will get with varying apertures. We will discuss how to do so for the two most popular camera brands.
How to Adjust And Change The Aperture On Canon?
In your Canon camera, use the touchscreen in Live View mode. Simply press the setting on the touchscreen to bring up a screen with all of the options.
Use Quick Control mode when using the viewfinder. Highlight the setting you wish to alter after pressing the Q button or tapping the Q touchscreen sign, and then twist the Main dial. Unfortunately, the Quick Control approach does not work in Live View mode.
If the exposure mode of your Canon is on –
➜ P mode (programmed autoexposure): The camera’s suggested aperture and shutter speed are shown. Rotate the Main dial to pick a new combination. However, keep in mind that your alteration only affects the current shot. Also, when using flash, you can’t deviate from the initial aperture.
➜ Av mode (aperture-priority autoexposure): To adjust the aperture, turn the Main dial.
➜ Tv mode (shutter-priority autoexposure): To adjust the shutter speed, turn the Main dial. The camera adjusts the aperture as needed to produce the optimum exposure as you switch.
➜ M mode (manual exposure): Rotate the Quick Control dial to change the aperture.
➜ B mode (Bulb exposure): To adjust the aperture, turn the Main dial. The shutter speed is controlled by the shutter button, which remains open as long as the button is held down.
How To Change The Aperture On Nikon?
On your Nikon, you can see the aperture on the Information display and Live View display. Press the Info button to cycle through the various display choices if you don’t see this data in Live View mode.
If the exposure mode of your Nikon s on –
➜ P mode (programmed autoexposure): When you click the shutter button halfway, the camera shows the suggested f-stop. You may, however, twist the Command dial to pick a new set of options. The amount of viable combinations is determined by the camera’s aperture settings, which are determined by your lens.
➜ A mode (aperture-priority autoexposure): In A mode, the touchscreen controls show beneath the aperture reading on the Information display, and you may change the f-stop setting value on the Live View display by just tapping it. The f-stop setting can be changed by using the touchscreen or just moving the command dial.
➜ S mode (shutter‐priority autoexposure): Rotating the Command dial to set the shutter speed is the quickest choice. The camera adjusts the aperture as needed to ensure optimum exposure as you switch.
Common FAQs on Aperture
Q: How wide is the widest aperture of a camera?
Ans: A wide aperture is typically defined as anything wider than f/2.8. However, this varies depending on the lens. Some lenses aren’t capable of reaching such high apertures.
Q: What is aperture priority mode?
Ans: Aperture priority mode is a nifty shooting mode that puts the photographer in control of the aperture. The photographer selects an aperture, and the camera chooses an appropriate shutter speed for proper exposure. This means you can use wide apertures for creative blurring and shallow depth of field or small apertures for greater depth of field.
Q: What is the best aperture for product photography?
Ans: The best aperture for product photography depends on the size of your product. If you are shooting a large item, like a car, you will probably want to use an aperture of around f/8. This will give you enough space in your photo to see details. For smaller items, you could use larger apertures (decrease in f-stops).
Q: What is the best aperture for landscape photography?
Ans: With all things considered, the f/7.1 aperture would be a good choice for landscape photography on full-frame cameras. This will even allow you to easily switch to portrait lighting when the situation calls for it. Alternatively, if you want a shallower depth of field, the f/2.8 aperture will offer more flexibility in that regard.
Q: What’s the Best Aperture for Portraits?
Ans: There isn’t one specific aperture that is best for portrait photographers. The perfect aperture will depend on the type of portrait photography you are doing, the lighting, and other circumstances that come into play.
As a general rule, you want to select an aperture and corresponding exposure time that will keep your subject’s face sharp and your background soft or blurred. In most situations, an aperture at or around f/5.6 will be ideal for shooting portraits.
Ending Remarks
It’s always nice to have a quick set of guidelines (like the one in this article) to follow when you’re trying to determine the best aperture for your photographs, but it’s even better if you understand why those guidelines exist.
They exist because you can become a great photographer! We hope this content has helped you learn what an aperture is in photography and how to effectively choose the right one for all your photoshoots to come.