ISO refers to a camera setting that affects the lightness and darkness in a photo. It is one of the core elements of the ‘Exposure Triangle’ in digital photography, alongside aperture and shutter speed. Digital photography or online-based photography prioritizes accurate and professional representation of the photo. To ensure that, professional photographers balance the use of ISO in photography.
ISO stands for International Organization for Standardization, an organization that sets international standards for all different measurements from business management, products, and services to social responsibility. In camera and digital photography, ISO is the camera’s sensitivity to light. It is measured in numeric values, such as ISO 400, ISO 1600, ISO 6400, etc.
There are two types of ISO in modern cameras: Auto ISO and manual ISO options. Auto ISO determines the appropriate ISO setting during inconsistent lighting or when the subject is in motion. When shooting manually, a lower ISO is used for a bright-light environment. Higher ISO is used in low-light situations. ISO inconsistency creates noise, loss of sharpness, or underexposed images, which is fixable in post-production.
What you’ll learn in this article
- 1 What is ISO in Photography?
- 2 How is ISO Measured in Photography?
- 3 How Does ISO Affect a Photo?
- 4 How to Change ISO on a Camera?
- 5 What is the Best ISO for a Digital Camera?
- 5.1 What is the Best ISO for Product Photography?
- 5.2 What is the Best ISO for Night Photography?
- 5.3 What is the Best ISO for the Outdoors?
- 5.4 What is the Best ISO for Landscape Photography?
- 5.5 What is the Best ISO for Indoors?
- 5.6 What is the Best ISO Setting for Action Shots?
- 5.7 How to Decide What ISO You Should Use?
- 6 What are the Common Mistakes Photographers Make with ISO?
- 7 How ISO Errors Affect E-commerce Product Photos?
What is ISO in Photography?
ISO in photography is the standardized value of a camera sensor’s sensitivity to light, which is expressed on a numeric scale set by the International Organization for Standardization. It controls the image sensor’s sensitivity, not the brightness. Higher ISO signifies increased light sensitivity and results in bright images with digital noise.
ISO value is displayed in numbers, such as ISO 100 represents a low ISO, and ISO 1600 indicates a higher ISO. Lower ISO is called the base ISO or native ISO. The higher the number, the more sensitive it will be to light, and the images will appear grainy and less detailed. On the contrary, the lower the ISO, the less sensitive it will be to light, and images will appear more defined and clearer.
What is Auto ISO in Photography?
Auto ISO is a camera feature that automatically determines and adjusts the necessary ISO setting for achieving the right exposure while framing. Auto ISO allows users to set the aperture and shutter speed, and the camera to select the suitable ISO to attain the proper exposure.
The benefit of Auto ISO is that it adjusts fast in dynamic situations and maintains high-quality digital images at a lower sensitivity by automatically raising the sensitivity according to the lighting. But the feature can be deceptive in the following scenario.
- Auto ISO offered ranges are broad enough to produce good images in a limited range of situations.
- In very low-light settings, auto ISO gains uncontrolled noise, producing grainy images and loss of data details. It affects commercial photography but is solvable through post-production work.
How is ISO Measured in Photography?
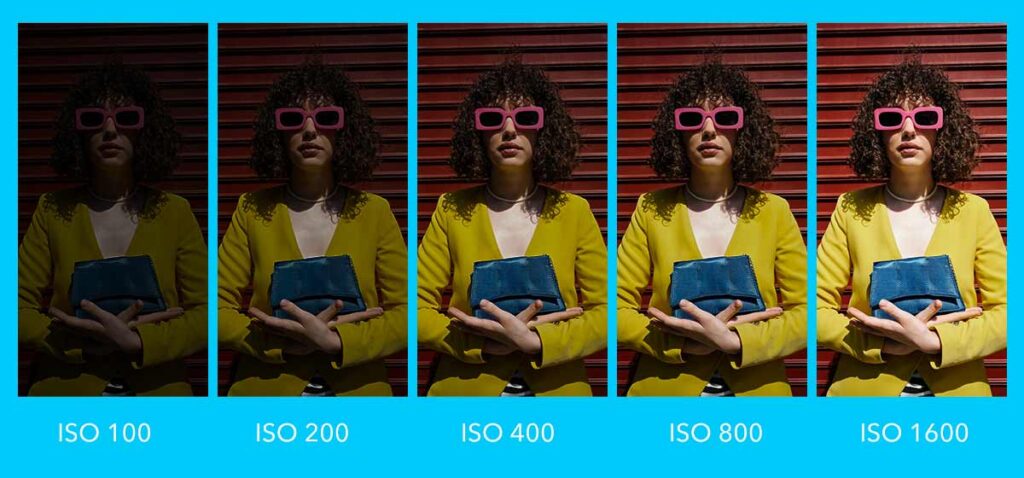
ISO is measured in photography as a numeric value that translates the speed of a digital camera sensor. The number goes from 100 to roughly 25600+. A lower number indicates less sensitivity, and an increasing number represents higher light sensitivity.
- ISO 100 to 200 produces sharp images and minimal noise. It is used for shooting in daylight.
- ISO 200 to 400 offers good quality images when the light is slightly muted or shaded during daytime, for example, when shooting indoors. ISO 200 to 400 is the recommended ISO setting for product photography.
- ISO 400 to 1600 is used for shooting in dim light, low light, and no light situations when a flashlight cannot be used. ISO 400-1600 is the recommended ISO setting for shooting wildlife photography.
- ISO 1600-3200 is used for pitch-dark situations to gain bright images with the appearance of digital noise.
Most cameras start with ISO 100, known as base ISO, and the unamplified sensitivity of the ISO range. Capturing a shot at base ISO produces a broad dynamic range, the highest image quality, with the lowest digital noise.
The numerical ISO values are set by the International Standard for light sensitivity to ensure that a specific ISO captures a consistent level of required light through different cameras. The ISO setting of 100 would have the same fundamental light sensitivity value across all cameras. The differences would be in the images. Digital camera manufacturers design their products with different sensors and image processing pipelines so that digital images offer varying results at a given ISO.
What is the History Behind ISO Standardization?
Before the standardization system came in, film and photography sensitivity was measured by the manufacturers. They established their own rating. Photographers would rely on guesswork. During the mid-20th century, two prominent standards emerged.
1. ASA (American Standards Association). US-based arithmetic scale, intuitive for exposure calculation. When a number doubled, it meant doubling the film’s sensitivity.
2. DIN (Deutsches Institut für Normung). Used in Europe, a logarithmic scale, expressed in degrees. An increase in the DIN degree meant a doubling of sensitivity.
The coexistence of these two terms confused international photography and trading. In 1974, the International Organization for Standardization (ISO) introduced a new ISO, combining both previous scales. ASA value became the base number (ISO 100), often followed by the DIN value (ISO 100/21°).
In early 2000, after gaining popularity, digital camera manufacturers adopted the ISO system for digital sensors without changing the core principle. Lower ISO-low light sensitivity, higher ISO-higher light sensitivity. ISO 12232 is the specific standard for digital cameras.
Even after technology changed from chemical reactions in film to electronic amplification in sensors, the numeric value still offers a consistent and familiar exposure reference. At present, ISO is a universal term used to describe the light sensitivity of both film and digital camera sensors, creating consistent exposure regardless of equipment or location.
What is the Normal ISO for Photography?
100-400 is the normal ISO for photography. This ISO range creates the sharpest images and allows you to take pictures in low light without getting too grainy. The range of normal ISO varies among photographers. Camera type, shutter speed, subject position in light or darkness, and whether auto ISO is set or not, determine what ISO setting he uses to capture shots. ISO 100–400 is a standard in ample and consistent lighting due to the following reasons.
- Minimal digital noise
- Accurate and vibrant colors
- Flexibility in exposure
- High-quality images
For higher sensitivity in low light conditions, evenly illuminate the surroundings, use a tripod, and take long exposure shots. To shoot in an overly bright environment, stack ND filters over your lens to block out the sunlight and reduce light hitting your sensor.
Increase the ISO range (800, 1600, and even higher) during lighting inconsistency. You would get brighter images, but your subjects in photos will suffer. The increase of ISO will increase the light, along with the noise in digital images. It damages professional and commercial images, such as product photography. Grain, blotchiness, and speckles will appear on the darker side of the images. Colors will dissolve, details will be lost, and overall image quality will degrade. You have two options to solve this: Either take photos in a controlled and well-lit environment or have your images edited by professionals.
How Does ISO Affect a Photo?
ISO affects a photo sensor’s ability to read light. The higher the ISO number, the more light it takes in. This means ISO affects your image’s overall brightness, noise, dynamic range, sharpness, and color accuracy in digital images.
- ISO directly contributes to the appearance of noise. High ISO means increasing digital noise, dropping image quality, and making less professional images. Digital noise brings color shifts or color artifacts, causing a desaturated or muted color appearance.
- High ISO supports shooting in low-light situations, creating bright images. But the images will appear different from the actual photo in bright situations.
- Increased ISO decreases dynamic range in photos, causing loss of detail in highlights and shadows and creating a less natural look.
- ISO doesn’t directly affect sharpness; it affects the perception of sharpness as the appearance of digital noise obstructs the image details and textures. Lack of clarity and sharpness causes harm to professional photography, especially product photography.
When Should You Use a Low ISO?
You should use a low ISO when shooting in controlled lighting situations like studio product photography. Low ISO offers a better dynamic range, capturing all minute shadows, highlights, and vibrant color appearance. It allows freedom for shutter speed without any motion blur in photos. Lower ISO value makes the digital images less noisy, clearer, sharper, and professional, which is the desired output for e-commerce products used for promotional and marketing purposes.
When Should You Use a Higher ISO?
Use a higher ISO during low-light situations, event photography, and indoor photography without using flash. A higher ISO lets more light into the sensor. It results in bright images in dim light conditions without needing a flash. You will get usable images even in a lighting deficiency, though you will get increased digital noise. To avoid digital artifacts when shooting motion shots, make sure your environment is well-lit. Use a fast shutter speed to eliminate motion blur.
When Should You Use Auto ISO?
You should use auto ISO for the following situations.
- Learning the basics of exposure as a beginner.
- Changing scenarios of the frame from indoor to outdoor or from lightness to darkness.
- Capturing digital photos during live events (conferences, weddings, etc.)
- During unpredictable weather and dynamic lighting conditions.
- When the subject is in motion.
How Does ISO Affect Exposure?
ISO affects exposure by impacting the overall brightness of photos. It adjusts the camera sensor’s sensitivity to light. The higher the ISO number, the more sensitive the sensor becomes, and the brighter the image will appear. Conversely, the lower the ISO number, the less sensitive the sensor is, and the darker the image will appear—assuming the shutter speed and aperture remain the same. The opposite also works. When you adjust the other shutter speed or aperture setting for your images, the ISO will be affected. Put your camera on the Auto ISO setting, and it will adjust the ISO value whenever you change the shutter speed or exposure to achieve the right brightness.
How to Change ISO on a Camera?
To change the ISO on a camera, find the ISO button or ISO sensitivity option in your DSLR camera, Mirrorless Camera, or Smartphone camera according to the following ways.
There is How to Change ISO on a DSLR Camera, Aps-C, and Full-Frame Cameras
- Option 1: Find the ISO button on your camera body, hold it, and turn the command dial (near the shutter button). The ISO value will change in the viewfinder or LCD screen.
- Option 2: Press the Menu button and go to the shooting/exposure settings. You will find the ISO or ISO Sensitivity button. Use the arrow keys to change the value. Press Ok/Set to confirm.
- Option 3: Access quick settings by pressing the Info or Q button. You will find the ISO option. Adjust the value with the arrow keys or the command dial.
There is How to Change ISO on a Mirrorless Camera
- Manual option: Mirrorless cameras have dedicated ISO buttons and, ISO dial on the camera body. Hold the button and use the rear command dial to change the ISO setting.
- Function button: Use the customizable function button (Fn1, Fn2, etc) to assign ISO and press it for fast access.
There is How to Change ISO on a Smartphone
- iPhone: Open the camera app, and tap the screen for focus. Look for the sun icon or exposure slider to change ISO. You can use a third-party app (for example, ProCamera) for manually controlling the ISO setting.
- Android: Open the camera app, tap the Pro or manual mode. Find the ISO settings. It will be displayed in numbers; tap to adjust the number. Similar to iPhone, you can use third-party apps such as Adobe Lightroom Mobile, Open Camera to manually control ISO on Android.
What is the Best ISO for a Digital Camera?
The best ISO for a digital camera is not a fixed number but rather a choice decided based on shooting place, lighting conditions, subject in motion or still, choice of aperture, and use of a tripod.
The shooting place and lighting conditions are interconnected. Indoor shooting requires a product photography lighting setup that is evenly lit. Shooting action or motion images needs a faster shutter speed to freeze moments, which might require a higher ISO to compensate for the fast shutter speed. Using a tripod requires a slower shutter speed, so a lower ISO is recommended for high quality.
What is the Best ISO for Product Photography?
ISO 400-800 is the best ISO for product photography. It works well for most cameras and produces good shots. When there is movement inside the frame, raise the ISO along with the shutter speed.
What is the Best ISO for Night Photography?
The best ISO for night photography is ISO 500-800. Anything higher than 800 will show too much noise. In case ISO 400-500 displays darkness, stick to ISO 800 and increase your exposure time to adjust the noise.
What is the Best ISO for the Outdoors?
ISO 100 to 200 is the best ISO setting for outdoor photography as it delivers a clean picture with a minimal amount of noise.
What is the Best ISO for Landscape Photography?
The best ISO for landscape photography is ISO 200 to 800. Expert photographers recommend starting from a low ISO during broad daylight. A good ISO 400 film will deliver a stronger signal-to-noise ratio than a good ISO 800 film, even if that ISO 800 film can stop the action in very low light conditions.
What is the Best ISO for Indoors?
ISO 800-1600 is the best ISO setting for indoor photography for producing great results. This ISO range exposes the digital images properly by adjusting the shutter speed and aperture as well. ISO 200 also offers the best quality images with less noise.
What is the Best ISO Setting for Action Shots?
ISO 400-1200 is the best setting for action shots. These ISO ranges offer versatility, moderate shutter speed to freeze motion, and minimized image noise. You get usable images with ISO 400-1200, even in post-processing, especially by using a flash.
How to Decide What ISO You Should Use?
To decide what ISO you should use, start with the base, which is ISO 100 (or lower, depending on the camera). Take a few shots, check if the images are too dark or too bright, and adjust the settings.
What are the Common Mistakes Photographers Make with ISO?
The common mistakes photographers make with ISO are as follows.

1. Shooting Without Changing ISO in Low Light
Shooting ISO 100 during bright light is okay, but the same setting won’t bring appropriate results in low light. Not aiming for higher ISO during dim or poor lighting would create underexposed images.
2. Not Adjusting ISO When Lighting Changes
When the lighting scenario changes, the ISO should be changed. ISO settings differ indoors and outdoors. Not minding the ISO when the lighting changes will create overexposed images with highlights being white or underexposed with the image being dark.
3. Relying on Auto ISO Indoors
Auto ISO offers an efficient solution during motion scenarios or inconsistent lighting. But depending solely on it would create a visual imbalance in image quality. Sometimes, automatic ISO cannot differentiate the appropriate scene where a manual interval is necessary.
4. Using Only the ISO for Exposure Adjustment
The exposure triangle contributes to creating the perfect exposure in the digital image frame. Changing the ISO alone would make some difference, but the entire change depends on when combined with the aperture and the shutter speed.
5. Not Understanding the Camera’s ISO
Cameras’ ISO functions differently depending on the manufacturer. Lack of ISO understanding would create mismatched images, causing photographers’ dissatisfaction.
How ISO Errors Affect E-commerce Product Photos?
ISO errors affect e-commerce product photos by creating noise, reducing image detail, showing inconsistent colors, and being different from the real product. E-commerce product images need to be crisp, clean, pristine, and high-quality to preserve brand image, convince clients, and boost sales. Inconsistent ISO delivers poor-quality images. Other effects that ISO causes in e-commerce images are as follows.
- Shooting the product in low light (high-ISO) makes the product appear different from the original product. It harms brand perception, professionalism, and approachability in the market.
- High ISO creates image noise, which affects the visual perception of low-quality products. It harms the products’ commercial intent and makes a poor first impression.
- High ISO affects the pixels, reducing photo detail and losing sharpness. Potential buyers cannot see the details during a Zoom or close-up shot.
- ISO may cause color inaccuracy in images. It makes the buyer feel skeptical about the products’ authenticity and serviceability, causing confusion and increasing the return rate.
- ISO impacts the appearance of a product on online platforms. If the image is misleading, it damages brands’ reputation and sales in the long run.
What Can be Fixed in Post-Production (And What Can’t)?
ISO issues that can and cannot be fixed in post-production are as follows.
| Recoverable During Editing | Irrecoverable During Editing |
|---|---|
| Appearance of noise (grain, speckles, etc) Overexposure or underexposure Lack of sharpness | The extreme level of noise is causing a loss of data Lost dynamic range Major color shift |
What is Noise and How Does it Relate to ISO?
Noise is the result of electronic fluctuations that occur when an image is captured with an analog-to-digital converter (for example, the CCD chip in a digital camera). Noise, also known as visual distortion, is an inherent property of digital photographs and is directly affected by the ISO setting. It is related to the ISO by the amount of “grainy” detail seen in the pixels. The higher the ISO, the more noise appears in the image.
What ISO is Grainy?
An ISO value over 200 in a dark room appears grainy. The measurement of grain in ISO is determined by the lighting conditions.
Is Lower ISO Always Better?
Yes, lower ISO is always better except when your images are underexposed. An underexposed shot will be very difficult to adjust in post-production. So, while lower ISO is better, don’t keep it too low. Either raise the ISO or raise the lighting.
Why Do You Still Need Post-Processing Even if ISO Was Right?
Even if ISO is right and images are good, you still need post-production for creating a professional-grade and uniform perception about the images across different publishing platforms. Professional post-processing includes different in-depth work from retouching, background cleaning, distraction to, flaws removal, color correction, and more. These technical applications upgrade image quality, appearance, and resolution for commercial purposes. Renowned brands and businesses, photographers, the fashion industry, advertising, and marketing agencies hire expert professionals for enhanced photos.