In this growing world of e-commerce business, photography became an undeniable part of marketing. Without utilizing photography in a smart way, this is nearly impossible to survive the virtual world of shopping. In fact, photography is considered as a major deciding factor while buying products online.
Though clipping path services mostly work with photoshop, this is essential to know how to use Adobe Lightroom. A complete step-by-step guide can be really helpful for beginners in this case. Because there are so many features to explore. In this competitive world, knowing just one software is never enough.
Online marketing has become such a big platform not just for businessmen but also for photographers. By 2040, 95% of all purchases will be through eCommerce. The number of photographers is increasing every day in this field. And to support them, new technologies are coming. Without being aware of these, one cannot survive here.
What you’ll learn in this article
- 1 What is Adobe Lightroom? How to Download It?
- 2 What Does Adobe Lightroom Do?
- 3 How to use Adobe Lightroom?
- 4 Which is better: photoshop or lightroom?
- 5 Are there any alternatives to the Lightroom?
- 6 What is Lightroom preset and how to use it?
- 7 Best Lightroom presets for product photography
- 8 What are the latest upgrades of Lightroom?
- 9 Lightroom keyboard shortcuts
- 10 Final
What is Adobe Lightroom? How to Download It?
To be straight, Adobe Lightroom is a photo editing and managing software. This software covers a large range of photo editing and managing works quite easily. Adobe Lightroom comes in both windows and mobile app versions. So, you can use this on your pc as well as on your smartphone.
To download Lightroom on your pc, just click on this link. After completing the download, follow the instructions. If you’re using Adobe software for the first time, you might need to open a Creative Cloud id. You can use one id for all the Adobe software.
To use Adobe Lightroom on your smartphone, go to the Play Store first. Search for Adobe Lightroom. Now, download the app and install it.
What Does Adobe Lightroom Do?
As a photo editor, adobe lightroom includes most of the adobe photoshop features that you might need. A contemporary photographer who doesn’t need extreme editing can easily do his/her work with Adobe Lightroom.
Edit anywhere
Adobe Lightroom has both windows and smartphone versions. So, you can use this software on your pc, tablet, mobile phone, and wherever you need it. This is really useful for those times when you need to do a quick correction. You can just grab your phone and do it within a moment.
Basic adjustments
Adobe Lightroom has all the basic adjustment tools that you might need to edit your photos. From cropping to adjusting exposure, white balance, light, color, everything you’ll need, you can get in the lightroom. It also has the option to work with curves and black & white images. So, you’re getting pretty much everything here.
Presets
Presets are the preconfigured editing that you can add to your photos with just one click. Presets make editing so easier and faster. You can create and save the presets you want to use in your photos, or you can use the presets that come with Lightroom too.
Organizing photos
Lightroom is not just a photo editing software. This is a great place to organize photos too. It helps to import, organize & manage images. Also finding photos is easier with Adobe Lightroom. This is a single place that combines both editing & organizing together.
Non-Destructive Editor
Unlike Adobe Photoshop, Lightroom is a non-destructive photo editor. You don’t need to think about saving a file. While working on a photo, lightroom automatically saves the changes and keeps that in history. There isn’t even any save button in lightroom.
How to use Adobe Lightroom?
Adobe Lightroom is a great choice for photographers. It offers so many features to work with like tethering, file renaming, color correction, adjustment history, 360 photography, local image support, etc. Here is how you can use Adobe Lightroom.
Tethered Capture with Lightroom Classic for Product Photography
When time is a matter for you, you can try tethered capture using Lightroom. This will allow you to see how the image will look after transferring it to your pc from the camera. Though most of the DSLR cameras support the feature, you can still check your camera here to see if it’s ready to shoot.
Step 1: At first, open Lightroom and Catalog
Step 2: Now, you’ll have to tether your Camera & Computer.
To do that,
- Turn the camera on
- In Lightroom, go to ‘File’ and then ‘Tethered Capture’ and click on ‘Start Tethered Capture’
- Then go to ‘Tethered Capture Settings’
- Now create a new folder for the set of images you’re about to shoot
- Assign metadata, like copyright and keywords
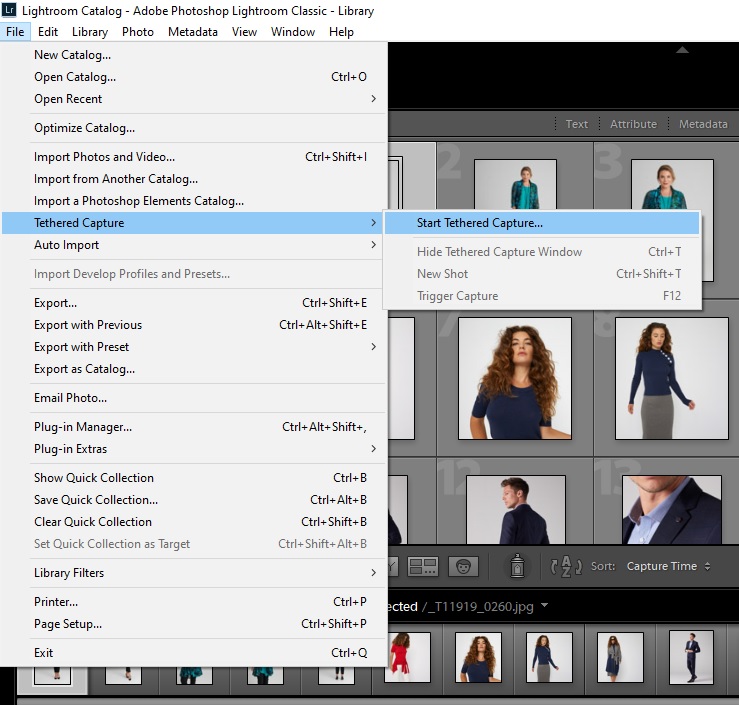
Step 3: Shoot your photos
Step 4: Now create a preset that you can use for all your images of the same set
Step 5: Export images when you’re done shooting
Batch-Edit Images with Lightroom
Batch edit is great for product photography. You can apply changes to a large number of images at a time.
Step 1: Organize your images in a particular folder. Arrange them by date & time and keep the raw file.
Step 2: Import all the images from your desired folder.
Step 3: Do some basic adjustments that you need to add to your images. For example,
- White balance
- Exposure
- Contrast
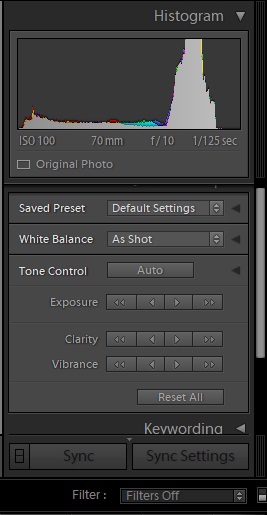
Step 4: Now you’ll have to apply the changes to all the images. Click on ‘Sync’ from the develop panel. Choose adjustments from the ‘Synchronize Settings’ menu and then click on ‘Synchronize’.
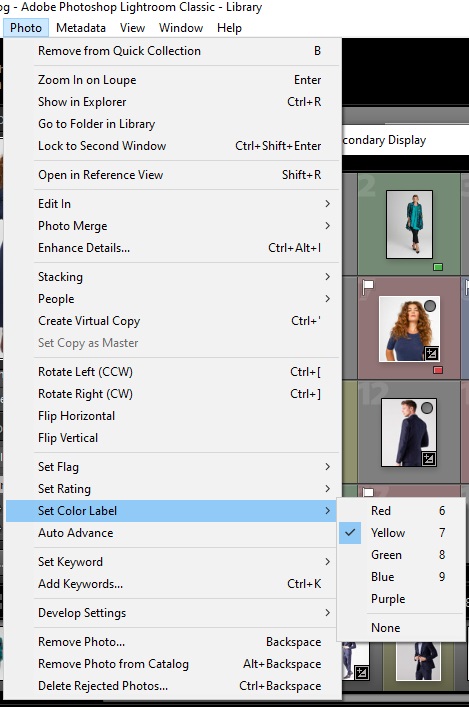
Step 5: Mark the files with a flag or star to categorize them according to your choice.
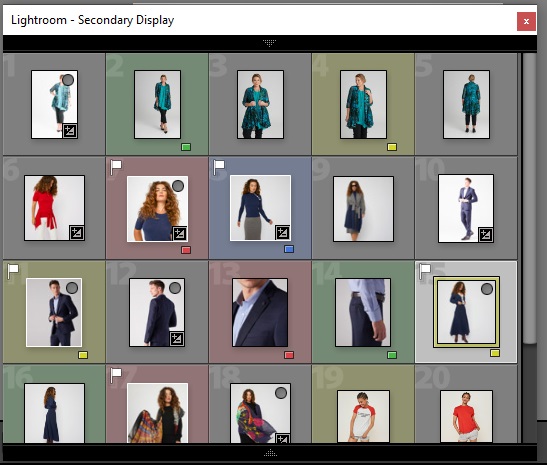
Step 6: Finally, export the images when you’re satisfied with the work.
Batch Process Images in Lightroom CC
Step 1: Add photos from your device.
Step 2: Edit one image that you think has similar light and color conditions like other images of the same group.
Step 3: Now, copy edit settings by going to Photo > Development Settings > Copy Edit Settings. Or you can just press on ctrl/cmd + shift + c. Your editing is copied now, and you can apply it to other images.
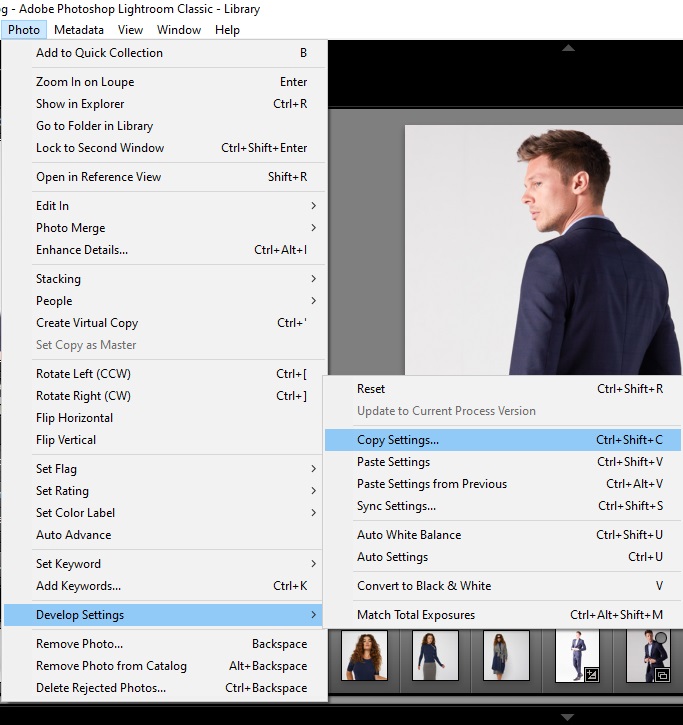
Step 4: Select the other images from the group and paste the settings to apply the same effect on all others. Go to Photo > Development Settings > Paste Edit Settings. Or press on ctrl/cmd + shift + v.
Step 5: Your changes have been applied to all the images now.
Which is better: photoshop or lightroom?
Photoshop and Lightroom – both are products of Adobe and both work as photo editing tools. It’s actually difficult to pick one because of the difference in what they offer. Each has its own strength. So, you can have your own reasons to use these software.
Advantages of Lightroom –
- Compared to Photoshop, Lightroom has a simpler interface which is easier to learn.
- Adobe Lightroom has the option of creating presets which can save a huge amount of time.
- Raw images can be uploaded directly to Lightroom
- Lightroom has photo management options which help to organize photos
- Lightroom has all the basic photo editing tools like exposure, contrast, clarity, saturation, warmth etc
- As Lightroom is a non-destructive editor, it keeps the original file and saves all the edits done in a photo
Advantages of Photoshop –
- Photoshop allows to control every inch detail of an image which produce more perfect images
- Photoshop has diverse types of tools and editing options to create more dynamic photos
- Removing or replacing any part of an image can be done by photoshop
- There are feature-boosting plugins in photoshop that helps to have general edits easily
- Photoshop offers the option of layers to work with each part of an image individually
- There is an iPad version of photoshop which is quite powerful
So, as you can see, each one offers different advantages. If you want to work with raw images, lightroom is a wiser choice. Also, this is great for organizing photos and quick editing. You can choose lightroom if you are a beginner. That way, you can learn the basics of editing quite easily.
On the other hand, if you need some in-depth work on your photos or complex editing, go for adobe photoshop. Also, choose this if you need to remove, replace or retouch something in your photo. Photoshop is a better option while working with layers too.
Adobe Lightroom is better than photoshop in so many ways. This is easier to use, and the interface is simpler. You can work with the raw files too. So, until you need some serious & complex photo editing, you can rely on Adobe Lightroom for your editing work. And then, for more extreme editing, shift to photoshop.
Are there any alternatives to the Lightroom?
Of course, Adobe Lightroom has its own charm. But if you don’t want to use it, there are plenty of paid and unpaid software that you can use instead of lightroom. Here are some of the most popular alternatives of Adobe Lightroom. Choose what suits you best.
Unpaid software
Dark Table:
According to the darktable team, darktable is created for photographers, by photographers. So, it’s obvious they’ll understand the needs of photographers. The interface of Dark Table is similar to Lightroom. It has a photo organizing option along with editing. So, it can be a really good alternative to Lightroom if you don’t want to spend money.
Raw Therapee
Raw Therapee is a cross-platform photo processing system. It can work with raw files from a broad range of digital cameras. It works as a non-destructive editor. You’ll get photo organizing features in the interface too. This is a great platform to work for free.
Light Zone
Light Zone is another non-destructive photo editor. This software is basically for professional level photographers. Like other alternatives of lightroom, this also has photo management features. Another great feature of Light Zone is zone editing. This user-friendly software is really a good choice for photography enthusiasts.
Paid Software
Skylum Luminar
Skylum Luminar is considered as one of the best and most intelligent photo editing software. This has effective automatic enhancement and powerful filers and adjustment tools. Its interface is quite impressive, and a great thing is the software gets updated features frequently. This is a complete professional workflow solution.
Exposure
Exposure has most of the core features of Adobe Lightroom. This software offers auto correction and tons of presets. It has unique photo editing tools that are great for creative photo editing. This software is pretty fast and smooth. With all these great features, this software is affordable too.
ON1 Photo RAW
If you want a one stop solution for photo editing, then ON1 Photo RAW is the software that you need to pick. This is a full-fledged all in one photo editing tool which will give you everything you might need from beginning to end. Along with many other features, it has artificial intelligence for portrait editing.
DxO PhotoLab
DxO PhotoLab is known for its best noise reduction quality. Though it’s not a complete photo workflow solution, it can work in unique ways that no other software can do. The interface is clear. This has some great local and auto adjustments to produce great quality images.
What is Lightroom preset and how to use it?
Preset is an editing setting which is already prepared to use. When you’ve preset editing that you can just add to your image with one click, that’s called preset. In adobe lightroom, one can buy, create or download presets and add them to their images.
There are tons of presets created by experts that are available to download. Wedding presets, portrait presets, food presets are used for specific needs. Some of the most used presets are Sepia Chic, Sepia Chic 2, Basic Bam, Basic Bam 2, and Modern Aged.
There is an option to create your own preset too. This gives the chance to create a unique style of your own. Also, one can save the presets according to one’s photography style. This will help to maintain the consistency of work.
Here is how to use presets in adobe lightroom –
Downloading Preset –
- Go to the Develop Module, click on the ‘+’ icon from the left corner.
- A menu will pop up. Click on the Import Presets options from there.
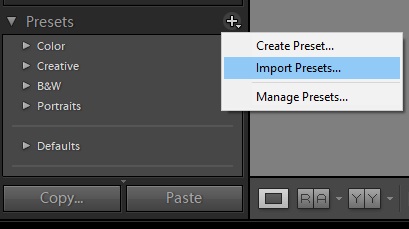
- Now, you can see options of presets to import. Choose the ones you like from the list.
- Once you’ve downloaded, you’ll see the presets in the Presets panel or in the User Presets category. You can rename the presets here too.
Creating Preset –
- When you’re satisfied with the editing, you can save it for future use. To save the preset, go to the Presets panel, click on the ‘+’ icon from the left corner. Then write a name for the preset and click Create.
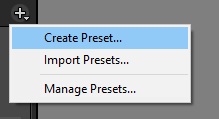
- You’ll see the saved presets in the list of User Presets category on the Presets panel. From there, you can apply the presets to whichever photo you want.
Applying Preset –
- Open the image you want to work on. Go to the Develop module. You’ll see a list of categories under the preset column. Pick the one you need.
- To have a preview of the preset, just hover over the preset. Don’t click on it. You’ll see the change.
- To apply the preset, just click on the preset.
Using a preset in the lightroom saves a lot of time. You can choose from a large number of presets according to your image. Many presets are so unique that they take photography to the next level. There is a chance to experiment with many different styles too. Also, it simplifies the editing and makes it easier.
Best Lightroom presets for product photography
Here is great news for product photographers! There are tons of presets for lightroom that are available online. Also, there are presets for product photography for those who want the free ones. And here is another large collection of paid presets where you’ll get thousands of presets to download. Check out some of the best presets of lightroom that you can use for your e-commerce photography.
1. Clean White Lightroom Preset: Removes unwanted shadows and patterns

2. Clarity Lightroom Preset: Removes blurry, gray film effects from products and the background.

3. Colorful Lightroom Preset: Enhances the color of images by making the colors deep and intense.
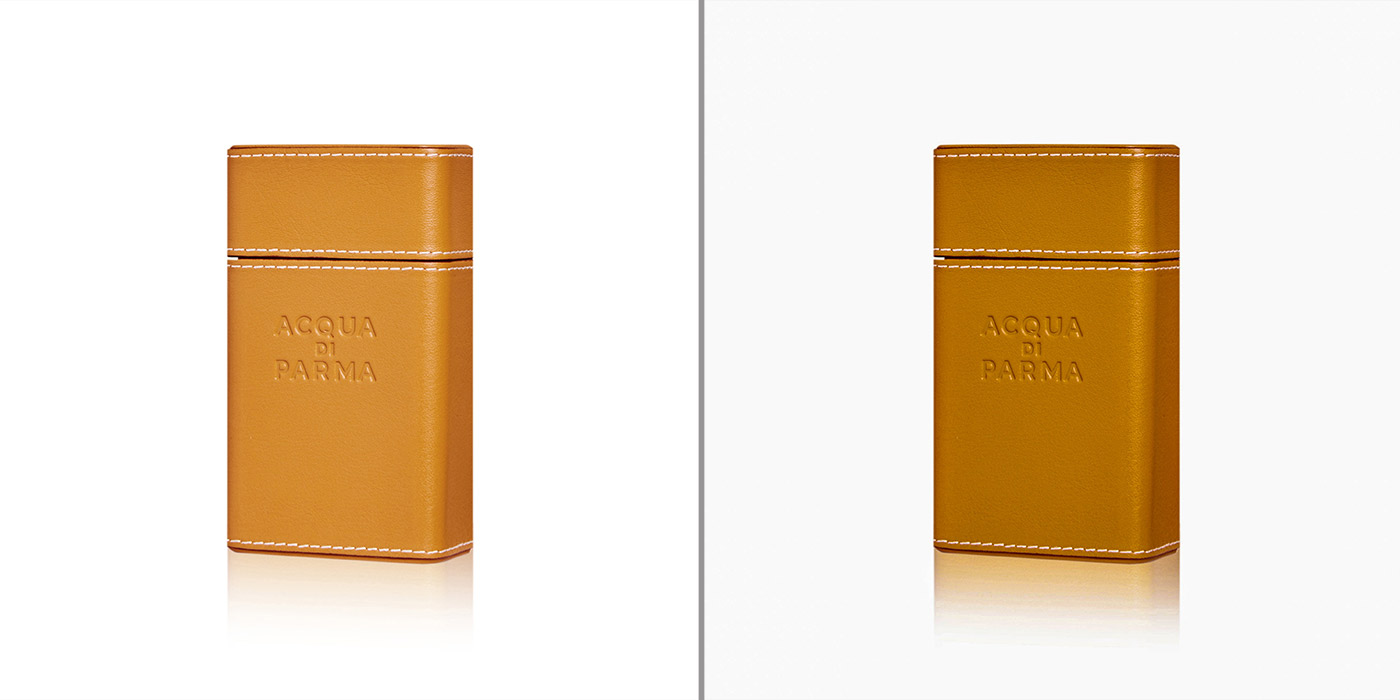
4. Brightening Lightroom Preset: Adjusts shadow-light ratio, makes brighter & cleaner, balances saturation.
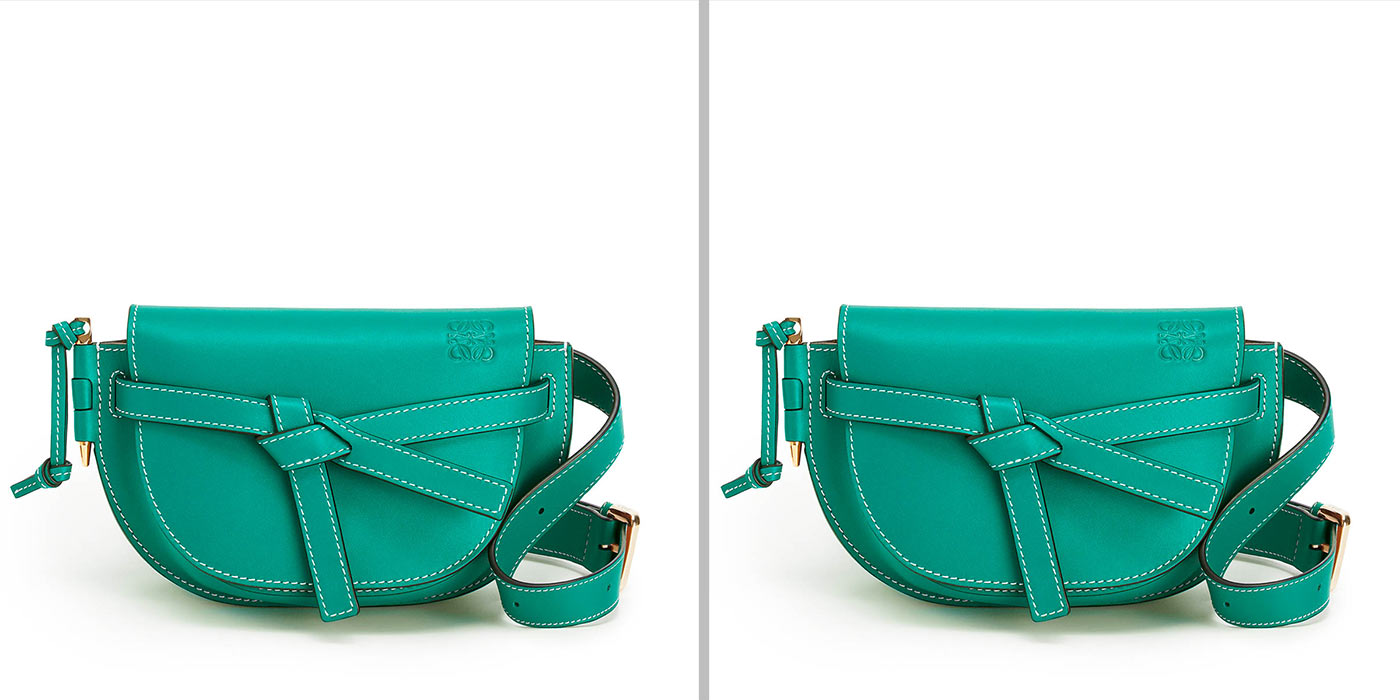
5. HDR Lightroom Preset: Removes unnecessary gloss and smooths harsh shadows, emphasizes the volume, shape, color, texture, etc.

6. Contrast Lightroom Preset: Improves lighting & contrast, highlight subject, enhances clarity & saturation.

7. Matte Product Lightroom Preset: Corrects saturation, removes flash reflections & yellowness, improves lighting.
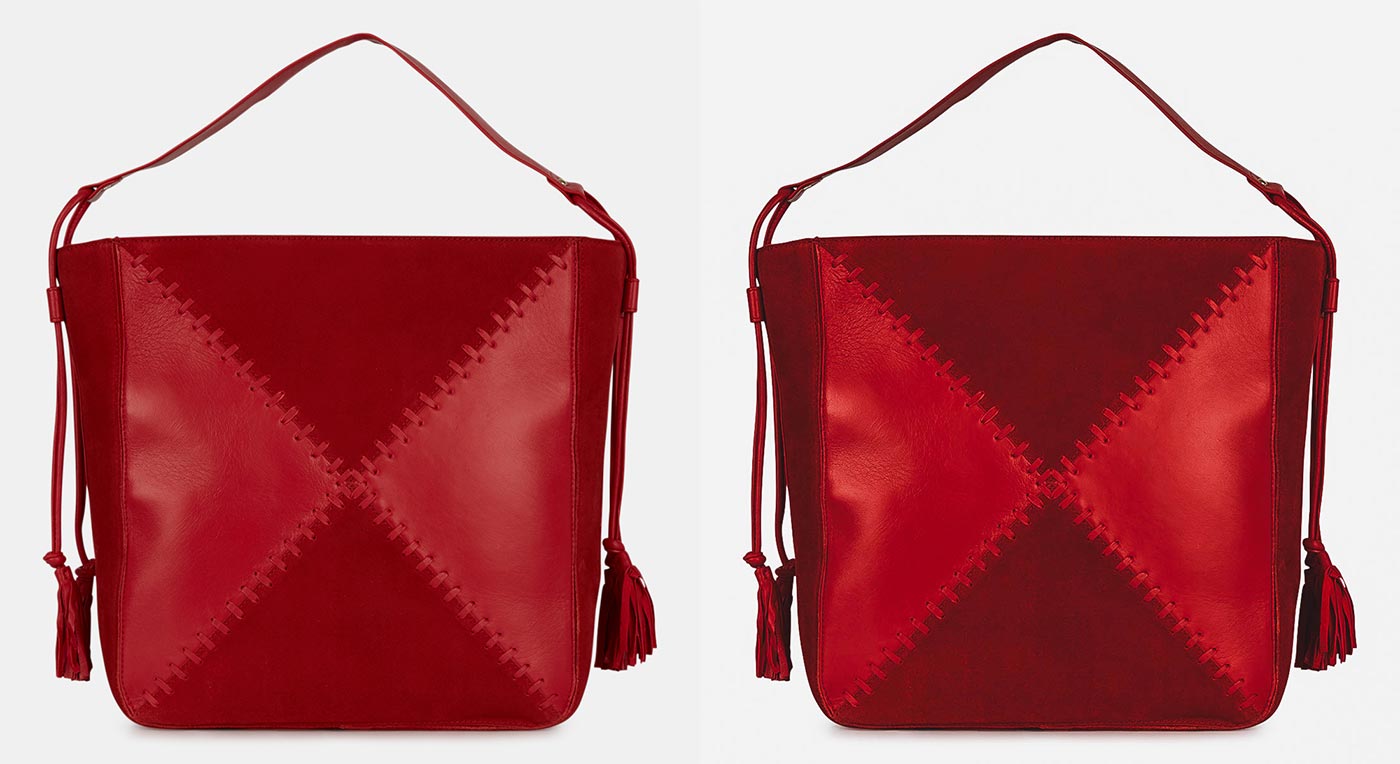

8. Reduce Blue Cast Lightroom Preset: Replaces unnecessary blue tone with pure white which comes from studio environments.
9. Reduce Noise Lightroom Preset: Corrects colors, shadows, contrast and white balance.
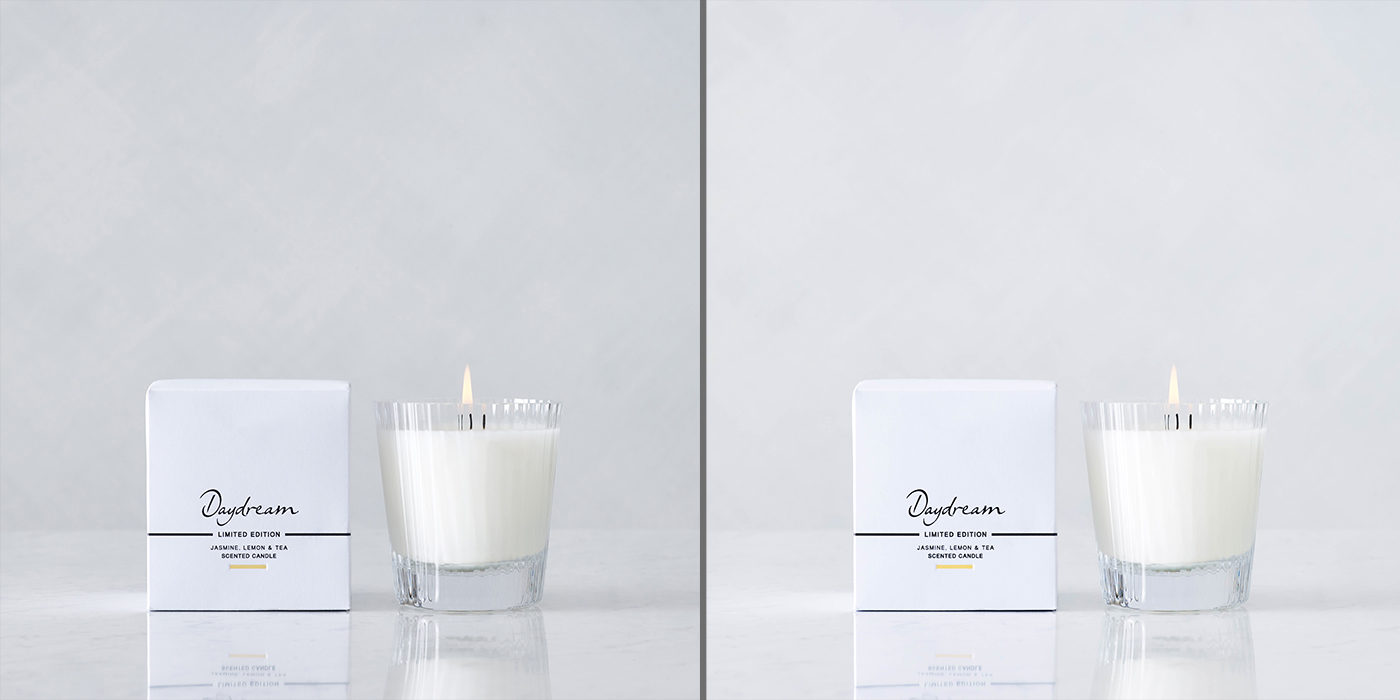
10. Toning Lightroom Preset: Eliminates unnecessary yellowness and corrects colors, improves contrast and brightness.
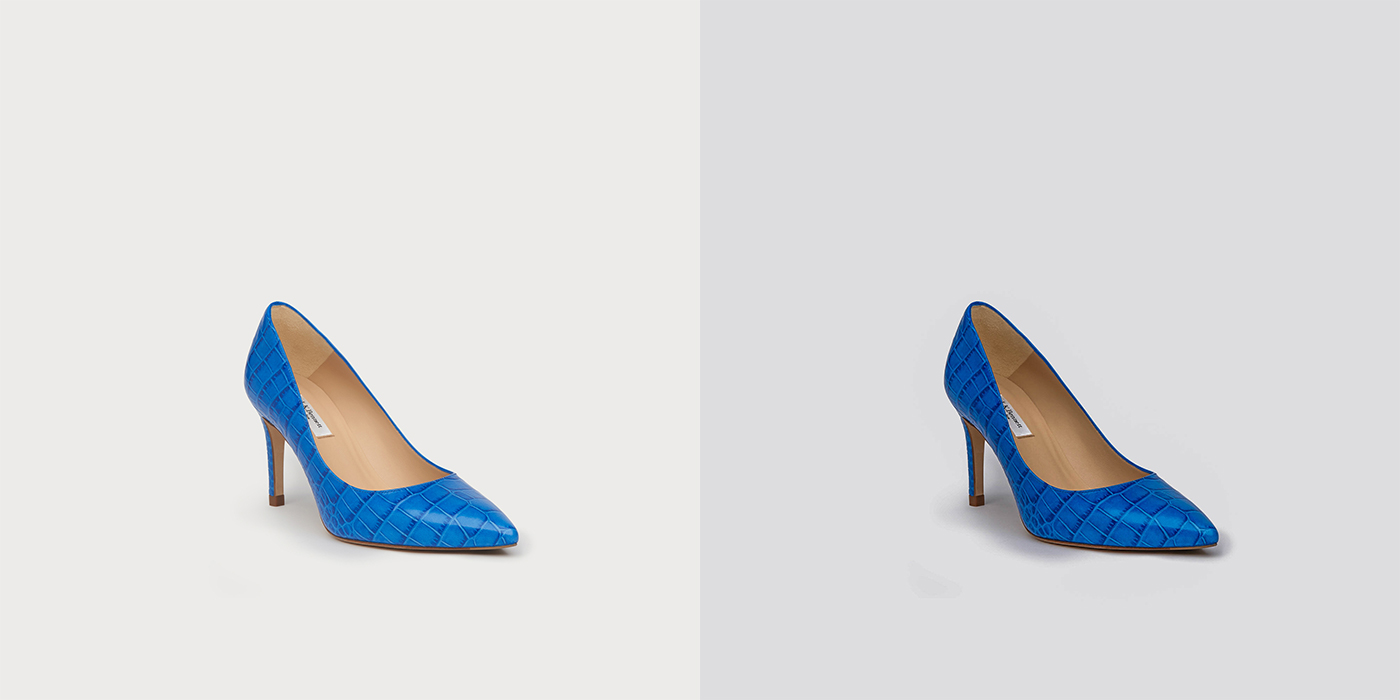
11. Soft White Lightroom Preset: Removes unnecessary shades, enhances other colors by making them clearer and brighter.
12. Minimal Lightroom Preset: Saturates colors and creates realistic shades and gives a natural look.
13. Flat Lay Lightroom Preset: Improves features like color, contrast, brightness and saturation, preserves natural textures, removes unnecessary glare of the flash. Get Flat Lay presets from here.
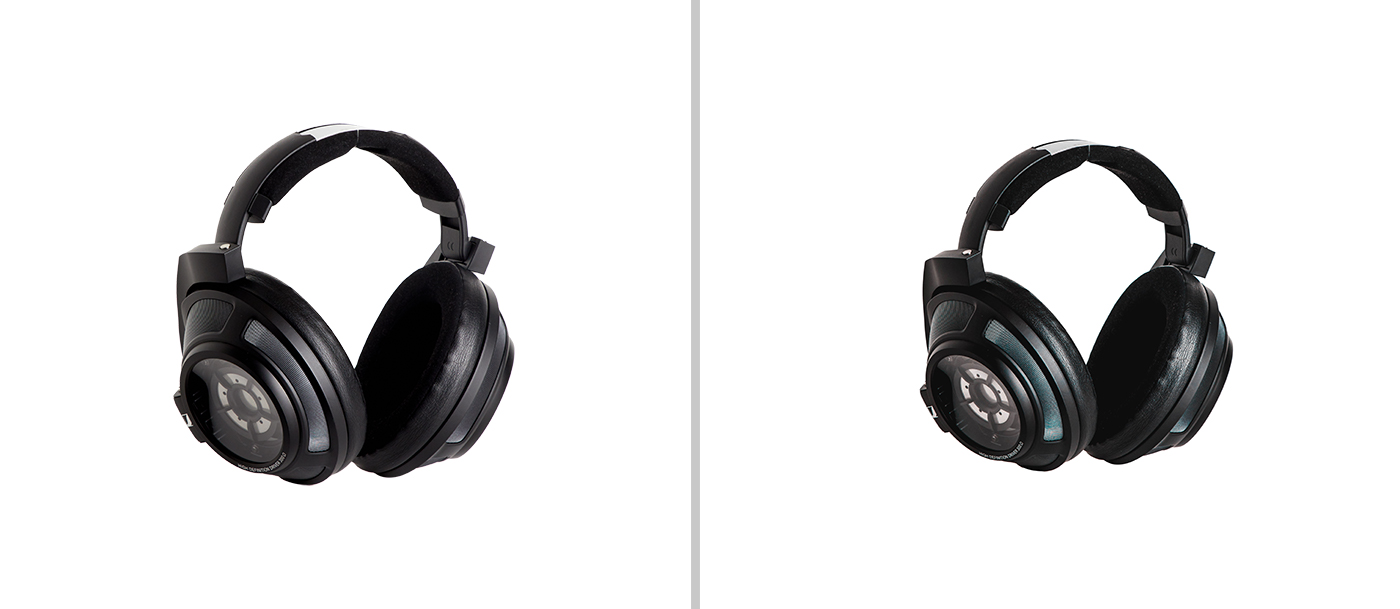
14. Irish Lightroom Preset: Softens hard edges, contrasts and shadows, makes images delicate and warm, fixes lighting issues.
15. Food Lightroom Preset: Corrects colors, adds volume and emphasizes texture, removes defects like spots, glare, etc. Download Food Lightroom Presets from this large collection to take your food photography to the next level.
16. Bright White Lightroom Preset: Adds clarity, softness and brightness, adjusts the white balance and corrects lighting.
17. Superior Lightroom Preset: Removes defects, like unnecessary shadows, harsh contrasts, etc.
What are the latest upgrades of Lightroom?
- Radial Filter
- Visualize Spots
- Facial Recognition
- Overlay Guide
- Smart Previews
- Super Resolution
- Faster Metadata Management
- File location changes for Develop Presets
- File Structure
- Premium Presets
- Support for new cameras and lenses
- Native support for Apple Silicon Computers
Lightroom keyboard shortcuts
Here are some of the most useful keyboard shortcuts for those who use Lightroom in pc or mac –
|
Results |
Windows |
Mac OS |
|---|---|---|
| Rate your images | Numeric keys 1 to 5 | Numeric keys 1 to 5 |
| Remove photo from collection | X | X |
| Pick or Flag an image | P | P |
| Quick access to Library module – Grid view | G | G |
| Change to single-image view (loupe view) | E | E |
| Enter the Develop module | D | D |
| Hide the panels and switch between Normal and Full-screen | Ctrl + Shift + F | Command + Shift + F |
| Convert your image to black & white | V | V |
| Shortcut to the straighten tool | Ctrl | Command |
| Open the brush tool | K | K |
| Show or hide the mask you’ve created | O | O |
| Show or hide guides in the Print module | Ctrl + Shift + H | Command + Shift + H |
| Show or hide rulers in Print module | Ctrl + R | Command + R |
| Continue editing in Photoshop | Ctrl + E | Command + E |
| Delete selected photos | Ctrl + Alt + Shift + Delete | Command + Option + Shift + Delete |
| Copy/Paste Develop Settings | Ctrl + Shift + C or V | Command + Shift + C or V |
| Export the photos you’ve chosen | Ctrl + Shift + E | Command + Shift + E |
| Undo | Ctrl + Z | Ctrl + Z |
| Auto Tone | Ctrl + U | Ctrl + U |
| Auto White Balance | Ctrl + Shift + U | Ctrl + Shift + U |
| Increase/Decrease Selected Slider In Small Increments | Arrow Keys | Arrow Keys |
| Increase/Decrease Selected Slider In Larger Increments | Shift + Arrow Keys | Shift + Arrow Keys |
| Move Up And Down Through Basic Panel Settings | . (full stop) + , (comma) | . (full stop) + , (comma) |
| Select White Balance Tool | W | W |
| Select The Crop Tool | R | R |
| Select The Spot Removal Tool | Q | Q |
| Select The Adjustment Brush Tool (from any module) | K | K |
| Select The Graduated Filter Tool | M | M |
| Increase/Decrease Brush Size | ] / [ | ] / [ |
| Increase/Decrease Brush Feathering | Shift + ] / Shift + [ | Shift + ] / Shift + [ |
| Rotate Photo | Ctrl + ] Ctrl + [ | Ctrl + ] Ctrl + [ |
| Zoom In / Zoom Out | Ctrl + / Ctrl -[ | Shift + ] / Shift + [ |
| View Before and After Left/Right | Y | Y |
| View Before and After Top/Bottom | Alt + Y | Alt + Y [ |
| View Before and After In A Split Screen | Shift + Y | Shift + Y |
| Edit in Photoshop | Ctrl + E | Ctrl + E[ |
Final
The number of online shoppers is increasing every moment. Photography and online business are connected so strongly. The growth of a business depends on photography in so many ways. On the one hand, businessmen are increasing their investment in photography; on the other, the product photography genre is getting bigger day by day.
Adobe Lightroom is one of the most used software in the photography field. Though you can find alternatives to lightroom, still this software has always been a favorite one. As being a master in one software is never enough, Adobe Lightroom should be on the learning list of every photographer. Knowing how to use Adobe Lightroom will benefit in the long run.
