A mask should hold still while the image moves inside it. But grab the wrong layer in After Effects, and the mask moves too. The reveal breaks. The render looks messy. It's a small mistake. It costs video agencies a full re-render the night before delivery.
To move an image inside a mask in After Effects 2026 without shifting the mask itself, press Y to grab the Pan Behind (Anchor Point) Tool, then drag the layer. The mask path stays locked while the footage repositions underneath it. For an animated move, keyframe the layer's Position property instead of touching the mask path directly.
That's the short version. Below, I will explain how to move an image inside a mask in After Effects. Also, the full walkthrough: why this goes wrong in the first place, three dependable methods, a side-by-side comparison, and fixes for the mask problems editors run into most in After Effects 2026.
Which Method Should You Use?
After Effects gives editors 3 ways to move an image inside a mask, and picking the right one upfront saves a re-edit later. A quick, one-off reposition calls for one tool. A keyframed reveal for a YouTube intro or a client ad calls for another. Working from a separate matte layer, common in product reveals and real estate walkthroughs, calls for a third.
Here's how the three compare before getting into the steps:
| Method | Best For | Difficulty | Precision |
|---|---|---|---|
| Pan Behind Tool | Fast, one-time repositioning | Beginner | Medium |
| Transform (Position) Property | Keyframed, animated reveals | Intermediate | High |
| Track Matte | Shape-based or multi-layer masking | Intermediate | High |
After Effects remains the stronger pick for layered, mask-based reveals; if you're still weighing it against After Effects vs Premiere Pro for this kind of edit, that comparison breaks down where each tool wins.
Move an Image Inside a Mask in After Effects
Once the mask is confirmed unlocked and correctly selected, three methods handle almost every situation an editor runs into. The Pan Behind in After Effects works best for a quick, manual reposition.
Transform properties handle animated, keyframed moves, the backbone of parallax and reveal effects that marketing teams and ad agencies lean on for scroll-stopping intros.
Track Matte comes in when the mask lives on its own layer, which shows up constantly in product photography reveals and real estate walkthroughs.
Each method is broken down step-by-step below, along with where it fits best in a real project. Skimming ahead works fine, but running through all three builds a much sturdier mental model to move an image inside a mask in After Effects.
Method 1: Move an Image Using the Pan Behind Tool
The Pan Behind Tool is the fastest fix for a single, manual reposition. The kind of quick nudge a freelance editor makes when a client asks to "shift the photo slightly to the left" inside an existing frame.
- Select the image layer in the Timeline panel, not its mask path. Clicking directly on the layer name confirms the right target.
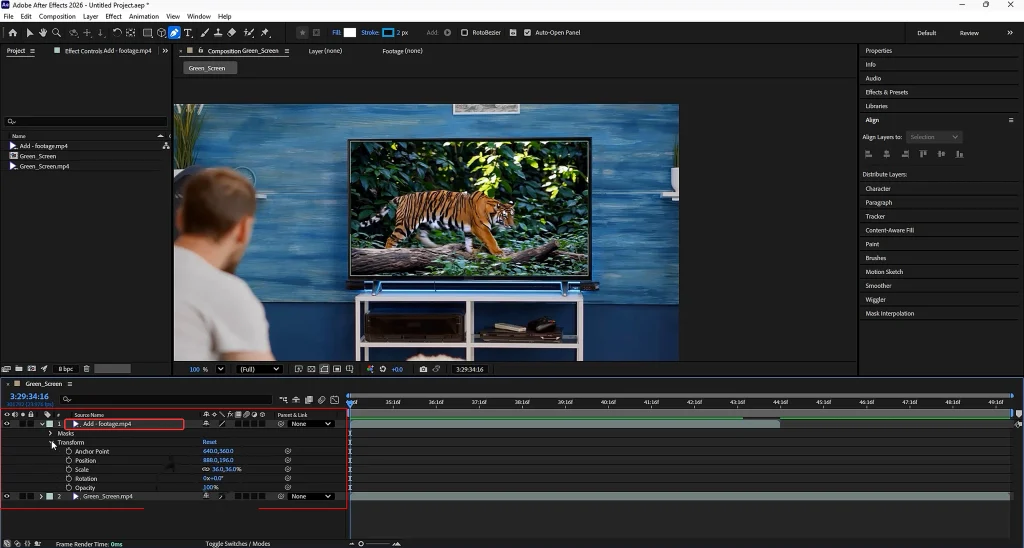
- Press Y on the keyboard, or click the Pan Behind icon in the toolbar above the Composition panel.
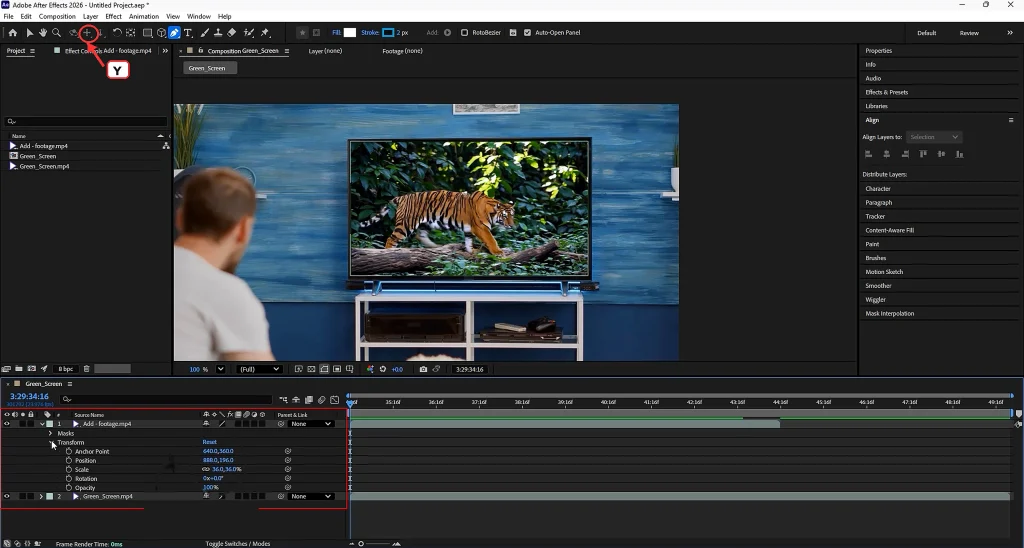
- Click and drag the image inside the Composition panel. The mask path stays exactly where it was drawn, while only the footage underneath shifts position.
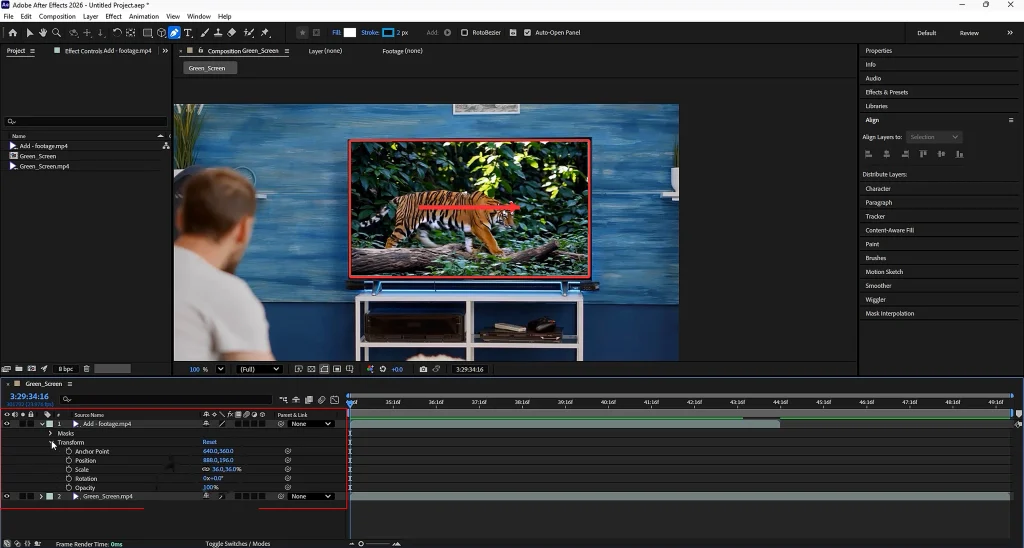
- Watch the anchor point marker (the small crosshair) as it moves with the layer. This confirms the tool is repositioning content rather than the mask itself.
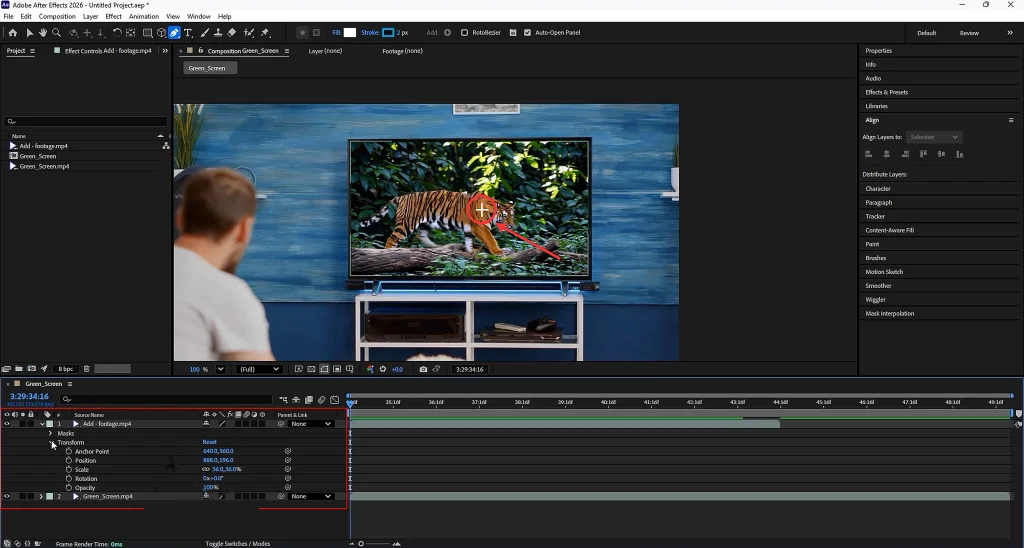
- Release the drag once the image sits where it should. No keyframes are created, so this works purely as a static reposition.
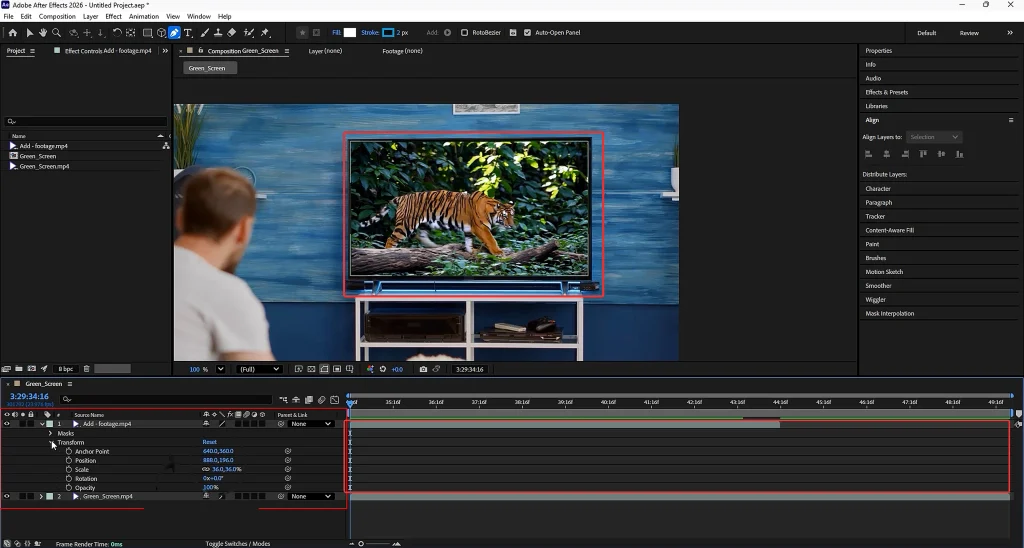
- Switch back to the Selection Tool by pressing V once finished, since the Pan Behind Tool stays active until changed.
Pro Tip: If the image jumps unexpectedly when dragging, the anchor point is likely off-center. Reset it with Layer > Transform > Center Anchor Point in Layer Content before repositioning again.
This method is ideal for one-off adjustments. Nudge a headshot inside a circular frame, or fine-tune a still photo inside a shape for a thumbnail. It isn't built for animation. Though for a moving reveal, Transform properties or Track Matte in After Effects handles that job far better.
Method 2: Move an Image Using Transform Properties
Keyframing the Position property is the standard approach whenever the image needs to move over time. A slow pan behind a mask, a parallax slide for a course lesson, or a reveal that syncs with a beat drop in a promotional cut.
- Select the image layer and press P to reveal its Position property in the Timeline panel.
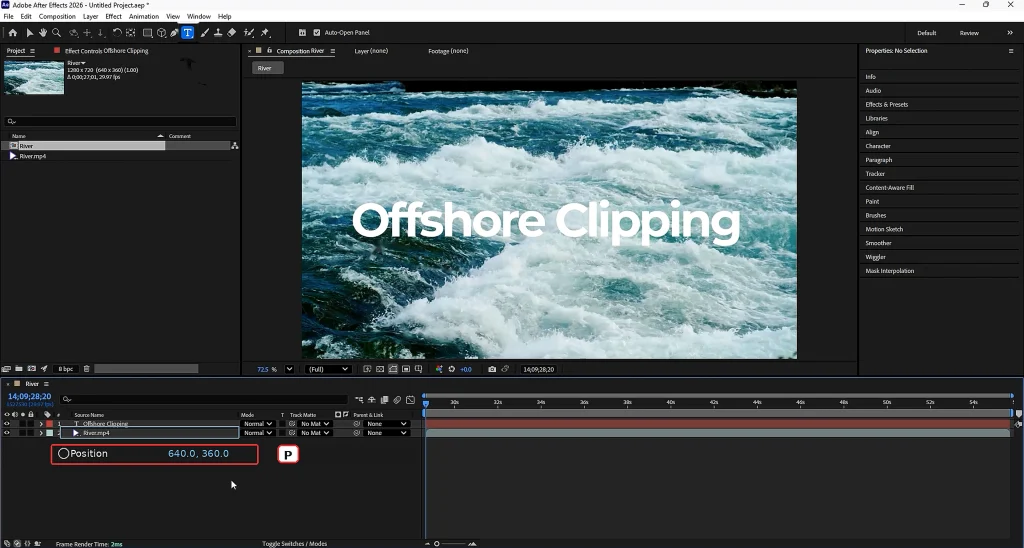
- Move the playhead to the point where the animation should begin, then click the stopwatch icon next to Position to set the first keyframe.
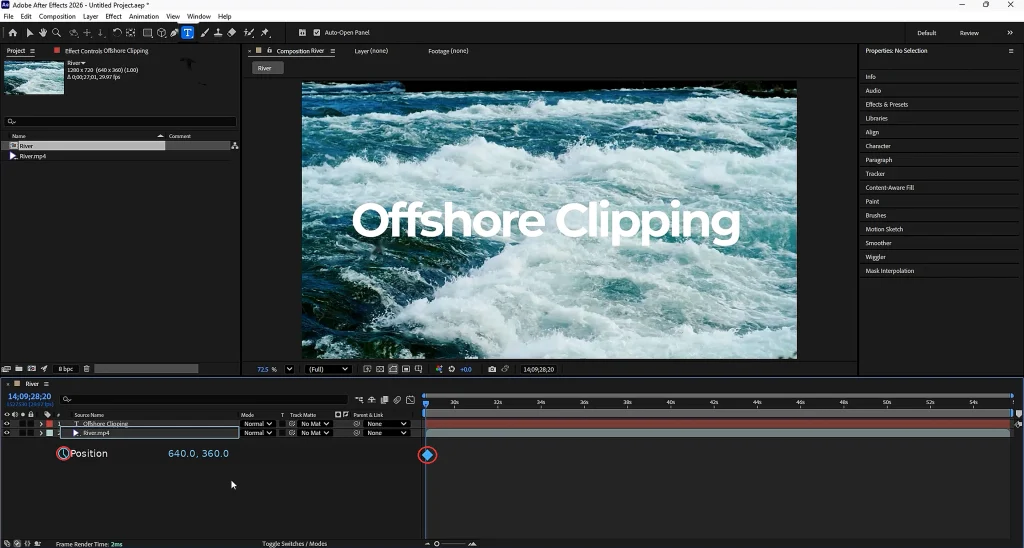
- Move the playhead forward to the next point in the timeline, then reposition the layer in the Composition panel. After Effects automatically records a second keyframe.
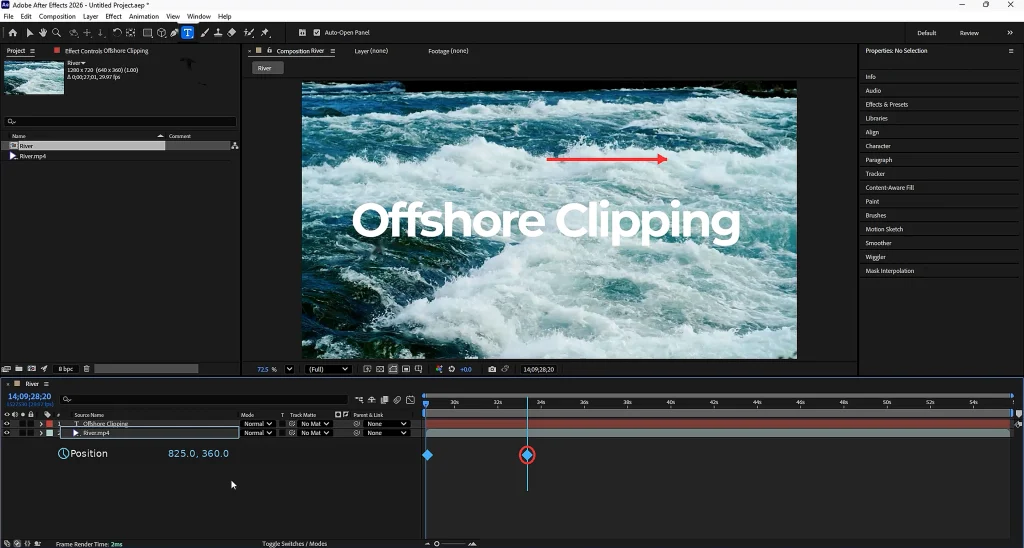
- Repeat for as many points as the move needs. A simple two-keyframe slide, or a more elaborate multi-stop pan for a longer sequence.
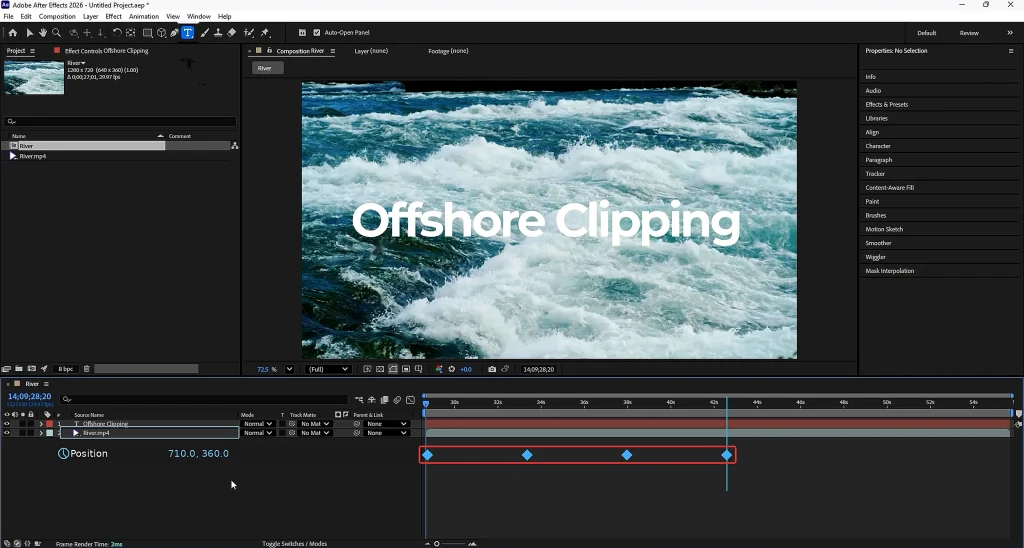
- Select all keyframes and apply Easy Ease (F9) for smoother acceleration and deceleration, instead of a mechanical linear move.
- Open the Graph Editor to fine-tune the speed curve if the motion still feels stiff, especially for slower, cinematic reveals.
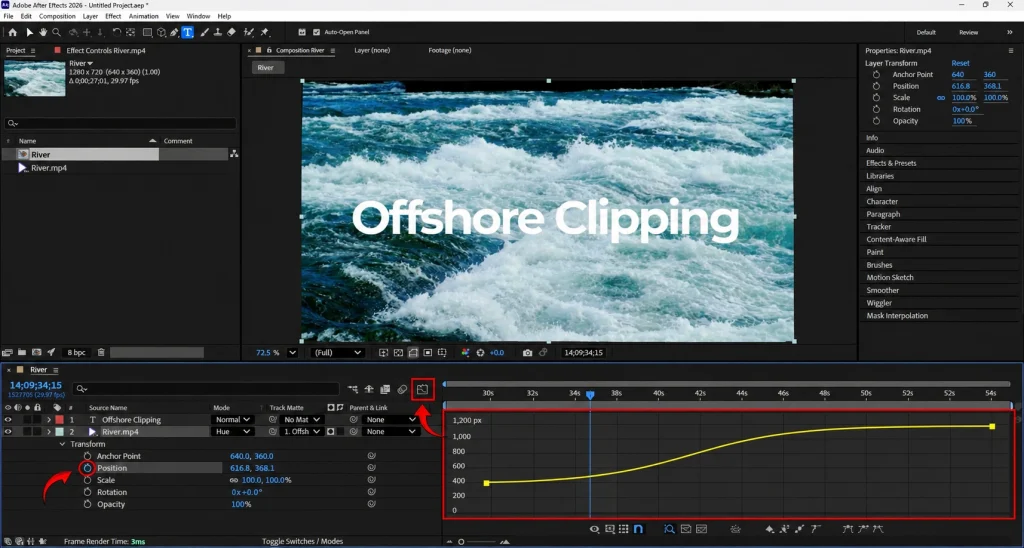
Because the mask path itself is never touched, this keeps the reveal shape locked while the photo glides underneath it. Exactly the effect behind most parallax slideshows, animated intros, and scroll-style product reveals.
Pro Tip: Parent the image layer to a null object if several properties (position, scale, rotation) need to move together. Adjusting the null moves everything in sync without hand-keyframing each property separately.
Method 3: Use a Track Matte
Track Matte is the better fit when the mask shape lives on its own layer. A logo, a custom shape, or text used to reveal footage underneath it. It's especially common in real estate walkthroughs, where a window or doorway shape reveals a property photo. Retail or e-commerce reveals built around a product silhouette.
- Place the shape or matte layer directly above the image layer it will control in the Timeline panel.
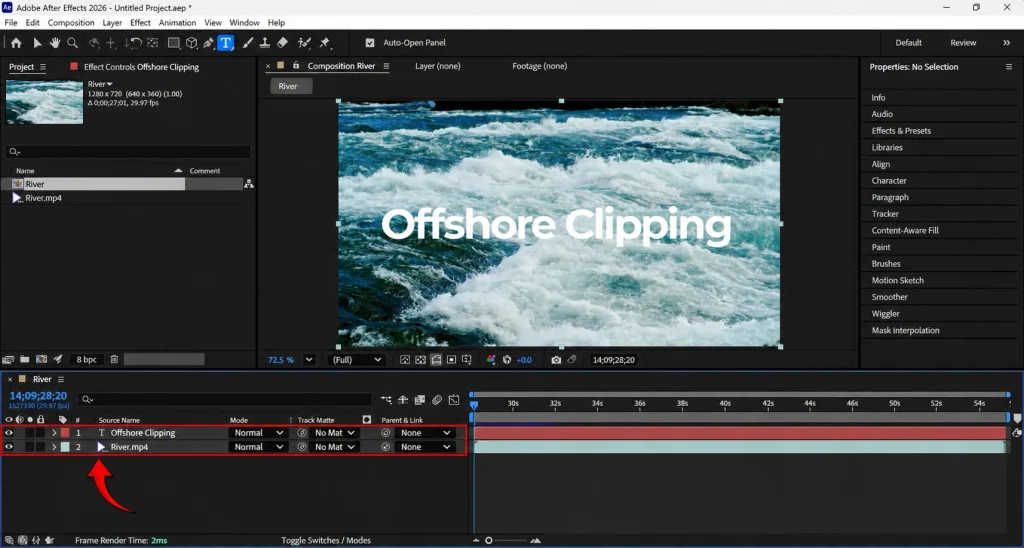
- In the Timeline's Modes column, locate the image layer and open its Track Matte dropdown (labeled TrkMat in earlier versions, refreshed in the 2026 Timeline).
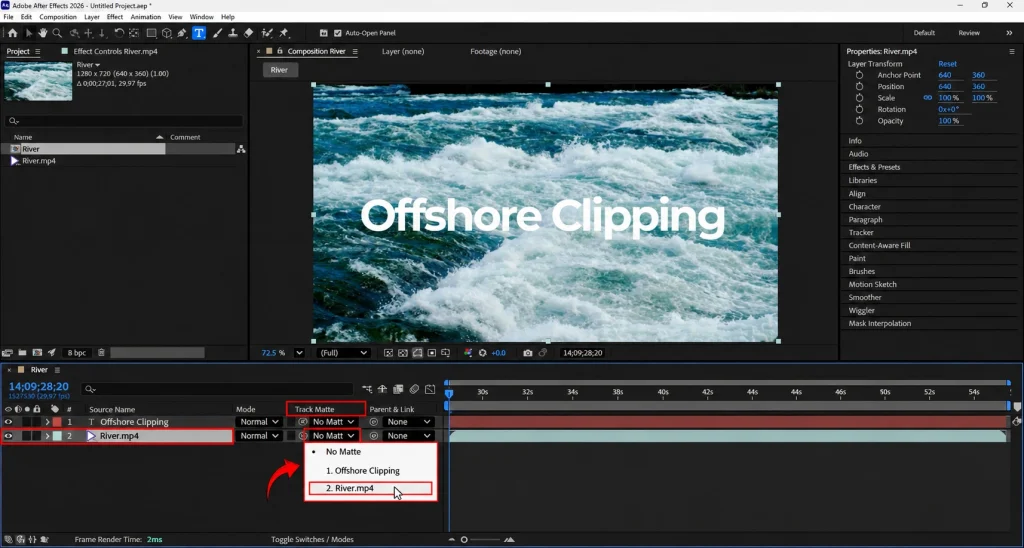
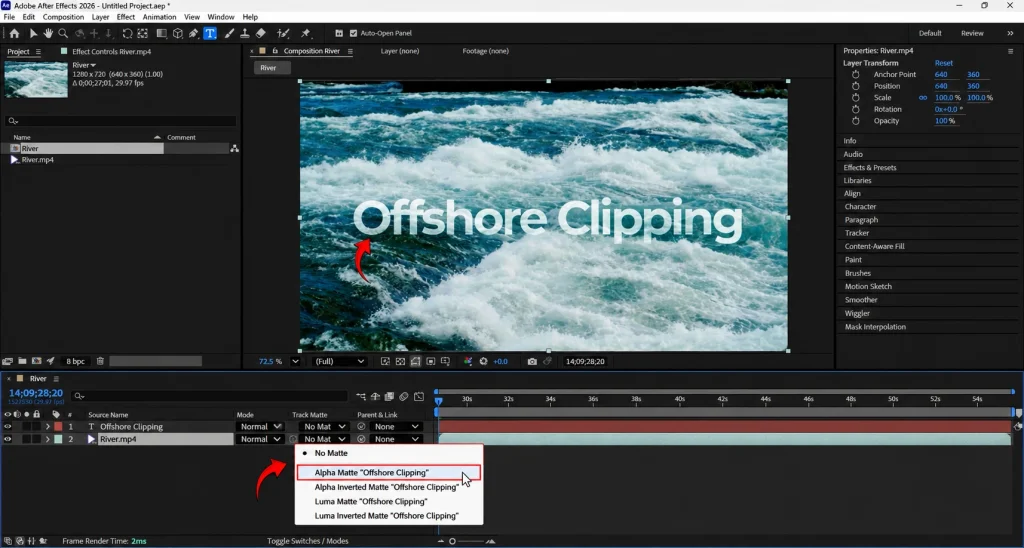
- Choose Alpha Matte to use the shape layer's opacity as the reveal boundary, or Luma Matte to use its brightness values instead.
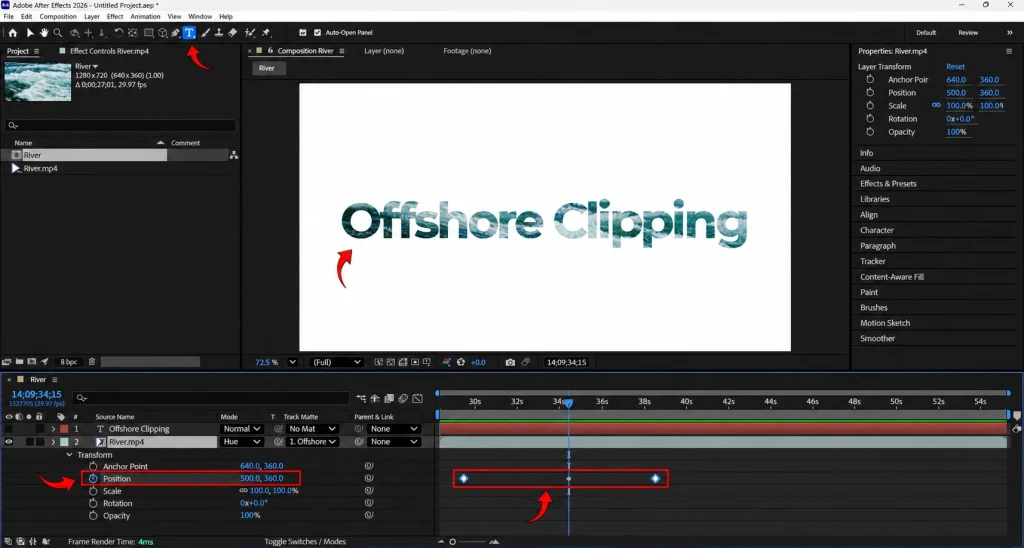
- Move or keyframe the image layer underneath as usual — the matte layer above defines what's visible, while the image itself moves independently.
- Animate the matte layer separately if the reveal shape itself needs to move or scale, keeping matte motion and image motion on two distinct timelines.
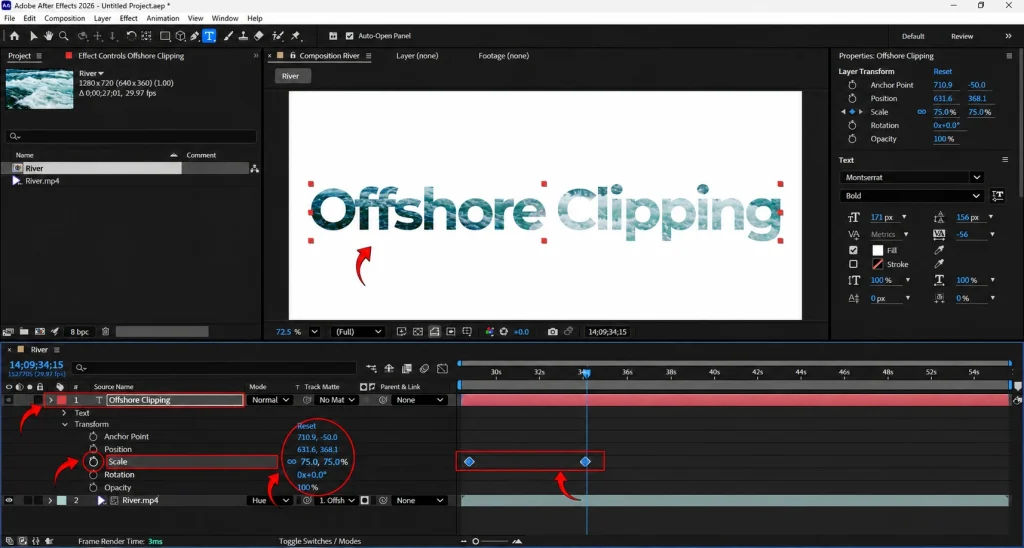
This setup separates what shape reveals the image from how the image moves, which gives far more creative control than a single hand-drawn mask path. It's the same principle behind a clipping mask in Photoshop. Particularly for agencies building repeatable templates across multiple client projects.
Why You Can't Move Object Inside Mask
Before troubleshooting a specific project, it helps to know what usually goes wrong. Most mask issues in After Effects trace back to one of six habits:
- Wrong layer selected. Clicking the mask path in the Timeline selects the mask, not the image. Moving it drags the mask instead of the footage.
- Off-center anchor point. When a layer's anchor point sits away from its true center, repositioning rotates or drifts the image unpredictably.
- Parented to a null. If the image is parented to a null object that also drives the mask, moving the null drags both together.
- A locked layer or mask. A padlock icon left on in the Timeline panel silently blocks every transform attempt.
- Mask Mode set incorrectly. Add, Subtract, and Intersect modes change how a mask interacts with layers stacked below it, and a mismatched mode can look like a "stuck" mask.
- Interface changes in After Effects 2026. The refreshed Timeline and Layer panel relocated a few toggles, so editors coming from older versions sometimes hunt for a control that's simply moved.
Editors who already know how layer masks work in Photoshop will recognize the same shape-controls-visibility logic here. Ruling these out first saves a lot of guesswork before opening any of the three methods below.
Working With Precompositions
Precomposing groups a masked layer and its matte (or its keyframed moves) into a single, self-contained composition. It's a habit worth building early, especially on projects with several moving pieces.
- Keeps a masked group portable, so it can be reused across multiple scenes or even multiple videos without rebuilding the setup each time.
- Simplifies the main Timeline panel, which matters once a project stacks several masked reveals, lower thirds, and transitions together.
- Lets effects (blur, color correction, grain) apply to the whole masked group at once, rather than to each layer individually.
- Makes it easy to swap the source image later. Useful for course creators reusing one animated frame template across dozens of lesson thumbnails.
To precompose, select the relevant layers, right-click, and choose "Pre-compose," keeping "Move all attributes into the new composition" checked so masks and keyframes travel with it intact.
Not Editing the Video Yourself? Offshore Clipping's editing team handles masking, retouching, and reveal-style edits for brands and studios!
Start My Edit
Pan Behind vs Transform vs Track Matte
With all three methods covered, here's a closer side-by-side to settle which one fits a specific project:
| Factor | Pan Behind Tool | Transform Property | Track Matte |
|---|---|---|---|
| Ease of use | Very easy | Moderate | Moderate |
| Best for animation | No | Yes | Yes |
| Precision control | Medium | High | High |
| Reusable across projects | Low | Medium | High |
| Ideal use case | Quick manual nudge | Keyframed reveals, parallax | Shape-based, product/property reveals |
Common Problems and Fixes
Even with the right method, masks in After Effects still misbehave sometimes. Here are the fixes for the issues that come up most often:
- Mask moves instead of the image. The mask path layer is selected instead of the footage. Reselect the image layer before dragging.
- Image drifts outside the mask. Check the anchor point position; recenter it through Layer > Transform > Center Anchor Point in Layer Content.
- Track Matte After Effects option is missing. The matte layer isn't positioned directly above the image layer. Reorder the layers in the Timeline panel.
- Mask appears hidden. The mask's visibility toggle may be switched off, or its opacity slider has been dragged to zero by accident.
- Image looks blurry inside the mask. The source asset is undersized for the composition's resolution. Swap in a higher-resolution image or PNG sequence.
- Parenting causes both layers to move together. Unparent the image from the null, or parent only the matte layer if they need to move independently.
- Animation looks choppy. Apply Easy Ease (F9) to keyframes, and confirm Motion Blur is switched on for the layer and composition.
Most of these take under a minute to fix once the cause is identified. This is exactly why ruling out the six habits from earlier saves time before troubleshooting further.
Essential Keyboard Shortcuts
A handful of shortcuts cover almost every step above:
| Shortcut | Action |
|---|---|
| P | Reveal the Position property |
| A | Reveal the Anchor Point property |
| M | Reveal the Mask Path property |
| MM | Reveal all mask properties at once |
| Y | Switch to the Pan Behind (Anchor Point) Tool |
| U | Reveal all animated (keyframed) properties on a layer |
| Ctrl/Cmd + Shift + H | Reveal properties with expressions applied |
Best Practices
- Use shape layers for mattes instead of hand-drawn mask paths whenever the reveal shape needs to scale or animate cleanly.
- Precompose early, not after the project has grown complicated. It's far easier to organize a masked group before a Timeline gets crowded.
- Turn on Motion Blur for any masked layer that moves quickly, so the reveal reads as smooth rather than mechanical.
- Start with high-resolution source assets, since a mask often crops in tight enough to expose any softness in a low-quality image.
- Name layers clearly ("Product-Matte," "Photo-Image"). A habit that saves real time for video agencies handing off a project between editors.
- Save reusable mask-and-matte setups as templates for recurring formats, like intros, lower thirds, or product reveal sequences.
Real Project Examples
These techniques show up constantly across different kinds of video work:
- Photo reveal transitions. Photography studios and freelance photographers use a Track Matte reveal to unveil a portrait or wedding shot behind a soft shape wipe.
- Slideshow animations. Course creators and coaches build slide-style lesson intros where each image pans behind a fixed frame using keyframed Position properties.
- Parallax effects. Marketing teams and ad agencies rely on layered parallax panning for scroll-style social ads and brand promo videos.
- Lower thirds. YouTubers and content creators mask a name-and-title graphic that slides in from off-screen using a simple Transform-based move.
- Profile frame reveals. Real estate agents and property teams use a Track Matte shaped like a window or doorway to reveal a listing photo mid-walkthrough.
These video techniques mirror various types of image masking used in photo editing. The method rarely changes; only the shape, the timing, and the source image do. Once the underlying logic clicks, adapting it to a new project is mostly a matter of swapping assets.
Frequently Asked Questions
Why does my mask move with the image in After Effects?
This happens when the image and its mask are parented to the same null object or when the mask path layer, rather than the image layer, is selected before dragging.
How do I move an image without moving the mask path?
Select the image layer, switch to the Pan Behind Tool (Y), and drag inside the Composition panel. The mask path stays fixed while only the footage repositions.
What's the difference between a mask path and a Track Matte?
A mask path is drawn directly on a layer using the Pen or shape tools. A Track Matte uses a separate layer's alpha or luma values to define the reveal area instead.
Can I animate an image inside a mask in After Effects 2026?
Yes. Keyframe the layer's Position property while the mask path or matte layer stays untouched, then apply Easy Ease for smoother motion.
Why is my Track Matte option missing in the Timeline?
The matte layer needs to sit directly above the image layer it controls. If it's positioned elsewhere in the stack, the Track Matte dropdown won't display correctly.
Does moving an image inside a mask affect render performance?
Not meaningfully on its own. Performance issues usually come from unoptimized source resolution, excessive effects, or too many nested precompositions rather than the mask itself.
Conclusion
Moving an image inside a mask in After Effects comes down to picking the right tool for the job. The Pan Behind Tool handles a quick manual nudge. Transform properties carry animated, keyframed reveals. Track Matte takes over once the mask lives on its own shape layer.
For a one-off adjustment, start with Pan Behind. For anything that needs to move an image inside a mask, keyframe Position. For shape-based or product-style reveals, build it on a Track Matte from the start.