Photoshop’s Liquify Tool is a real-time-saver in photo editing when it comes to fixing imperfections or just creating something funky. It’s a very powerful tool that can help you achieve great things in your digital art.
In less than 10 minutes, you’ll be able to make apples more realistic, make objects look as if they are melting, or become more elongated.
It’s a great addition to your digital toolbox, but it can be tricky to use. This article will show you how to use the Liquify Tool in photoshop effectively and apply it to the real world – with examples and scenarios.
What you’ll learn in this article
- 1 About Liquify Tool – What Is It?
- 2 Tutorial: How To Use The Liquify Tool In Photoshop
- 2.1 Step 1: Open the Image in Photoshop
- 2.2 Step 2: Create a New Layer
- 2.3 Step 3: Select Liquify Tool
- 2.4 4. Forward Warp Tool
- 2.5 5. Reconstruct Tool
- 2.6 6. Smooth Tool
- 2.7 7. Twirl Clockwise Tool
- 2.8 9. Bloat Tool
- 2.9 10. Push Left Tool
- 2.10 11. Freeze Tool
- 2.11 13. Face Tool
- 2.12 14. Hand Tool
- 2.13 15. Zoom Tool
- 2.14 16. Control Other Options
- 2.15 17. Using the tool
- 3 Final Thought
About Liquify Tool – What Is It?
Liquify tool is a photoshop tool that allows you to push, pull, rotate, reflect, pucker, and bloat the pixels of an image. This tool is used a lot for fashion photography since it allows for facial modifications according to the client’s preferences.
It can also be useful for landscape photos and other images that would benefit from some perspective correction.
The Liquify tool can be quite powerful in the right hands, and it’s amazing what can be accomplished with a bit of creativity and imagination. However, users should be very careful while applying these operations so that the images don’t end up looking worse than they did originally.
Where Is The Liquify Tool In Photoshop?
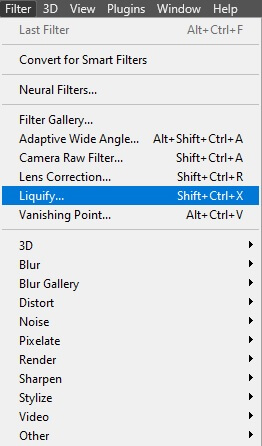
You’ll find Liquify Tool under the Filter menu. From the top menu, click on Filter and there while going down, you’ll get Liquify… Also, you can open the Liquify tool by pressing Shift+Ctrl+X on your keyboard.
After opening the tool, you’ll find many other tools under it. There are different tools for different effects and for each tool, you’ll find some other options to control the effects.
Tutorial: How To Use The Liquify Tool In Photoshop
As liquify tool has so many options, it’s important to have an in-depth idea about the tools so that you can use the right one while needed.
So, let’s dive into the world of Liquify Tool and explore the options that it offers!
Step 1: Open the Image in Photoshop
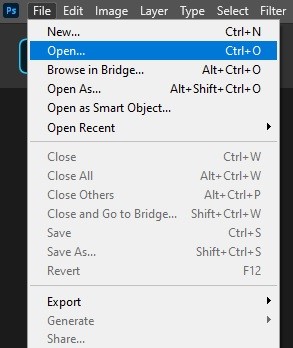
To open the file in photoshop, go to File, then click on Open and select the file that you want to work on.
Step 2: Create a New Layer
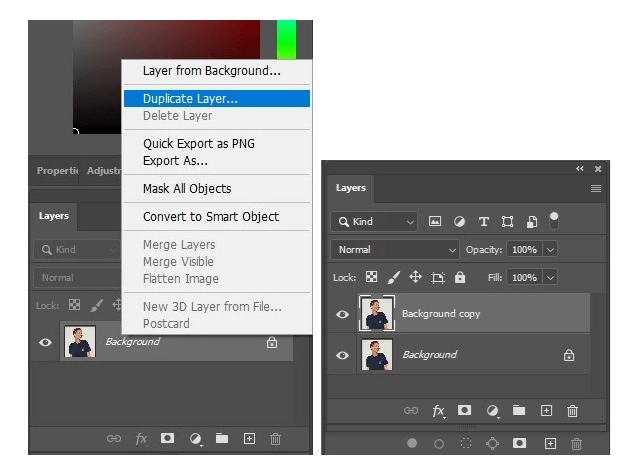
Right-click on the Background Layer and click on Duplicate Layer to make a copy of the layer. You can also create the copy by pressing Ctrl+J on your keyboard.
Step 3: Select Liquify Tool
Go to Filter and click on Liquify…(Shortcut: Shift+Ctrl+X) A new window will pop up. We’ll do the work here in this window.
Here on the left side, you’ll get some tools and on the right side, you’ll get options to control the tools.
We’ll know now how each tool works.
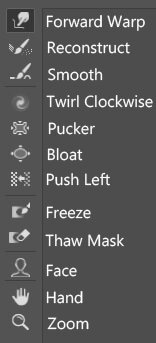
4. Forward Warp Tool
This tool basically pushes forward a particular part of an image. Click on the tool and then click on the part you want to work on and drag wherever you need. As you can push parts with this tool, you can use it to expand or narrow any part of an image.
5. Reconstruct Tool
Don’t worry if you ruin any part of the image, this tool will help you to restore everything you did wrong. Take the tool from the panel. Then click and drag on the area that you want to restore. Gradually it’ll bring back the original state and put everything back into place.
6. Smooth Tool
This tool will help to smooth the hard edges in an image. If you need a curve somewhere in the image where it has a straight angle, use this tool to smooth that area. This tool also helps to fine-tune any area that you edited.
7. Twirl Clockwise Tool
Take this tool, click and hold it at any place of the image. This tool will do exactly what it says. It’ll rotate the pixels in a clockwise direction. This can create distortion too.
If you want to change the direction (anti-clockwise rotation) just press the alt button on your keyboard and then use the tool in the same way.8. Pucker Tool
This tool pulls everything on the edges towards the center. If you select the tool and click and hold it at a particular place, it’ll take everything that’s on the edge within the circle, towards the center.
Pressing Alt in this case will shift to the opposite direction – spreading the center towards edges.
9. Bloat Tool
This is the opposite tool of Pucker Tool. The bloat tool pushes the pixels from the center towards the edges. Click on the area you want to work on, the center pixels will be spread towards the edges.
If you press the Alt button, it’ll take you back to the Pucker Tool and the pixels will go in the opposite direction.
10. Push Left Tool
Though its name says push left, this tool can push both left and right. You’ll have to take the tool and then drag any area to the left and it’ll shift the area. If you drag it to the right, it’ll shift the area to the right. As simple as that!
11. Freeze Tool
Freeze mask does exactly what it says. Suppose you need to brush a particular area and you don’t want to touch other areas. Just pick the freeze tool and select the area you want to keep untouched. Now work on the other parts without having any worry. The selected area will remain locked.12. Thaw Mask Tool
Again, this is the opposite tool of the freeze tool. If you want to unlock a certain area that is locked by the freeze tool, take Thaw Tool and click on the area, it’ll unlock the area you want to work on.
You can alter between Freeze and Thaw Tool by pressing the Alt button on the keyboard.
13. Face Tool
Face tool is a really useful tool of photoshop. This tool is mostly used for fashion photography. This can automatically detect the face as well as the specific areas like forehead, eyes, nose, lips, chin from an image.
With the face tool, you can modify any area of the face and give whatever shape you want to give. To use this tool in a professional way, you need to understand the beauty standard of the market. It might vary, so understand which shape of eyes or nose will be attractive or how your client wants these.
14. Hand Tool
The hand tool is used to drag the image up and down or left and right. It is usually used when the image is zoomed in.
15. Zoom Tool
As it says, it’ll zoom the image. Select the tool and click anywhere on the image, the image will magnify. To zoom out, press the Alt button on the keyboard and click on the image.
You can zoom in and out by pressing ‘Ctrl and +’ or ‘Ctrl and –’ on the keyboard too.
16. Control Other Options
You can have full control over your image by using the options you’ll get on the right side of the liquify window. Here are the options you’ll get to see there –
- Brush Tool Options:
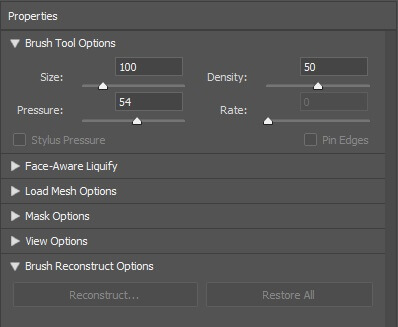
Size: This determines the size of the area that you want to work on. Move the slider to change the brush size. You can also just put the number or press the bracket buttons on the keyboard to change the size.
Density: This option determines how hard or soft the brush will be. If the number is higher, the edge will be harder and if the number is lower, the edge will be softer.
Pressure: The brush pressure sets the speed of your workflow. If you put more pressure, the tool will modify the area quickly, and if you put less pressure, the filter will affect the image slowly. The lower your brush pressure, the more control you’ll have on your image.
Rate: This tool works in the same way as Brush Pressure. But this option is particularly for those tools that work without moving or dragging the cursor.
- Face-Aware Liquify:
Under the Face-Aware Liquify Tool, you’ll get to see individual options like Eyes, Nose, Mouth, Face Shape. Under each option you’ll find more options to edit the face as you want.
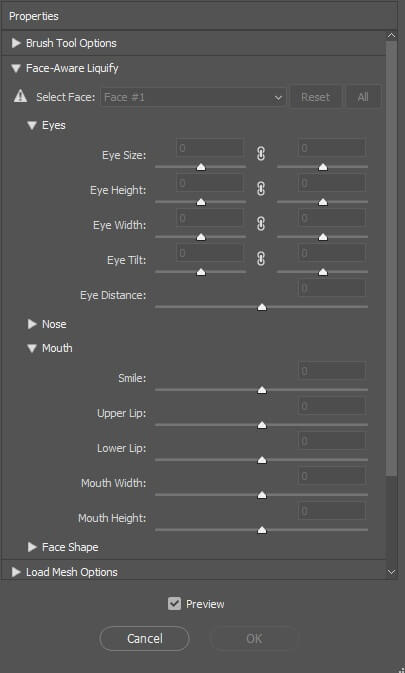
For Eyes, there are options to change the distance, size, height, width, For Mouth, photoshop offers changing smile, upper lip, lower lip. There are also options to change jawline, chin. Photoshop ultimately gives all the control that you might have in your mind to modify the face.
Other than these, there are Load Mesh, Mask, View and Brush Reconstruct options. You can use these options according to your need. Mark the Show Backdrop option under View Options to see the change you made.
17. Using the tool
Here, we’re going to edit an image using the Liquify Tool.
As we’ve already explained how to open the file and the tool, we’re going straight to the Face Tool. After opening Face Tool, go to the Face-Aware Liquify on the right side.
At first, we’ll work on forehead. It seems quite big, so, reducing it just a bit.

Now, going to the eyes. Let’s make these eyes a little bit bigger.
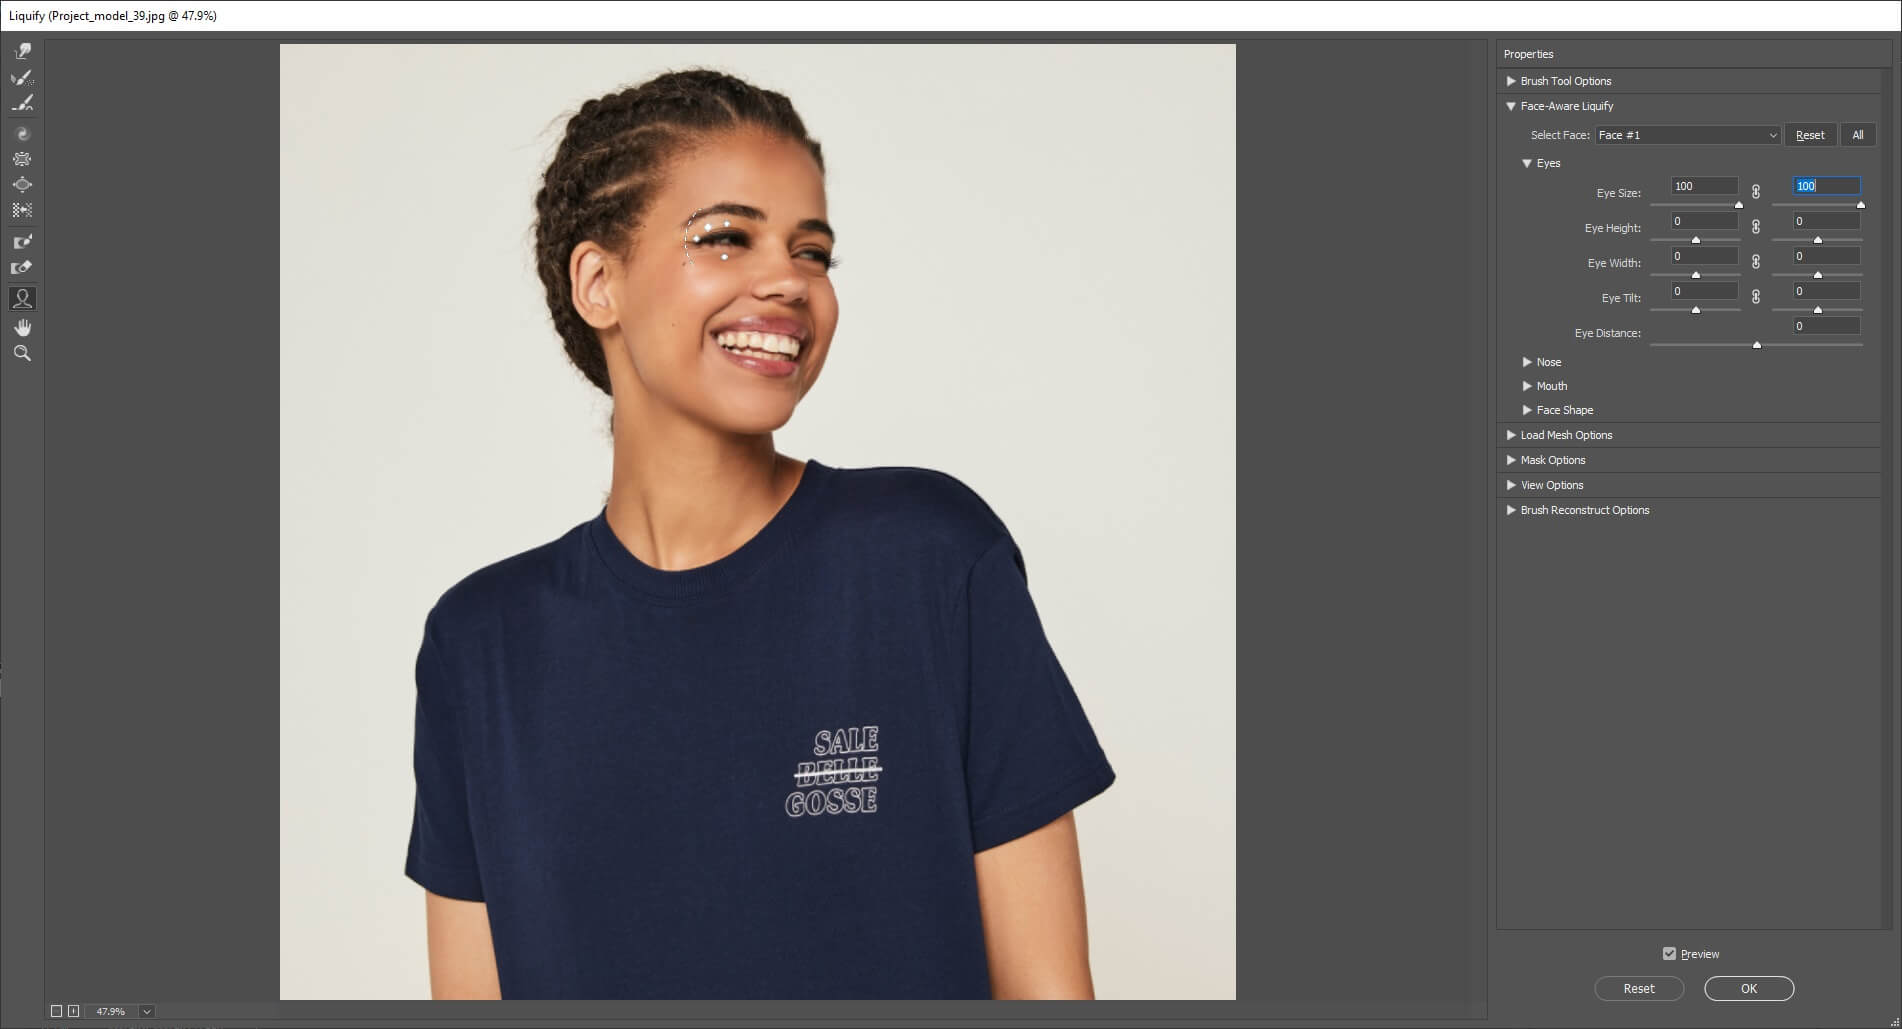
We can reduce the smile size as well as it might seem wider.

Rest of the parts are fine with what it is. So, we’ll end here. It’s better not to ruin the image in the way of making it better.
Final Image:

Final Thought
It requires practice to be a master at Liquify Tool. You need to have a sense of decent manipulation so that the image doesn’t lose its natural look. If used properly, this tool can bring a professional look to your image. You’ll find the evidence from the work of clipping path company.
Hopefully, you’ve learned useful ways to apply this powerful feature. But there’s no reason not to experiment and see how it also can be applied in creative ways. Ultimately, it’s up to you how you want to use the liquify tool in photoshop.
And if you ever do find yourself struggling or running into limitations with a particular effect or technique, don’t hesitate to explore other tutorials we’ve compiled on our blog. There is something for everyone – whether a beginner, intermediate or advanced user.

