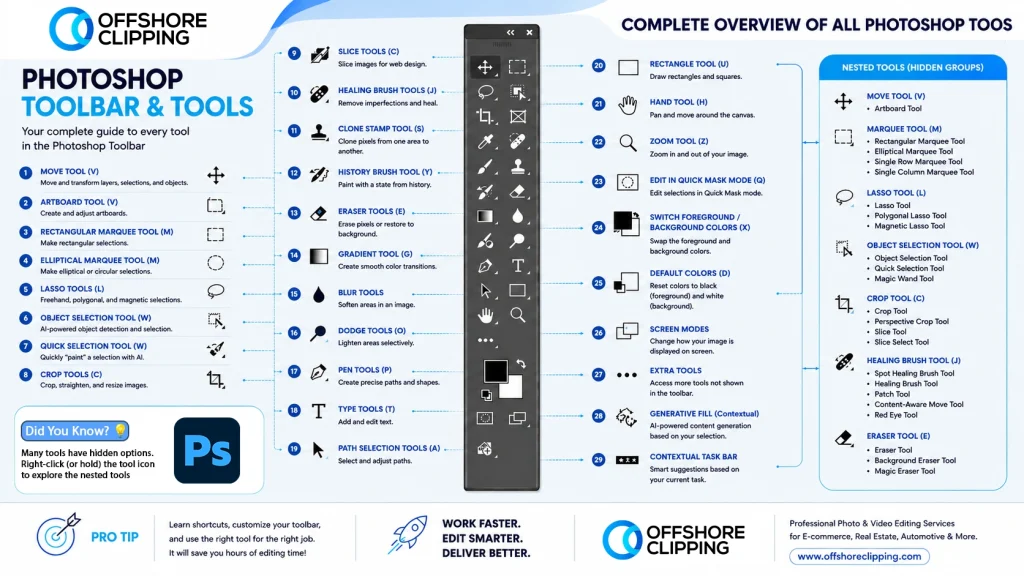
Can you guess how many tools are in Photoshop? The number of tools is surprising. You will find more than 70 distinct tools in Photoshop. The first step to mastering Adobe Photoshop is to acquire knowledge about the Photoshop toolbar and tools. It is important to sharpen your editing workflow.
Photoshop has been amplified into a powerful editing ecosystem. It is now covering from basic selections to AI-powered enhancements. Mastering these tools will change how you work.
Here is the complete breakdown for every essential tool in Photoshop. These are explained as to how they work, and you will get to know how they apply in real-world editing, especially for automotive photography.
What you’ll learn in this article
- 1 Who This Guide Is For
- 2 Photoshop Toolbar Overview
- 3 Photoshop Toolbar and Tools – Detailed Guide
- 3.1 Selection Tools (Updated Grouping)
- 3.2 Crop & Slice Tools (C)
- 3.3 Eyedropper Tool (I)
- 3.4 Healing & Retouching Tools (J) – (AI-Enhanced)
- 3.5 Painting & Drawing Tools (B)
- 3.6 Clone & Pattern Tools (S)
- 3.7 Eraser Tools (E)
- 3.8 Fill and Gradient Tools (G)
- 3.9 Blur, Sharpen & Smudge Tools
- 3.10 Dodge, Burn & Sponge Tools (O)
- 3.11 Pen & Path Tools (P)
- 3.12 Type Tools (T)
- 3.13 Shape & Vector Tools (U)
- 3.14 Navigation Tools
- 4 How to Customize the Photoshop Toolbar
- 5 Updated Smart Features in Photoshop AI Tools – (2024–2026 Updates)
- 6 Photoshop Toolbar Tips & Shortcuts
- 7 Final Thoughts
- 8 FAQs
- 8.1 What is the Photoshop toolbar used for?
- 8.2 How do I customize the toolbar in Photoshop?
- 8.3 What is the new Remove Tool in Photoshop?
- 8.4 Why is my Photoshop toolbar missing tools?
- 8.5 What are the most commonly used tools in Photoshop?
- 8.6 What is the Contextual Task Bar in Photoshop?
- 8.7 What is the main difference between the Brush Tool and the Pencil Tool?
- 8.8 When should I use the Clone Stamp instead of the Healing Brush?
- 8.9 What is the quickest way to move around a canvas when zoomed in?
Who This Guide Is For
Are you working on a product catalog, a brand campaign, or a client photography project? Don’t you want to edit smarter and communicate better with your creative team or editing partner? This guide is especially useful if you are:
- An e-commerce brand owner or catalog manager dealing with hundreds of product images and needing consistent, clean results across every SKU.
- A marketing manager or creative agency overseeing visual content production and working with designers or outsourced editors.
- A photography studio or freelance photographer who handles your own post-production and wants to speed up your retouching workflow.
- A fashion or apparel brand managing seasonal lookbooks, product shots, or model photography at scale.
- A real estate agent or property consultant who needs polished listing photos — sky replacements, exposure corrections, and clean backgrounds.
- A beauty brand, MUA, or skincare influencer focused on skin retouching, color grading, and campaign-ready visuals.
- A video agency or content creator who regularly works with still frames, thumbnails, and social media assets alongside video production.
- A retail brand or FMCG team managing product imagery across multiple platforms and channels.
Not everyone edits in-house, and that’s okay. Many of these personas use Photoshop knowledge to brief, review, and approve work done by professional editing teams.
Photoshop Toolbar Overview
The Photoshop toolbar is the main controller for editing. It is kept vertically on the left side of the interface and contains all the image editing tools in Photoshop. Tools are grouped based on their function to make things easier.
Adobe Photoshop Toolbar Missing?
What if you find out there is no toolbar showing in the Photoshop interface? It can happen, but don’t worry! The toolbar exists, but maybe it is hidden somehow. If you don’t see the Photoshop toolbar in your interface, then
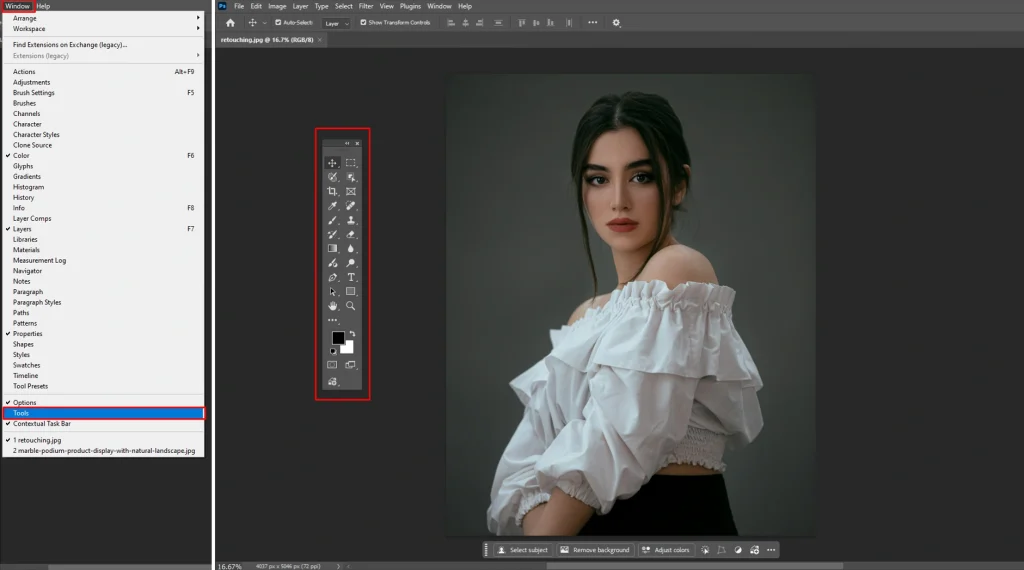
- Go to the Menu bar.
- Click on the Window menu.
- Look down a little bit, and you will see the Tools option.
- Click to enable it. Then you can access the toolbar in your interface.
Main Photoshop Tools Categories
- Selection Tools: Used to isolate parts of an image. Essential for editing when separating objects from backgrounds.
- Retouching Tools: Perfect for removing dust, scratches, or unwanted reflections on object surfaces.
- Painting Tools: Used for color corrections, masking, and creative effects.
- Vector Tools: Important for creating shapes, paths, and outlines. These are useful for branding or design overlays.
- Navigation Tools: Help you zoom, pan, and manage your workspace efficiently.
If you are coming from Adobe Lightroom, you already understand global adjustments like exposure, contrast, and white balance. But Photoshop tools take editing further. It gives you pixel-level control that Lightroom simply cannot match.
Move & Artboard Tools (V)
These tools represent the fundamental way you interact with and organize elements on your Photoshop canvas. These tools are the primary means of repositioning content and managing layout structures.
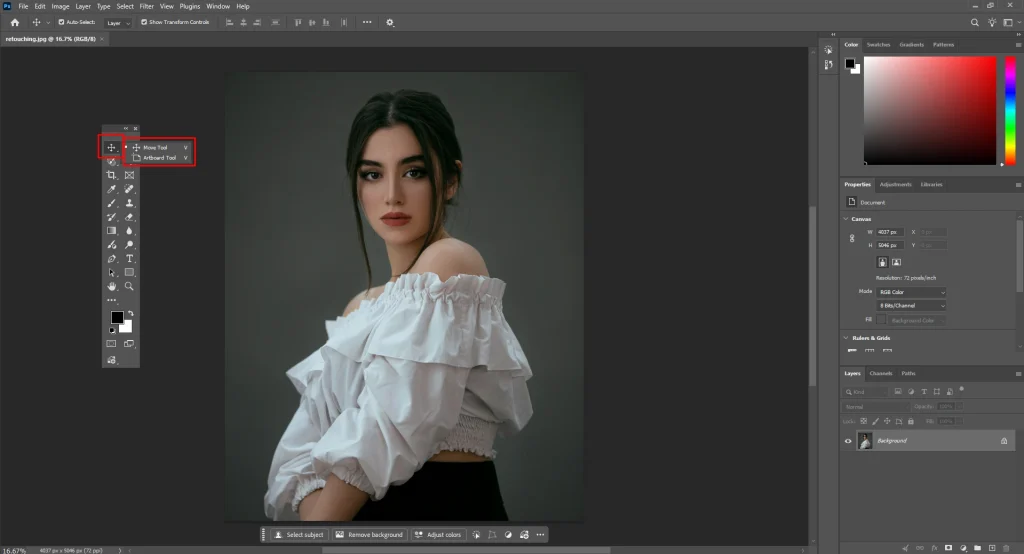
Move Tool
This tool is an essential Photoshop tool, and it lets you reposition elements, layers, and selections.
Use Case: Adjusting the placement of a car within a frame or aligning multiple images for catalogs.
Artboard Tool
Artboard is used to create multiple layouts within one document.
Use Case: A perfect and handy tool for designers to design for different-sized screens. It allows you to have multiple canvases within one document. Before mastering, you need to make the foundation stronger. These are the foundations of mastering the Photoshop toolbar explained in a practical way.
Photoshop Toolbar and Tools – Detailed Guide
Managing a commercial image catalog or building a brand’s visual identity requires a structured, repeatable framework. The Photoshop toolbar is often treated as a simple menu of digital brushes and selectors. But operationally, it functions as your asset production engine.
For e-commerce managers handling extensive SKU counts, agency directors managing remote design teams, and studio photographers balancing multi-layered workflows, mastering this toolbar is the difference between scalable growth and production bottlenecks.
Selection Tools (Updated Grouping)
Selection tools are among the most powerful tools in Photoshop, especially with AI improvements.
Marquee Tools (M)
Marquee tools in Photoshop let you do precise and geometric selections. It has variations:
- Rectangular Marquee Tool: The most frequently used variation for structural edits and layout design. It creates four-sided selections with 90-degree corners.
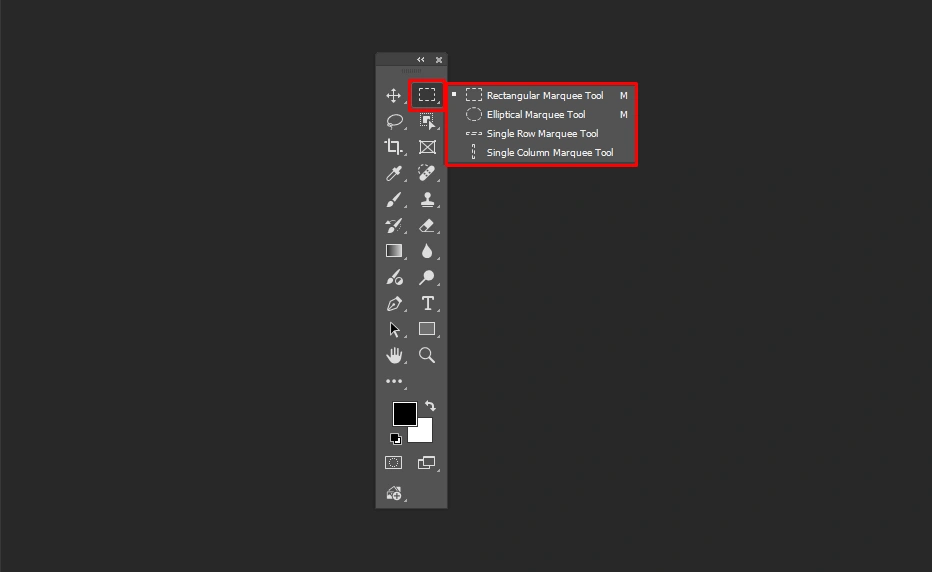
- Elliptical Marquee Tool: The Elliptical Marquee tool is used for circular or curved selections. It creates an oval or circular path.
- Single Row Marquee Tool: With this tool, you can select a horizontal strip of pixels exactly 1 pixel high across the entire width of the canvas.
- Single Column Marquee Tool: With this tool, you can select a vertical strip of pixels exactly 1 pixel wide across the entire height of the canvas.
Lasso Tools (L)
The Lasso tool offers freehand selection for borders around objects by dragging the mouse. You will find the following tools under the Lasso tool group:
- Polygonal Lasso Tool: You can create selections based on straight-line segments by clicking to set anchor points with this tool.
- Magnetic Lasso Tool: It is a smart freehand tool that snaps to the edges of high-contrast objects as you move your cursor near them. The magnetic lasso tool is useful for tracing subjects against a simple background.
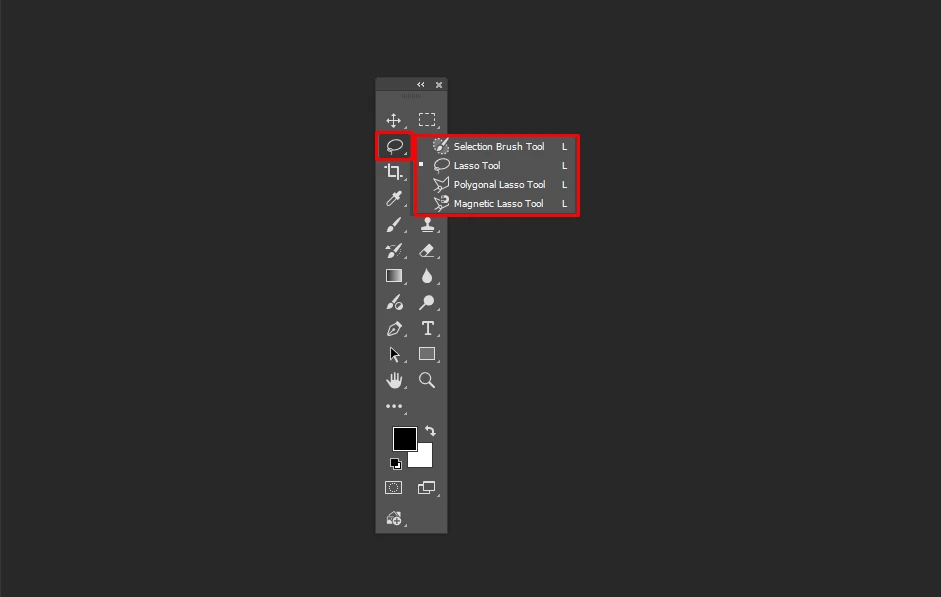
- Selection Brush Tool: The Selection Brush tool allows you to paint over areas to select them. It features a colored overlay (usually pink, red, or magenta) to show exactly what is being included.
Object Selection Tool (L)
The Object Selection tool is an AI-powered tool. It automatically detects objects in your scene when you hover over them or drag a box around them.
2026 Update: Much more accurate with complex backgrounds.

Quick Selection Tool (L)
It is a brush-based tool. It quickly selects objects by detecting contrast and texture edges. It is a smart brush tool that automatically finds and snaps to edges when you paint over the desired area.
This tool is one of the most widely used tools for car photography and is ideal for quickly selecting vehicles.
Magic Wand Tool (L)
The Magic Wand tool in Photoshop selects based on color similarity and tolerance level rather than physical shapes. This tool is best for removing solid backgrounds or flat-colored icons
You will find the object selection tool, quick selection tool, and magic wand tool in the same group.
Crop & Slice Tools (C)
You will find the crop, perspective crop, slice, and slice select tools in the 5th group of the Photoshop toolbar.
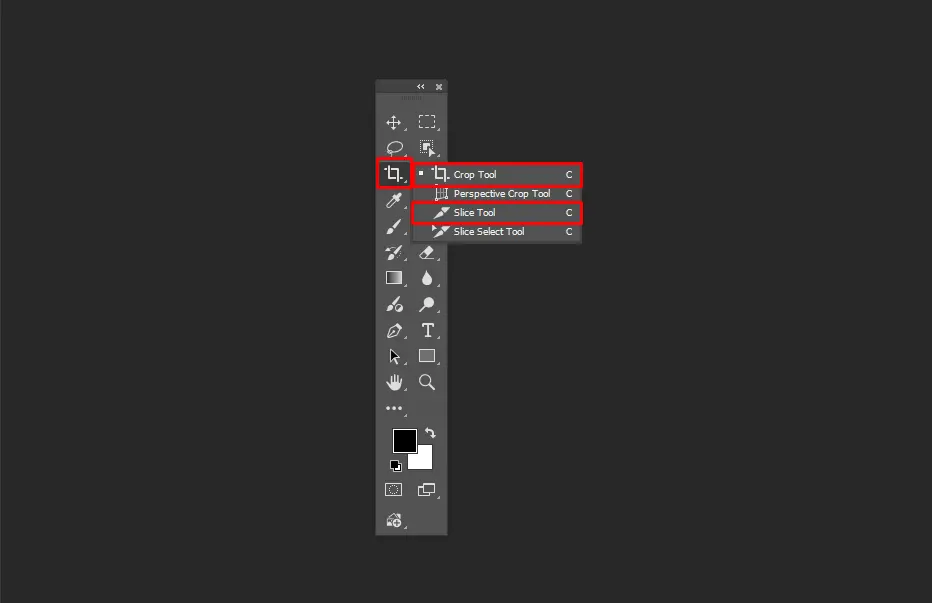
Crop Tool
The Crop tool is used to frame and straighten images in Photoshop. You can use it to make a perfect composition for the object.
Slice Tool
The Slice tool in the Photoshop toolbar is used to split images into smaller and independent parts. This is used for web design. You can break a large website mockup into smaller components like header, footer, button, etc.
Eyedropper Tool (I)
The Eyedropper tool group consists of 5 tools, which include the Eyedropper tool, the Color Sampler tool, the Ruler tool, the Note tool, and the Count tool.
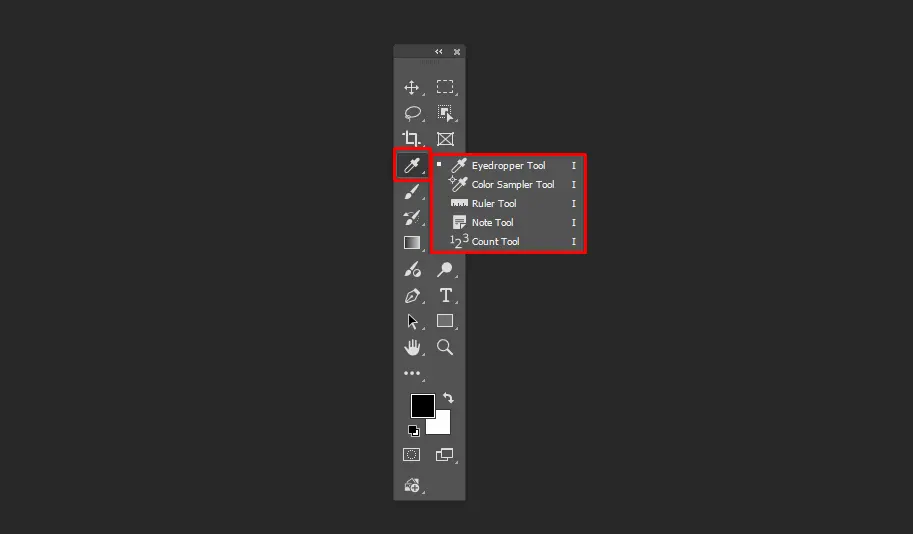
Eyedropper Tool
It samples a color from any part of your image and sets it as your new foreground color. This is crucial for matching specific paint colors of a part of the image.
Ruler Tool
The Ruler tool is used to measure the distance between two points, the angle of a line, and often the coordinates of a specific area.
Healing & Retouching Tools (J) – (AI-Enhanced)
These tools are critical for high-end image editing and are designed to remove imperfections, blend textures, move objects, or make an image look flawless.
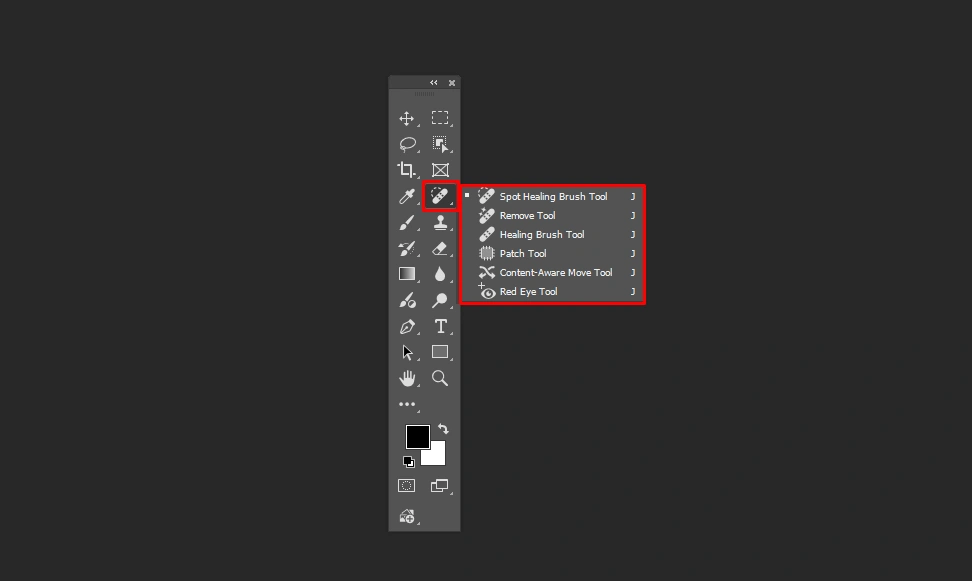
Spot Healing Brush Tool
This tool helps fix and remove small spots by sampling the texture from the immediate surrounding areas. You can remove dust spots, acne, or small sensor spots quickly from a photo by using the Spot Healing Brush tool with a single click.
Remove Tool
The Remove tool in Photoshop uses AI to remove objects, people, or distractions instantly by brushing over them. Then, the gap is filled intelligently by Photoshop with realistic background detail.
Healing Brush Tool
Unlike the spot version, this requires you to Alt+Click to define a source area. Then, it blends the texture of the source with the color and lighting of the target.
Patch Tool
The Patch tool is a content-aware retouching tool. You can remove, replace, or duplicate objects by blending them with surrounding pixels with this tool.
Painting & Drawing Tools (B)
Painting and drawing tools are the core of digital artistry. These allow you to add texture, color, and blended effects to the layers.
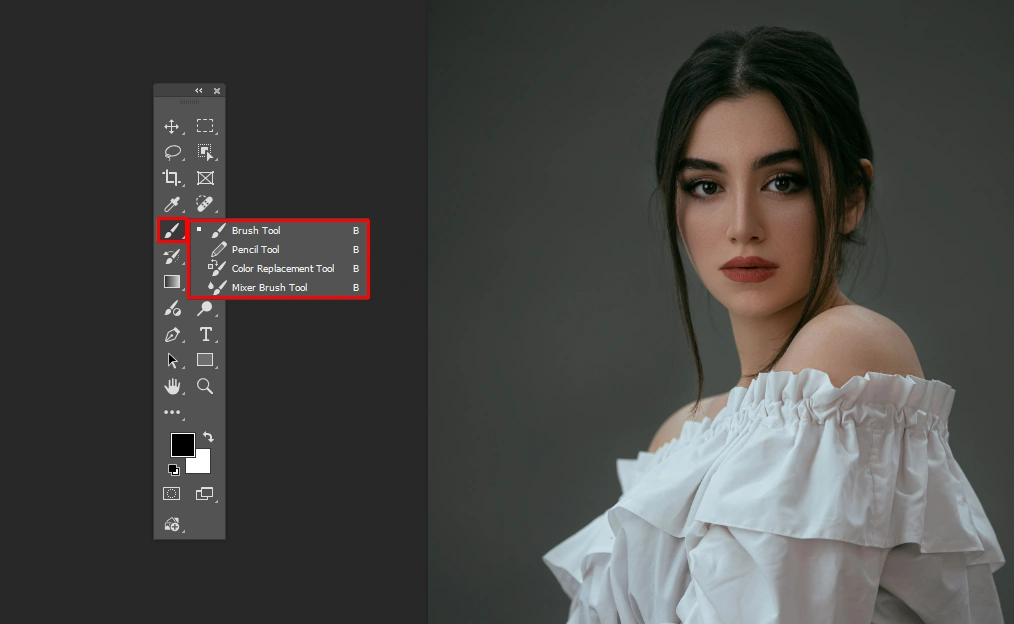
Brush Tool
This is a fundamental tool located in the toolbar. The brush tool is used to apply color, paint effects, or edit masks by clicking and dragging. It supports thousands of customizable tips that can mimic a soft airbrush, gritty charcoal stick, etc.
Mixer Brush Tool
This device simulates realistic painting by mixing colors on a canvas. It mixes colors with a single brush tip and varies the moisture content of the paint, causing the colors to spread and blend with each other.
Clone & Pattern Tools (S)
These tools are dedicated to duplicating existing textures. Also used to apply repetitive designs. These tools are for exact replication.
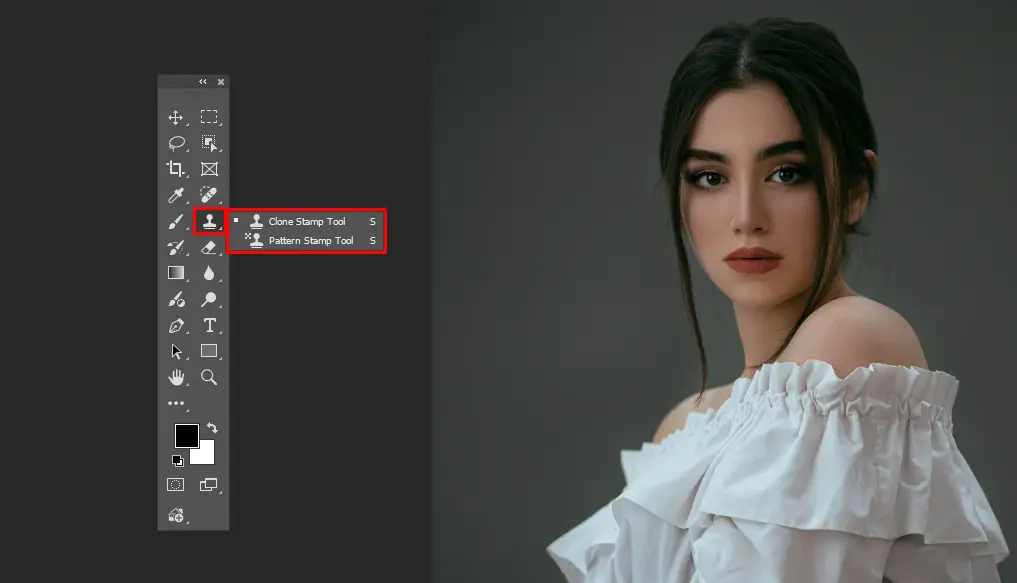
Clone Stamp Tool
The Clone Stamp tool copies pixels from a targeted source area to a designated area. This tool is ideal for duplicating, removing, or repairing elements.
Pattern Stamp Tool
This tool allows you to paint with a selected pattern instead of copying pixels from the image itself. This is a specialized brush to add textures or fill areas.
Eraser Tools (E)
The Eraser Tool group is used to remove pixels from your layer. Keep in mind that these tools are destructive. That means they permanently delete visuals unless you are working on a separate layer or using a Smart Object.
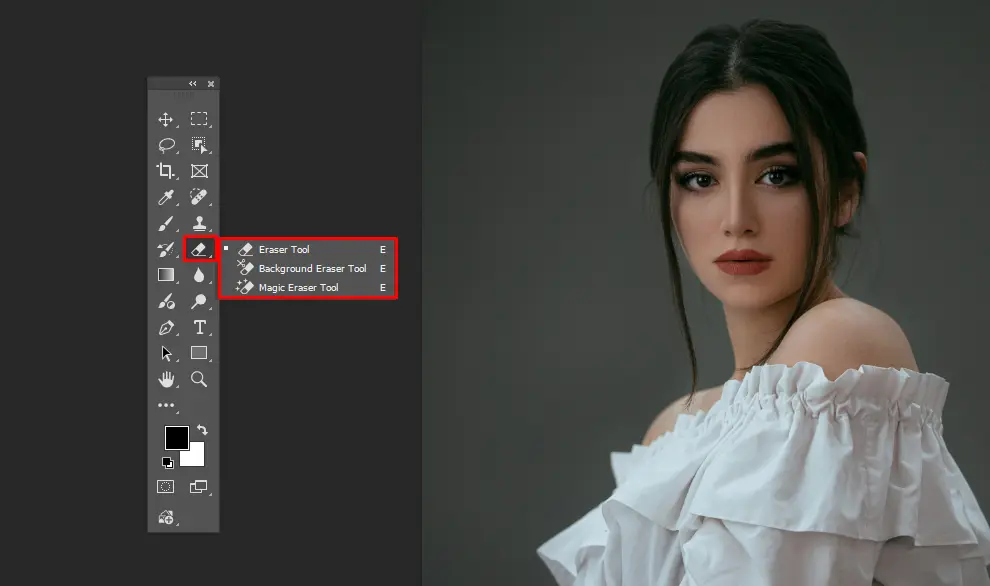
Eraser Tool
The Photoshop Eraser tool permanently deletes pixels and converts them to transparency or the background color. This tool is best for manual and fine-tuned cleanup.
Background Eraser Tool
This tool samples the color at the center of the brush (the crosshair) and deletes only that color as you drag. The Background Eraser tool makes it effective for complex edges like hair, fur, tree branches, or a car’s antenna.
Magic Eraser Tool
The Magic Eraser Tool in Photoshop instantly removes solid-colored backgrounds or similar-colored pixels. Then it turns them transparent with a single click. This tool works similarly to the Magic Wand tool, but instead of selecting a color, it instantly deletes it
Fill and Gradient Tools (G)
These tools are used to apply large areas of color or smooth transitions between multiple colors.
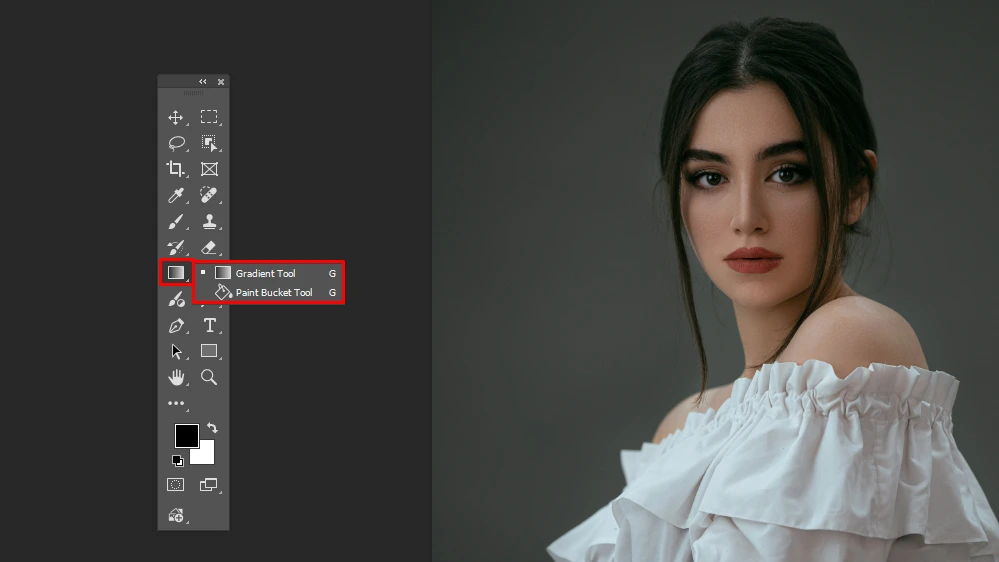
Gradient Tool
This tool creates a gradual mixture between two or more colors. You can choose from several styles that include linear, radial, angular, reflected, and diamond. The Gradient tool helps in creating realistic backgrounds, adding artificial lighting effects, or making smooth transitions.
Paint Bucket Tool
The Paint Bucket tool fills an area of similar-colored pixels with the currently selected foreground color. It uses a “Tolerance” setting to determine how closely the colors must match to be filled.
Blur, Sharpen & Smudge Tools
This group in the toolbar is focused on focus and texture manipulation. These tools don’t add or remove pixels.
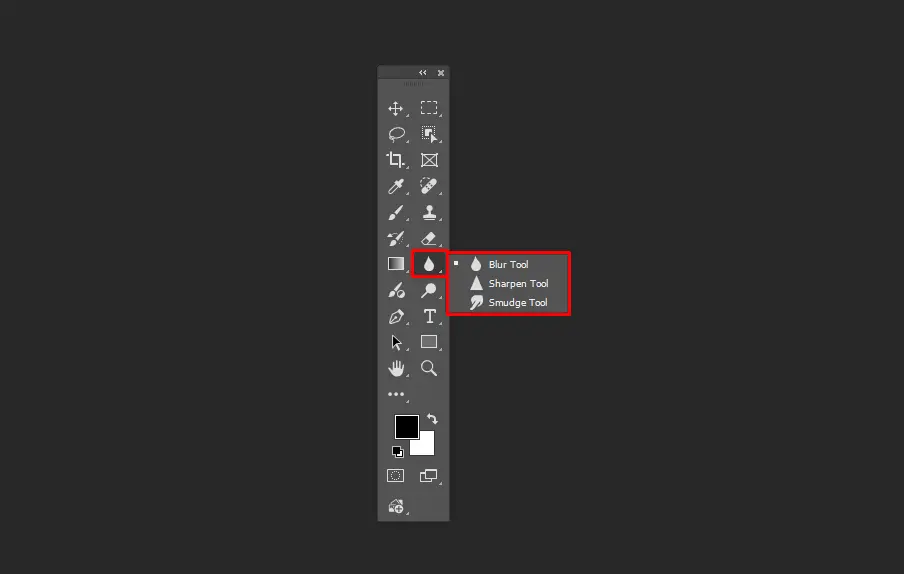
Blur Tool
The Blur tool softens hard edges or reduces fine detail in an image by decreasing the contrast between neighboring pixels. You can create a shallow depth of field with this tool.
Sharpen Tool
The Sharpern tool increases the focus of an area by boosting the contrast along edges. It makes soft edges appear crisper.
Smudge Tool
The Smudge tool in Photoshop mimics dragging a finger through wet paint. It picks up the color from where you start the stroke and pushes it in the direction you move your cursor.
Dodge, Burn & Sponge Tools (O)
These tools are used to manipulate the light and color intensity of specific areas without changing the actual colors themselves. This tool is ideal for brightening a subject’s eyes in a portrait and bringing out detail in dark shadows

Dodge Tool
The Dodge tool in Photoshop lightens specific areas of an image. You can target “Shadows,” “Midtones,” or “Highlights” in the options bar to ensure you only brighten the parts you want.
Burn Tool
This tool is the opposite of the Dodge tool. It darkens the areas you paint over. Like the Dodge tool, it allows you to target specific tonal ranges like Shadows, Midtones, and Highlights. The Burn tool is perfect for adding depth and dimension.
Sponge Tool
The Sponge tool is brush-based. It is used to locally increase (saturate) or decrease (desaturate) color intensity in specific areas of an image.
Pen & Path Tools (P)
You can create mathematical vector lines precisely. Unlike pixels, paths remain perfectly sharp regardless of how much you zoom in or scale them.
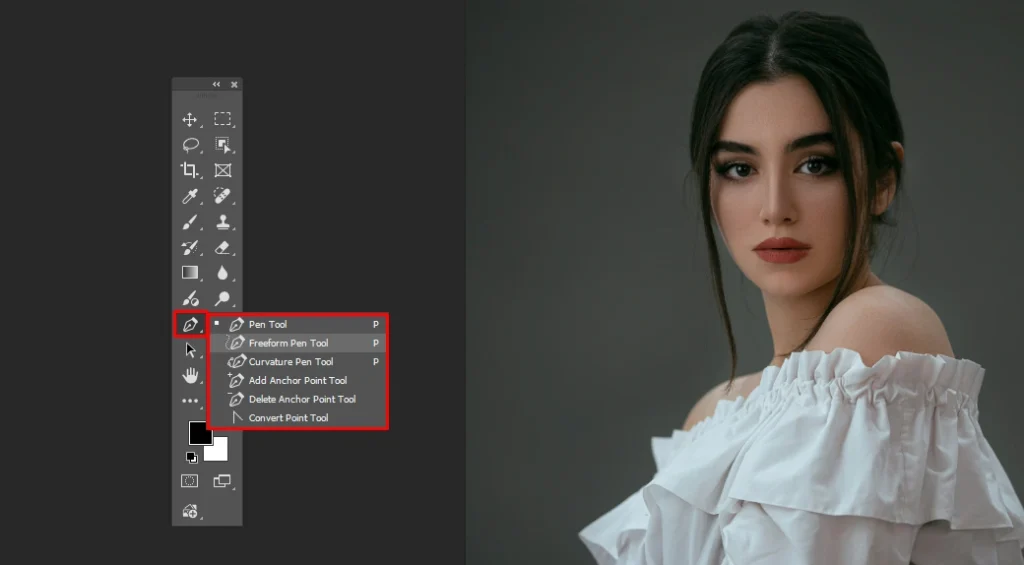
Pen Tool
The Pen tool is a powerful handler for creating precise vector paths, custom shapes, and intricate selections with anchor points. This offers far more accuracy than raster-based tools. You can create the most accurate cutouts possible for complex subjects.
Freeform Pen Tool
The Freeform Pen tool acts like a pencil. This tool allows you to draw paths freehand. The anchor points are created automatically as you move the cursor.
Curvature Pen Tool
The Curvature Pen tool is a simplified version of the Pen tool. It creates curves between points when you click. You don’t need to drag to create handles, as it predicts the curve.
Type Tools (T)
The Type Tools are used to add text to your documents. These tools create vector-based type layers. That’s the reason the text stays crisp and sharp even if you resize it significantly.
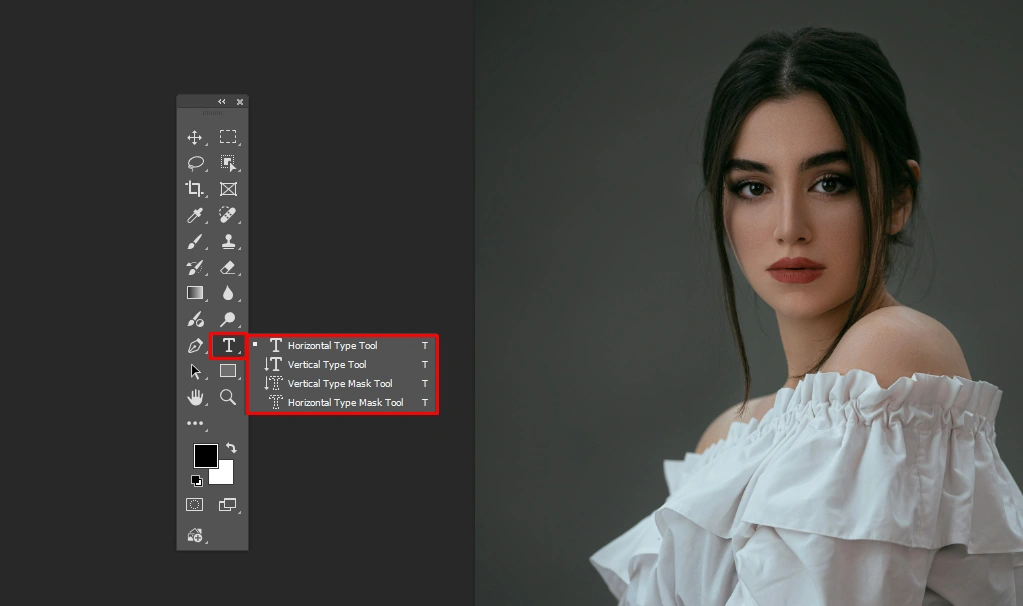
Horizontal Type Tool
This is the most common tool in the group. It allows you to click and type text horizontally across the canvas.
Vertical Type Tool
The Vertical Type tool functions exactly like the horizontal version. But characters are stacked on top of each other, so they read from top to bottom.
Shape & Vector Tools (U)
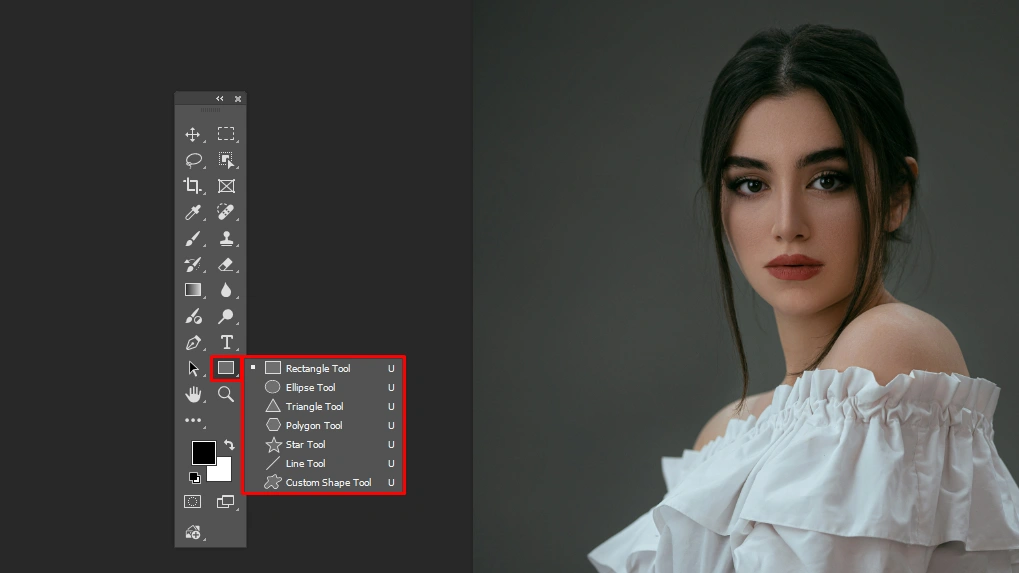
Shape Tool
Under this tool, Rectangle, Ellipse, Triangle, Polygon, Line, and Custom Shape tools are nested. You will find the suitable one according to your needs while designing something.
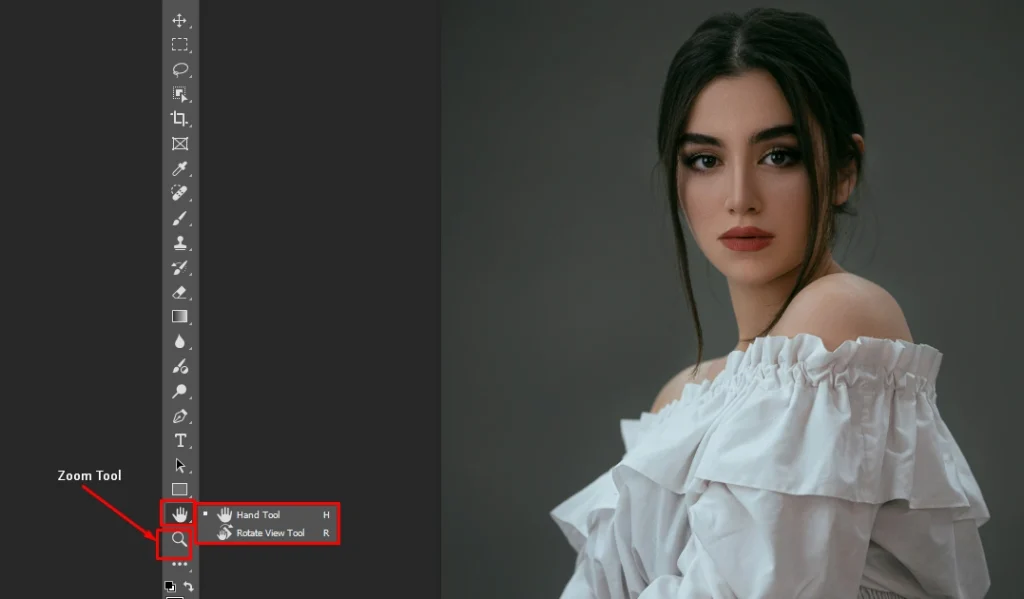
Hand Tool
This tool allows you to grab the canvas and slide it around within the document window wherever you want. It is especially useful when you zoom in on any part of your canvas. You can easily wander on it when your canvas is zoomed in.
Zoom Tool
This is to zoom in on the image. If we click the cursor on a specific area of the image, it will zoom in on that area.
How to Customize the Photoshop Toolbar
To speed up your workflow, customizing the Photoshop toolbar and tools is one of the easiest ways. It also reduces distractions. Photoshop shows a full set of tools by default. But not all of these are necessary for every user.
A customized toolbar lets you hide unnecessary tools, prioritizing frequently used tools, and allows you to create a workspace which fits your editing style. This helps you in your repetitive tasks like background removal, car retouching, or bulk image editing.
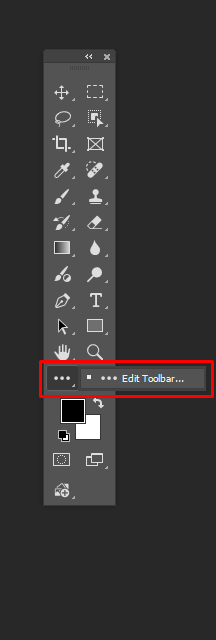
Step 1: Go to Edit > Toolbar
To begin customizing:
- Navigate to the top menu
- Click Edit
- Select Toolbar
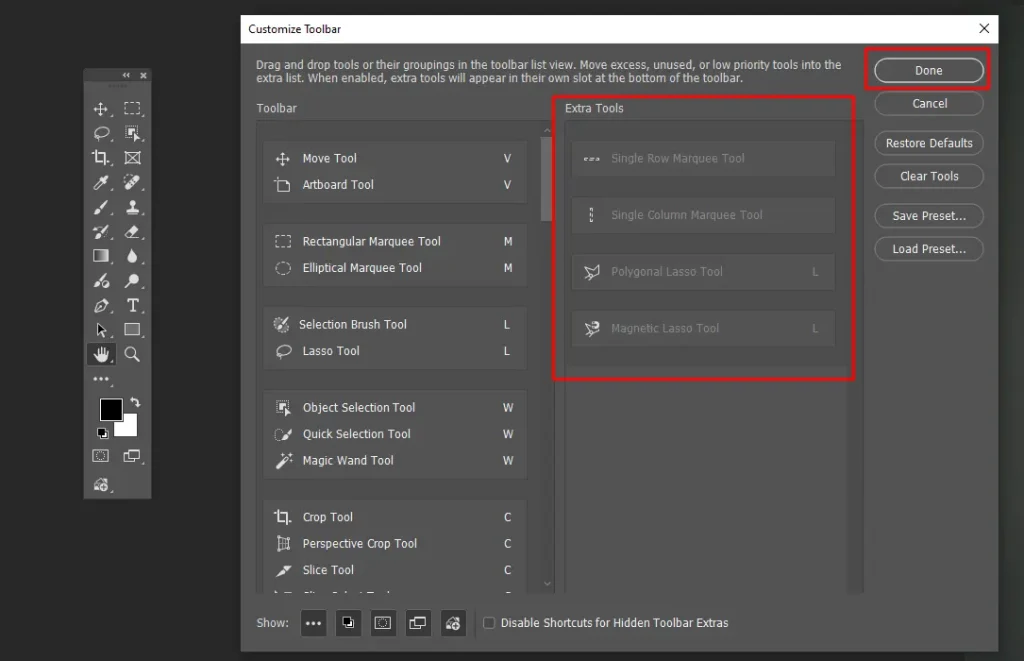
This will open the Customize Toolbar panel, where you’ll see two sections:
- Toolbar (left side): Tools currently visible in your toolbar
- Extra Tools (right side): Tools that are hidden
Step 2: Drag Tools to Rearrange
To reorganize tools based on your preference,
- Click and drag any tool to change its position
- Place frequently used tools near the top for quick access
- Organize tools based on your workflow sequence
Example (Automotive Workflow): You might place tools like the Move Tool, the Quick Selection Tool, the Remove Tool, the Brush Tool, etc., closer together so you can switch between them quickly while editing car images. This small adjustment can save a significant amount of time in long editing sessions.
Step 3: Group or Remove Unused Tools
You don’t need every tool visible all the time.
- Drag tools into groups to keep similar tools together
- Move rarely used tools to the Extra Tools section
- Simplify your toolbar by keeping only essential tools visible
Why this matters: A clean toolbar reduces confusion, especially for beginners learning image editing tools in Photoshop.
Example: If you don’t use Slice Tools or certain drawing tools, you can hide them temporarily and bring them back later when needed.
Step 4: Save Your Custom Layout
Once you’re done customizing:
- Click Done to apply changes
- Your toolbar layout will be saved automatically as part of your workspace
If you want more control, you can also:
- Save a custom workspace via Window > Workspace > New Workspace
- Create different tool setups for different tasks
This is especially useful for professionals who switch between multiple types of projects.
Updated Smart Features in Photoshop AI Tools – (2024–2026 Updates)
AI is heavily powering modern Photoshop. It helps in making editing faster and more precise. The integration of Adobe Firefly and machine learning has now become a time-saving and labor-saving matter. Some powerful AI features in Photoshop:
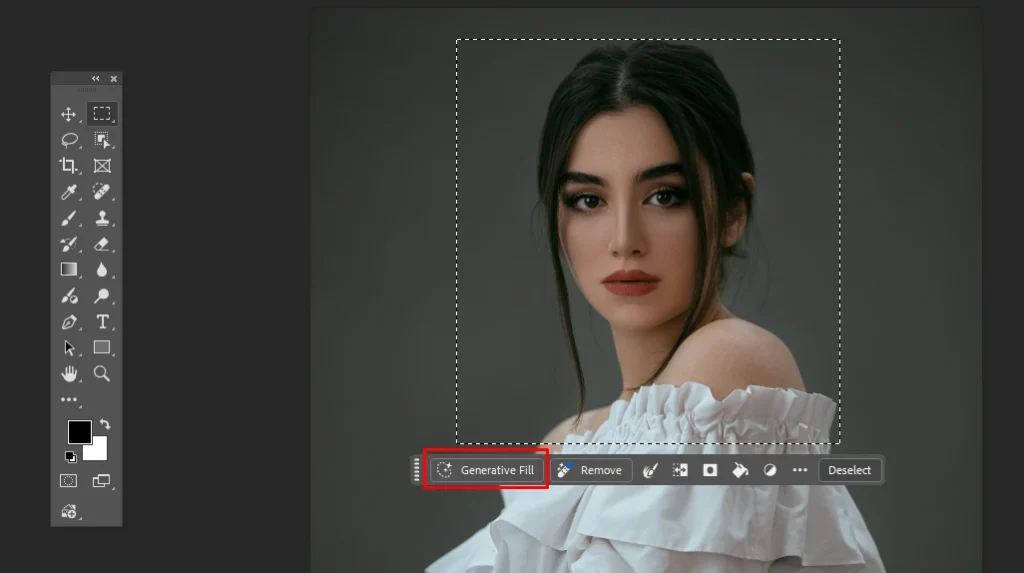
Generative Fill
Generative Fill allows you to add, replace, or remove elements in an image using simple text prompts. You can find it in the Contextual Task Bar. This bar pops up below your image when you make a selection using the Lasso, Marquee, or Subject Selection tool.
You can also find it in the Properties Panel and under Edit > Generative Fill. Here is how to do it:
- Select an area of your image
- Enter a prompt (e.g., “add clouds” or “remove object”)
- Photoshop generates realistic results instantly
It doesn’t just copy pixels — it creates entirely new content that matches lighting, perspective, and style. That’s why it is powerful.
Use Cases:
- Adding background elements
- Removing unwanted objects
- Creating variations of a design
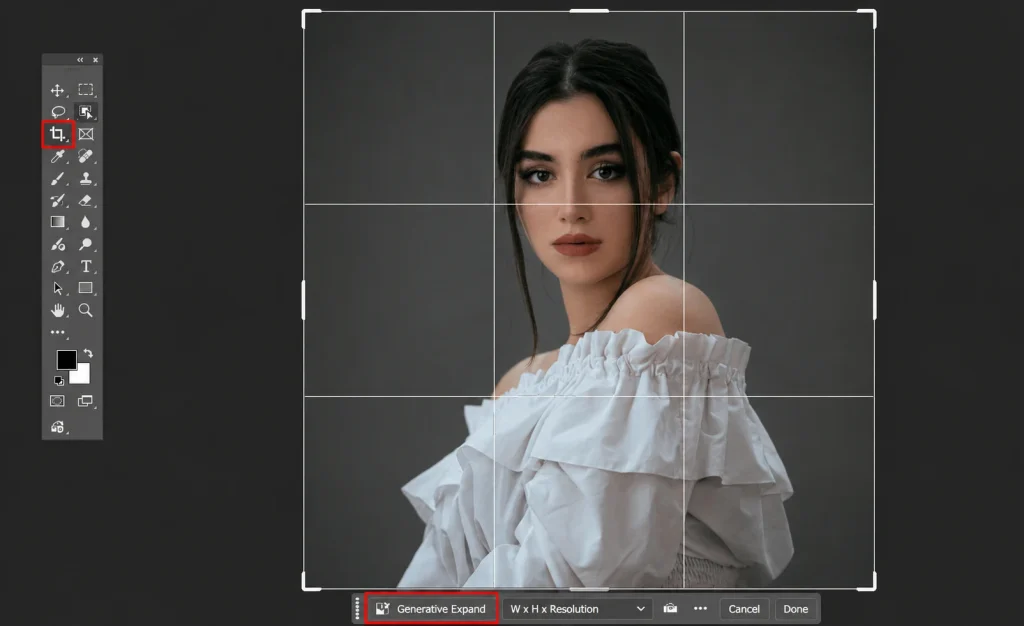
Generative Expand
Generative Expand in Photoshop is powered by Adobe Firefly. It is an AI-powered feature. This allows you to extend image borders and fill the new space with content that matches the original, perspective, lighting, and style. To do it:
- Expand the canvas size
- Let Photoshop automatically fill the new areas
- Maintain consistent lighting and composition
Back in the days, extending backgrounds required manual cloning and blending. Now it can be done automatically.
Use Cases:
- Adapting images for different aspect ratios (social media, banners, ads)
- Fixing tight crops
- Creating more space for text or design elements
Remove Tool
The Remove tool quickly eliminates unwanted elements. It’s a smart retouching feature evolved in Photoshop. To demonstrate it:
- Simply brush over the object
- Photoshop analyzes the surrounding area
- It fills the space naturally with minimal effort
It combines the power of healing and content-aware tools into one seamless experience.
Use Cases:
- Removing distractions from photos
- Cleaning up backgrounds
- Eliminating unwanted objects or imperfections
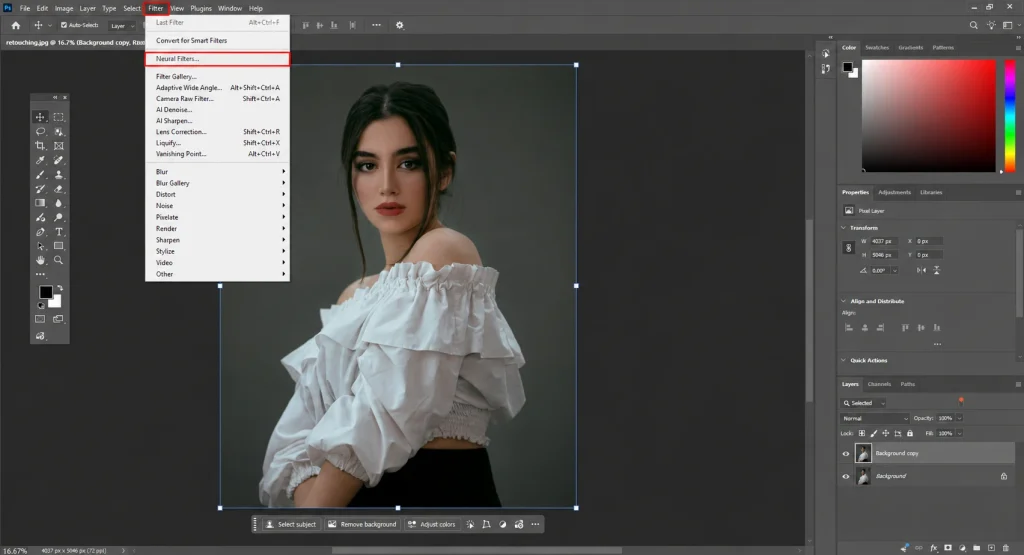
Neural Filters
Neural Filters are AI-driven adjustments that use machine learning to analyze and enhance your image intelligently. Instead of manually applying multiple layers, masks, and adjustments, these filters allow you to achieve complex effects in just a few clicks.
Key capabilities:
- Skin Smoothing: Automatically reduces blemishes while preserving natural texture
- Color Transfer: Applies the color grading of one image to another
- Lighting Adjustments: Alters light direction and intensity using AI estimation
- Style Transfer: Converts images into artistic or stylized versions
Neural Filters process your image through Adobe’s cloud-based AI models. Its results are constantly improving with updates.
Use Cases:
- Portrait retouching
- Fast color grading for social media or campaigns
- Experimenting with creative looks before finalizing edits
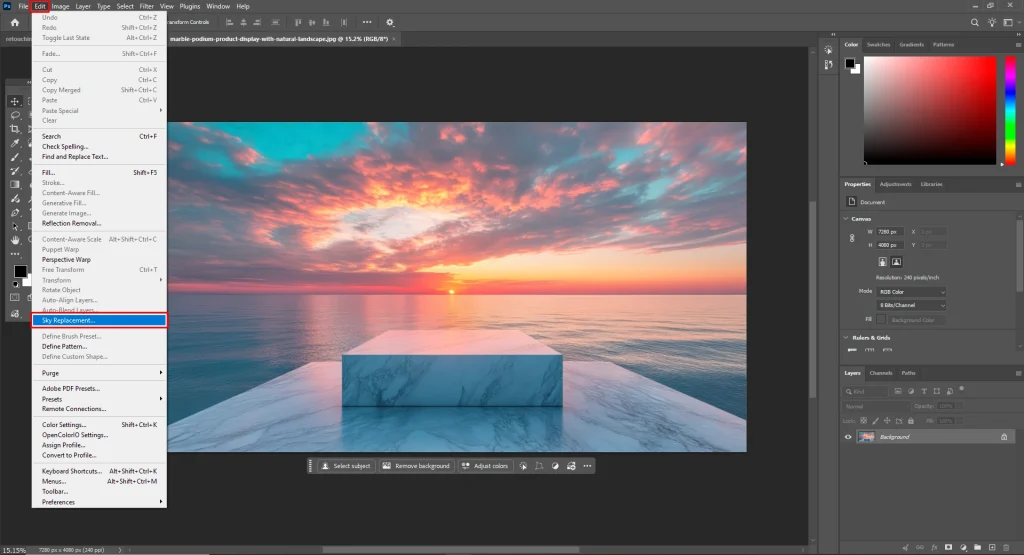
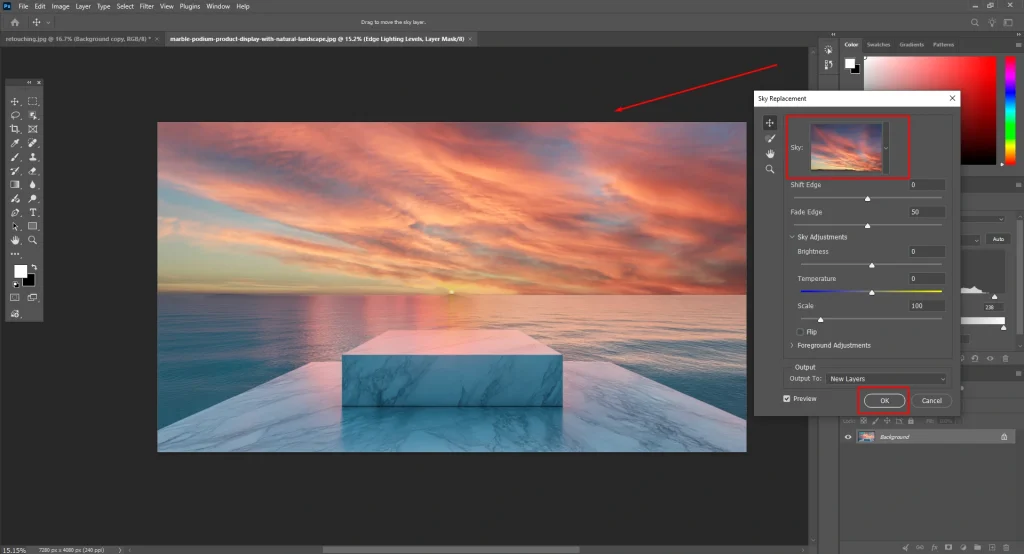
Sky Replacement
Sky Replacement is a highly advanced AI feature that allows you to completely change the sky in an image while maintaining realistic lighting and color balance.
Key Capabilities:
- Automatically detects the sky area, even with complex edges like hair, trees, or buildings
- Blends the new sky seamlessly with the foreground
- Adjusts brightness, color temperature, and atmosphere to match
Built-in controls include:
- Sky position and scale
- Edge fading and transition smoothing
- Foreground lighting adjustments
- Color matching sliders
Use Cases:
- Fixing dull or overexposed skies
- Enhancing travel and landscape photography
- Creating dramatic or cinematic visuals
Select Subject / Select Object
These are two of the most important AI-powered selection tools in Photoshop. Accurate selection is the foundation of most edits, and these tools dramatically simplify that process.
Select Subject:
- Automatically detects the main subject in an image
- Works with people, products, animals, and more
- Creates a selection with one click

Best Use Cases:
- Background removal
- Quick subject isolation
- Starting point for detailed masking
Select Object:
- It lets you hover over different elements in an image
- Highlights objects in real time
- Click to select specific items instantly
What’s improved (recent updates):
- Better edge detection
- More accurate recognition of complex shapes
- Faster processing
Best Use Cases:
- Selecting multiple objects individually
- Editing specific parts of an image
- Working with layered compositions
Photoshop Toolbar Tips & Shortcuts
Speed is needed when you’re working on multiple images or close deadlines. Photoshop toolbar shortcuts can dramatically improve your efficiency. It reduces repetitive actions and helps you stay focused on the creative side of editing.
Essential Tool Shortcuts
Here are the most commonly used shortcuts from the Photoshop toolbar and tools. These shortcuts cover almost all essential image editing tools in Photoshop:
| Keyboard Shortcuts | Tools |
| V | Move Tool |
| M | Marquee Tools (Rectangular/Elliptical) |
| L | Lasso Tools |
| W | Quick Selection / Object Selection Tool |
| C | Crop Tool |
| I | Eyedropper Tool |
| B | Brush Tool |
| S | Clone Stamp Tool |
| J | Healing Brush / Spot Healing / Remove Tool |
| E | Eraser Tool |
| G | Gradient / Paint Bucket Tool |
| O | Dodge / Burn / Sponge Tool |
| P | Pen Tool |
| T | Type Tool |
| A | Path Selection / Direct Selection Tool |
| U | Shape Tool |
| H | Hand Tool |
| Z | Zoom Tool |
Tool Group Shortcuts (Hidden Tools)
Many tools are grouped together under one icon. Pressing the same key repeatedly cycles through them.
Example:
- Press L multiple times → cycles through Lasso, Polygonal Lasso, Magnetic Lasso
- Press J → cycles through Healing tools and the Remove Tool
- Press U → switches between different shape tools
Pro Tip: To avoid cycling, right-click the tool and select your preferred default.
Editing & Workflow Shortcuts
These shortcuts are critical for daily editing tasks. These commands are used constantly in both basic and advanced workflows:
| Shortcut | Action |
| Ctrl + Z | Undo/Redo last action |
| Ctrl + Alt + Z | Step backward multiple times |
| Ctrl + Shift + Z | Step forward |
| Ctrl + C | Copy |
| Ctrl + V | Paste |
| Ctrl + T | Free Transform (resize, rotate, scale) |
| Ctrl + D | Deselect |
| Ctrl + A | Select All |
Brush & Painting Shortcuts
If you use the Brush Tool frequently, these will save a lot of time. You can adjust brush settings instantly without opening panels:
| Shortcut | Action |
| [ | Decrease brush size |
| [ | Increase brush size |
| Shift + [ | Softening brush |
| Shift + ] | Hardening brush |
| Alt (hold) | Temporarily switch to Eyedropper tool. |
Selection Shortcuts
Selections are a big part of editing, so speed here is important. These shortcuts work seamlessly with tools like the Photoshop Quick Selection Tool and Object Selection Tool:
- Ctrl + Click (Layer Thumbnail) → Select layer content
- Shift + Click → Add to selection
- Alt + Click → Subtract from selection
Moving around your canvas efficiently is just as important as editing:
| Shortcut | Action |
| Spacebar (hold) | Activate Hand Tool |
| Ctrl + + | Zoom in |
| Ctrl + – | Zoom out |
| Ctrl + 0 | Fit image to screen |
| Ctrl + 1 | View at 100% zoom |
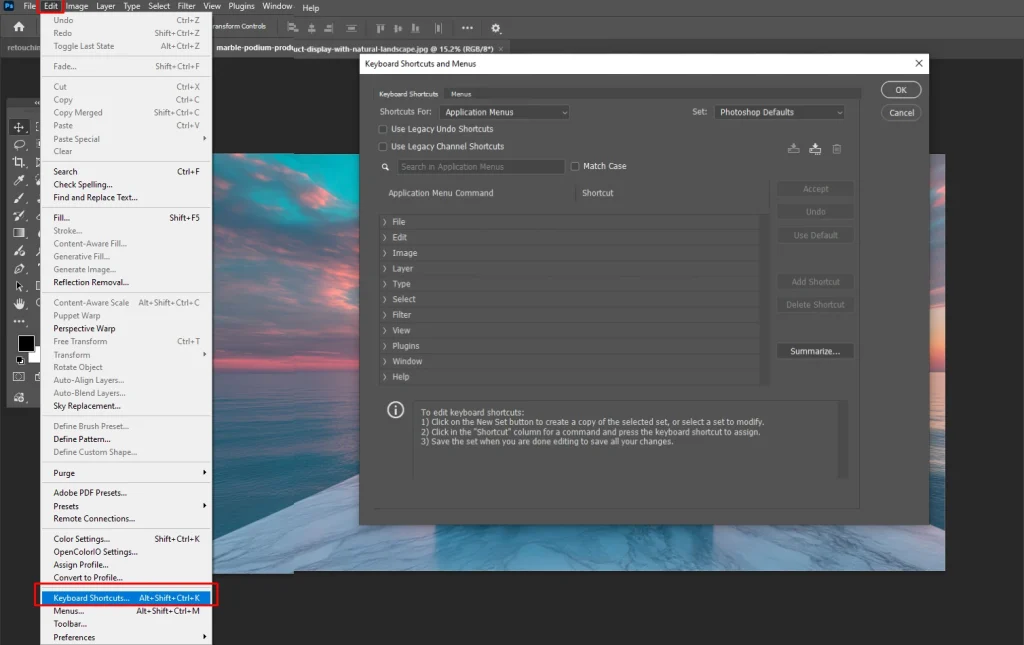
Customize Your Own Shortcuts
Photoshop also allows you to create your own shortcuts. You can tailor Photoshop exactly to your editing style, especially if you repeat specific actions frequently.
- Go to Edit > Keyboard Shortcuts
- Assign keys based on your workflow
- Save custom shortcut sets
Final Thoughts
Mastering the Photoshop toolbar and tools is the foundation of professional editing. Every tool plays a role in creating high-quality visuals.
Start with the basics and practice regularly. Explore advanced tools as you grow. But if you’re working with tight deadlines, bulk images, or commercial projects, doing everything manually isn’t always practical.
FAQs
What is the Photoshop toolbar used for?
The Photoshop toolbar contains all the essential tools needed to edit, select, retouch, and manipulate images.
How do I customize the toolbar in Photoshop?
Go to Edit > Toolbar and rearrange or remove tools based on your workflow needs.
What is the new Remove Tool in Photoshop?
It’s an AI-powered tool that removes unwanted objects seamlessly without manual cloning.
Why is my Photoshop toolbar missing tools?
It may be hidden, minimized, or customized. Reset it via Window > Workspace > Reset Essentials.
What are the most commonly used tools in Photoshop?
Move Tool, Brush Tool, Crop Tool, Pen Tool, and Quick Selection Tool are widely used.
What is the Contextual Task Bar in Photoshop?
It’s a smart toolbar that suggests relevant actions based on your current task.
What is the main difference between the Brush Tool and the Pencil Tool?
The Brush Tool creates smooth, soft, anti-aliased edges that blend naturally. The Pencil tool produces hard, aliased, pixelated edges, making it ideal for pixel art.
When should I use the Clone Stamp instead of the Healing Brush?
Use the Clone Stamp when you want an exact, pixel-for-pixel duplication of an area. Use the Healing Brush when you want to copy a texture.
What is the quickest way to move around a canvas when zoomed in?
Hold down the Spacebar while using any tool to temporarily switch to the Hand Tool. Click and drag to pan across your image, then release the spacebar to instantly return to your active tool.