Photo editing is more than just an art form; it’s a way to produce stunning, powerful images that really show off your skills as a photographer. If you manage to master the craft of photo editing, you’ll be able to capture visions and ideas that were previously out of reach. You may even tell stories through your imagery.
With the right information and some dedication to your craft, anyone can become a true master of photo editing.
In this article, you will learn everything there is about photo editing from the bottom-up alongside more information, including software, hiring photo editors, all the kinds of photo editing effects, and so on!
What you’ll learn in this article
- 1 What does Photo Editing mean?
- 2 The History of Photo Editing
- 3 What are the Types of Photo Editing?
- 4 What are the basics of Photo Editing?
- 5 Basic Photo Editing Techniques
- 6 Why do Photographers need to edit their photos?
- 7 Essential Photo Editing Techniques Every Photographer Uses
- 8 Best Photo Editing Software for Photographers or Photo Editors
- 9 How do I learn Photo Editing?
- 10 What does a Photo Editor do?
- 11 FAQs – Things people usually want to know about Photo Editing
- 12 Final Words
What does Photo Editing mean?
Photo editing is the process of making alterations to a photo. These changes can be any number of alterations to color, light, and/or tone. These edits also may involve making changes to the mass of different elements in an image, such as composition and focus.
With the rise of digital photography, photo editing is now easier than ever. There are all kinds of software that cater to all kinds of specific adjustments under the large umbrella of “photo editing”.
Editing has a lot to offer normal people and photo enthusiasts alike. Whether you’re looking to create a masterpiece or just enhance your photos, applying photo editing is inevitable.
The History of Photo Editing
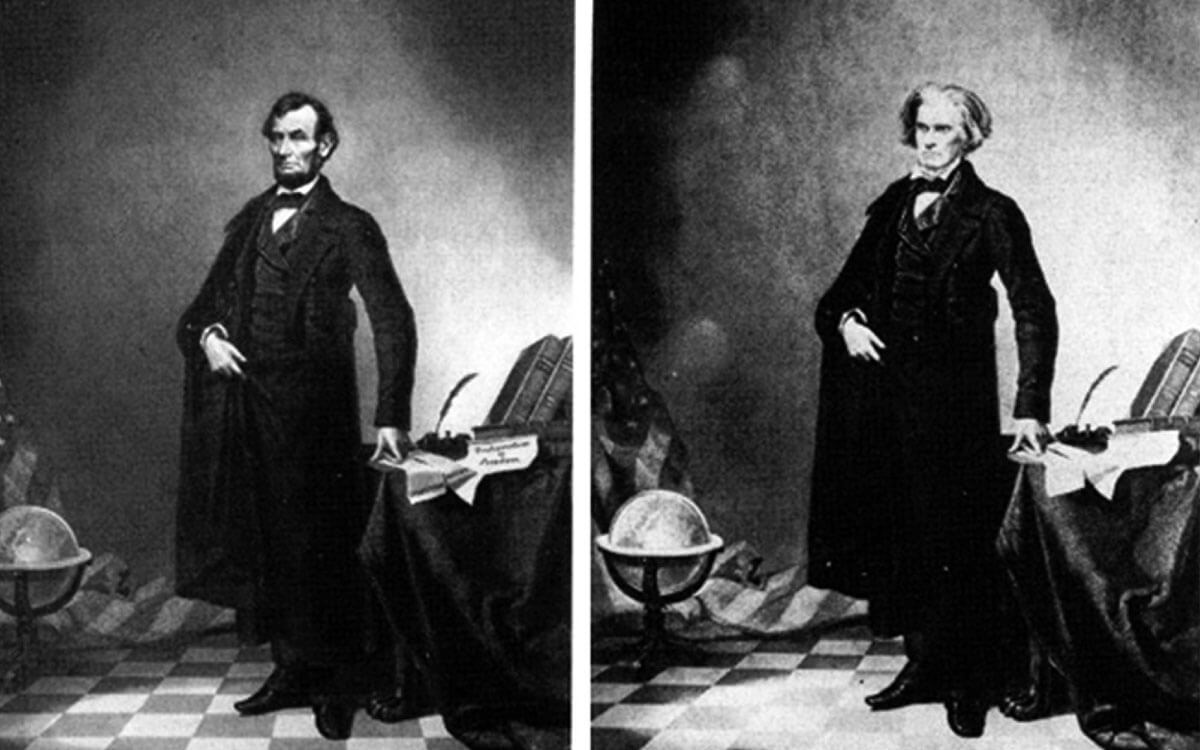
Photo manipulation may be traced back to some of the earliest images taken on glass and tin plates in the nineteenth century. The practice originated shortly after the invention of the first photograph (1825) by Joseph Nicéphore Niépce, who invented heliography and produced the first photographic print from a photo engraved printing plate.
It was done by Mathew Brady, a popular photographer with a studio on Pennsylvania Avenue. It was for a photograph of Abraham Lincoln! In February 1860, Lincoln posed for what would become one of the first widely published photo edits.
Brady used visual effects to make Lincoln appear more fit for the presidency. He exaggerated the light on Lincoln’s face to distract from his uneven facial structure. Brady went so far as to expand Lincoln’s collar to make his neck appear more proportionate. These were essentially the first commercial editing processes applied on a photo.
The move from film to digital has been a long process, but tremendous progress has been achieved from the 20th century onwards. All thanks to the innovation that has substantially increased digital image quality while lowering the bulk and weight of cameras and equipment.
Digital retouching became accessible in professional contexts in the 21st century with Quantel computers running Paintbox. Gradually, other programs were successfully supplanted in the market, such as Adobe Photoshop and GIMP.
What are the Types of Photo Editing?
In the following sections below, we’ll discuss the basic photo editing techniques and types of photo editing that are highly specialized and used all across the professional photo editing industry.
Color Match

Color Match is a command that matches colors between several layers, multiple pictures, or numerous selections. Although it only works in RGB mode, it allows you to change the color range and neutralize a color cast in a picture.
The cursor becomes the ‘Eyedropper’ tool when you execute this command. It’s frequently done to match the colors of things, replace them, or adjust their tones.
Color Change is widely used in ecommerce for changing the colors of one product to various other colors instantly.
Photo Retouching
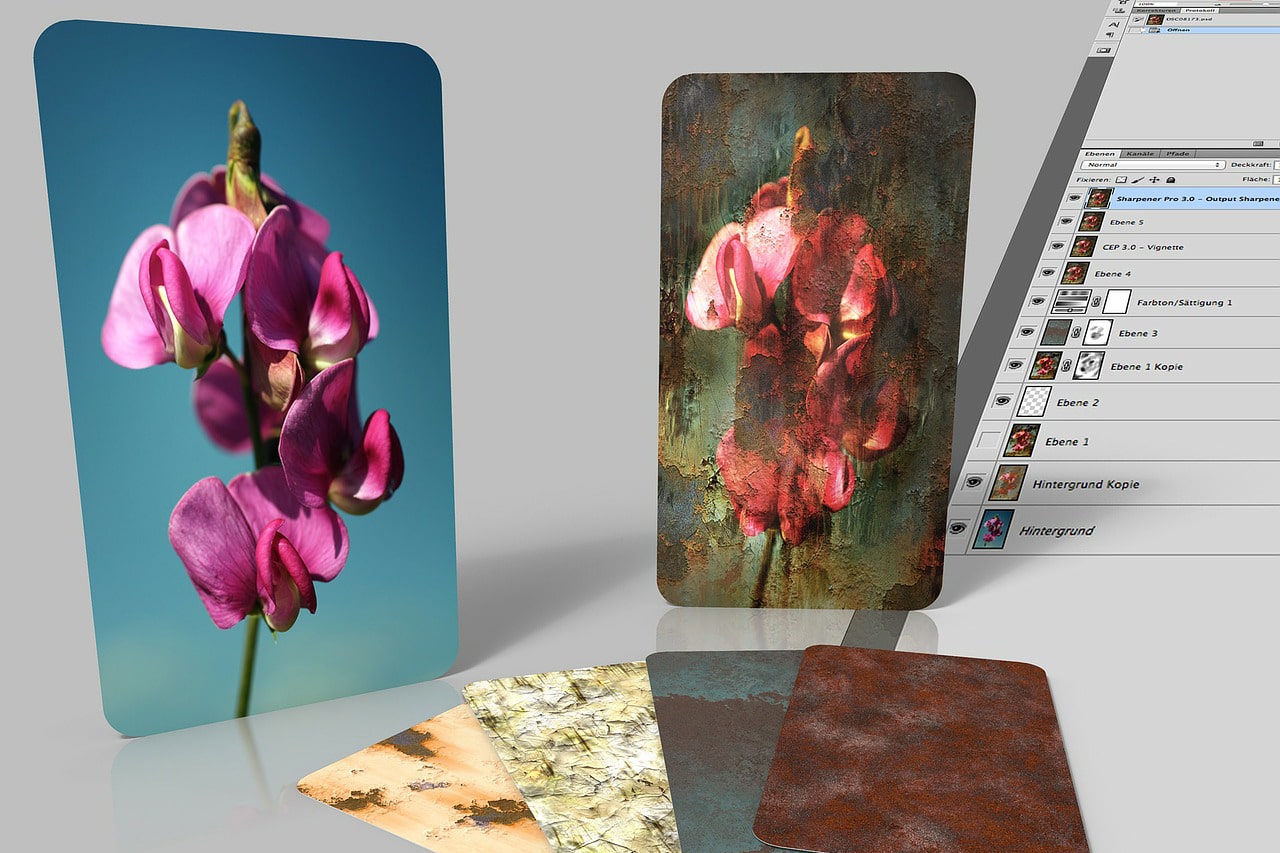
Photo retouching is the process of removing all flaws from a photograph. This commonly involves color and tone correction, the removal of blemishes and under-eye circles, as well as changes to brightness, contrast, and saturation.
Apart from that, the photo retouching process also includes airbrushing, which includes eliminating or adding specific spots/elements from the background that were not present in the original photograph.
One thing to note is that you should be absolutely clear on what is photo retouching. It’s not the same thing as photo editing; rather, photo retouching is a branch under the giant tree of photo editing!
Photo retouching is a common need for fashion photography, model photoshoots, portraits, and products. It serves a wide variety of needs.
Clipping Paths
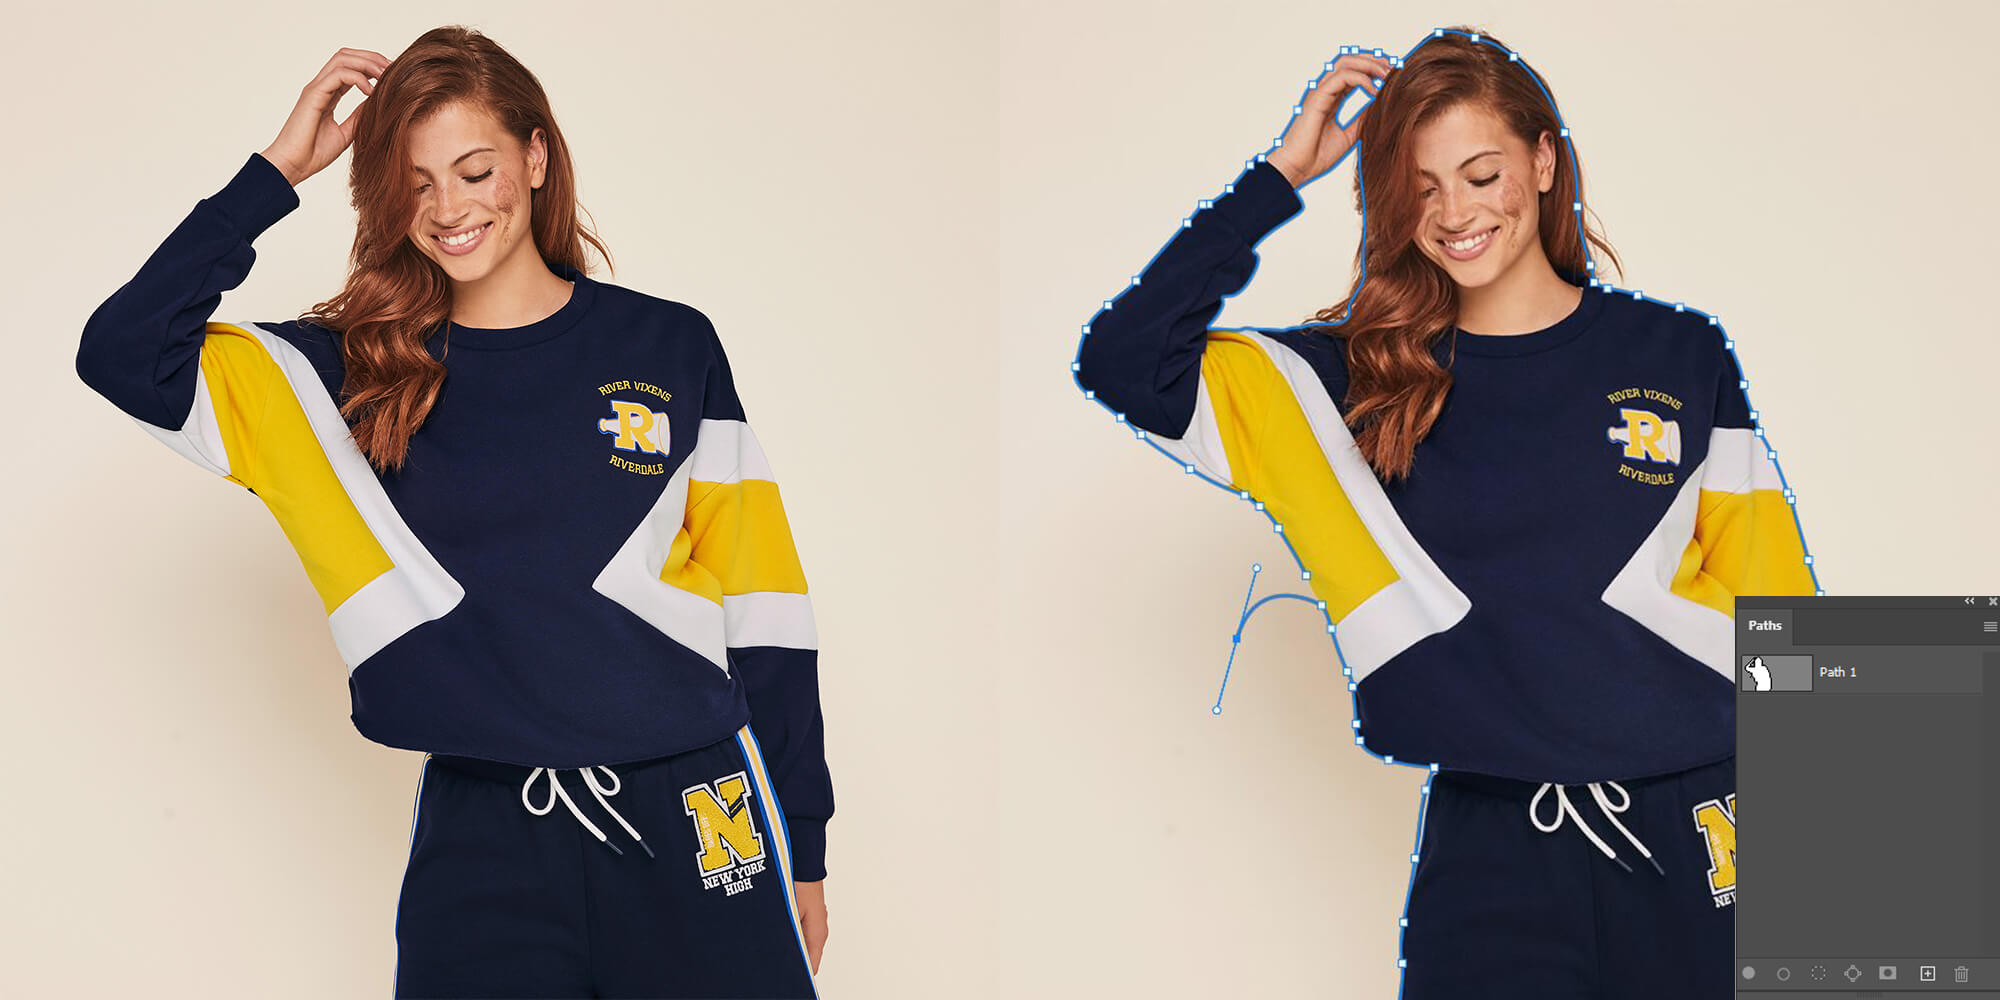
Using the pen tool in Photoshop, a clipping path is a technique for constructing a near-vector path or shape. It’s a non-destructive selection method.
This technique is commonly used to eliminate the backdrop from photographs or to replace it with a white background. The clipping path is created using Adobe Photoshop’s pen tool. Clipping paths are by far the most effective method for pixel-perfect selection.
In today’s fierce competition, your photos need variations. Clipping paths are the fastest way to vary the backgrounds in your photo.
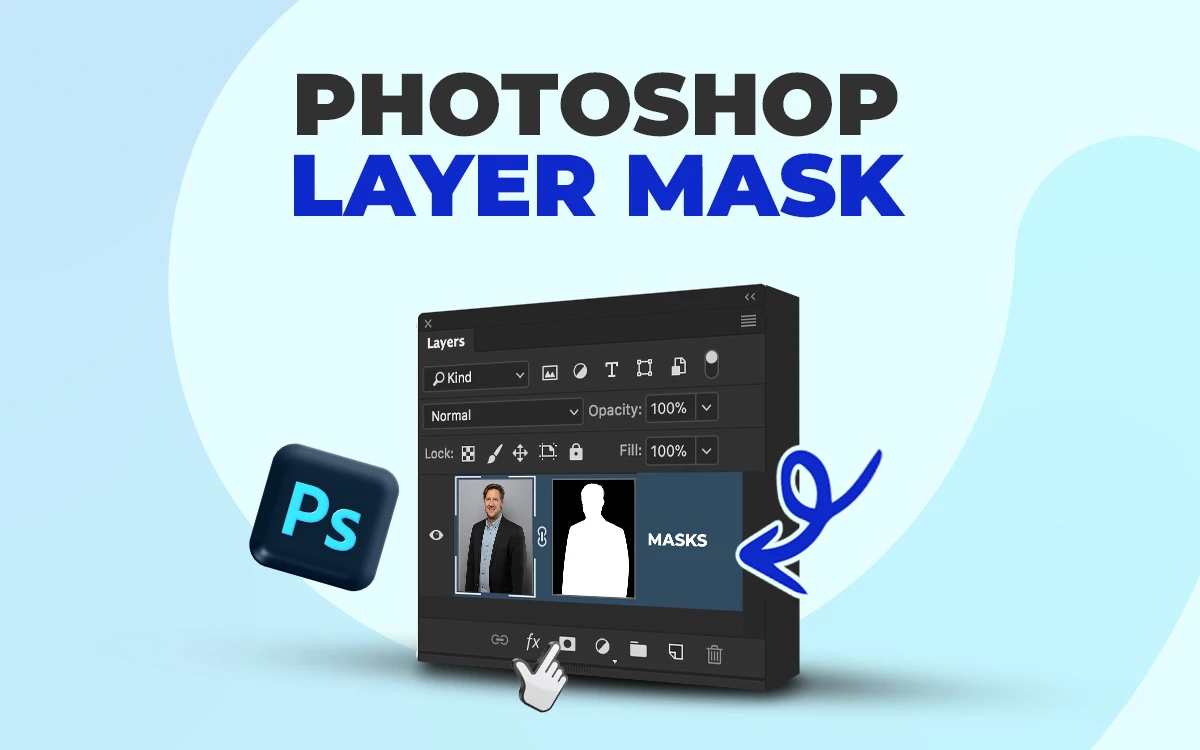
Photo Masking
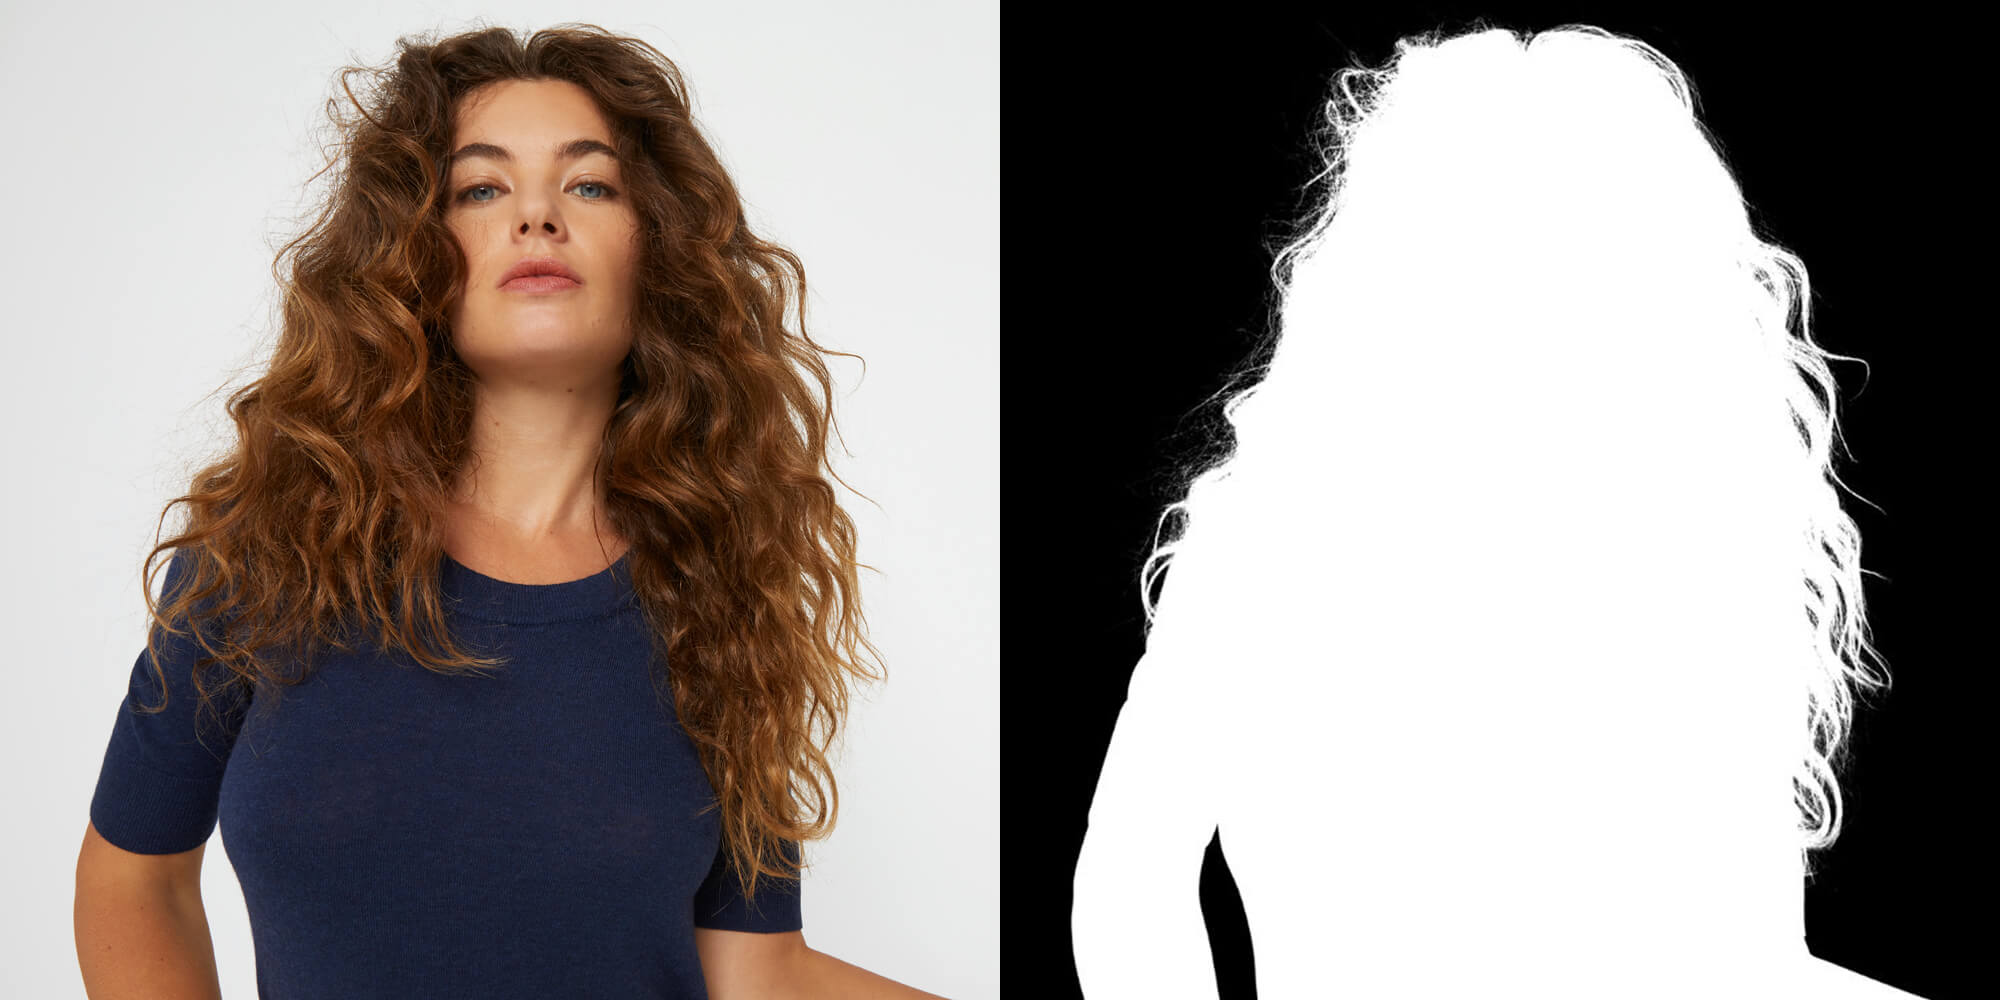
When you “mask” an image in photo editing, you’re restricting the visibility of a specific layer or adjustment. A mask lets you make changes to a specific area of your image while keeping the rest undisturbed.
You might apply a mask, for example, to highlight your subject while leaving the backdrop alone. Photo masking allows you to fine-tune how and where editing improvements will be implemented in an image.
It would be impossible to make specific areas of your image pop out without photo masking!
Shadows

Product photography benefits from realistic shadows and typically employs them the most.
Even though the effect is minor, these shadows help items seem more desirable to shoppers. Shadows help objects appear realistic instead of seeming flat and lifeless, especially when they’re shown against a white background.
Shadows are also useful for separating your product from the backdrop (for example, a white outfit against a white background) and for maintaining a consistent appearance throughout all of your product photographs.
There are almost 5 kinds of shadows you can add – all varying in visual realism from product to product!
Background Remove
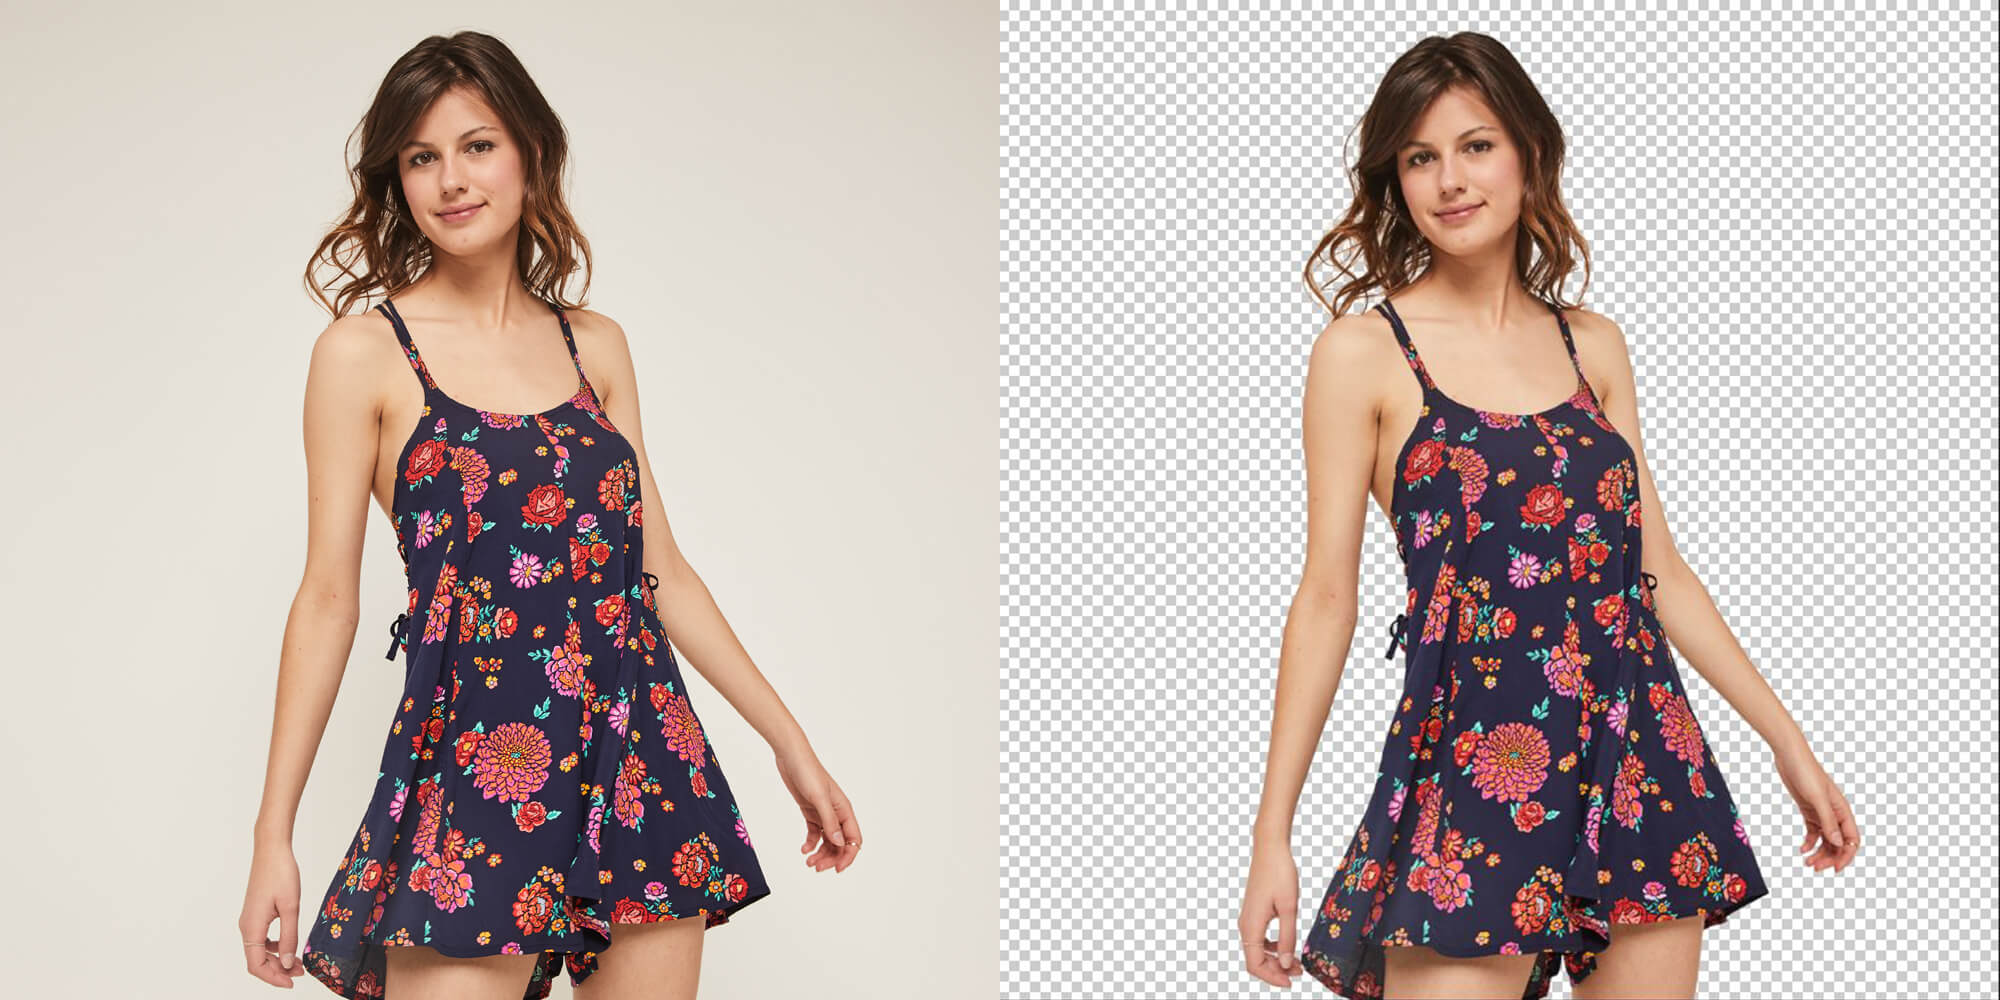
When you isolate the subject of a shot and wipe the rest of the image clean, you’re doing background removal. After that, you’re left with a clean white background.
The elimination of image backgrounds is not limited to white backgrounds. You can also use a single-color background, such as yellow, or a “contextual” background, such as a beach.
To comply with the requirements of most ecommerce marketplaces, background removal is almost always needed.
Photo Manipulation

Similar to photo retouching, it is important to know what photo manipulation is. It’s also a branch under the large tree of photo editing.
The modification of original contents in a photograph is known as photo manipulation. It might be something simple, such as switching a sky, or it could be more complex, such as adding new features to the shot.
Average photographers are less likely to manipulate their photos. It’s a skill that takes time to master because it’s only used in particular situations and requires a high level of expertise in specialized editing software.
Photo manipulation is a technique for enhancing a photograph’s aesthetic expression or altering an image to reflect the photographer’s creative objective.
Photo Restoration
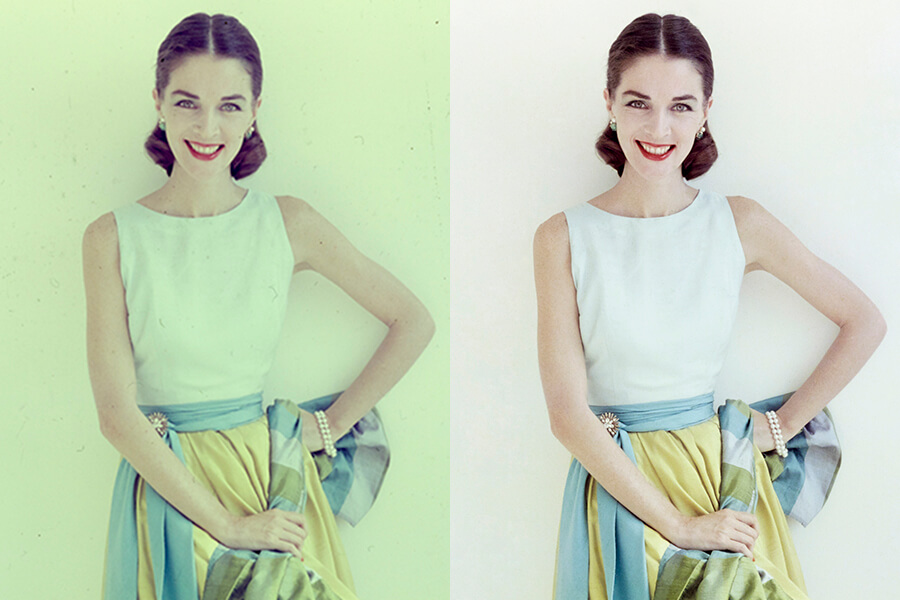
Old pictures are highly sensitive to deterioration and fading over time. Water, fire, tearing, rips, stains, and other factors may all wreak havoc on printed images. These flaws can be mitigated or completely corrected with photo restoration.
Photo restoration is the act of creating digital copies of such photos while simultaneously increasing their quality and fixing damage using digital restoration technologies.
Such an effect is done to bring age-old ancestors or even recent hazy memories back to life.
Removing and Replacing
A photograph may contain some unwanted elements that you need to remove. For example, the image of a watch that you captured may contain its case on the side. But during the editing process you decided it’s best to just not have the case.
Setting up the studio again to reshoot would be quite cumbersome in this case. And if you rented a studio, it’s going to be a large expense for a small change.
With photo editing, all of these items can be flawlessly removed. It will seem as if they were never there to begin with! Additionally, professional editors can not only remove such items, but also replace them with another item/product if needed.
Removing and Replacing is faster and effective than reshooting, but that doesn’t mean you should keep your shooting sessions unplanned & unorganized!
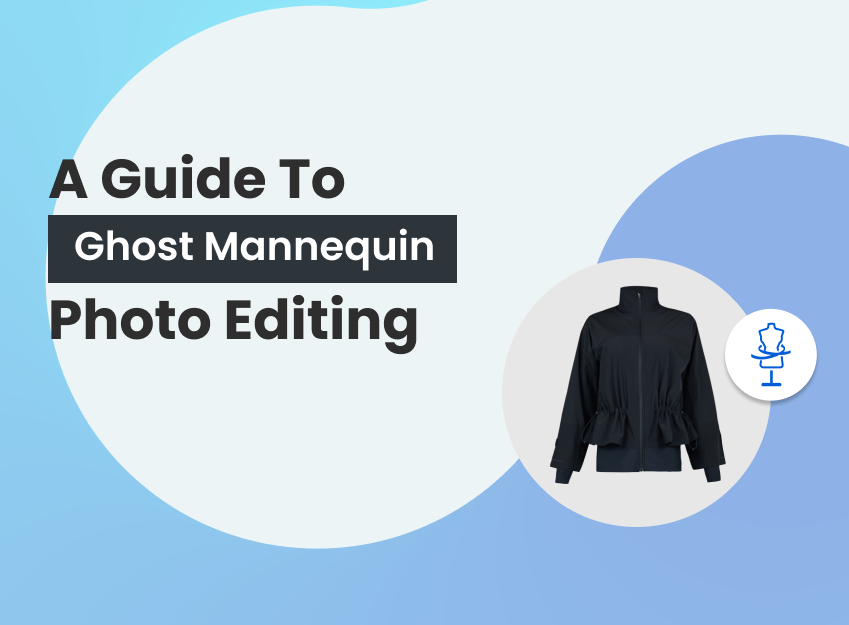
Ghost Mannequin Effect
The ghost mannequin effect is achieved by taking several shots of a product on a model or mannequin, then merging the photos in post-production to eliminate the model or mannequin. The end result is a lifelike visual that retains the viewer’s attention to your product.
Showcasing products the way physical showrooms can have always been an issue for online stores. But with the advent of the ghost mannequin effect, this problem is long gone.
When ghost mannequin is combined with 360-degree product viewing, consumers get an unparalleled shopping experience.
What are the basics of Photo Editing?
The basics of image editing like Color hue and brightness imbalances, red eye removal, sharpness changes, zoom features, and automated cropping, are all basic photo editing functions.
In most cases, these changes may be made automatically without user participation or by selecting an option from a menu with a single click of a button.
Furthermore, certain automatic editing software allows you to combine multiple editing operations with little or no user intervention.

Basic Photo Editing Techniques
What is photo editing and all its basic techniques? In the following sections below, we’ll discuss the basic photo editing techniques that professionals use. You can’t fully grasp the core of image editing without learning about these.
Don’t forget to read: Top 15 Ecommerce product photo editing trends to follow
White Balance
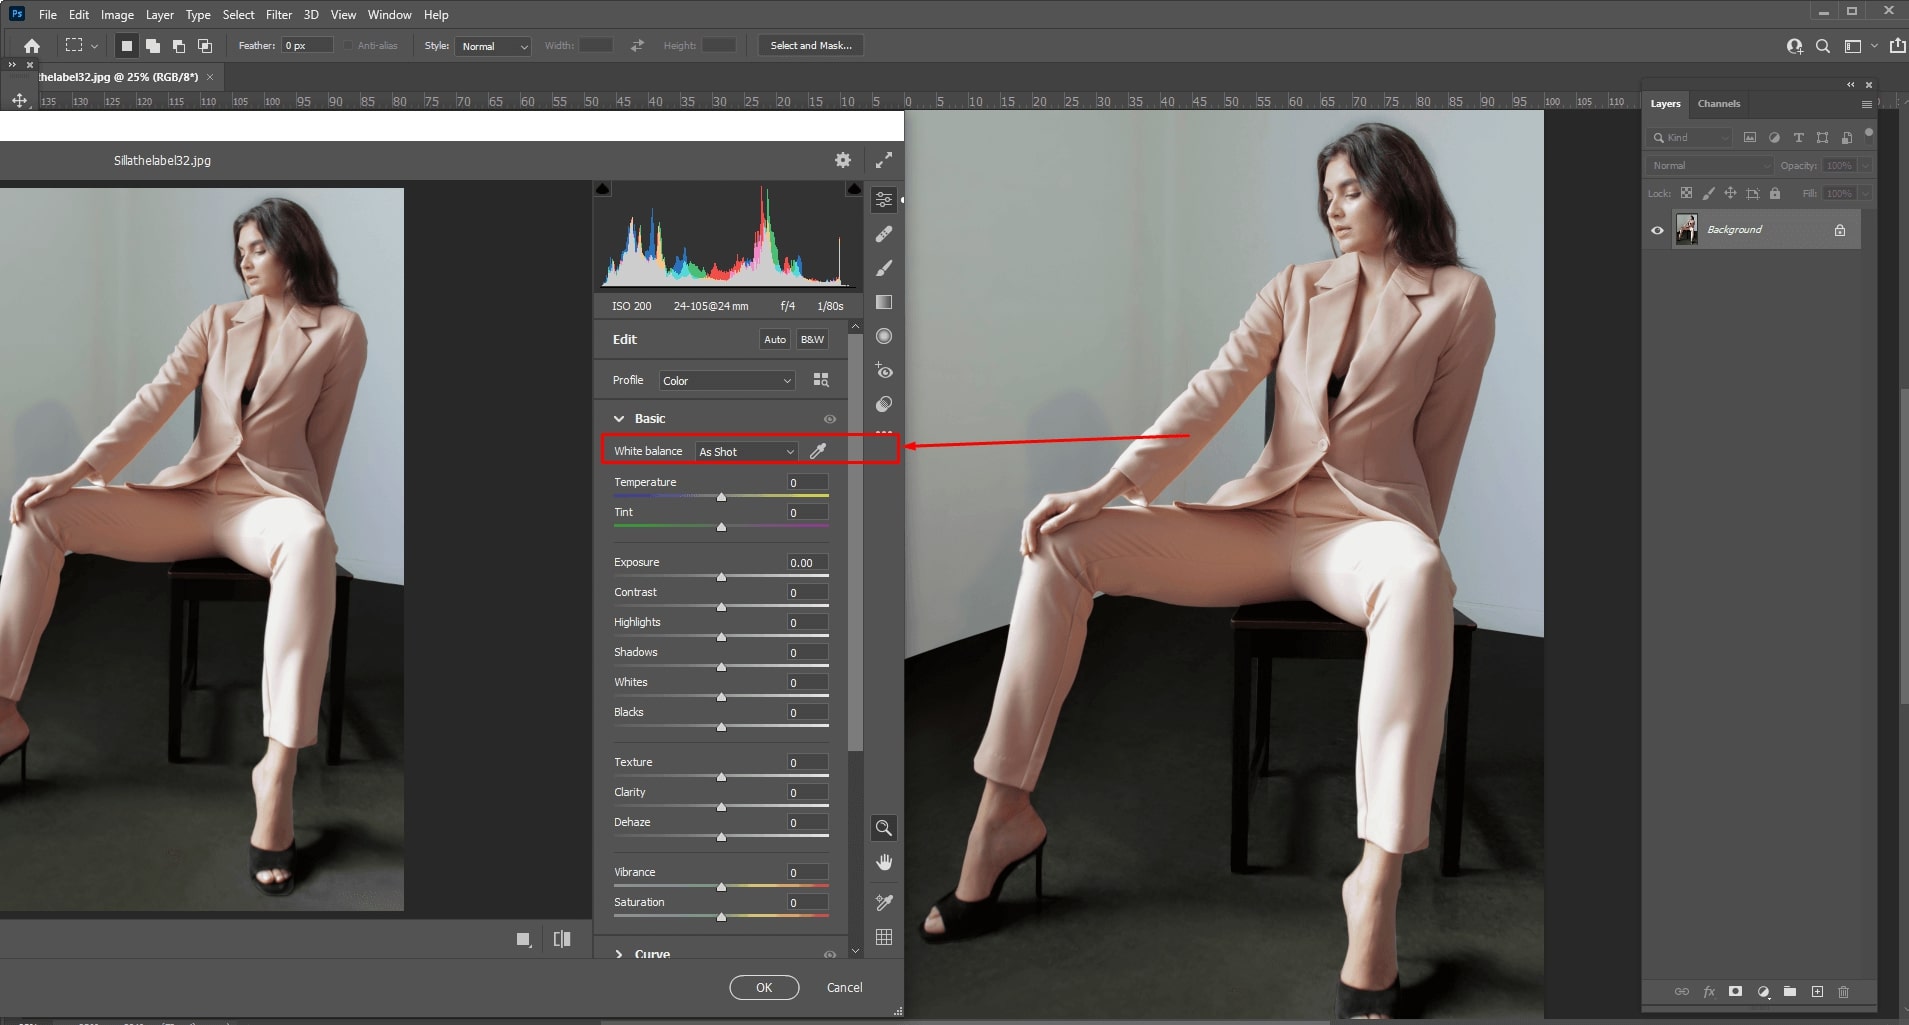
White balance is the technique of eliminating unnatural color casts from photographs so that items that are white in reality also appear white in your photograph. Human eyes are quite excellent at detecting what is pure white under varying light conditions, but digital cameras struggle with auto white balance.
Photographs end up having unattractive blue, orange, or even green color casts. Changing the white balance throughout the editing process can help you remove these color casts, allowing you to improve your images in a broader range of lighting situations.
Exposure
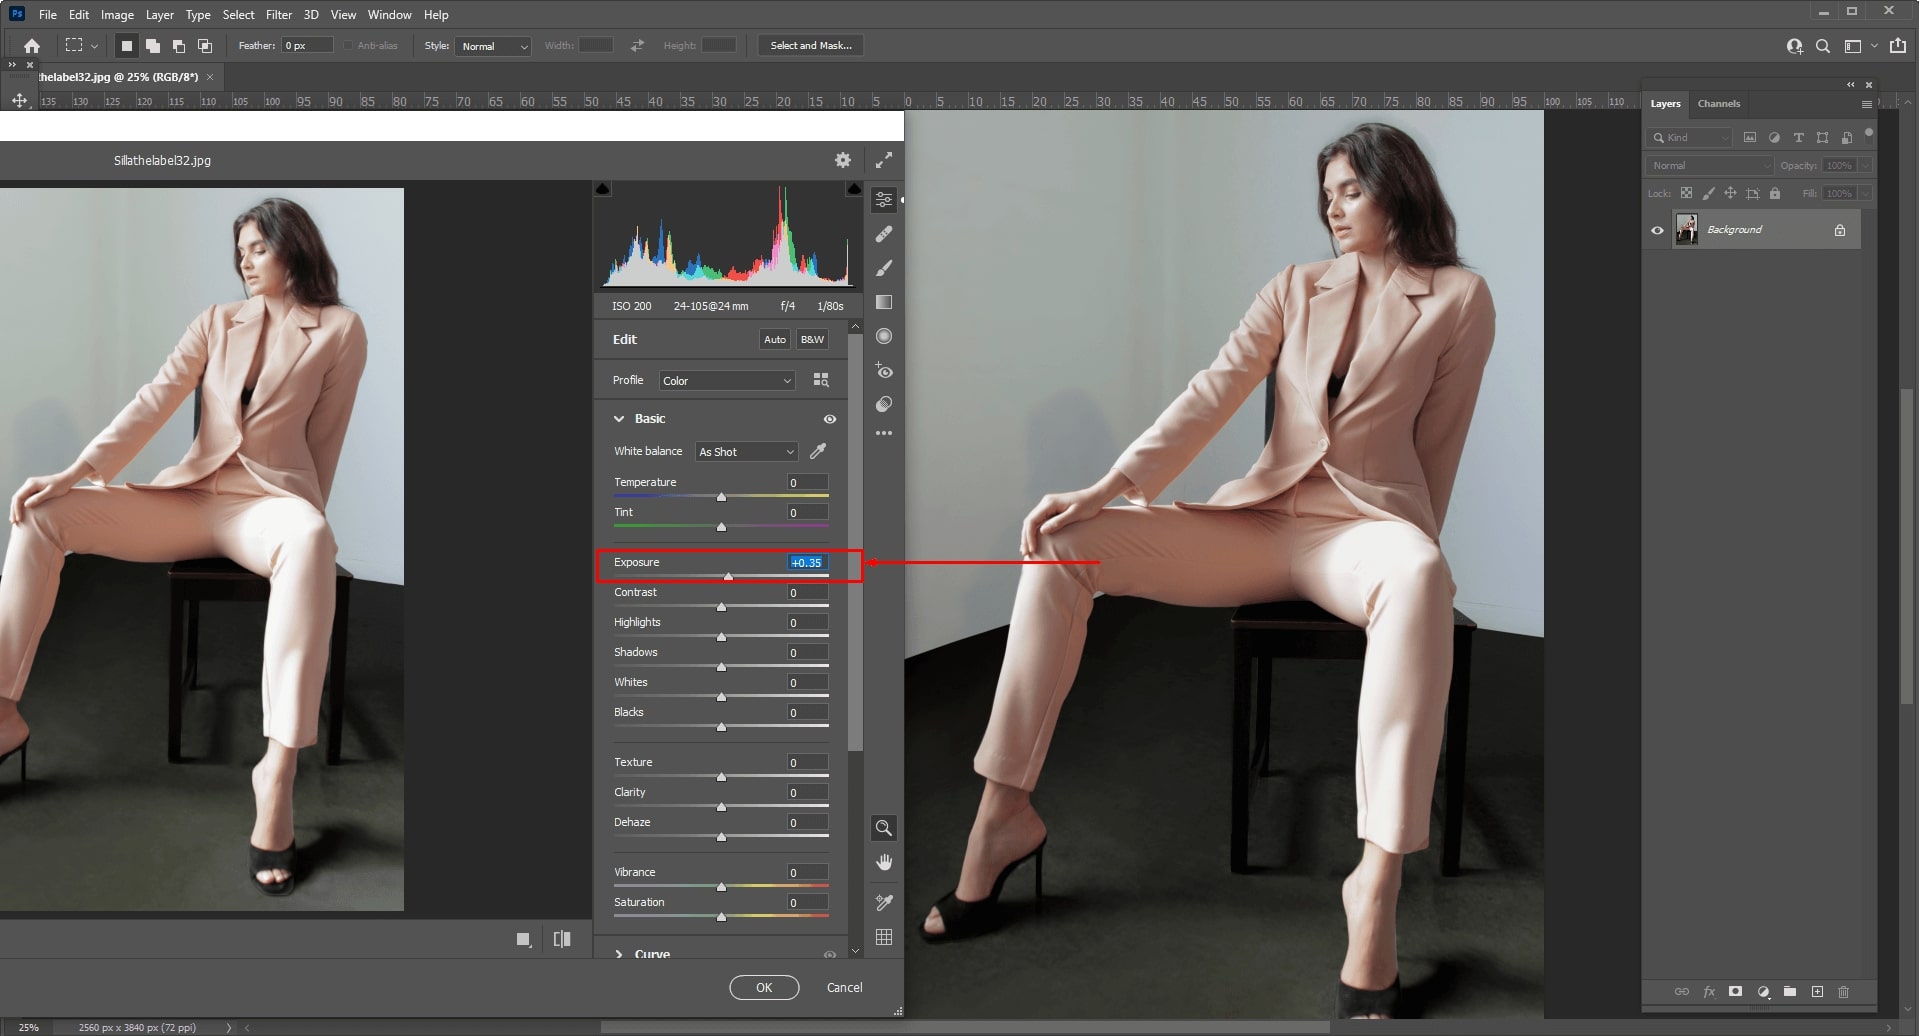
The overall brightness of an image (the level of light in the shot) is known as exposure. A photograph with an exposure that is too low will appear too dark, whereas one with an exposure that is too high will appear too bright.
If your images aren’t correctly exposed, one approach to improve their appearance is by using the exposure slider to add more light or subtract some of the present light. This is a common photo editing method.
Contrast

The intensity of difference between the tones and colors in a photograph is called contrast. You may think of it as the tonal ratio or the proportion of light vs dark in an image.
High, medium, and low contrast all make varied impacts on viewers and alter the mood of your photographs. If this tonal difference doesn’t come out naturally in photographs, you can control this in editing.
Clarity
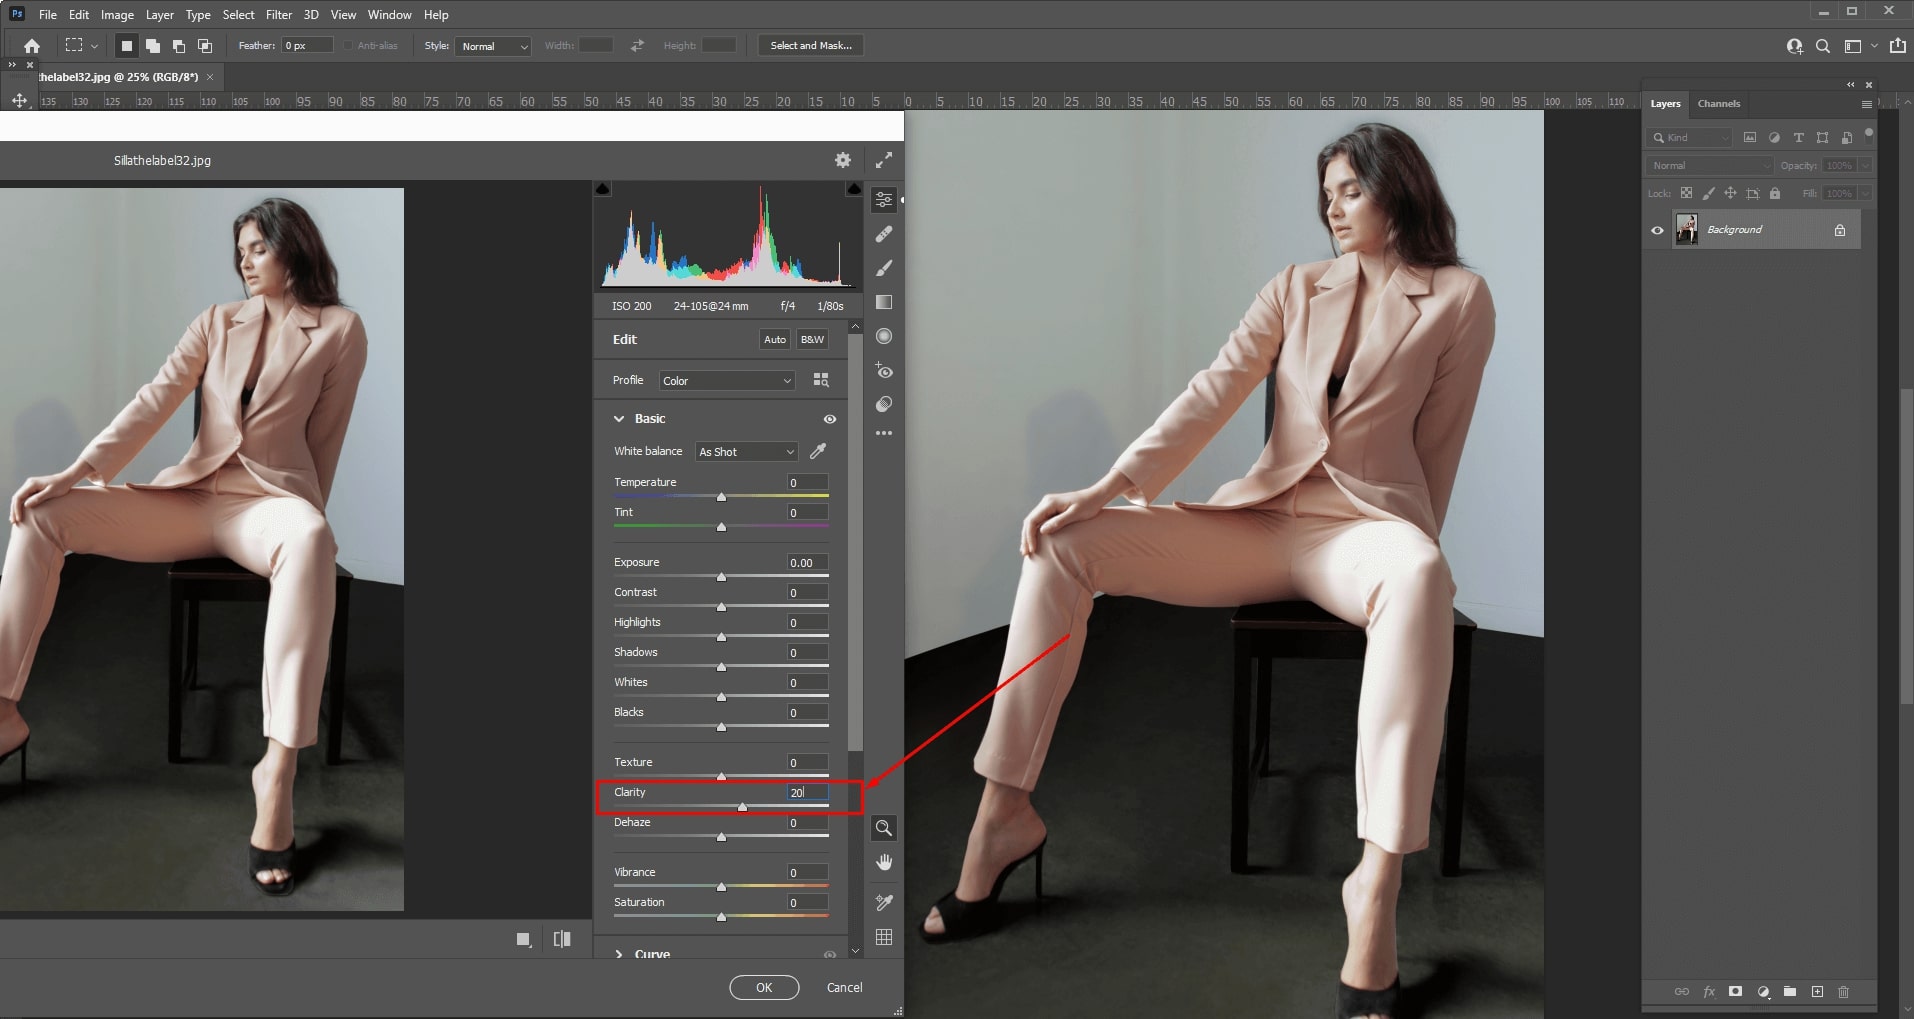
Clarity is a denoising contrast boost that concentrates on the image’s mid-tones. It varies from sharpness; sharpness improves contrast between dark and light tones, whereas clarity raises contrast between the image’s mid-tones. Clarity also emphasizes textures a little more.
Furthermore, digital noise isn’t as visible while increasing clarity (as it tends to be while increasing sharpness). This is one of the main reasons why clarity is done in post-production as opposed to only changing the sharpness and contrast.
Saturation
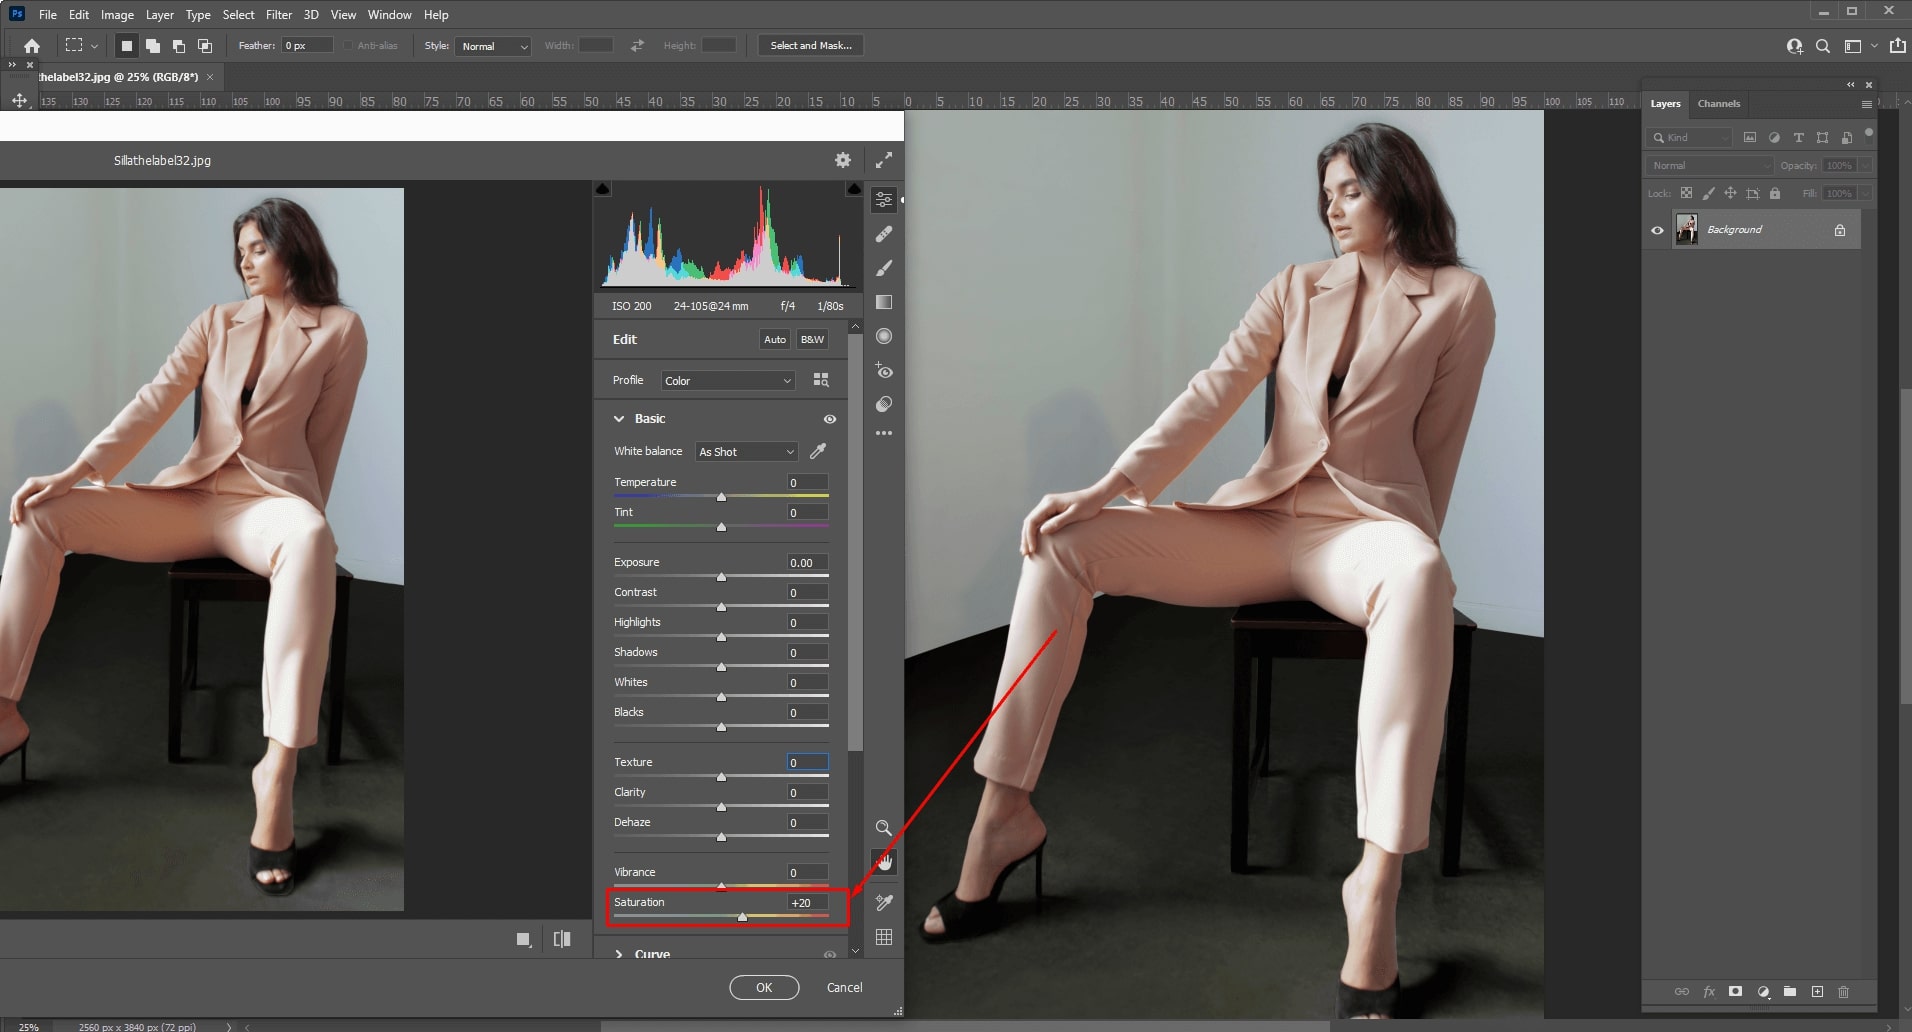
The intensity of a color is referred to as saturation. The more saturated a hue is, the more vibrant it is. The lower a color’s saturation, the closer it is to grayscale.
Lowering the saturation of a photo might have a “mellow” or “muting” impression, whilst raising it can give the image a much more colorful feel. It’s crucial not to over-saturate a photograph because this might result in an unrealistic over-colored look.
Sharpening
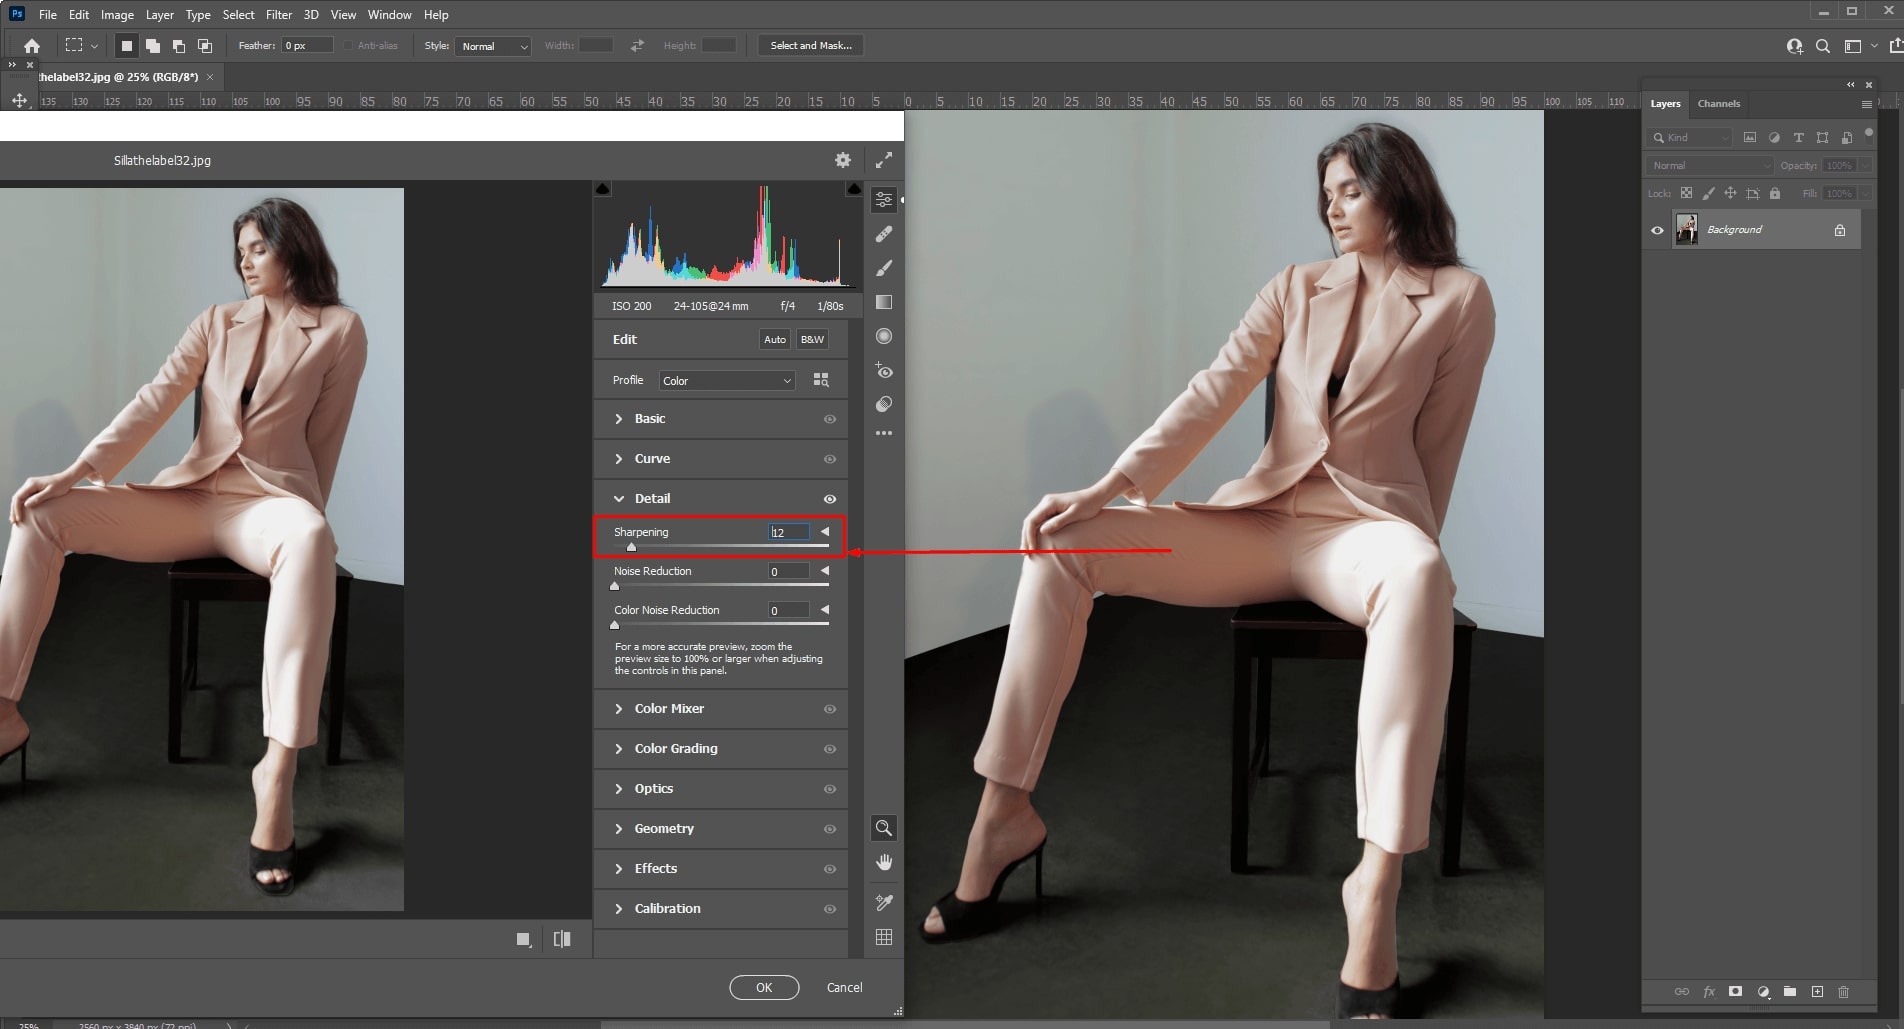
Any current camera’s RAW data is almost always somewhat unsharp. Blur is introduced at every stage of the image capture process. Some definition is lost when the light goes through the lens elements, no matter how finely crafted they are. That is where sharpening is done.
Sharpening is a method of enhancing an image’s perceived sharpness. It helps minimize blurring caused by camera equipment, bring attention to certain regions, and to improve visibility.
Individual leaves stand out; faces become more distinct, the text becomes easier to read. Sharpening a photograph in the photo editing process allows you to notice such essential features more clearly.
Noise Reduction

The process of removing undesirable noise in digital photos captured in low light circumstances is known as noise reduction. The goal behind noise reduction is to selectively filter pictures to minimize noise and avoid making noise worse while making other edits like contrast changes.
Brush tool
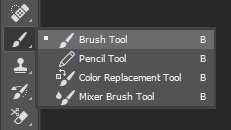
The Brush tool, similar to a real paintbrush, allows you to paint on any photo. You’ll also have a variety of options to pick from, allowing you to tailor it to your own needs.
Other applications, such as Erasing and Spot Healing, can be done with the brush tool.
Lens Corrections
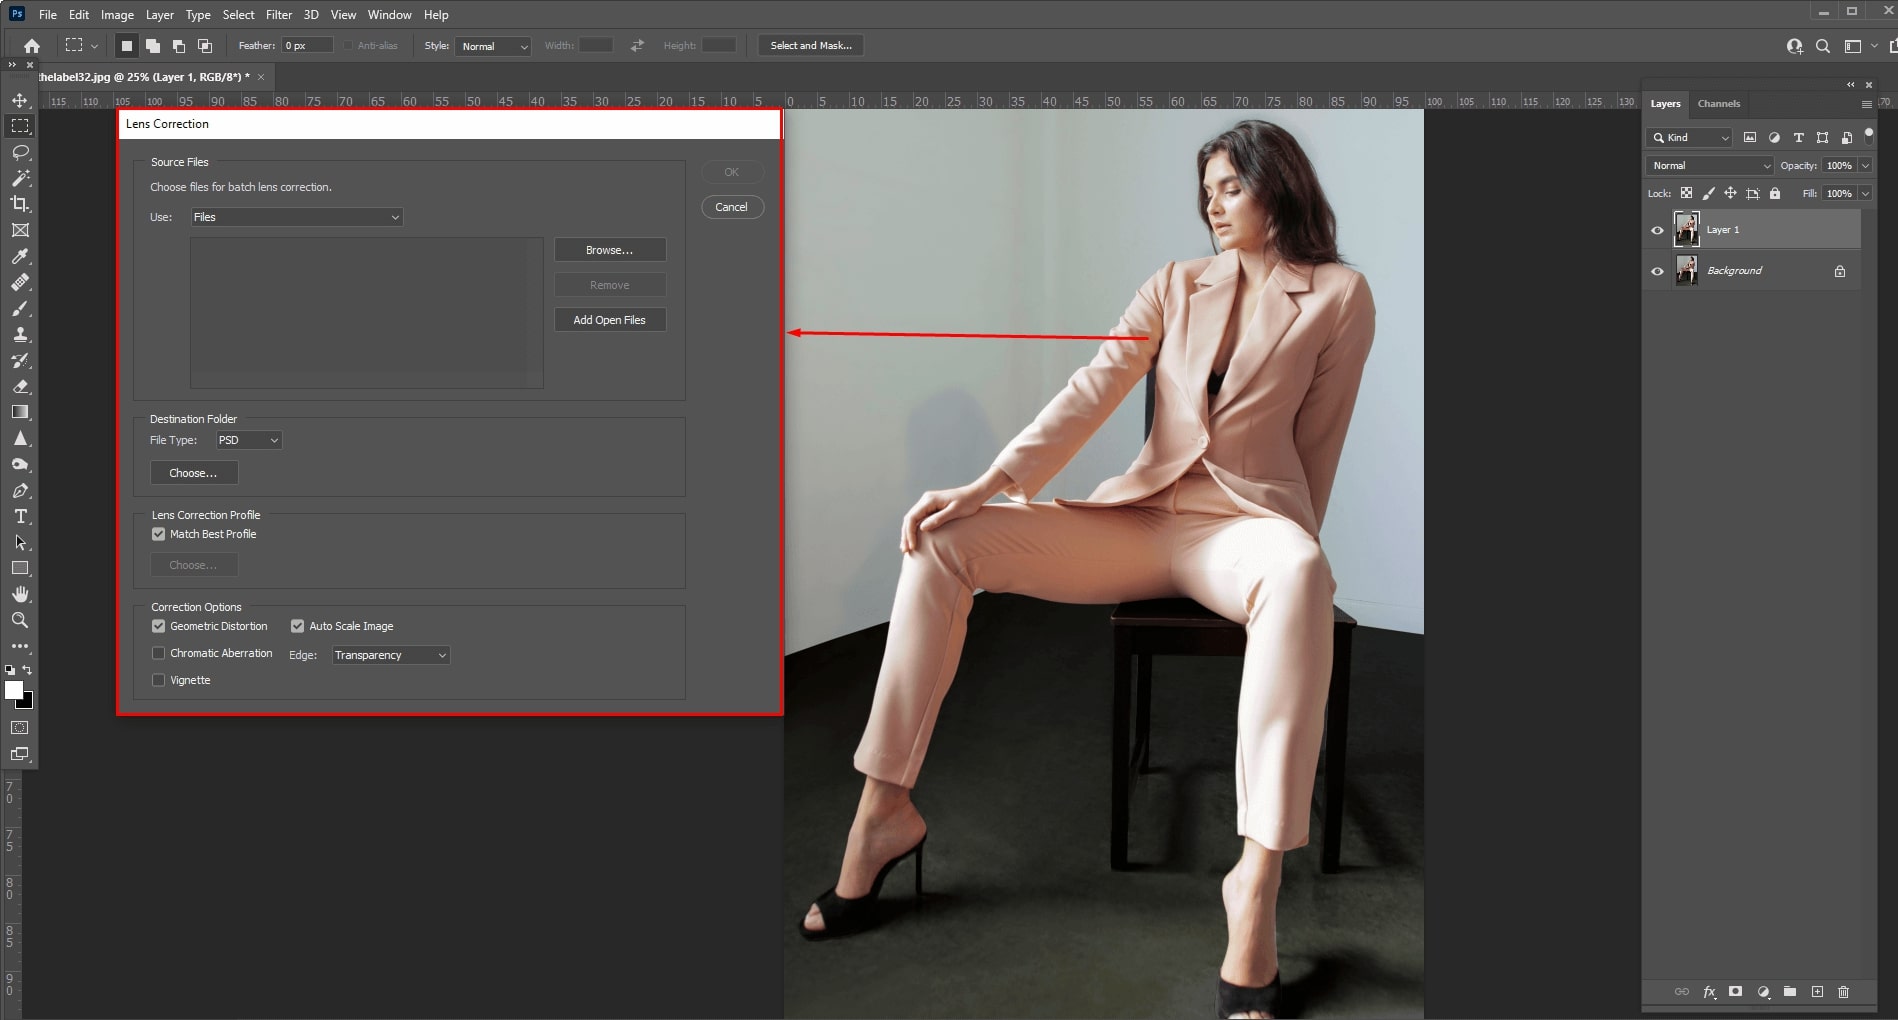
Because of the manufacturing process, each lens has its own optical properties. These properties do affect the photos, and sometimes negatively. These effects include vignetting, distortion, and chromatic aberration.
Lens corrections assist in compensating for such flaws in almost every shot. Dimming around the frame’s corners, straight lines seeming curled, or color fringes near edges – are all solved with lens correction. Even though these effects aren’t always visible in the original shot, the benefits of removing them are always visible.
However, if not done correctly, lens corrections can make photographs worse. And sometimes, photographic defects may actually be good!
Perspective Correction
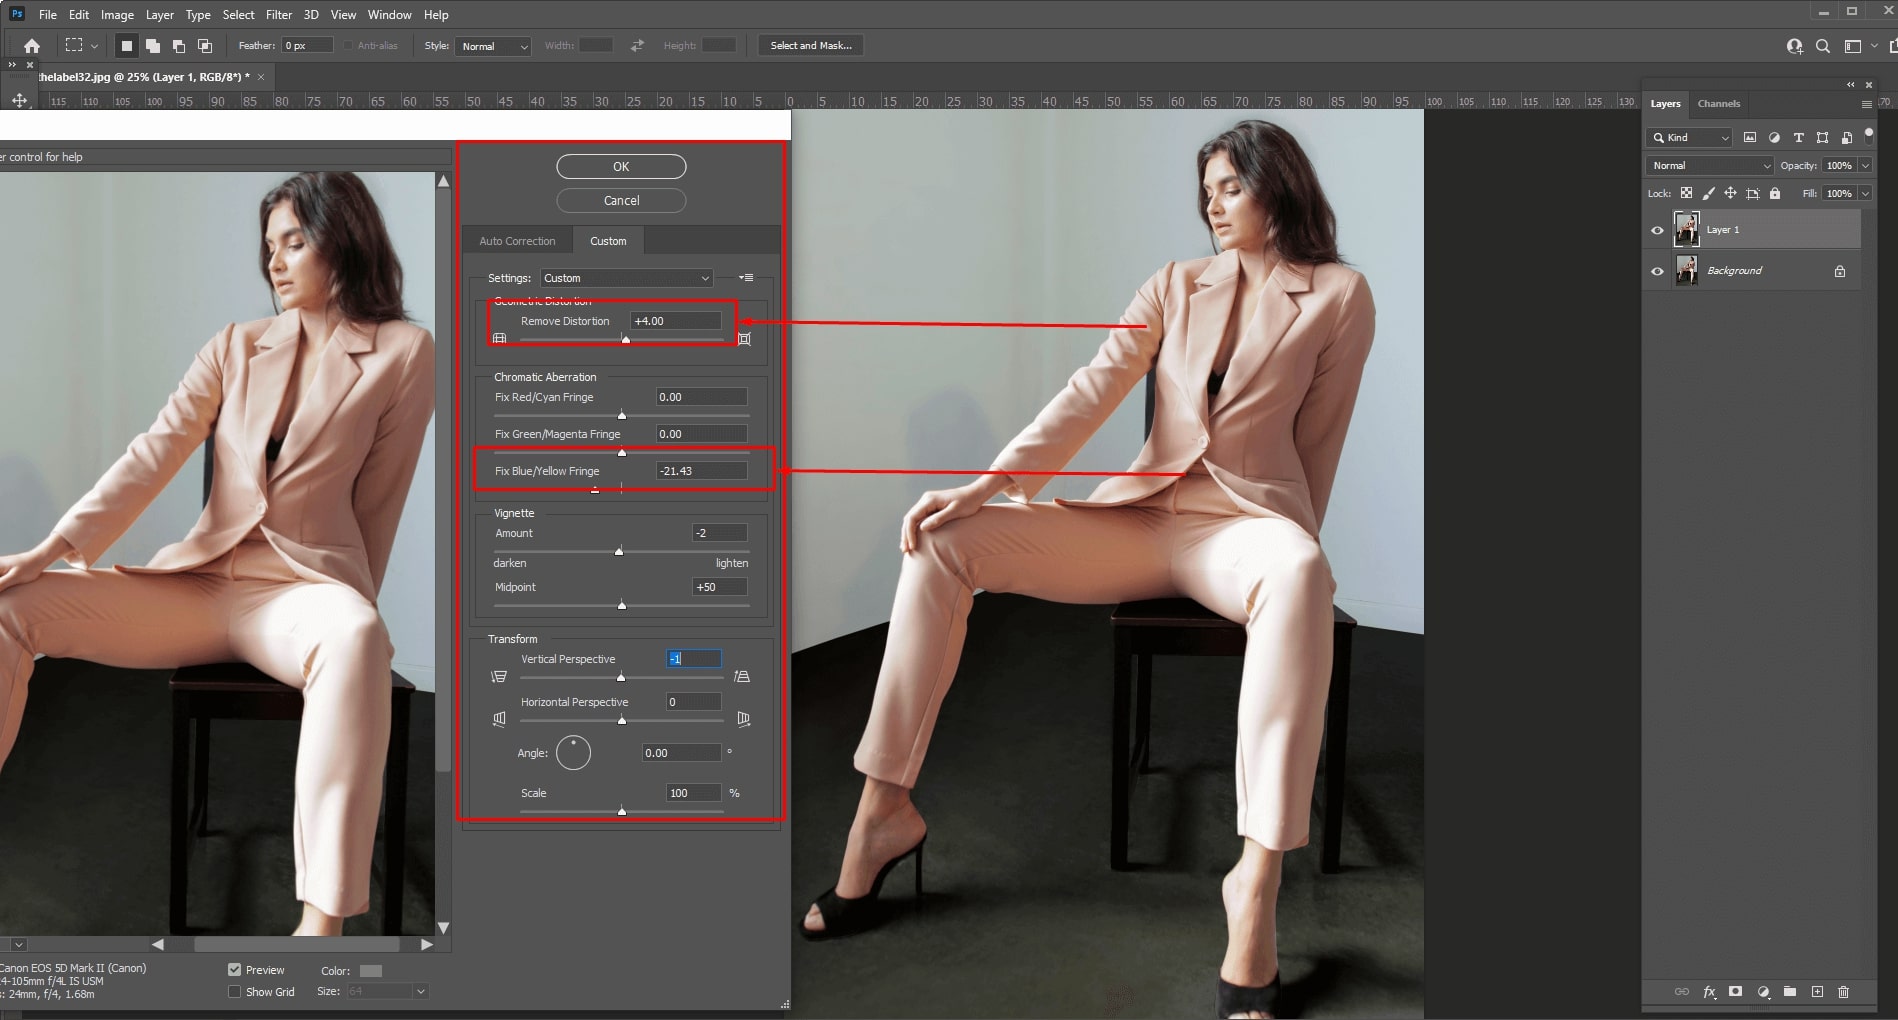
Perspective correction is typically applied to photographs with ‘converging verticals’. This occurs when you have to angle the camera upwards to fit the entire subject into the frame.
Wide Angle lenses make it worse because you’re closer to your subject and have to adjust the camera more. Such lenses also overstate the scale of items in the front (a building’s foundation) in comparison to those farther away (the top of the building).
Strong converging lines can sometimes be an intentional feature of a composition, but they must appear intentional. Otherwise, it can appear to be a careless technique. That’s where perspective correction is needed.
Grain
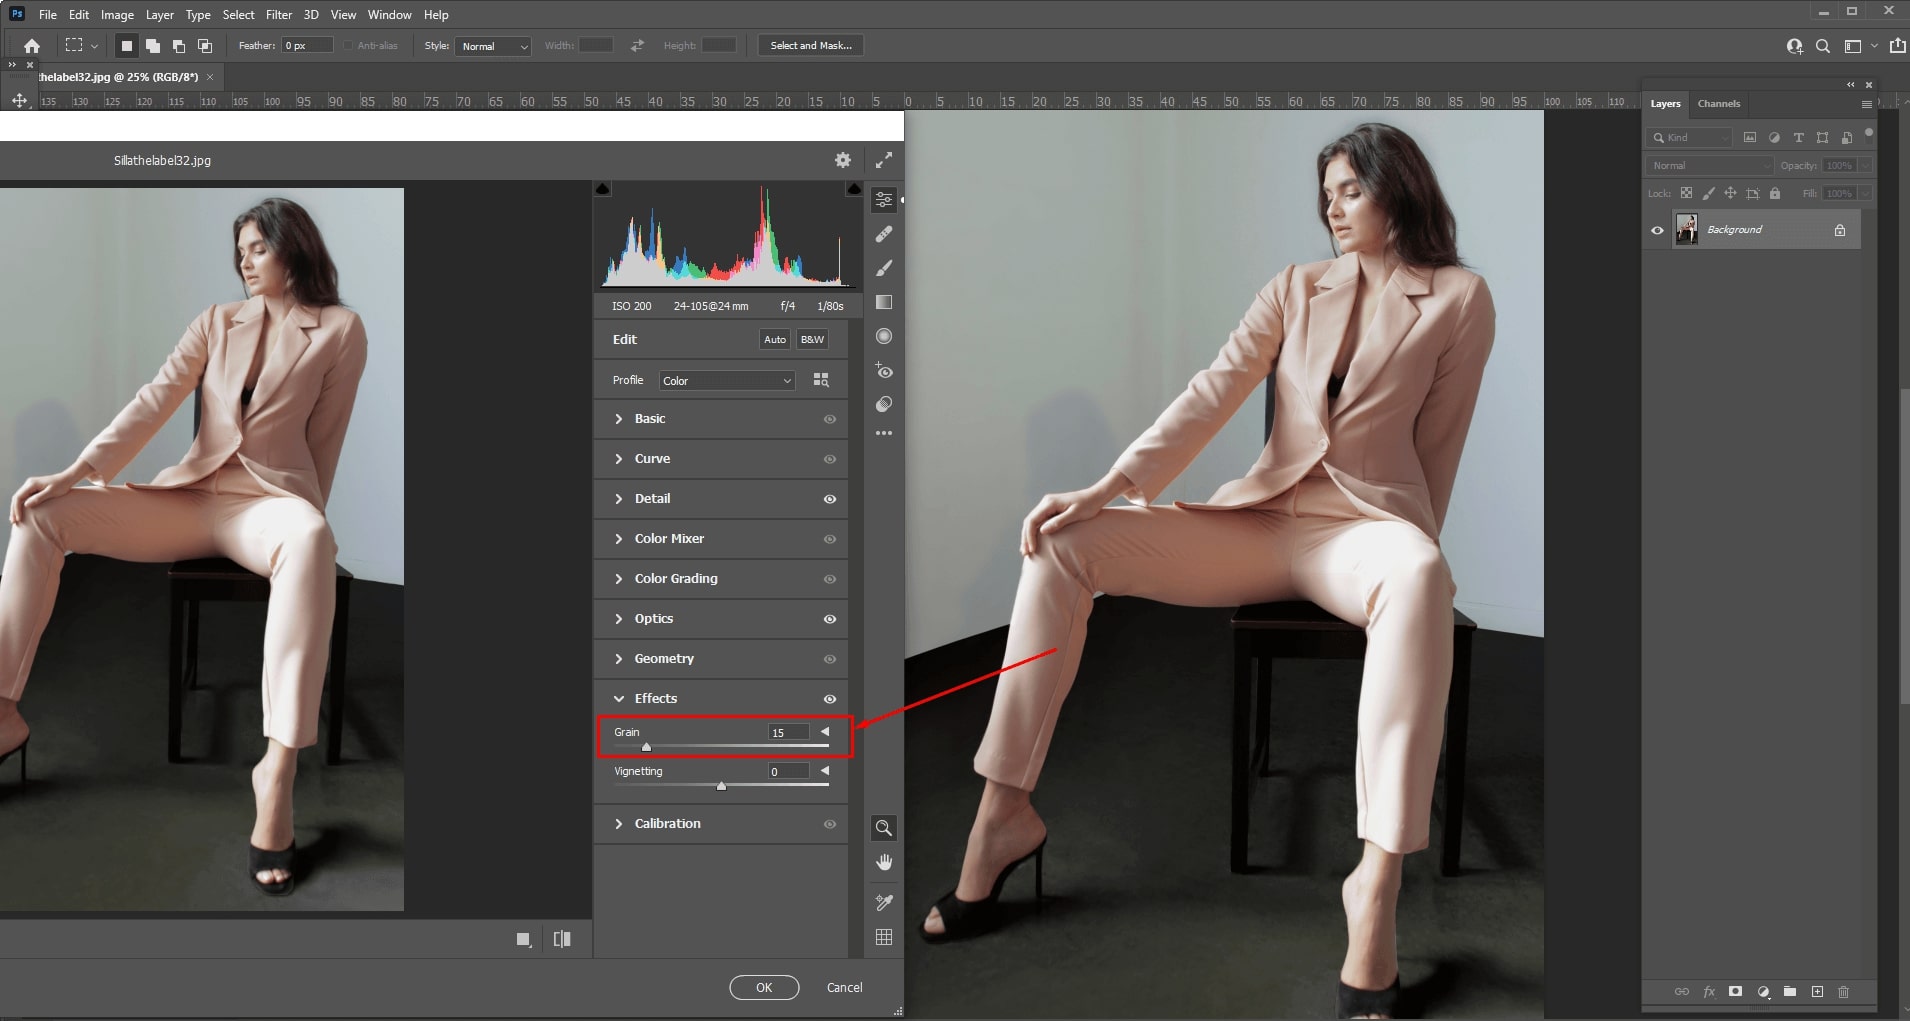
Grain is a term used in cinematography to express how finely a picture or piece of paper can capture detail. In modern pictures, detail and resolution is typically the focus – not grain.
However, grain can be added in photo editing to add a nostalgic and retro feel. Softwares typically emulate the film grain found in wet film chemistry. This can help fix the focus in some cases but is done mostly as an artistic choice.
Vignette
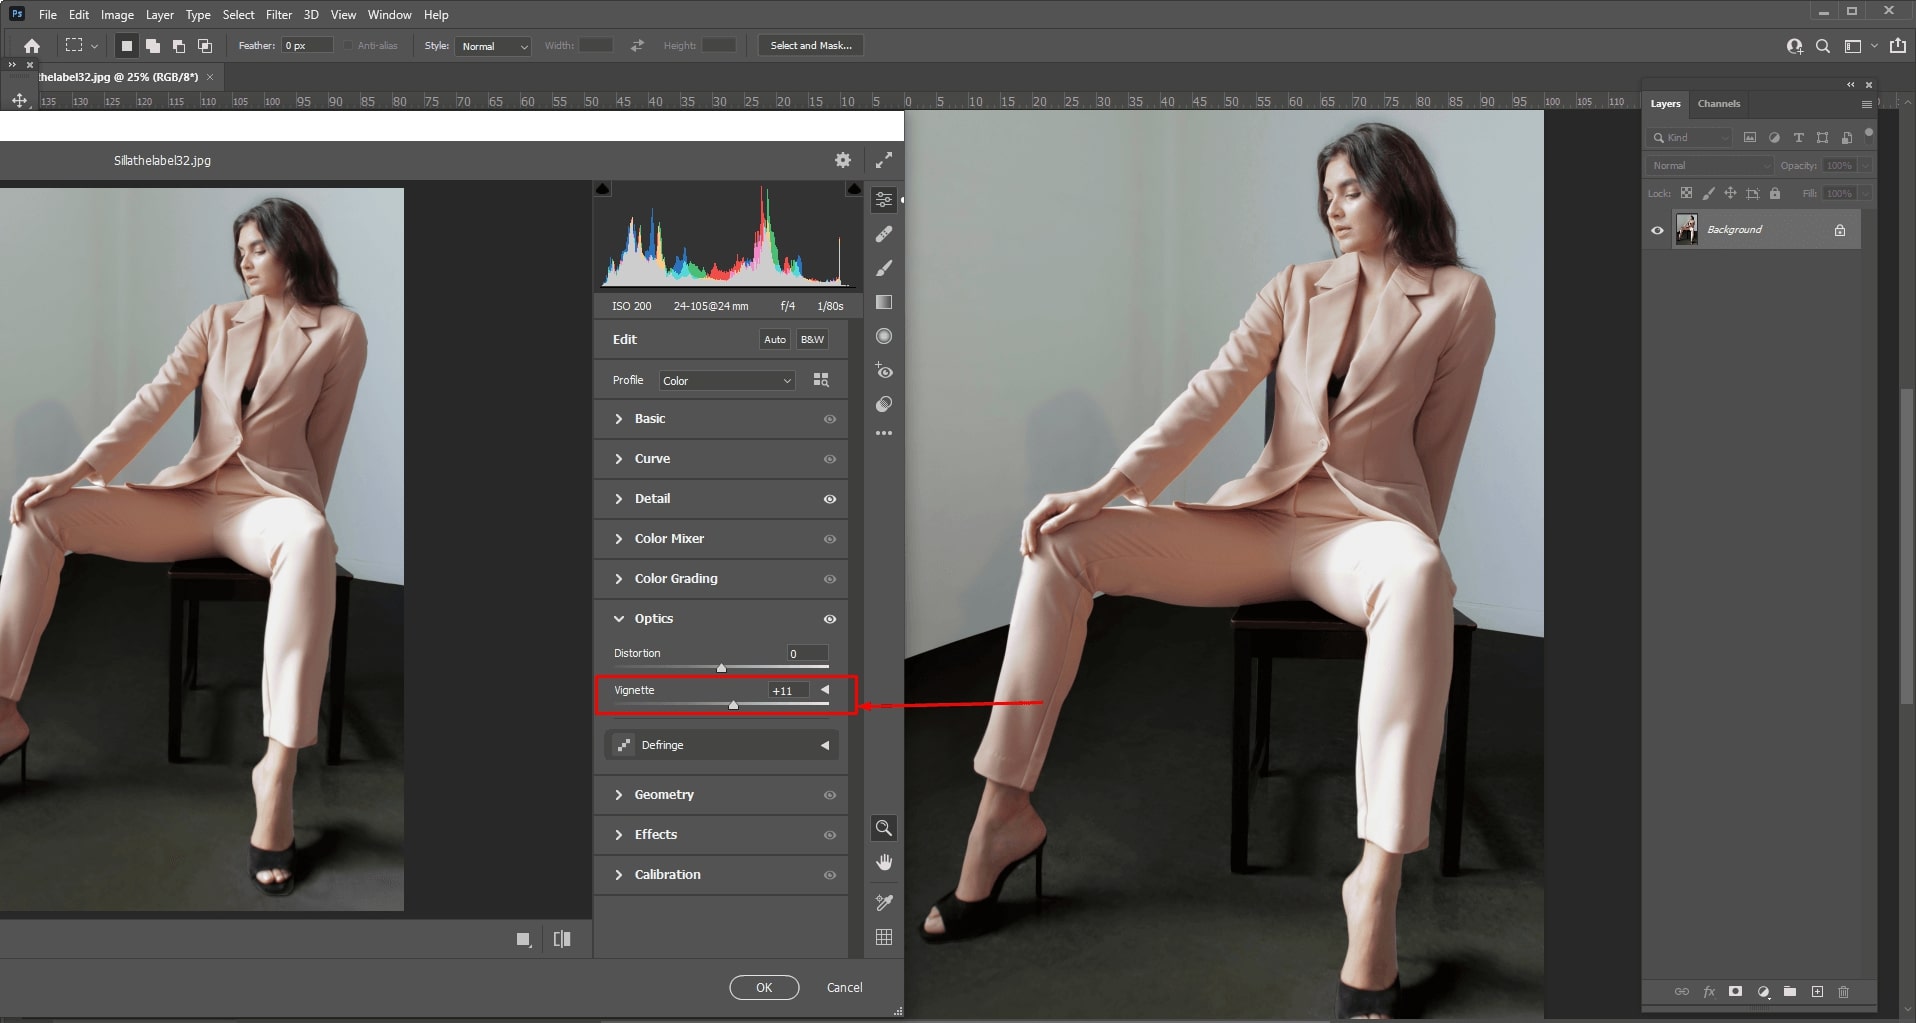
A vignette effect is a dramatic darkening of a photograph’s corners in comparison to its center. In portrait or product photography, photographers frequently employ it as a stylistic effect to attract the viewer’s attention straight to the subject.
Certain filters may be used to generate vignettes, or photographers can utilize post-processing software like Photoshop to do so.
Radial Filter Tool
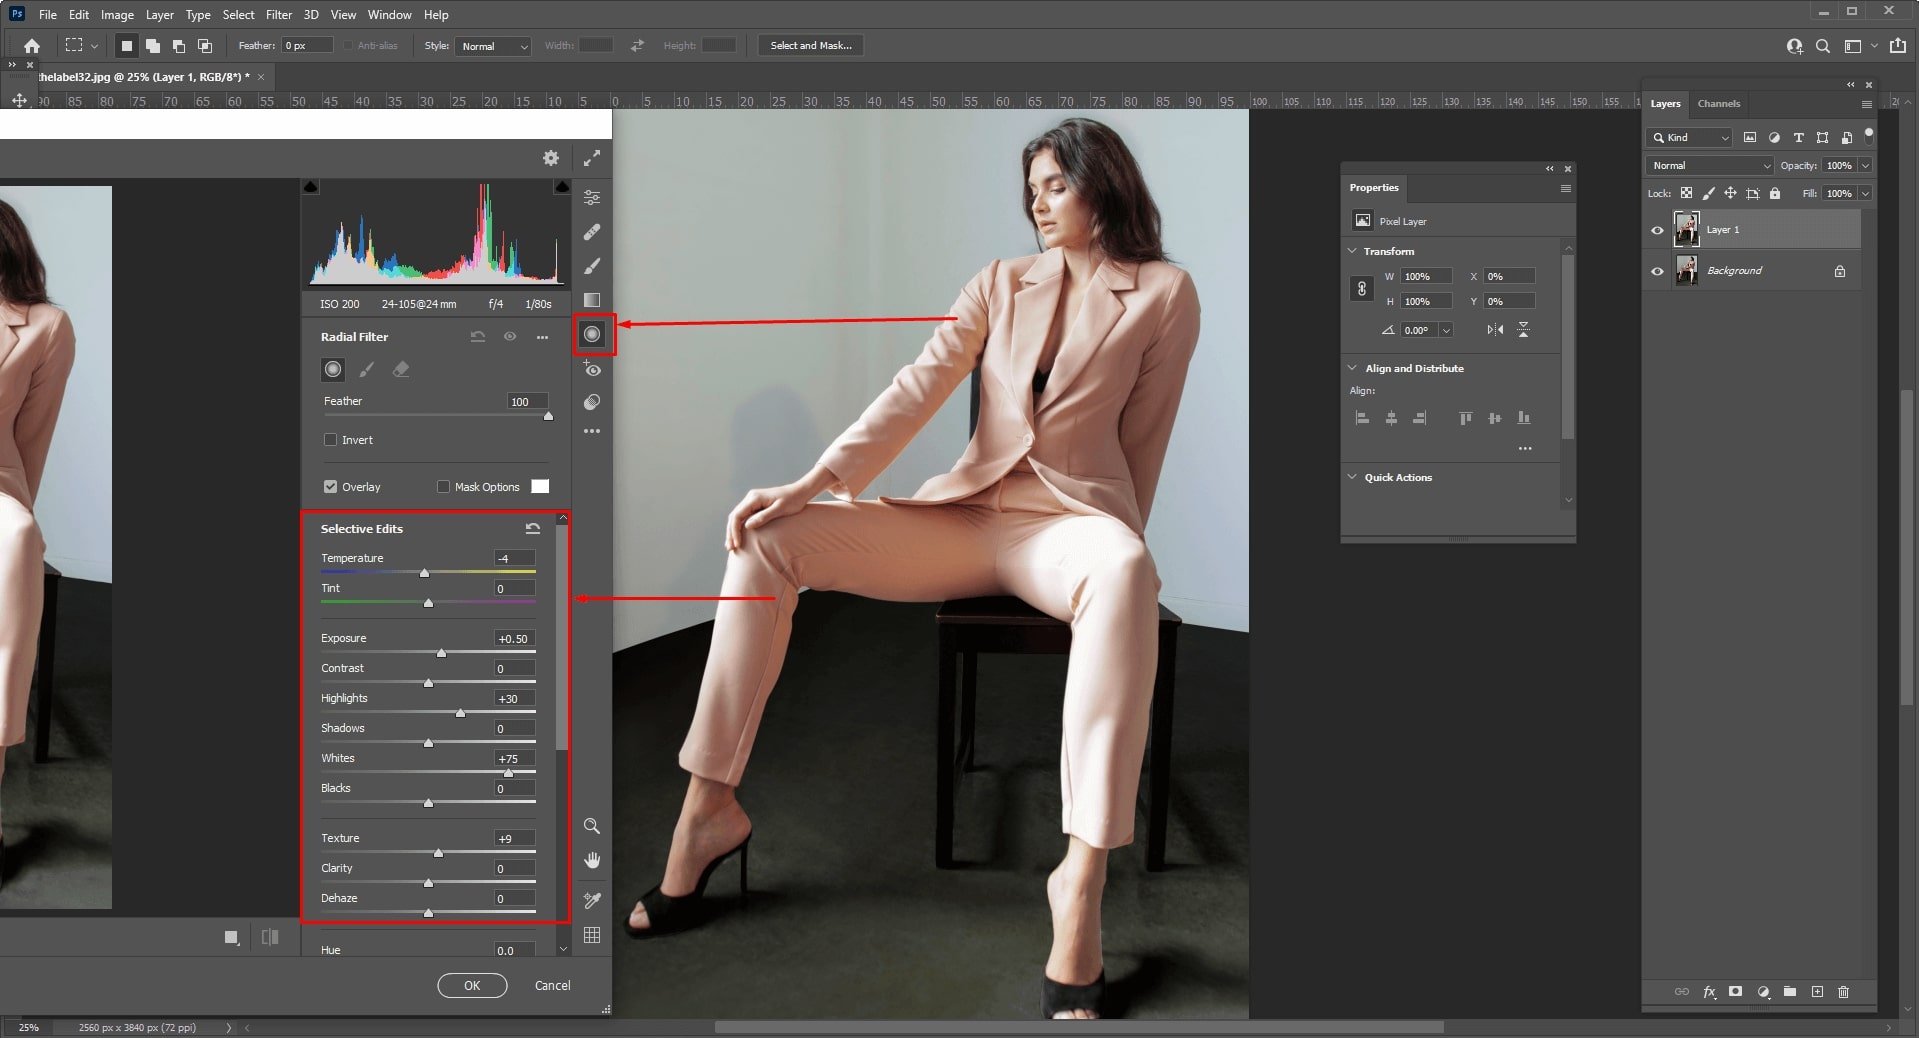
To emphasize certain sections of an image, you can use the Radial Filter tool to produce several off-center and/or vignetted regions.
It allows you to create an elliptical region around the subject and lower the exposure, saturation, and sharpness of the areas outside the specified mask.
Graduated Filter Tool
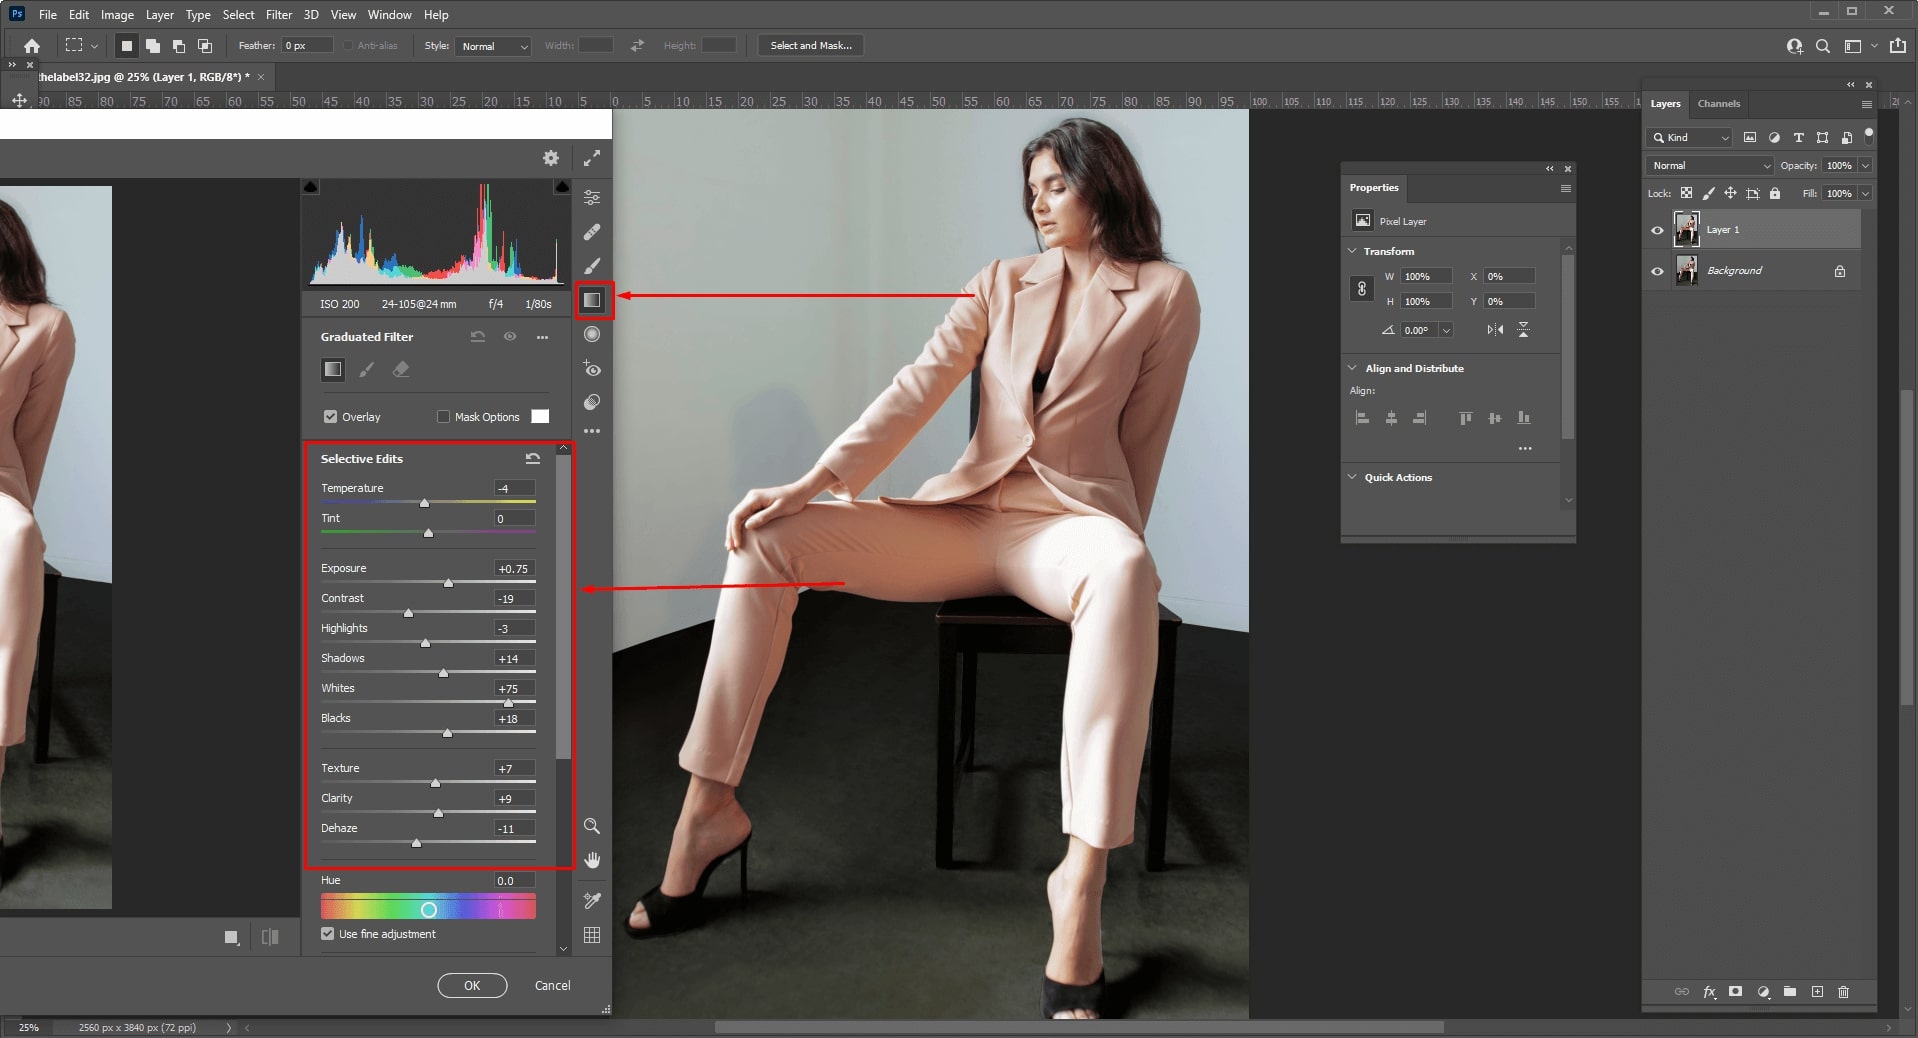
The Graduated Filter is a useful tool for making local tweaks to your images. Graduated filters are not the same as global modifications like the Exposure or Contrast settings, which affect the whole shot equally.
Instead, you may use the Graduated Filter to carefully apply these adjustments using a gradient that smoothly flows between the corrected and uncorrected areas.
This allows you to apply changes to a single region of a photograph without leaving a visible line separating the corrected and uncorrected portions. For darkening the sky or lightening foregrounds, this effect is great.
HSL
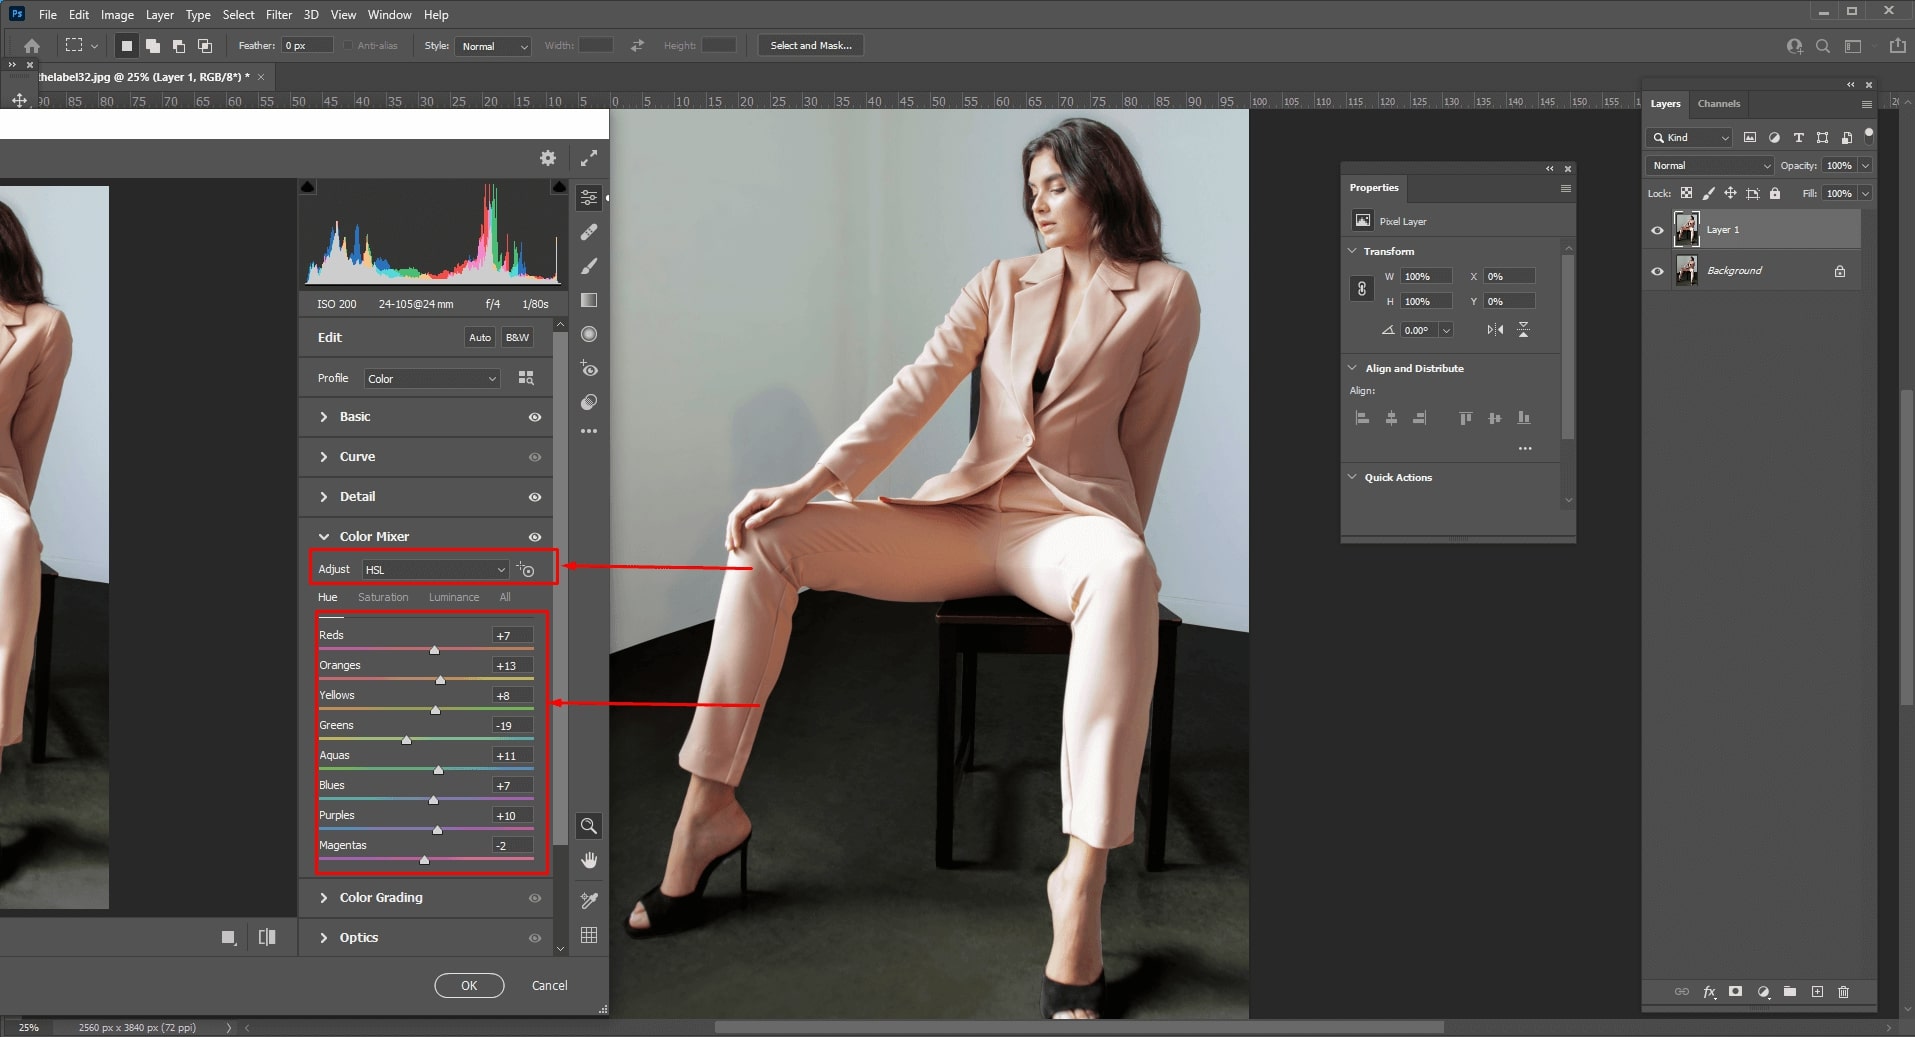
HSL is an acronym for Hue, Saturation, and Luminance. Color is always made up of these three values.
Every color you can think of has a hue value, a saturation value, and a luminance value. Photo editing software includes panels for individually modifying these values, allowing you to generate or adjust any color in the most accurate way possible. This gives the editor complete creative control over the colors in an image.
Why do Photographers need to edit their photos?
Editing is a vital step in the workflow of any photographer.
A poorly edited image can ruin an otherwise well-put-together composition, while an expertly polished photo will enhance the presentation of any photo. Photographers are prone to errors during the digital image capture process, which is why editing is necessary.
If you want your images to really stand out from the rest, editing is a must. Professional photo editing produces quality results and helps you show your style as a photographer.
Even basic photos can be edited by programs to make them appear better than they were originally taken.
With the perfected photo, you may alter its color, brightness or even remove certain objects from your frame. The idea is to improve the photo to make it more visually pleasing and appealing.
Essential Photo Editing Techniques Every Photographer Uses
Below are the most essential and must-use photo editing techniques that every photographer uses.
Crop and Clean Up Your Images
Cropping is a fairly simple process, but it can be very powerful. By just trimming down the size of an image and removing excess objects, you can drastically change the look of your image.
The last steps of cleaning up an image are great for removing small dust particles from the edges of your images, as well as erasing smudges and cleaning up lines.
Adjust Exposure and Contrast
In photo editing, an image is often first adjusted for exposure. This allows to capture the light-dark balance of an image in order for the photo to have vivid coloring.
After the exposure has been captured well, contrast can be added to provide more depth in a picture. The two work hand-in-hand in order to develop a photo into something remarkable and memorable.
Adjust Color Vibrancy and Saturation
Increasing the saturation while decreasing vibrancy is a great way to punch up colors that are too muted, as well as a way to introduce bold accents into an otherwise desaturated image.
It’s also a great way to bring some life back into faded photographs. Color can be used to create interesting compositions, and it’s important to use the right colors to carry the story you want to tell.
Adjust Sharpness
It is often necessary to adjust the sharpness of your image in order to attain the best quality possible. Proper sharpening techniques can add a lot of value to a design, but not if they are done incorrectly.
The way that you sharpen your image will greatly depend on individual images and what they contain. For example, some photos such as macro shots or geometric shapes may require different sharpening methods than more portrait-oriented images.
To give a photo that final touch it needs without blowing up its file size, adjusting the sharpness can help.
Best Photo Editing Software for Photographers or Photo Editors

Below is a comprehensive list of all the best photo editing software in the world right now!
Adobe Lightroom
Adobe Photoshop Lightroom is a powerful application to help you quickly and easily bring out the best in your photographs. It lets you import, view, organize, edit and share your photos from wherever you are.
Using the cloud-enabled syncing feature, you can give instructions to Lightroom for it to work its magic on your images on any of your devices – all without leaving what you are doing!
Lightroom is the complete photo solution for today’s professional photographer. All the photo tools you need to fulfill your creative vision, all in one place; editing, perfecting, and organizing.
Adobe Photoshop
Photoshop is the industry standard for creative tools. The new Photoshop makes it even easier to design, edit and deliver excellent work – whether you work on a desktop or mobile.
You can use it to get unrivaled capabilities across design, photography and editing while harnessing the power of Adobe Stock.
Adobe Photoshop empowers the people who use it to unleash their creativity. You can choose from a rich array of pixel-perfect presets. It can be used to make small details pop with simple but powerful color correction tools.
Get better results faster thanks to intelligent layering and masking and other time-saving features built into each tool. These are the things that make it easy for designers, photographers, photo editors, and everyone else who uses Photoshop to work faster, smarter, and create better work across all devices.
Photoshop is a powerful, versatile and professional photo-editing software. It’s used by artists and professionals to create digital art, beauty work, editorial images, 3D objects, collages, posters – anything you can use a computer to make.
Skylum Luminar
Luminar by Skylum is a photo editor that allows you to enhance, transform and create your best images. Luminar’s innovative approach to photo editing means no software subscriptions, no subscription fees and no need for a large amount of storage space on your computer.
A simple setup process means you will be editing like a pro in no time. Luminar was made by photographers for photographers, so it is packed full of clever tools, magic effects and a fully automated, dual-engine processing engine that corrects exposures with ease and blends them almost flawlessly.
Luminar has also put all the power of manual adjustments at your fingertips, giving you complete control to add your signature style. Plus, all your edits are non-destructive, so you can tweak them any time or even change them entirely!
With over 30 unique tools, 3 magical AI filters, 1,800+ presets, and 4K video editing capability, Luminar is like nothing you’ve ever seen or used before. Luminar combines the best features of advanced photo editing software with the simplicity of professional photography tools to make everyday image editing a breeze.
GIMP
GIMP is an acronym for GNU Image Manipulation Program. It is a free software for opening, editing, and creating image files. It can be used to edit photos, produce graphics and artwork, and even do desktop publishing work.
It works on a variety of operating systems such as Linux, Mac OS X, and Microsoft Windows.
This software also permits users to correct photo brightness or color-balance problems, add text or draw shapes within or on top of an existing picture, remove unwanted elements from photographs, create images to prepare for photo manipulation or to be used in design templates, and much more!
This is a powerful and fun application. If you are familiar with Adobe Photoshop, GIMP works in much the same way – with zero cost!
Affinity Photo
You need professional tools to give your photography and design work the polish it deserves. You need tools that understand and respect your creativity. Software that makes you excited about digital imaging, not frustrated with complex interfaces and expensive upgrades.
Affinity Photo is that essential photo editing application. It is for designers who demand complete creative freedom. As one reviewer so aptly put it: “Affinity Photo is the Adobe Photoshop we’ve always wanted, but never had.”
It is the fastest and most responsive image editor of its kind. It’s just as suitable for professional photographers as it is for illustrators and fine artists.
With precision tools, realistic brushes, and stunning filters built into a simple and intuitive interface, you can focus on creating amazing photos, artwork and designs – without focusing on mastering the software.
With daily free updates adding new features, Affinity Photo offers an even better photo editing experience every day.
Corel PaintShop Pro
Capture beautiful moments and make photos sing with PaintShop Pro. PaintShop Pro 2022 is the most powerful photo editor suite made for everyday users.
This is the smartest way to make sure all your digital photos look absolutely stunning, whether you’re a photography expert or just dabbling with digital art. Plus, the Automatic Photo Correction technology makes editing shots a breeze!
The Zen Brush lets you draw beautiful strokes of paint like a professional artist. Add dramatic lighting effects to your photos or add depth and detail to almost any kind of design project.
No matter what kind of project you’re working on, the SmartShapes toolbox has everything you need to create eye-popping shapes and graphics. These tools are fast-brushes that let you paint by clicking or dragging to help you create original designs fast.
PaintShop Pro 2022 is the ultimate photo editing software. Combining powerful AI, an easy-to-use customizable toolset, and Corel’s legendary ease of use, PaintShop Pro is everything you need to perfect photos quickly with amazing results.
Capture One
Capture One is a photo editing software that lets you create the world as you see it. With one click, Capture One makes your photos look more detailed and beautiful with industry-leading color processing, an exceptionally powerful toolkit, and stunning creative effects. Capture One brings photographers closer to their artistic vision for every image.
From RAW conversion to editing, color processing to asset management, Capture One delivers a workflow that is tailored to the professional photographer’s needs.
The new version (Capture One 22) features updated tools and technologies, including performance management and support for an extended range of cameras and lenses.
Capture One has been used by the world’s best commercial photographers, photo retouchers and digital imaging enthusiasts since it was first introduced in 2001. It is now standard in creative image studios around the world.
DxO PhotoLab
There are many photo editing tools, but none with the quality and ease of use of DxO PhotoLab. It’s an all-in-one software that’s easy enough for beginners and powerful enough for professionals.
In just a few clicks, your photos will look better than ever before. In its latest version, the DxO PhotoLab 5 is boosted by artificial intelligence to automatically adjust images.
Is your shot too dark? The software has a fix for that. Need to lighten shadows? No problem. Colors are dull? Don’t worry, it has got you covered there too. All this without even lifting a finger; just press and watch the magic happen right before your eyes!
For everyday photos, DxO PhotoLab 5 is ideal. It allows you to easily edit your photos with just a few clicks.
ON1 Photo RAW
ON1 Photo RAW 2022 is a new-generation photo editor with unlimited potential.
ARQ AI-powered real-time adjustment tool makes achieving perfect images easy and almost automatic. Browse your favorite effects, quickly apply edits to multiple selected photos, and harness the power of SkySwap AI and NoNoise AI to make every part of your image perfect.
Edit your best shots without restriction with unlimited double the resolution support, higher resolution export possibilities and lossless 16-bit editing. Additionally, you can work faster using quick actions on key parts of your photo for even more professional results.
This visual editor provides seamless access to over 800 professional and curated effects – all while providing free tutorials, intuitive controls, and industry-leading customer support.
ACDSee Photo Studio Ultimate
ACDSee Photo Studio Ultimate provides the professional workflow photographers need to organize their images, master their craft, and share their vision with the world.
This software offers individual photographers, as well as commercial and editorial photographers, the most features-per-dollar.
Preview your RAW files in detail prior to editing, and quickly perform actions including cropping, color adjustments, curves, and more. Effortlessly manage your image collection, both online and off, with support for all the major file formats, including RAW formats.
Digital Asset Management, e-mailing, FTP, USB/CD Burning, and Printing can be directly from the software. Organize photographs at work or home with intuitive folder modeling. ACDSee also offers a simple wizard interface so you can spend more time editing images and less time setting up folders.
You can automatically back up your images as often as every few minutes and share images easily on the web via web albums or simply by emailing.
ACDsee provides an intelligent, seamless environment for imaging professionals that optimizes every facet of their workflow to help them perform faster and more efficiently.
How do I learn Photo Editing?

Editing is vital for those who are pursuing photography as a career. And if you specifically plan to be a professional photo editor, you must learn it to the best of your ability.
How to learn photo editing offline?
California Institute of the Arts, Parsons School of Design, Yale University School of Art, Tokyo Zokei University, Royal College of Art, Rochester Institute of Technology are all great establishments around the world to learn professional photo editing.
Through these institutions, it is possible to receive a diploma, bachelor’s degree, or master’s degree in photo editing. There is no need to have any previous experience because in most courses, you will have important mentors who will also train you.
How to learn photo editing online?
There are two ways you can learn photo editing online:
- You can learn from online for free.
- You can learn to buy an online photo editing premium course.
How to learn photo editing online for free?
Youtube Tutorials are the best free resource for learning almost anything, including photo editing. There are thousands of tutorial videos in varying editing levels and categories. This includes beginner, intermediate, and advanced level edits. You just cannot get any larger of a comprehensive library for learning photo editing online for free.
Adobe Photoshop Tutorials provide great free lessons for photoshop-based editors. They also have paid lessons if you want them.
GIMP Tutorials also provide similar lessons for GIMP-based editors. All of these lessons are free and come in both written and video tutorial formats.
How to learn premium photo editing online?
While this will help with basic photo editing skills, you can find more in-depth resources at SkillShare, Udemy, and LinkedIn Learning. These platforms provide courses with paid subscriptions and certificates. Taught by industry professionals, these websites will ensure that once you finish the lessons, you are ready to edit perfectly.
SkillShare does provide free courses as well as paid courses. They have a unique approach to making the courses feel more like an in-classroom experience. You can learn through interacting with the tutor.
Udemy also provides free courses as well as paid courses. They have courses of varying levels and price tags, so if you can’t anything suitable for you elsewhere, you can definitely find it here.
LinkedIn Learning, previously Lynda.com, is quite fresh in the tutorial market. You can certainly expect great lessons here since LinkedIn is a platform dedicated to the corporate industry. Alongside individual lessons, you can find team-based lessons as well.
What does a Photo Editor do?
A photo editor, or image editor, is primarily focused on the aesthetic value of images. The more complex a task becomes, the harder it becomes to define a photo editor’s role.
This person’s responsibilities range from simple low-level tasks like resizing and cropping images to tasks that require considerable skill and knowledge, such as color correcting or retouching images.
Photo editors are invaluable members of a team. They take photos that are merely okay and make them stunning, unforgettable photos. They can turn boring or ugly into something that is fun and beautiful.
It doesn’t matter if you’re working for a newspaper, magazine, or website. A great photo editor will make your job easier, make your followers/consumers come back for more, and make your published photos more successful.
Is it a wise decision to hire a Photo Editor?
The short answer is yes; it can be a wise decision for a company to hire a photo editor. The long answer is that it depends on your company and what you are trying to achieve with your photos.
If you’re looking for a photo that boosts your marketing campaign, you should hire one. A well-placed photo can be enough to bring more sales and success to your business, but a bad one can make things worse. This is why many companies try to hire professional photo editors so they can get quality pictures for their business.
Though you could employ someone on a freelance basis, this isn’t always the most effective way to get your work done. A company that offers its services on an ongoing basis will be much more efficient and allow you to focus your attention elsewhere.

How do I hire a Photo Editor?
There are several methods to locate affordable photo editing services on the internet. You can try to use the software we discussed in this post. But in order to utilize these programs, you’ll need to edit the photographs yourself, which will take some time if you’re a novice editor.
On sites like Fiverr and Upwork, you may hire freelance image editors. However, freelancers will never be able to finish a huge batch of images rapidly.
Hence, professional picture editing services that edit thousands of photographs on a daily basis are the best choice. Such photo editing businesses will do vast volumes of photo editing work with pinpoint accuracy.
Is it as simple as visiting or googling photo editing agency websites and placing a trial order (if they offer it). If you like the results, start working with them! Good photo editing agencies will ensure proper communication with you throughout the entire process.
FAQs – Things people usually want to know about Photo Editing
What is the importance of Photo Editing?
Photo editing is to an image what writing is to a book. It’s a way to communicate your message and tell your story.
Whether you choose to tell the story through 100 pre-designed filters or customize each detail down to the curve of an eye, photo editing will allow you to take full control of the image and present your images the way you want them presented – stylish and professional.
What is done in Photo Editing?
In photo editing, basic changes like Exposure and Contrasts adjustments are made as well as specialized edits like clipping paths and background removal.
Which image editing software is best?
Adobe Lightroom, Adobe Photoshop, DxO Photolab 5, or just about any software that we mentioned above in the list would be best for any photo editing purpose.
What is the relationship between a Photographer and a Photo Editor?
This relationship is key in getting the best photo and the best end product possible. Photo editors and photographers have to work closely together. There are a lot of things a photo editor must understand about each job. They have to know what the photographer wants and how to deliver it.
That doesn’t mean that photo editors have no value to a photographer. A good photo editor will have experience and training, as well as a creative eye that can spot potential in images that the photographer may not have initially perceived.
They will likely be able to recognize what is happening in each photo, the position of subjects and how they are interacting, and whether or not the colors reflect the subject matter.
A photo editor has a role in assisting photographers to produce their best work and bringing out the strongest points within each image. Having said that, the photographer and the photo editor can also be the same person!
Final Words
Photo editing techniques can be used in many ways, whether you choose to employ them for creative, cosmetic, or professional purposes.
Regardless of your method and motivation for using photo editing software and services, it’s useful to know what’s out there and what each type of photo editing technology is.
We hope that this article has been helpful to anyone looking for tips and information on what is photo editing!