Lighting is one crucial component of photography setup.
Light variations make the difference between an image looking great or looking bad.
This happens because of the structural placements of light, the popping out of shadows, highlight, contrast, and how much depth those have put onto the frame.
There are 2 types of light sources: natural and artificial.
In this article, I will talk about their benefits, setup procedures, and don’t.
Without further delay, let’s get started.
What you’ll learn in this article
- 1 What is Natural Light in Product Photography?
- 2 The Benefits of Natural Light in Product Photography
- 3 How to Use Natural Light for Product Photography?
- 4 What is Artificial Light in Product Photography?
- 5 The Benefits of Artificial Light in Product Photography
- 6 How to Use Artificial Light for Product Photography?
- 7 Common Product Photography Lighting Mistakes and How to Avoid Them
- 7.1 Mistake 1: Using only Flashlights for Indoor Shooting
- 7.2 Mistake 2: Harsh Light from Behind
- 7.3 Mistake 3: Harsh Natural Lighting for Close Shots
- 7.4 Mistake 4: Relying on only Sunlight for Outdoor Shooting
- 7.5 Mistake 5: Not Understanding Natural Lighting Variations
- 7.6 Mistake 6: Overlook Aperture Adjusting
- 7.7 Mistake 7: Not Considering the Position of the Sun During Shooting
- 8 Natural vs. Artificial Light: What to Consider
- 9 Conclusion
What is Natural Light in Product Photography?
Sunlight and moonlight are natural sources of light, whereas sunlight is the greatest source on Earth. Both natural light sources offer different levels of lighting to make the product look natural. They are free of cost, easy to use, and accessible from anywhere, with only the limitation of time.
The Benefits of Natural Light in Product Photography
Proper lighting is one necessary step for any photography, including product photography. Natural lighting offers plenty of advantages. Such as:
- It is a great assistance for outdoor product photoshoots, especially for landscape and wildlife photography, car photography, model photography, or furniture photography. If you need help finding photo locations for shotting products, contact liverpool photography studios.
- Using natural light doesn’t require any cost or transportation. The resource is simply infinite and you can access it every day, every season, and every location.
- It produces lights of different intensity and temperatures: warm, hot, harsh, etc. So, you can create a realistic effect which isn’t achievable with artificial ones.
- It offers diversity and dynamism in images. You can capture the playfulness of color combination, tone, effect, and shadows. Natural lighting can also create mystery.
How to Use Natural Light for Product Photography?
Using natural lighting is a bit tricky. Why?
The timing of the sun is unpredictable. Shooting under harsh light will create glare in the photos. Shooting low light will darken the photos.
So, what can you do? Take advantage of ‘Golden Hour’ or ‘Magical Hour’.
It is the time when the sun is close to the horizon, during the sunrise and sunset.
That’s when the sunlight is soft and gentle and offers a cinematic vibe to the subject of the photography. You can also shoot in the morning until the sun has harsh rays.
Here is how you can set up for using natural light:
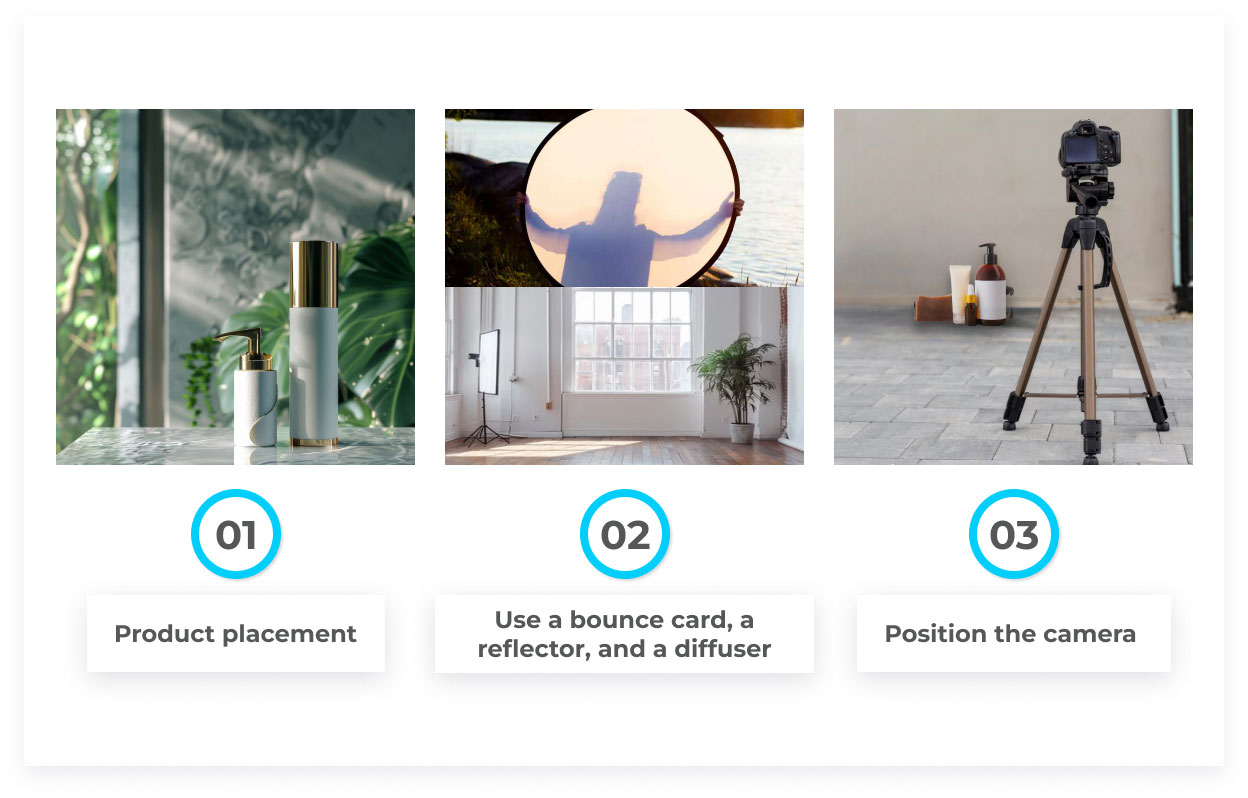
Step 1: Product Placement
Let’s say, your product is something shotable on a flat-lay photography setup or a room setup. Place it near the window or a door where the natural light enters.
Step 2: Use a Bounce Card, a Reflector, and a Diffuser
The purpose of these is to balance the light evenly. As you get the sunlight from one side. Naturally, the other sides will feel a bit darkened and such uneven images won’t look good.
Step 3: Position the Camera
If the product is in a standing position, place your camera on top of a tripod at an appropriate position, neither upward, nor downward. Some ideas include
- Place the camera at eye level.
- Place it in a somewhat mid position; for example, if this is a shirt, the camera should be positioned on the belly level.
If the product is on flat-lay, the camera should be on top of the product at a distance, following the same position.
Apart from the e-commerce guideline, you can use props inside the frame.
Now your setup is ready to photoshoot.
Do & Don’ts of Natural Lighting in Product Photoshoots
| Do’s | Don’ts |
| When shooting natural lighting, take ample time to understand the perspective of lighting conditions. | Avoid shooting during harsh light when the sun is directly overhead. |
| Check the weather forecast before setting up your setup under sunlight. | Don’t ignore if there is any light sparking directly behind the subject. |
| Take advantage of ‘Magic Hour.’ | |
| Experiment with angle and camera settings. | |
| Don’t forget to edit your product photos. A product is going to get exposed to commercial platforms. So, do a makeup of it. |
What is Artificial Light in Product Photography?
Artificial lighting is the secondary light source that comes from man-made objects like lamps, candles, torches, flashes, studio lights, etc. Other than the natural lighting, every light is artificial.
The Benefits of Artificial Light in Product Photography
When it comes to benefits, artificial lighting is like a full bag. There is quite a lot to mention. The only downside is the cost. Depending on quality, support, and purposes, this type of light pricing can be higher than the budget.
Even so, considering the limitations and lack of controllability of natural lighting, artificial lights are most suited for commercial photoshoots. Here are the benefits of artificial lights:
- These lights are available in both online and offline markets. Also, as they are artificial, you can carry them anywhere, set them up anytime, and make your photoshoot process go on.
- Artificial lights have different functions that allow users to control how much lighting they want, based on the requirement you can increase or decrease the lighting intensity.
- Using these lights aids working in dark spaces, low-light situations, or nighttime. Once you have arranged your setup, you don’t have to worry about lights anymore; you can work uninterrupted.
- These lights save energy, last longer, are hassle-less, and are safe to use. Besides, there are numerous variations, so you will always find something that suits your needs.
How to Use Artificial Light for Product Photography?
Using artificial lights for commercial photoshoots is easier than mastering it under the sunlight. Still, the setup depends on the type of product you are shooting, its background, types of shots, product size, etc.
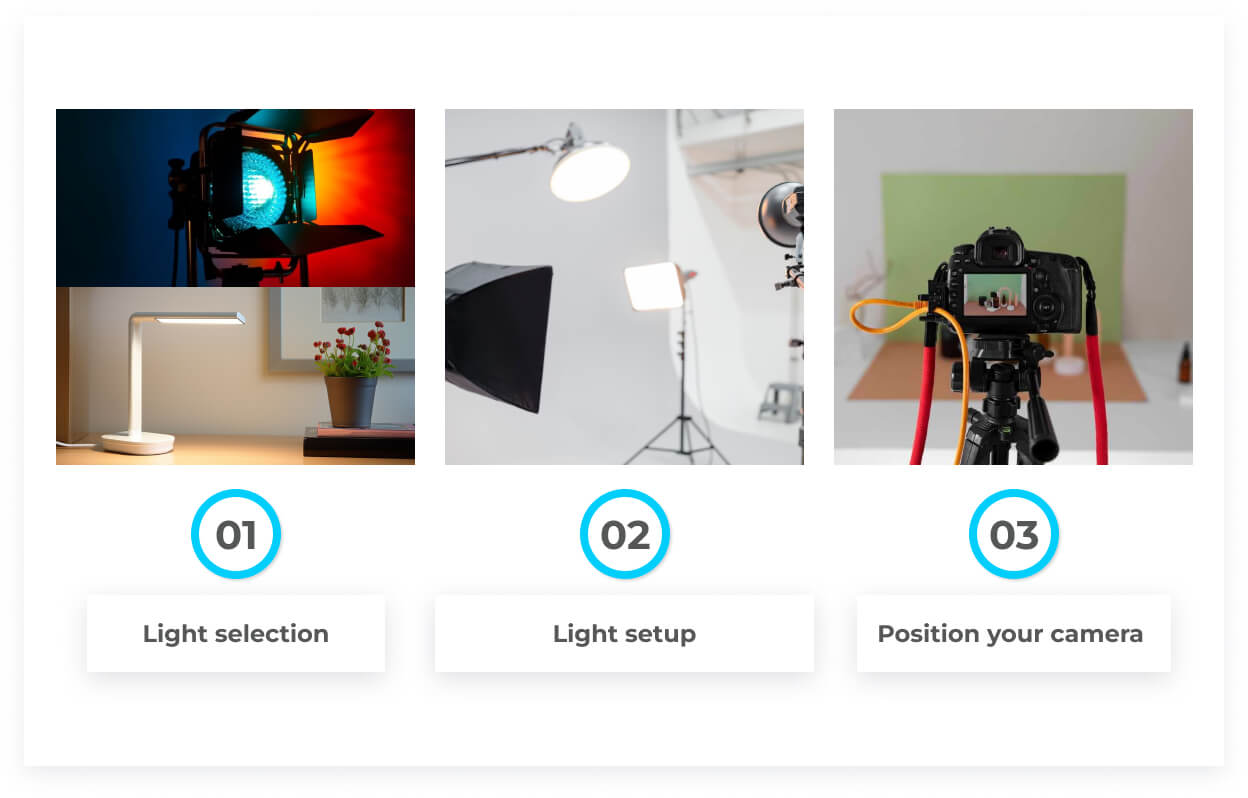
Step 1: Light Selection
First, you need to decide which types of lighting you need. There are quite a few options to choose from, such as:
- Strobes
- Rim light
- Speedlight
- LED light
- Softbox
- Lamps etc.
Step 2: Light Setup
Decide the type of setup that will align well with the product. Some common product photography lighting setups are:
- Single-light setup: If your product is something simple, a one-light setup will do the job by creating a dramatic look.
- Two-light setup: With a key light and a fill light, you can create soft light and more rays. You can use it for food photography.
- Three-point lighting setup: This is a great foundation for lighting setup. All you need is to position one key light, one fill light, and one backlight.
- High-key lighting setup: This setup requires multiple lights from multiple directions to create a bright, fresh, and clean look on products.
- Low-key lighting setup: It is a minimalist lighting setup to create a dark atmosphere. On top of a black background, you can achieve mindblowing photos if you make this setup for jewelry product photos.
- Lightbox photography: It is used for small objects like jewelry photography or toy photography. By placing the item inside the box, you can take a shot of it.
Step 3: Position your Camera
Place your camera maintaining a certain distance. For details check the ‘Position Your Camera’ in the natural lighting section.
Do & Don’ts of Artificial Lighting in Product Photoshoots
| Do’s | Don’ts |
| Use as many light sources systematically as possible. | Avoid using bright lights. |
| Ensure consistency and even lighting throughout the product. | Don’t allow light-entering doors or windows behind the subject. |
| Use sunlight as the primary source and add artificial ones to balance it. | Don’t place the key light directly in front of the subject, but rather in a somewhat angular position. |
| Use modifiers, bounce cards, and reflectors to make the illumination even, and soft. | Don’t point the lights in any direction other than the subject. |
Common Product Photography Lighting Mistakes and How to Avoid Them
Here is a word from the wise: don’t consider mistakes to be fault. This is a part of your learning curve to help you master the rest of the process. You will make mistakes, and that’s okay. As long as you know how to make up for that, that’s what matters.
Having said that, here are some of the common artificial vs natural light mistakes and their solution.
Mistake 1: Using only Flashlights for Indoor Shooting
Indoor shooting requires some light arrangement to make it as vivid as it should be outside in daylight. Using a flash overpowers the indoor natural lighting condition, bringing harsh shadows and unnatural and uneven lighting.
Solution
- Use other lights and bounce cards, diffuser to tone down, compensate the light properly, and make the lighting well-lit evenly.
- Cross-check the lighting position over again. It may look okay in bare eyes. But is it in the camera lens?
Mistake 2: Harsh Light from Behind
During product photography with models, using bright light behind makes the model silhouetted, and it also shadows other details of the model.
Solution
Use side lights to complement the whole scenario. The backlight should be as light as the front if you want to separate the subject from its background. Try to soften the lighting from every angle.
Mistake 3: Harsh Natural Lighting for Close Shots
Whether it is a portrait or macro shot, if you are to shoot in natural light, veteran photographers forbade using direct sunlight.
Solution
Wait for the light to become somewhat dull, have a soft overcast, or when the clouds cover the sun. That’s a striking moment to capture close shots.
Mistake 4: Relying on only Sunlight for Outdoor Shooting
It’s not that all images come good under natural light. You need to understand the difference and technique to use sunlight.
Solution
- Move to find the right position and angle.
- Wait for different times of the day. The perfect scene may not look great on sunny days, but marvelous on rainy days.
Mistake 5: Not Understanding Natural Lighting Variations
It’s tricky and takes years to find the exact lighting match.
Solution
Learn exposure to control lighting. One suggestion is to observe lighting in classical painting.
Mistake 6: Overlook Aperture Adjusting
Pay close attention to the aperture settings. It varies from scene, subject, mood, and ambiance to setup.
Solution
For landscape or wide-scene photography during sunlight, lowering the aperture is quite common. But if the sun is behind the subject, then the aperture needs to be higher.
Mistake 7: Not Considering the Position of the Sun During Shooting
When the sun is low, you will have a dramatic and warming glow. Direct sunlight creates silhouettes, glares, and reflections on the images.
Solution
Many photographers follow a guess theory for this: the difference between the sun and the horizon determines the quality of light. The closer, the better, and vice-versa.
Natural vs. Artificial Light: What to Consider
There is a lot to consider when comparing natural light sources to artificial light sources. Issues, flaws, or mistakes will naturally occur in photography. It can be from the camera angle, setup, product, or light. You can’t always hit the bull’s eye during a photoshoot.
Learning to understand and differentiate natural light and artificial light and put them to use is all about error and trial. During the learning process, what you can do is alter the address of the problems and consider the solutions.
Consider the following factors when you fall into any of the mentioned situations.
- Lights are creating harsh shadows: Use a fill light behind or in a diagonal position.
- You have gotten overexposure images: Use a diffuser or modifier. Or you can move the light further.
- Light rays have become uneven: Use as much light in the same direction, and take advantage of reflectors and light bulbs.
- Color casts are shown on the image: Adjust the white balance to match the light sources.
- Unwanted reflection is coming off: Experiment with angles and change light position.
- The setup looks dim and dull: Use a high CRI (Color Rendering Index) for truer color representation.
Conclusion
Light possesses the power of perception. The placement of light hides, shows, accentuates, or overshadows a product in the image. Getting hold of this technique takes time, patience, and experimentation. Every experiment helps you achieve a look you need to be made aware of.
So, let your curiosity and creativity merge while shooting. You will be astonished.