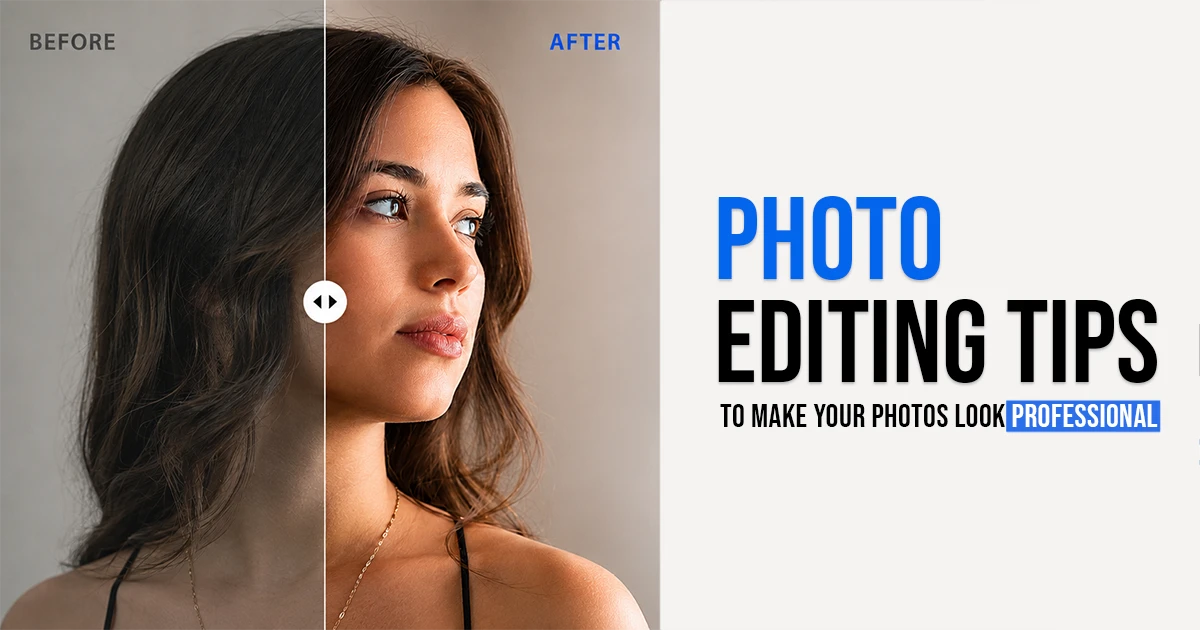
Your product photo is technically correct. The exposure is fine, and the focus is sharp. But it is not converting. Your competitor’s image is shot with the same type of product but looks premium, trustworthy, and instantly clickable. The difference is not the camera, and it never is. It is the edit.
This is the quiet pain point that photographers, brand managers, e-commerce teams, and content creators share across every industry. The shoot gets done. The editing is where things fall apart. Either because it is rushed, inconsistent, or simply not done with enough intention.
So, we curated 25 photo editing tips that are built around that reality. Not theory. Not tool overviews. Practical techniques are organized in the way a real editing workflow runs. This covers fundamentals through to color, retouching, advanced methods, and workflow strategy.
Why Editing Is the Real Differentiator
Most people underestimate how much editing affects perception. A well-edited image communicates professionalism and trust before a single word is read.
Consistent product imagery reduces returns and increases conversion, especially for an e-commerce brand. A balanced and bright property photo drives more inquiries for a real estate agent. The edit is what justifies your rate for a photographer.
At Offshore Clipping, we have processed images for brands, photographers, agencies, and businesses across dozens of industries. The gap we see most often is not in photography quality; it is in post-processing. Here are the tips below to close that gap.
Basic Photo Editing Tips for Beginners
1. Adjust Brightness and Contrast Carefully
Overcorrecting an image creates a different problem. Again, flat and dark images lose attention immediately. Blown-out highlights and unnatural contrast are unprofessional.
Work with highlights, shadows, whites, and blacks individually instead of reaching for the brightness slider. With this, you can get surgical control over specific tonal ranges.
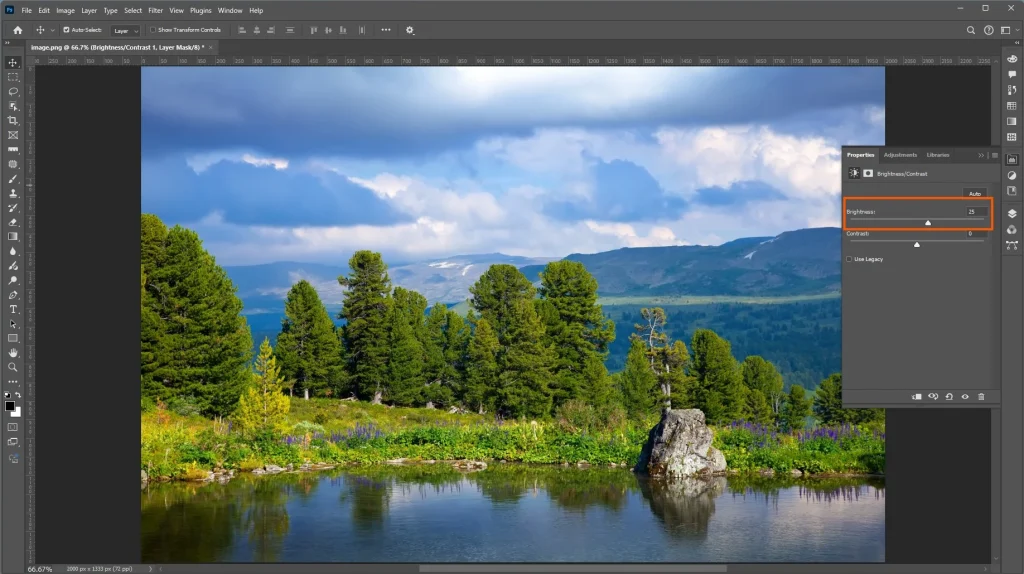
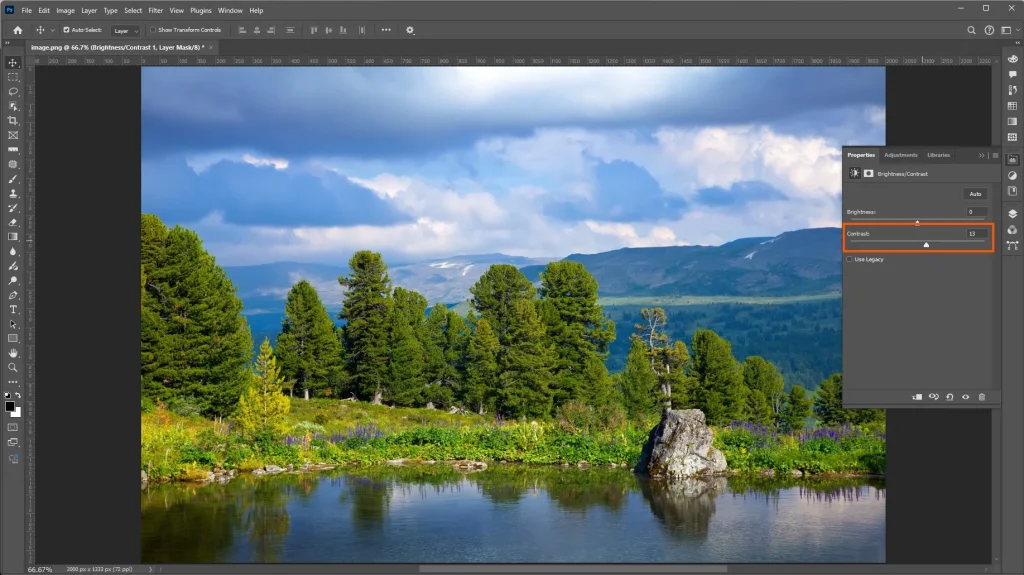
To show material detail, product photos need balanced brightness. Fashion brands benefit from slightly softer contrast for an editorial feel. Real estate interiors require lifted shadows to make rooms feel spacious.
2. Fix White Balance for Accurate Colors
How do you understand an image that has a white balance problem? It is revealed when it looks too orange or too blue. Color temperature controls how warm or cool your image reads. If it gets wrong, it would undermine every other adjustment you make.
White balance correction is critical for:
- Fashion brands where clothing colors must match the actual product
- Beauty and cosmetics businesses displaying accurate makeup shades
- E-commerce catalogs where inconsistent color temperature across products looks unprofessional
- Wedding photographers preserving natural, flattering skin tones throughout a gallery
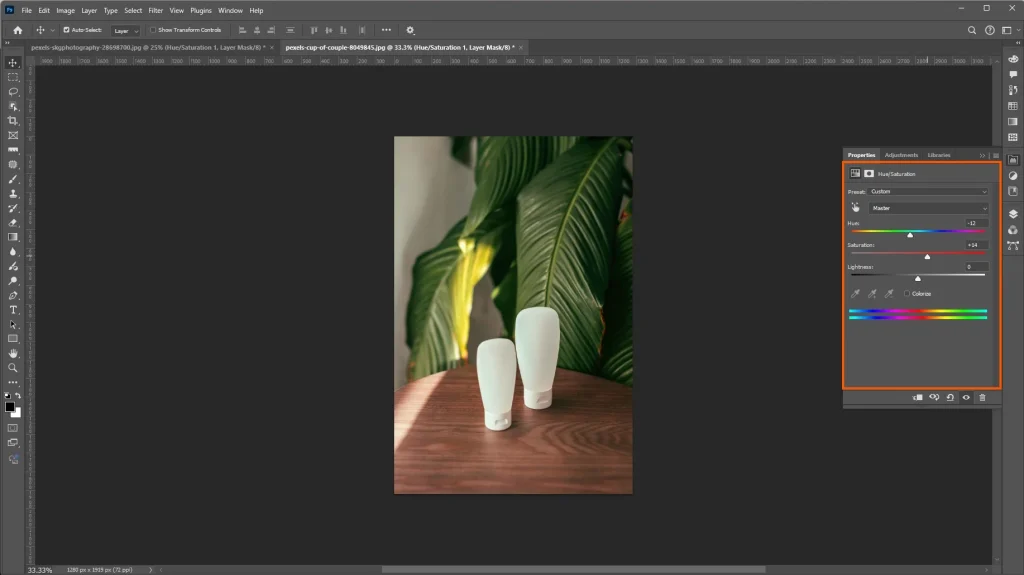
Automatic white balance in Lightroom or Photoshop is a useful starting point. Manual fine-tuning with the temperature and tint sliders almost always produces better results. This is one of the most overlooked professional photo editing tips in any workflow.
3. Crop for Better Composition
A strong crop removes dead space and redirects attention to the subject. This immediately improves how an image is accepted. The Rule of Thirds is the most practical guide. Place your subject along one of the four intersection points of a 3×3 grid rather than dead center.
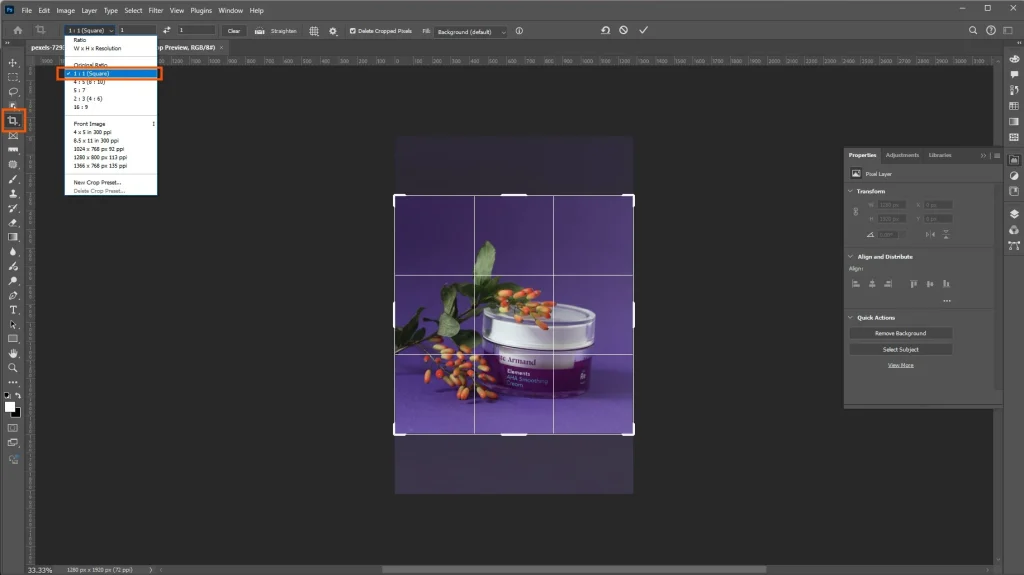
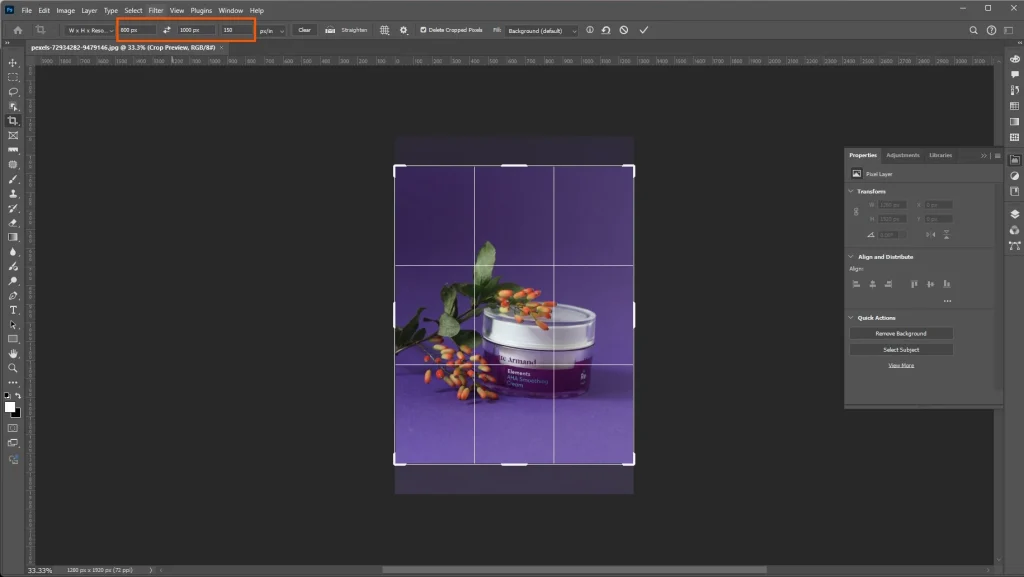
Cropping for platform specifications is a workflow step for marketing and advertising teams. It saves significant production time. A single hero image cropped upfront to 1:1 for Instagram, 16:9 for display ads, and 9:16 for Stories. This eliminates the rush of submitting campaign assets.
4. Straighten Images for a Cleaner Look
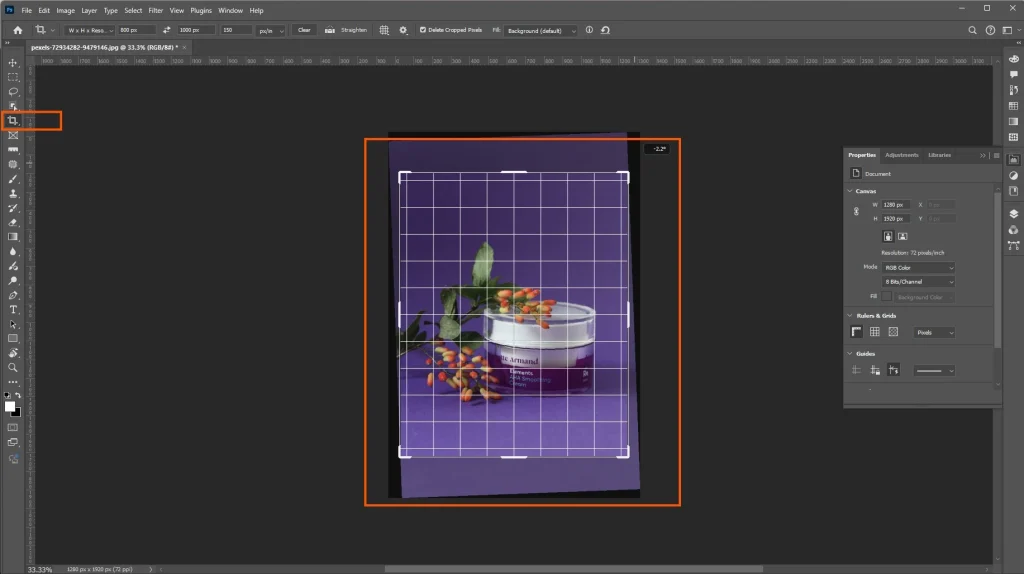
Horizontal and vertical lines carry visual weight in many photographs. Even a professional photo looks careless if the horizon line is slightly crooked. The viewer may not consciously notice the tilt, but they can feel it. This state matters the most in real estate photography, product or car photography, event coverage, and any architecture or interior work.
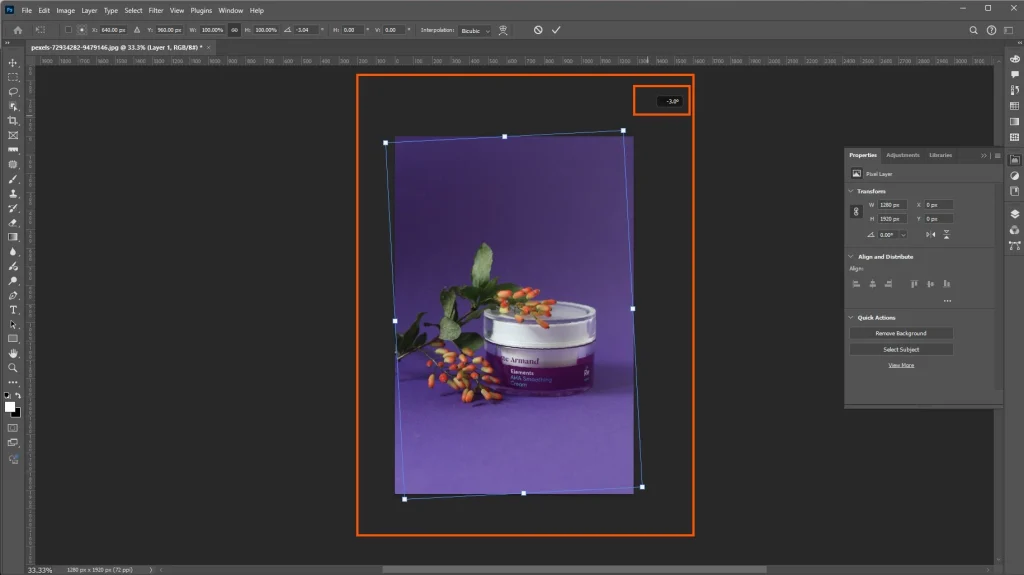
Most software includes an auto-straighten tool. Use the manual transform tool and check vertical alignment separately for real estate and architecture. Because auto-straighten corrects horizons but often misses the keystone in interior shots.
Retouching Tips for Perfect Photo Editing
5. Remove Blemishes Without Overediting
Sometimes small distractions divert attention from a strong image. That’s why you may need to use photo retouching techniques. Use the Spot Healing Brush tool for quick fixes on organic surfaces. Use the Healing Brush tool for more controlled repairs.
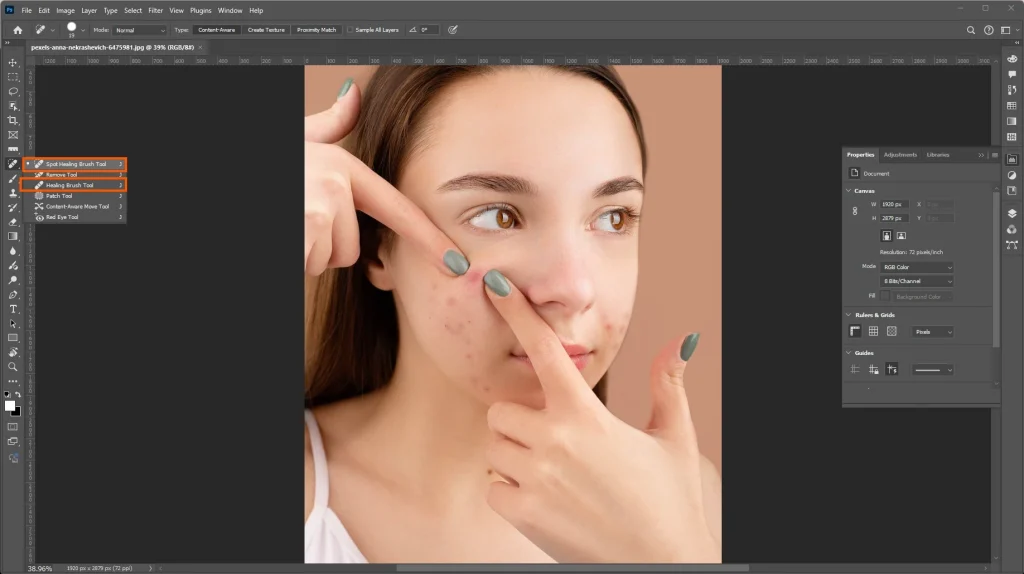
Use the Clone Stamp tool for structured surfaces where context-aware healing creates blurry artifacts.
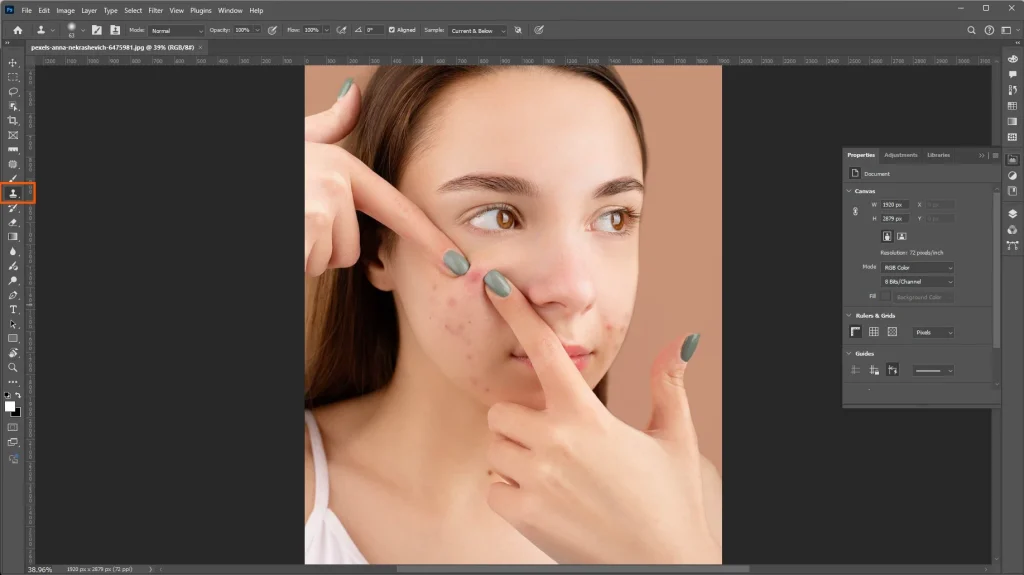
The key indicators: Remove temporary distractions and preserve permanent characteristics. A dust spot, a stray hair, or a sensor mark should go. A person’s freckles, a product’s natural surface texture, and a leather bag’s character belong in the image.
6. Smooth Skin Without Losing Texture
Over-smoothing is the biggest mistake in retouching for beginners. Plastic-looking skin is not recognized as beautiful. It reads as fake and undermines the credibility of the whole image.
For proper enhancement, reduce harsh texture irregularities. Lift unflattering shadows around blemishes and correct uneven color tones. Don’t remove texture. Healthy skin has pores and subtle variations. A good retouch makes the subject look like themselves on a very good day.
7. Sharpen Selectively, Not Globally
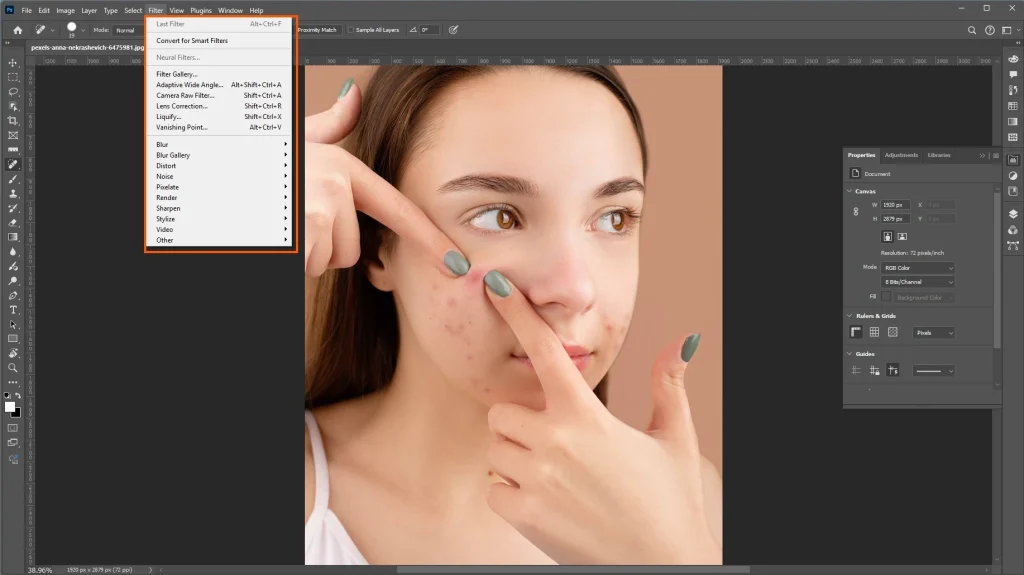
Global sharpening has some issues. It amplifies noise, creates unnatural edges, and makes images look over-processed. Meanwhile, selective sharpening is applied only where attention falls naturally. This makes images feel professional and crisp.
- Portraits: eyes, eyelashes, eyebrows
- Fashion: fabric weaves, jewelry, stitching
- Product shots: logo details, material surfaces, textures
- Sports and action: faces, jersey numbers — leave the motion-blurred background soft
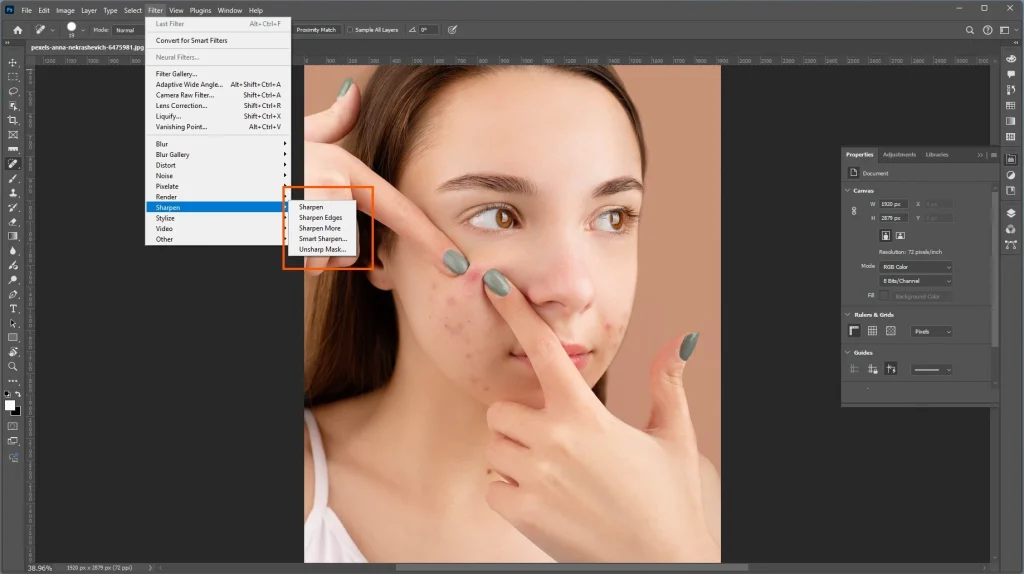
Hold Alt while dragging the masking slider under sharpening in Lightroom. This is to visualize exactly which edges are being targeted.
8. Use Frequency Separation for High-End Retouching
Frequency separation separates images into two layers. One contains only texture. Another one contains only color and tone.
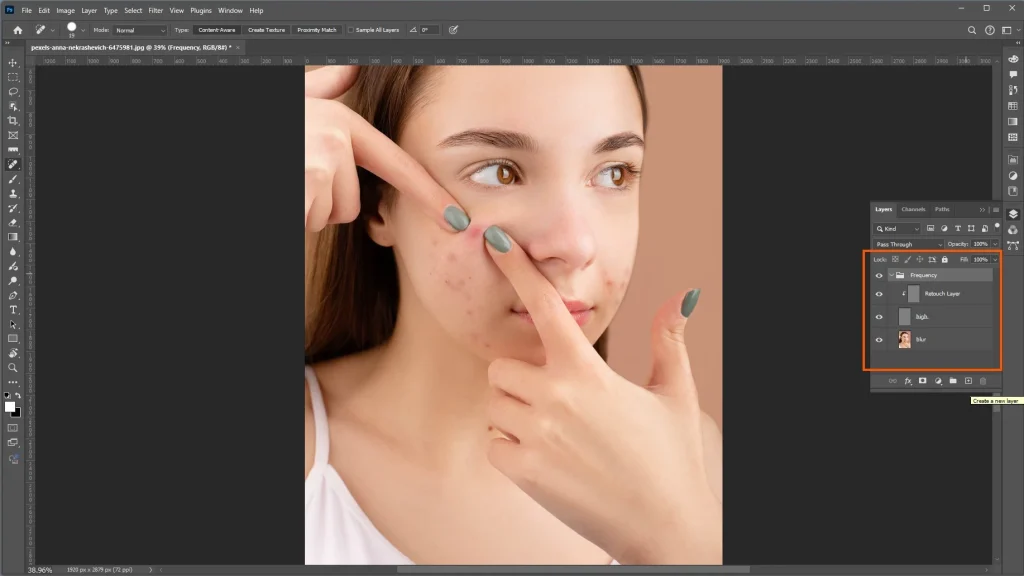
With these, you can smooth uneven skin color on the color layer without touching the texture layer. You can make the skin look flawless in tone this way.
Especially beauty and cosmetic brands rely on this technique the most. Close-up product shots require precise retouching. This preserves the authenticity of the modern beauty audiences demand.
Fashion photographers use it as a standard tool for catalog and editorial work. Try to use it with restraint. Over-application creates an obvious and unflattering frequency-separated look that is easily recognizable.
Retouching at scale is where most in-house teams hit a wall.
It can be beauty campaigns, fashion catalogs, or high-volume portrait galleries. Offshore Clipping delivers consistent, brand-accurate results without the turnaround pressure.
See Our Retouching Services →
Color Correction Tips
9. Learn Curves and Levels
Levels are best for quick tonal fixes. Adjust the black point, white point, and midtones to quickly correct a flat or overexposed image.
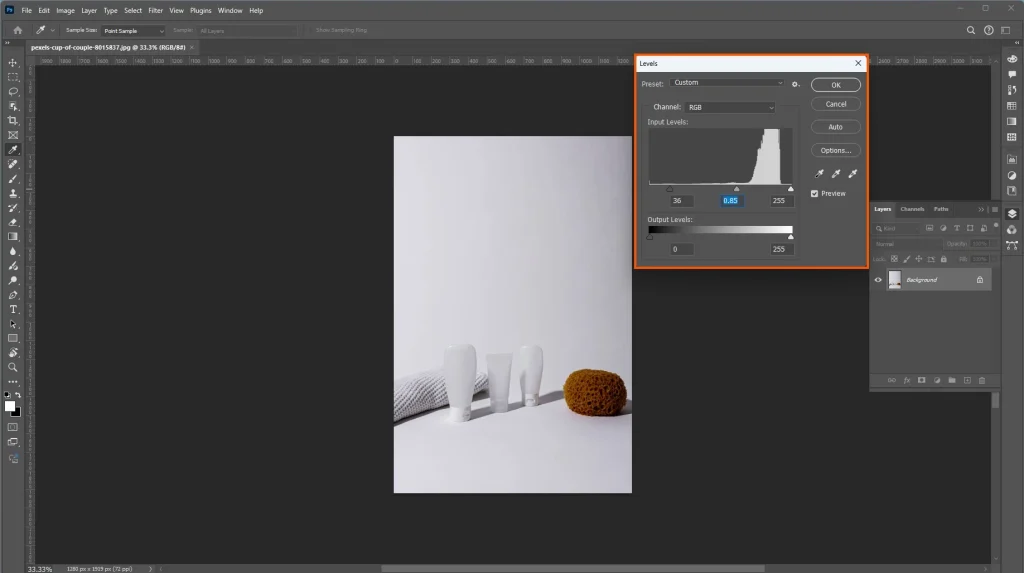
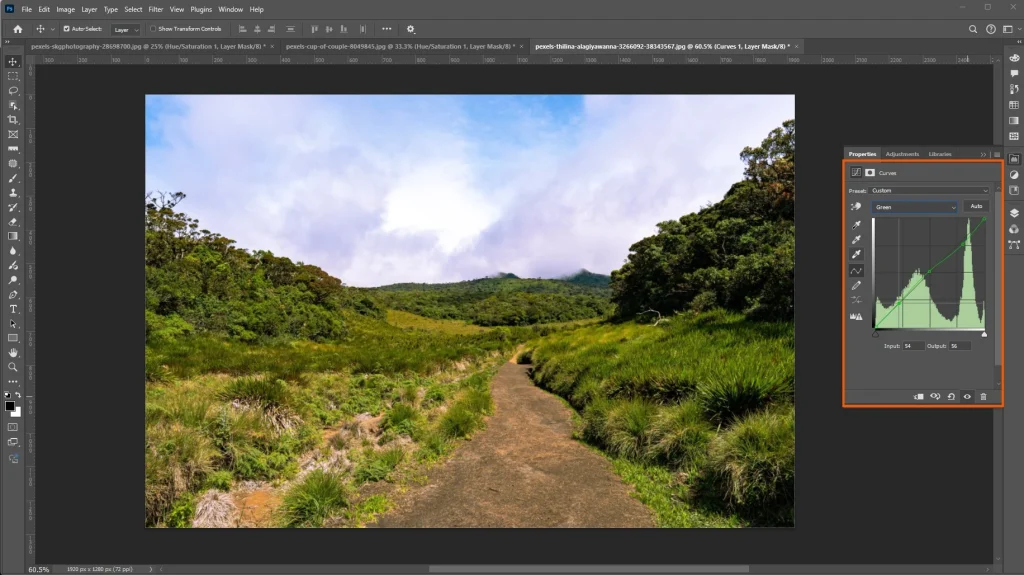
You can get more granular control from Curves. This lets you manipulate specific tonal ranges independently.
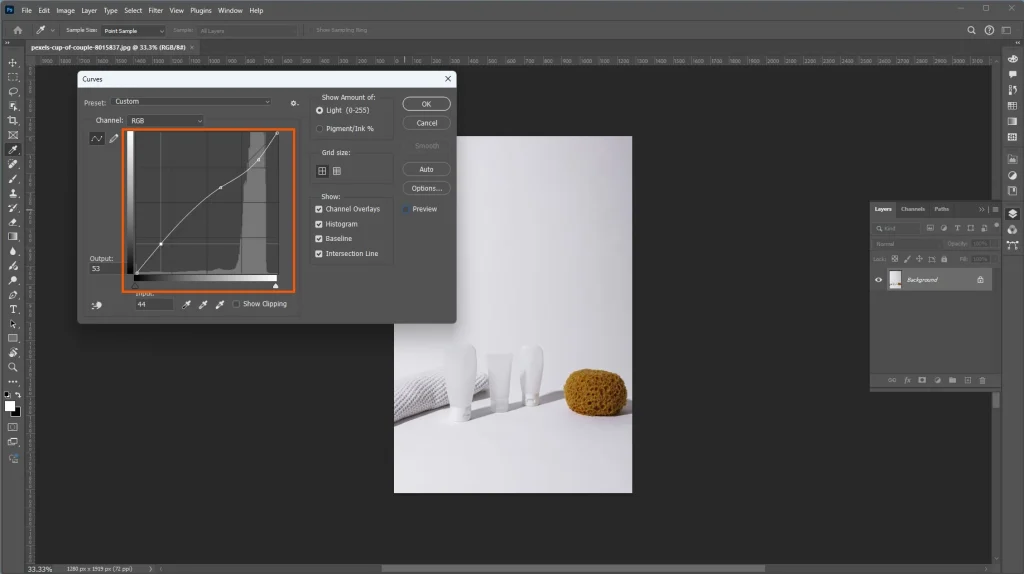
A subtle S-curve pulls highlights slightly up. Shadows slightly add contrast and depth that feels more cinematic than the contrast slider ever produces. A tighter S-curve increases perceived sharpness and material definition for product photography.
10. Fix Skin Tones Naturally
A recognizable sign of amateur retouching is over-editing skin. You have to set the goal for enhancement, not transformation. Reduce redness selectively, correct uneven color tones, and smooth texture slightly.
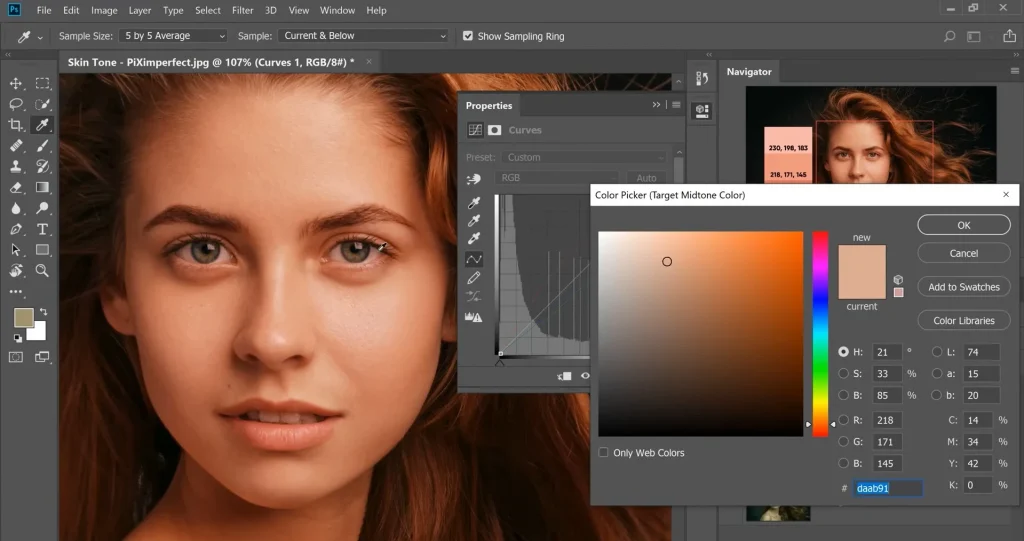
These help to keep the skin looking like actual skin.
This is important in beauty campaigns, fashion shoots, wedding photography, and influencer content.
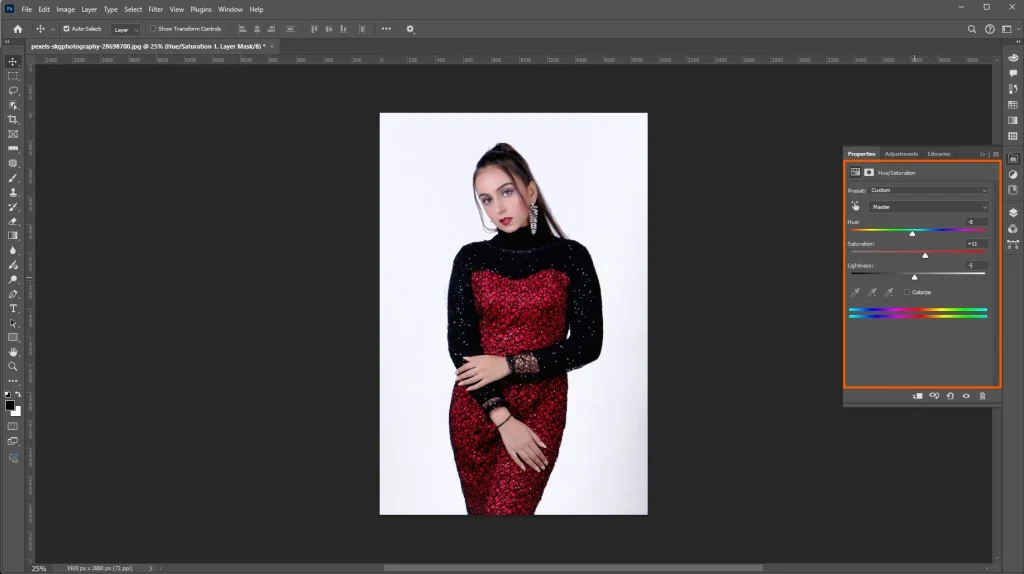
Modern beauty audiences have become sophisticated at identifying over-processing and disengaging from it.
Among all wedding photo editing techniques, maintaining natural and realistic skin is always the most important. Also violated at the same time.
11. Understand Color Grading
Color correction fixes problems. Color grading creates a mood. They are related but not the same. Understanding color mood is central to strong aesthetic photo editing.
- Warm tones (amber, honey, golden): Work well for wedding photography, lifestyle brands, and hospitality. They make spaces feel inviting, and people feel relaxed.
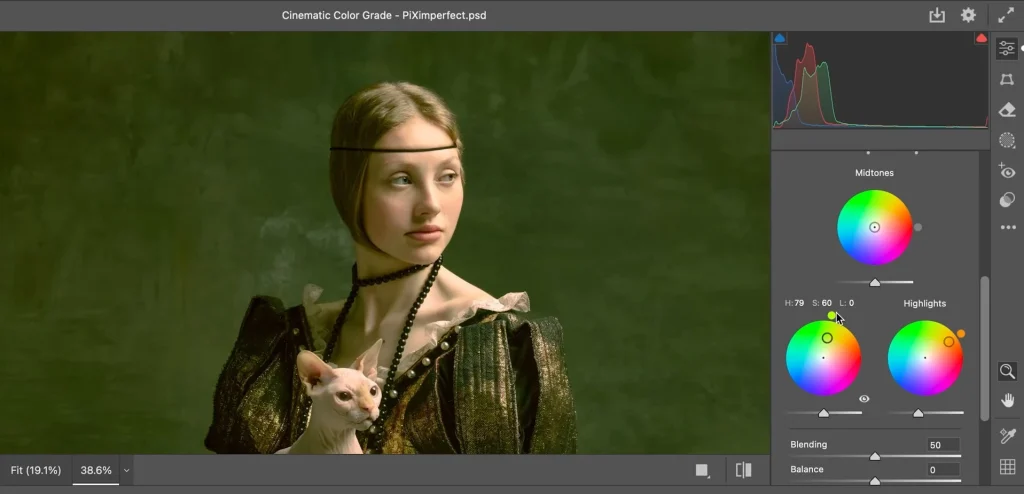
- Cool tones: Communicate precision and modernity. This makes them the go-to for SaaS brands, tech companies, and corporate communications.
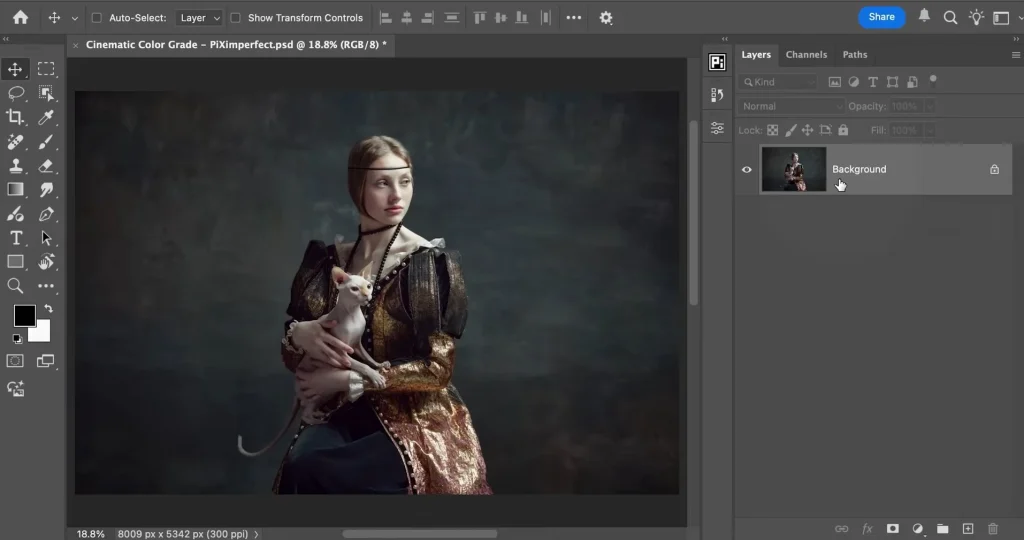
- Moody tones (desaturated shadows, high contrast, muted midtones): These are the standard for luxury fashion and premium lifestyle brands. This palette communicates exclusivity before a customer reads a single word about the product.
12. Vibrance vs Saturation — Use the Right Tool
First, many beginners reach for saturation when they want more vivid images. Then wonder why the result looks artificial. Saturation boosts every color in the image equally. This includes skin tones also, which turn orange and unnatural quickly.
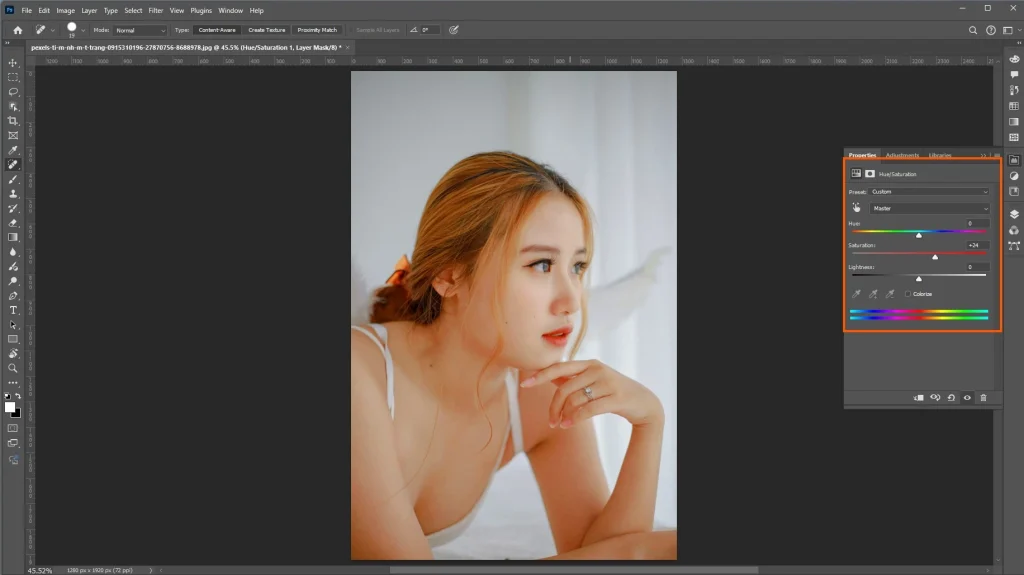
Vibrance is smarter. It enhances saturation on muted colors while protecting tones. Vibrance produces a more vivid result in almost every portrait, lifestyle, or social media context.
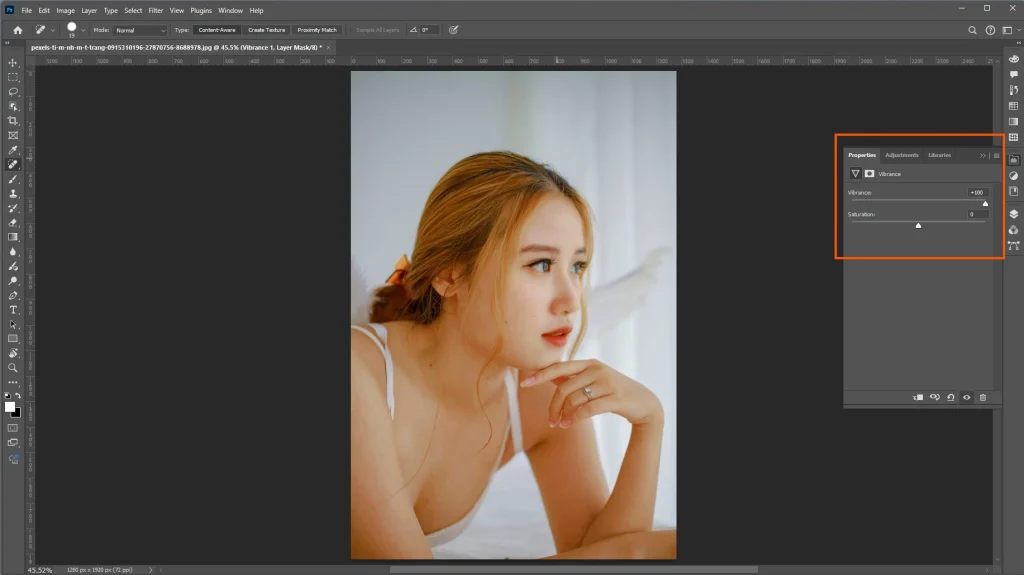
This single understanding can immediately improve the quality of an entire feed if you are a content creator or influencer.
Advanced Photo Editing Tips
13. Master Layer Masking
Do you know the non-destructive way to edit in Photoshop? It is layer masking. Masks let you apply edits to specific areas instead of permanently altering pixels. At the same time, it helps you to preserve the original image data entirely.
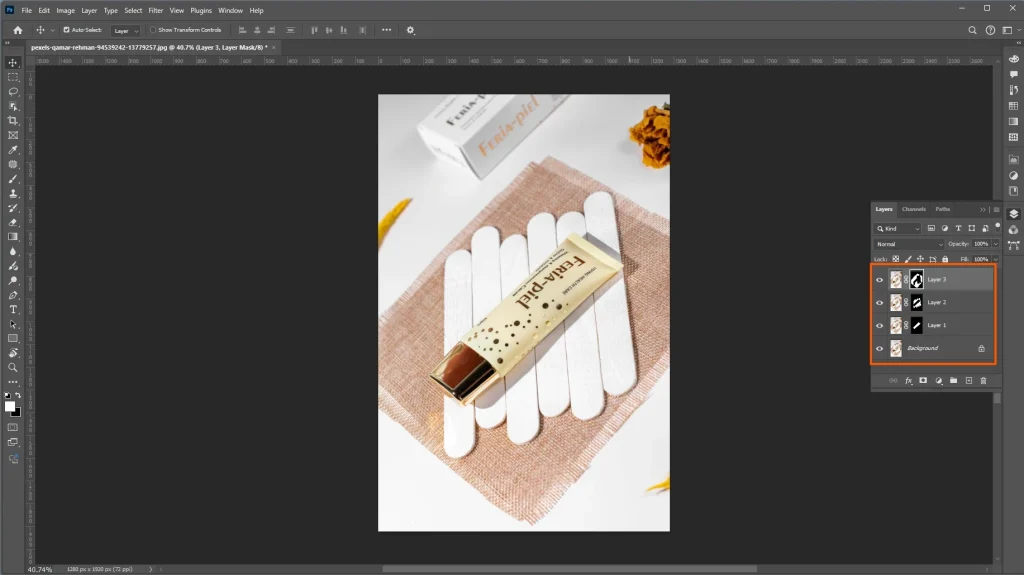
Adjust a background without touching the subject. Blend multiple exposures. Apply different color grades to different zones of a single image.
This is operationally critical for studios and agencies managing client revisions. A layered file means your editor responds in minutes rather than rebuilding from scratch. It helps when a client requests a change three weeks after delivery. Non-destructive editing is a business protection, you can say.
14. Apply HDR Carefully for Real Estate
Dark interiors against blown-out windows are the most persistent challenges for the real estate industry. HDR photography solves these challenges for real estate photographers in real estate photography. No single exposure can capture both correctly.
HDR blends multiple exposures. This preserves detail in the bright exterior, which is visible through windows and the shadowed room interior simultaneously.
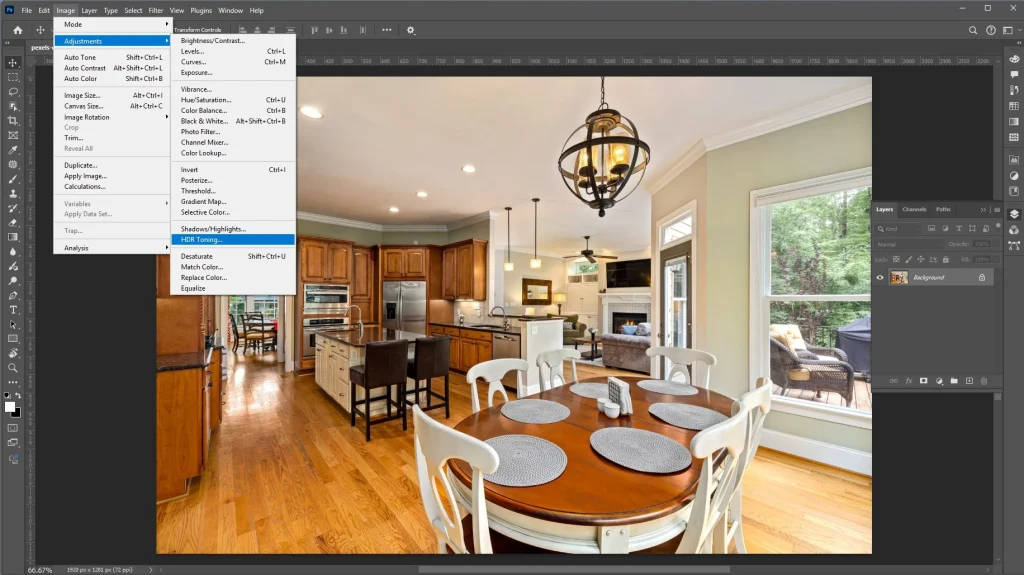
Window pull editing is an industry standard in competitive real estate markets. Here, separate interior and exterior exposures are shot and blended with layer masks. This creates an effect that appears bright, detailed, and spacious in a way that a single exposure simply cannot achieve.
The critical warning: Overdone HDR looks artificial and dates an image badly. Modern HDR editing should look indistinguishable from a single perfectly exposed frame. The viewer should feel the space is naturally well-lit, not technically composited.
15. Reduce Noise Without Smearing Detail
High ISO shooting in low light brings grain and digital noise. Reducing noise too aggressively creates a soft and watercolor-like appearance that destroys fine detail.
To target grain, apply luminance noise reduction first. Then apply color noise reduction to handle the chromatic artifacts.
Apply Luminance noise reduction first to target grain, then Color noise reduction to handle chromatic artifacts. Use the Detail and Contrast sliders to restore the sharpness lost due to noise reduction.
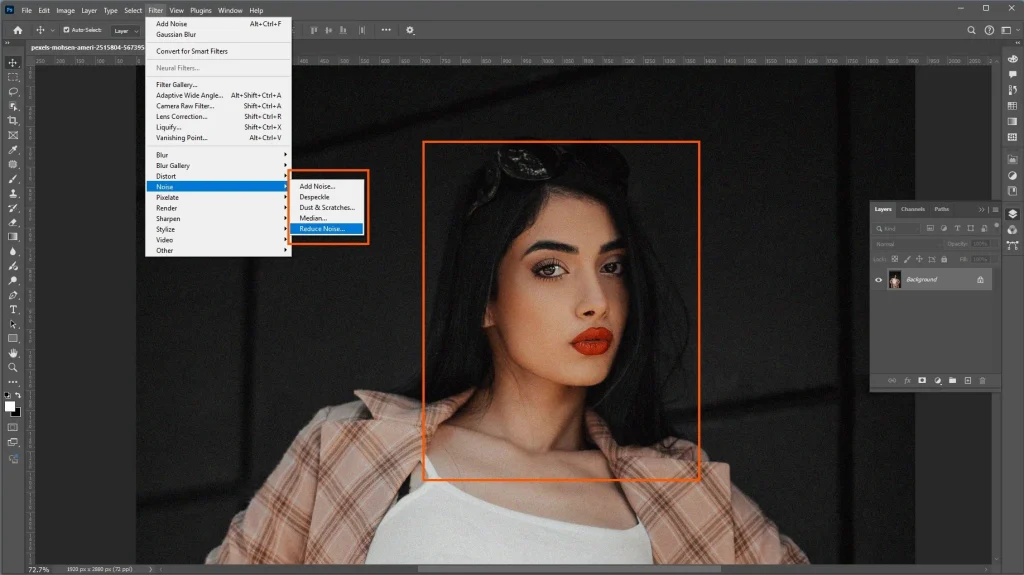
This matters most for the photographers, where high ISO is unavoidable at fast shutter speeds. These can be dim reception venues, mixed-lighting environments, or stadium lights.
Exceptional Workflow Tips for Photo Editing
You do your editing work precisely, but in the end, you find that your deadline is near and you can’t make it in time. You find out that your great editing skills have become inefficient. This is where the perfect workflow breaks the ice.
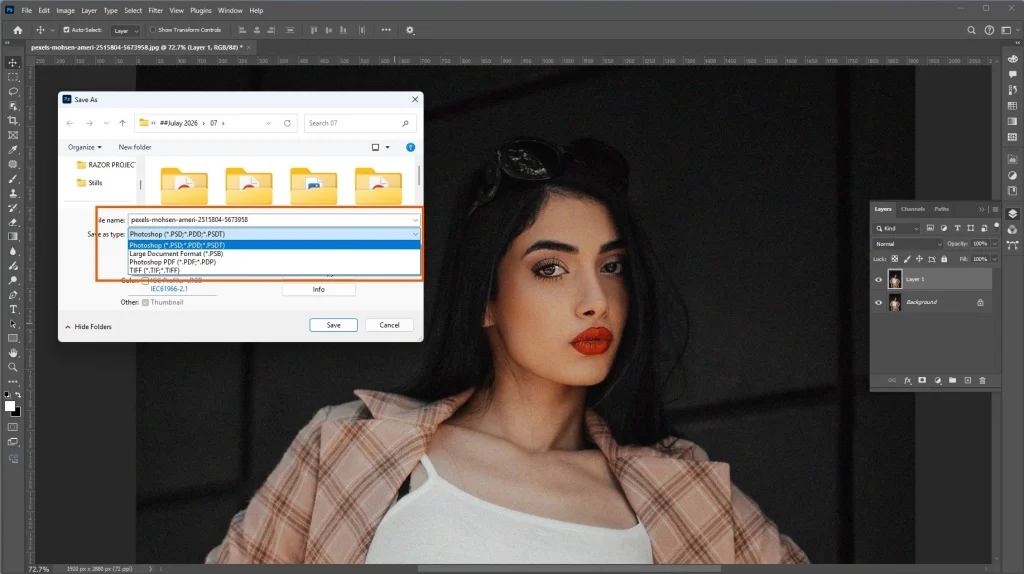
16. Always Edit Non-Destructively
Many agencies manage multiple client campaigns with overlapping revision cycles. Non-destructive editing is mandatory for them. It is the foundation that makes revision management possible without rebuilding from scratch.
- Never edit directly on your original image.
- Work on adjustment layers.
- Duplicate layers before any destructive operations.
- Use smart objects so filters remain editable.
- Keep layered PSD files alongside your exports.
17. Batch Edit Similar Photos
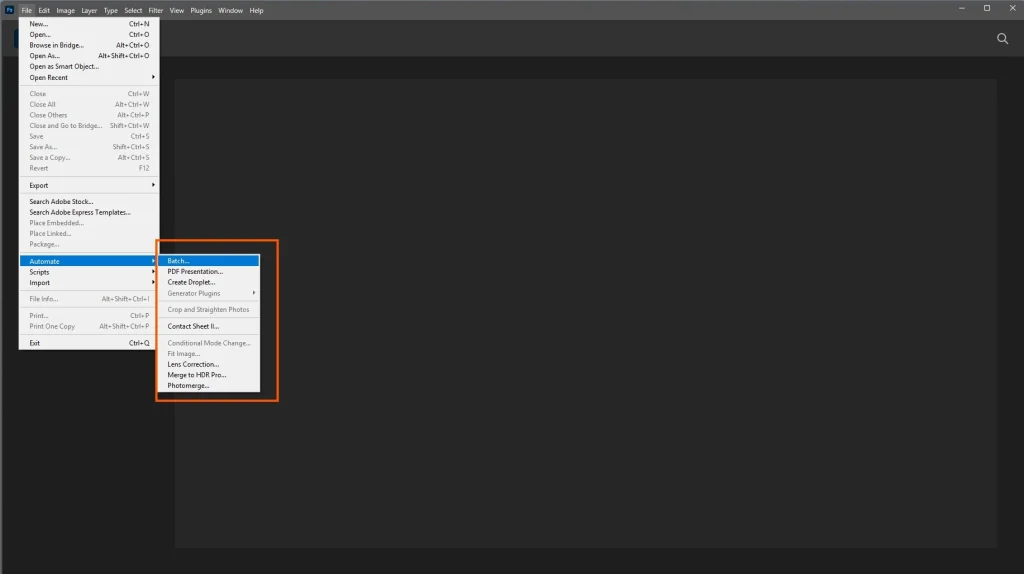
Suppose you have hundreds of images for editing, and they share the same lighting and color conditions. If you try to edit them individually, it would be the largest time inefficiency in creative production. Batch editing lets you dial in a reference edit. Then it applies your corrections to multiple images at once.
This is essential when
- Wedding photographers deliver 700 image galleries
- E-commerce teams process hundreds of product images per week.
- Event firms need a gallery within 24-48 hours
- University media departments manage even coverage across multiple departments with different source quality. And many more factors.
Select all images in a session and use Sync settings in Lightroom. For Photoshop, use Actions and Batch Processing under File > Automate.
18. Build and Use Presets
Saved editing parameters are called presets. You can apply these presets to your established settings for any image with one click. They are influential tools for maintaining visual brand consistency at scale.
| Who Uses Presets | Why it Matters |
|---|---|
| Instagram creators and influencers | Consistent feed aesthetic builds faster band recognition |
| YouTubers | Uniform thumbnail style increases click-through rate |
| E-commerce brands | Consistent product treatment across a full catalog |
| Course creators and coaches | Visual brand consistency signals professionalism and justifies premium pricing |
| SaaS and startup teams | Unified look across team headshots and product imagery |
| Wedding photographers | Fast, consistent application across large galleries |
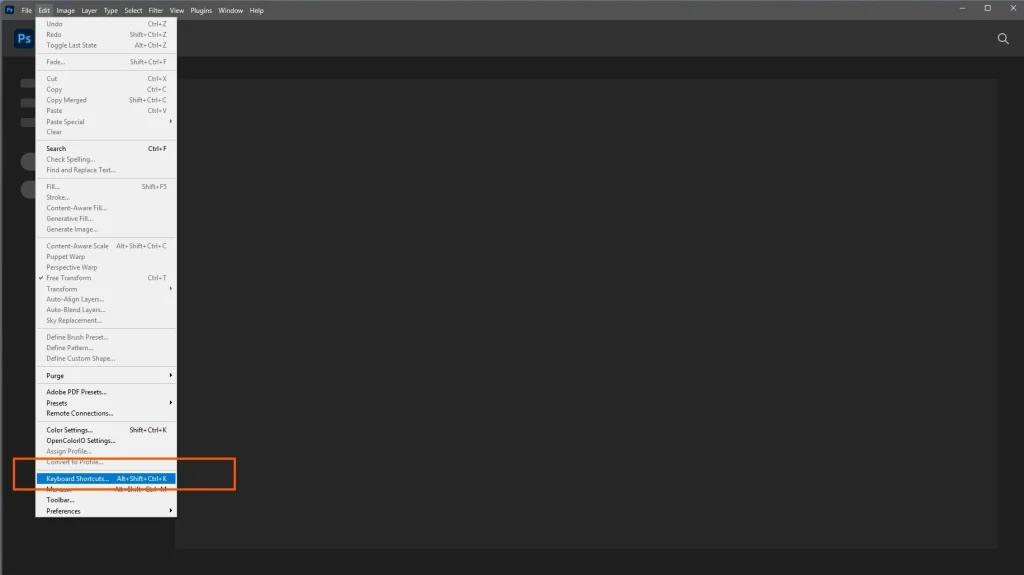
19. Learn Keyboard Shortcuts
Every time your hand moves to a menu to find a tool, you lose momentum. Across a full editing session, accumulated menu navigation time is significant.
Essential shortcuts to memorize first
In Photoshop:
- V (Move)
- B (Brush)
- J (Spot Heal)
- C (Crop)
- [ / ] (brush size)
- Ctrl+Z (undo)
- Ctrl+Alt+Z (step back)
In Lightroom:
- G (Grid)
- D (Develop)
- P (Pick)
- \ (before/after toggle)
- Auto Sync for batch application
If you deliberately practice for two weeks, you can make shortcuts automatic. The time return over a career is significant.
Tools for Photo Editing
20. Photoshop for Precision Work
Adobe Photoshop is the leading industry standard for detailed and pixel-perfect editing. What can’t you do with this software? From precise edge control to layer compositing to any campaign imagery, you can make it with Photoshop.
In terms of managing high-production visual campaigns, no other tool can beat or replicate its level of control. Don’t know how to edit images in Photoshop? Watch this!
21. Lightroom for Fast, Consistent Processing
Do you need to process large volumes of images efficiently? For this, Lightroom photo editing is the preferred workflow tool for photographers. It offers you
- RAW processing,
- Batch editing,
- Catalog management, and
- Preset system
This is primarily helpful if you are a
- Wedding photographer
- Event photographer
- Or dealing with high-image-volume workflow
Lightroom and Photoshop can work together seamlessly. Use Lightroom for color and volume. Use Photoshop for precision retouching.
22. Fix the Broken Lightroom Tip Most Guides Miss
Basic editing with Lightroom is a special benefit for wedding photographers. You may need to shoot 600-800 images per event. The ability to batch apply a color grade, sync exposure corrections, and export in multiple sizes simultaneously can reduce time.
When you reduce editing time from three or four days to under twelve hours, you get the direct business advantage in a competitive market.
23. Mobile Apps for Fast Publishing
You don’t always need desktop software.
- Lightroom Mobile: This is the most capable mobile option. It syncs presets from your desktop installation. Lightroom keeps your visual identity consistent regardless of device.
- Snapseed: Snapseed handles selective adjustments well.
- VSCO: It is popular among lifestyle photographers for its aesthetic presets.
- CapCut: CapCut has become the dominant tool for short-form content creators. It can manage both video and image editing in one place.
If you are an influencer, a social media manager, or a YouTuber, you may need the fastest publishing speed. Mobile editing is often the fastest path from shoot to publish.
The important caveat: Even a great mobile app won’t save a poorly taken photo in low light, but the basic principles still apply.
24. Use AI Editing Thoughtfully
AI photo editing tools have genuinely changed what is possible in professional workflows. Background removal, object removal, noise reduction, and basic skin retouching are now significantly faster with AI assistance.
The honest framing:
- AI performs well on well-defined, repetitive tasks.
- Background removal performs well on a product with clean edges.
- Noise reduction does it on a high-ISO portrait.
- Basic blemish cleanup on a large batch.
Do you know where human judgment consistently produces better results? It is in nuanced creative decisions, brand-specific color accuracy, and complex compositing work.
25. Know When to Outsource Your Editing
Your in-house editing becomes the bottleneck. How? Because you skip this tip. And you lost the competitive advantage.
The math on in-house editing changes when
- Your turnaround times are slipping because editing is backing up
- Your photographers are spending more time editing than shooting
- You are managing more than a few hundred images per month, while trying to maintain consistent quality
In some common scenarios where outsourcing creates clean and measurable ROI:
- E-commerce brands managing 500+ SKUs per season
- Wedding photographers delivering 10+ galleries per month
- Agencies running multi-channel production
The real return is the bandwidth that comes back to your team when production editing is no longer their problem.
How Different Industries Use These Tips
Every industry has distinct visual standards and editing priorities. Here is where the techniques above apply most directly.
| Industry | Primary editing Needs |
|---|---|
| E-commerce Brands | Color accuracy, background consistency, batch processing across large SKU catalogs |
| Fashion and Apparel | Frequency separation, color grading, premium retouching across catalog shoots |
| Real Estate | HDR window pull, white balance correction, perspective straightening |
| Beauty and Cosmetics | Skin tone precision, frequency separation, packaging color fidelity |
| Wedding Photography | Batch color grading, natural skin retouching, consistent gallery treatment |
| Marketing Agencies | Multi-platform cropping, campaign color consistency, non-destructive revision workflows |
| Influencers and YouTubers | Preset consistency, thumbnail editing, aesthetic feed management |
| Course Creators and Coaches | Headshot quality, brand color consistency, promotional imagery polish |
| Sports Teams | Action shot sharpening, noise reduction, fast-turnaround batch processing |
| Universities | Event batch editing, admissions campaign consistency, faculty headshot standardization |
| Event Firms | White balance normalization, fast-turnaround batch delivery, consistent gallery treatment |
Common Mistakes to Avoid in Photo Editing
Even experienced editors make mistakes while editing photos. Knowing these mistakes makes you faster at catching them in your own work.
- Overediting: More adjustment does not mean better results. Every change should serve a clear purpose. Overediting removes the image’s balance and makes it unrealistic.
- Oversaturation: Use Vibrance instead of saturation for more natural, controlled results in your image.
- Skipping white balance: Fix the color temperature first. Everything else depends on it being correct.
- Global sharpening: you have to sharpen selectively. Global sharpening amplifies noise and creates unnatural edges.
- Over-smoothing skin: Reduce imperfections and preserve texture. Plastic skin reads as fake. People don’t like it.
- Exporting at the wrong specs: Know whether your output is digital or print before you edit. It affects resolution, color profile, and sharpening decisions.
When Should You Outsource Photo Editing?
Suppose you are a full-time professional photographer. You have to be engaged almost the whole time. So, when will you deliver the pixel-perfect images to your client?
In this type of situation, outsourcing photo editing comes in handy. The most professional decision is recognizing that in-house editing has become the limiting factor.
Consider outsourcing if:
- Your editing backlog is consistently delaying client or campaign delivery
- Your team is editing instead of shooting, strategizing, or creating
- You need to maintain consistent quality across hundreds or thousands of images per month
- Turnaround requirements exceed what your internal capacity can reliably meet
Need professional editing without the overhead of building and managing an in-house editing team?
At Offshore Clipping, we work with e-commerce brands, photographers, agencies, fashion businesses, and creative teams.
Background removal, retouching, color correction, catalog processing, and image enhancement, delivered to your standard and on your timeline.
Frequently Asked Questions
What are the best photo editing tips for beginners?
Start with the four fundamentals: white balance correction, brightness and contrast adjustment, cropping for composition, and straightening.
What software is best for professional photo editing?
Photoshop and Lightroom together remain the industry standard. Lightroom handles color, RAW processing, and batch workflows. Photoshop handles precision retouching, compositing, and detailed work.
What are the best Instagram photo editing tips?
Maintain consistent color treatment across your feed. Build a preset that defines your visual palette and apply it consistently. Avoid over-editing, especially oversaturation and heavy smoothing.
Can AI replace professional photo editing?
Not for work where precision, brand accuracy, and creative judgment matter. AI handles repetitive, well-defined tasks like background removal, noise reduction, basic retouching at scale. Complex creative work, nuanced retouching, and brand-specific color decisions still require a skilled human editor.
How do I maintain consistent editing across a large product catalog?
Edit one reference image to your exact standard. Save those settings as a preset. Apply it as the starting point for every image in the catalog. Then fine-tune individually for source variations.
When should I choose outsourcing over in-house editing?
For catalogs above 200 images, outsourcing to a team working from your brand specification typically produces more consistent results than any single in-house editor managing a full catalog alone.
Final Thoughts
Professional-looking photos consist of intentional editing decisions, consistent workflows, and a clear understanding. You have to understand what itchy technique is actually doing and why. The gap between average and professional is rarely exotic tools or years of training.
As a marketing manager making sure campaigns are consistent. As a photographer competing on deliverable quality. As a brand building a catalog that converts. As a creator whose feed is your storefront. Whatever you do, the fundamentals you’ll find in this guide apply to your work.