The quickest controlled way to make an image sharper in Photoshop is to work non-destructively, inspect the file at 100%, and then use Smart Sharpen to balance Amount, Radius, and noise reduction. Photoshop can improve edge definition and perceived clarity. But it cannot fully recreate detail that the camera never captured.
Imagine a product label that looks crisp in the studio and turns soft after export. Or a portrait where the eyes lose their spark. The problem is the same in both cases. And so is the risk of fixing it too hard.
In our editing work, the real challenge is rarely finding a Sharpen command. It is knowing how far to push it without creating halos, grain, or brittle edges.
In this Photoshop guide, I’ll share the workflow to judge sharpening. High Pass and Unsharp Mask alternatives for images that need a different kind of control.
What Does Sharpening an Image Actually Do?
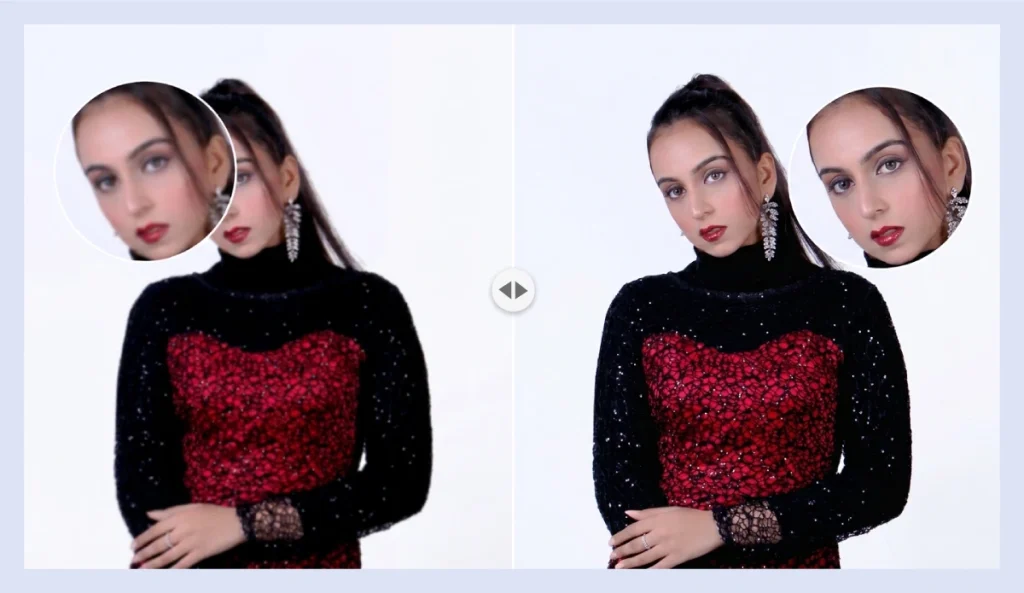
Sharpening does not add a new layer of real detail. It increases local contrast around existing edges. So boundaries between light and dark pixels look more defined. That is why a bottle label, garment stitching, eyelashes, or architectural lines can appear clearer after a careful sharpening pass.
You have to treat sharpening as a finishing decision, not a rescue button. If the source is already noisy, a strong sharpening pass can make that noise more obvious. If Amount or Radius is pushed too far, bright or dark outlines appear around the edges. Those halos are one of the fastest signs that the image has been over-sharpened.
How to Make an Image Sharper in Photoshop Using Vivid Light (Smart Sharpen)
For most controlled sharpening jobs, Smart Sharpen is our first choice because it keeps the important decisions in one dialog. In Photoshop 2026, you can use Vivid Light and Gaussian Blur together to enhance image details. Here's how to sharpen an image using this layer-based technique.
Step 1: Duplicate the Background Layer Twice
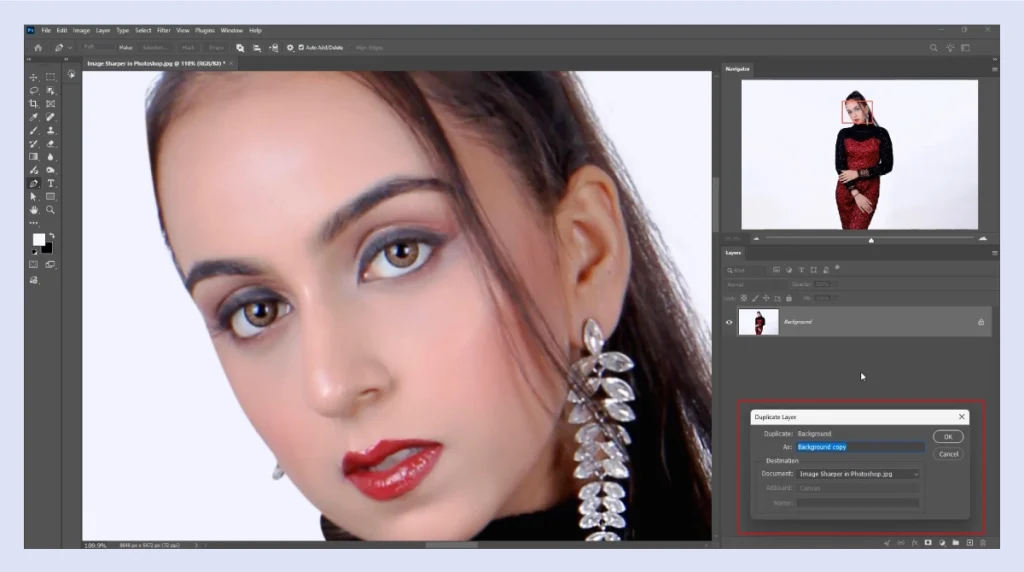
Open your image in Photoshop and locate the Background layer in the Layers panel.
- Press Ctrl + J (Windows) or Cmd + J (Mac) to duplicate the Background layer.
- Rename this duplicate Normal or something you would like to name.
- Duplicate the Normal layer again and name the new layer Vivid.
You should now have three layers: Background, Normal, and Vivid. Keep Vivid at the top.
Step 2: Invert the Vivid Layer
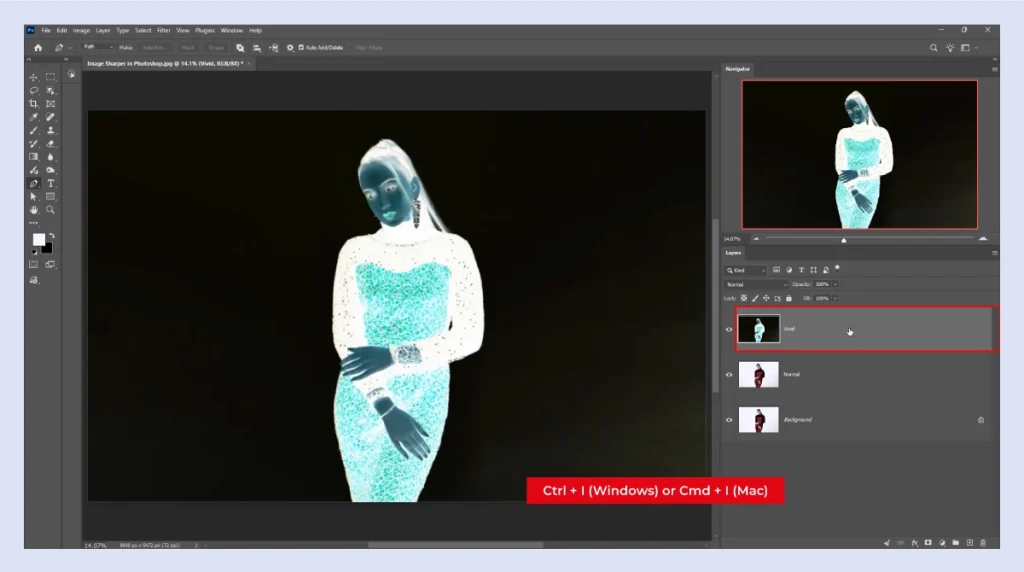
Select the Vivid layer and press Ctrl + I (Windows) or Cmd + I (Mac) to invert its colors.
The image will temporarily appear like a photographic negative. Don't worry, this is part of the sharpening process. Use the inverted layer to create stronger contrast around image details.
Step 3: Convert the Vivid Layer Into a Smart Object
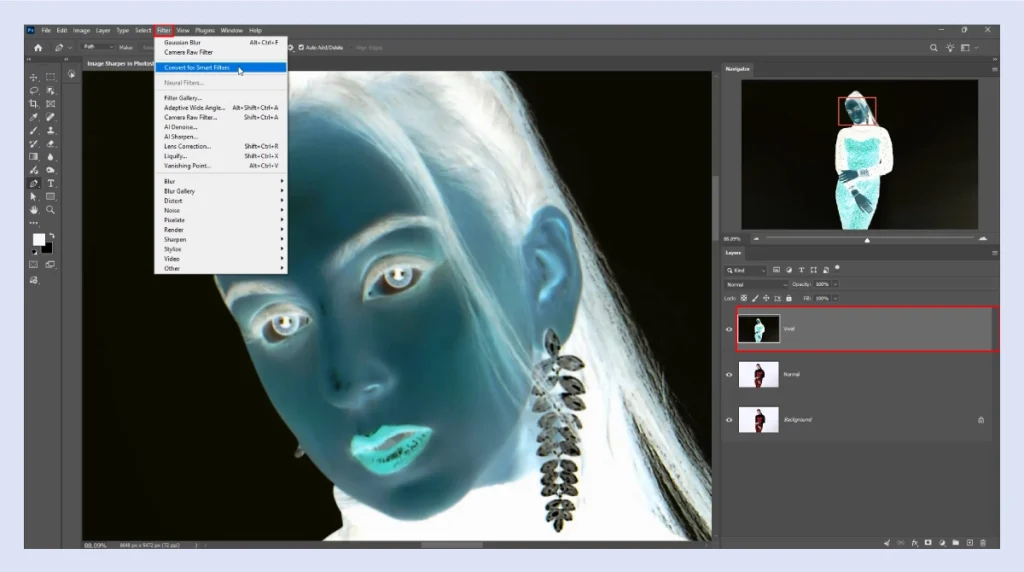
With the Vivid layer selected, go to Filter > Convert for Smart Filters and confirm the conversion.
Look at the layer thumbnail in the Layers panel. You'll notice a small Smart Object icon in its corner. This confirms that the conversion worked.
Now, any compatible filter you apply will remain editable. So you can adjust its settings later without permanently changing the layer. For commercial work, you have to check smooth backgrounds, skin, shadows, and reflective surfaces separately from the main detail. Our product photo retouching guide explains why sharpness is only one part of a broader cleanup workflow that can also include color, exposure, dust, and surface correction.
Step 4: Change the Blending Mode to Vivid Light
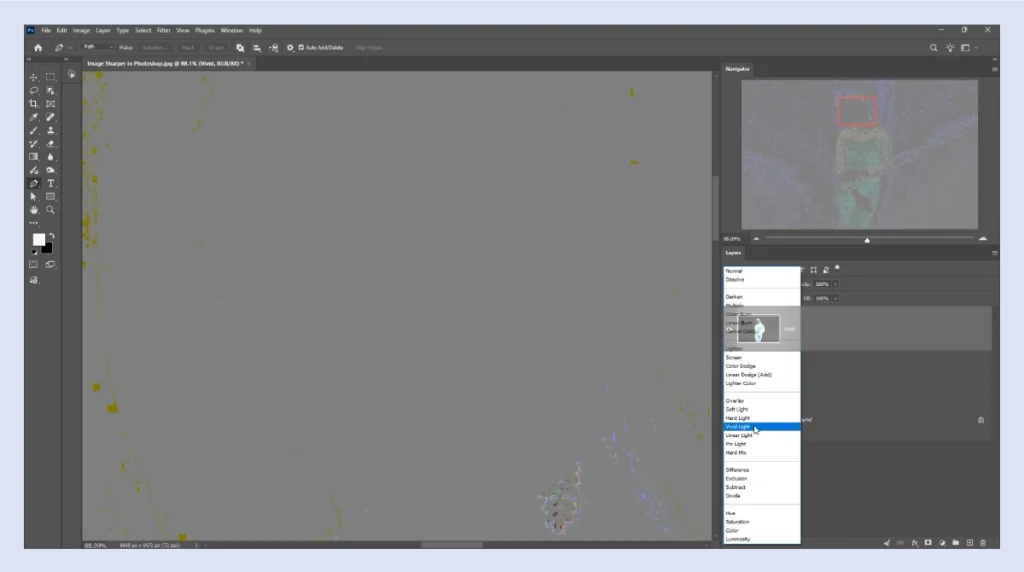
Keep the Vivid layer selected and find the Blending Mode dropdown at the top of the Layers panel. Change it from Normal to Vivid Light.
Your image should now look mostly gray, with some outlines or textures still visible. That's expected. The next adjustment will help bring those details into the sharpening effect.
Step 5: Apply Gaussian Blur to Enhance Details
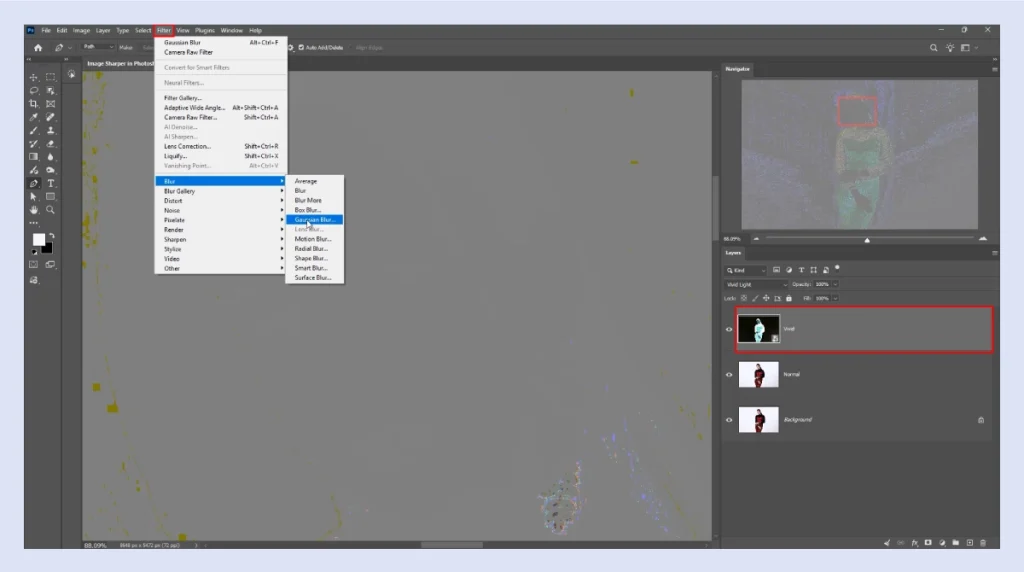
Go to Filter > Blur > Gaussian Blur. In the Gaussian Blur dialog, adjust the Radius slider while watching the preview. Although you're applying blur, this technique uses the blurred, inverted layer to build the sharpening effect.
Increase the Radius gradually until the important edges and textures become more defined. The right value depends on the image's resolution and detail.
Click OK when you're satisfied.
Step 6: Group the Layers and Apply Overlay
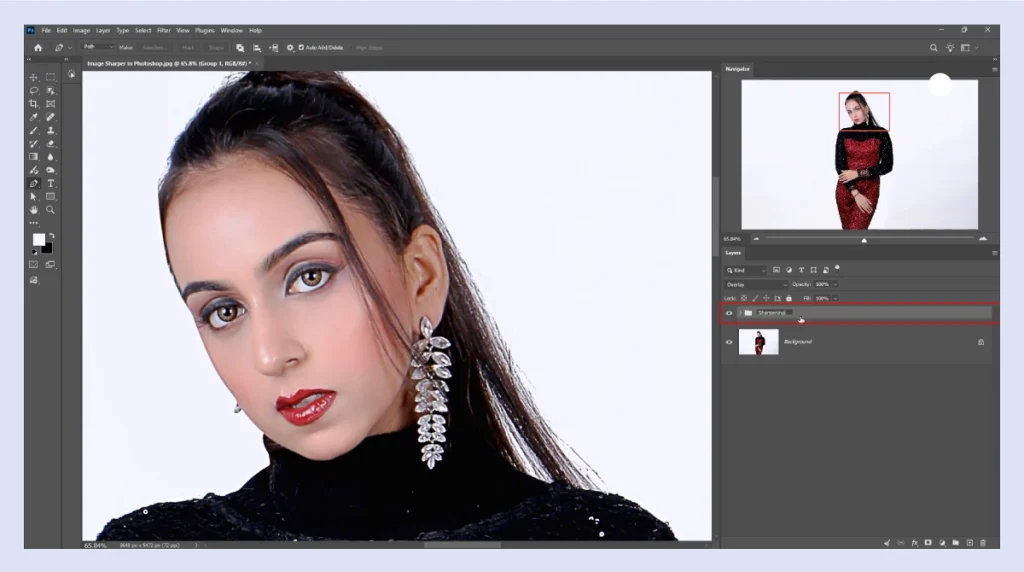
Now combine the sharpening layers.
- Hold Ctrl (Windows) or Cmd (Mac) and select both the Normal and Vivid layers.
- Press Ctrl + G or Cmd + G to group them.
- Rename the group Sharpening.
- Change the group's Blending Mode from Pass Through to Overlay.
You'll now see the sharpening effect applied to the original image. If it looks too strong, lower the group's Opacity until the details appear natural.
Finally, toggle the Sharpening group's visibility to compare the before-and-after results. Zoom to 100% and inspect important details, such as product labels, hair, fabric texture, and edges. Watch for excessive contrast, visible halos, or unnatural textures.
Need More Than Basic Sharpening? For complex fixes, leave the fine work to our retouchers.
Get a Free Trial!
How to Sharpen Specific Areas Without Sharpening the Whole Image
In practice, selective sharpening often looks more professional. The best way to make an image sharper in Photoshop is often to sharpen less of it. It directs attention to useful detail while leaving smooth areas alone. That matters for portraits, beauty campaigns, fashion catalogs, real estate photos, and branded product imagery.
- After applying Smart Sharpen as a Smart Filter, use its filter mask to limit the effect.
- Paint on the mask so sharpening stays on areas such as eyes, eyelashes, hair, product labels, stitching, jewelry edges, or architectural details.
- Keep skin, skies, soft backgrounds, and clean studio gradients quieter unless they genuinely need detail.
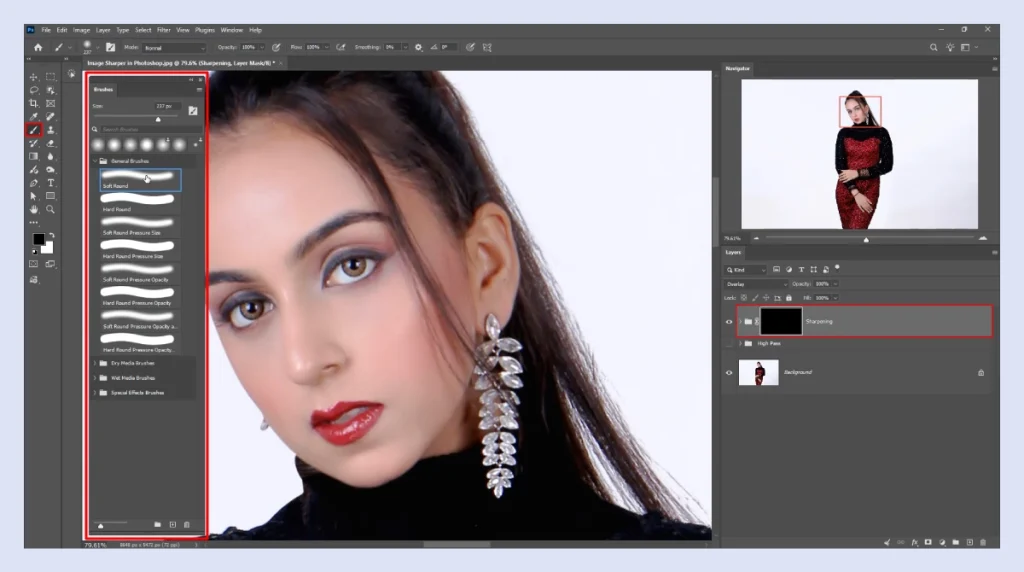
Selective sharpening also keeps sharpening separate from general image post-processing. A marketing manager may need crisp packaging text, while a beauty brand needs natural skin and defined lashes in the same frame. The correct edit is not stronger sharpening everywhere. It is controlled sharpening where the viewer needs information.
Two More Ways to Sharpen an Image in Photoshop
Smart Sharpen is not the only way to make an image sharper in Photoshop. Switch to High Pass when you want layer-based edge control. Use Unsharp Mask when its Threshold control better fits the image.
High Pass Filter: Edge-Focused Control
Step 1: Duplicate the Working Layer
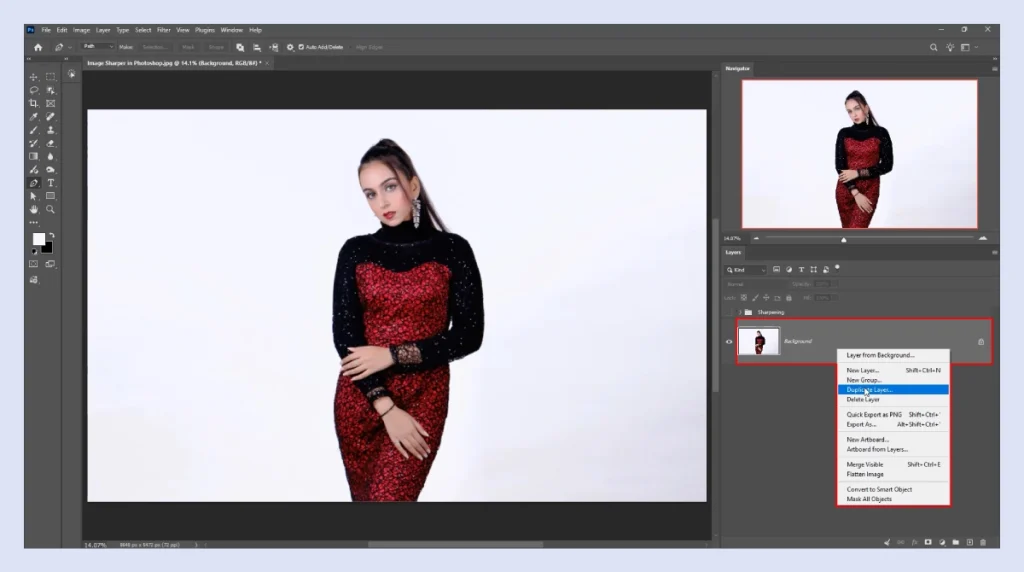
Duplicate your working layer. Keep the High Pass effect on a separate layer. It gives you more control over the sharpening later.
Step 2: Apply the High Pass Filter
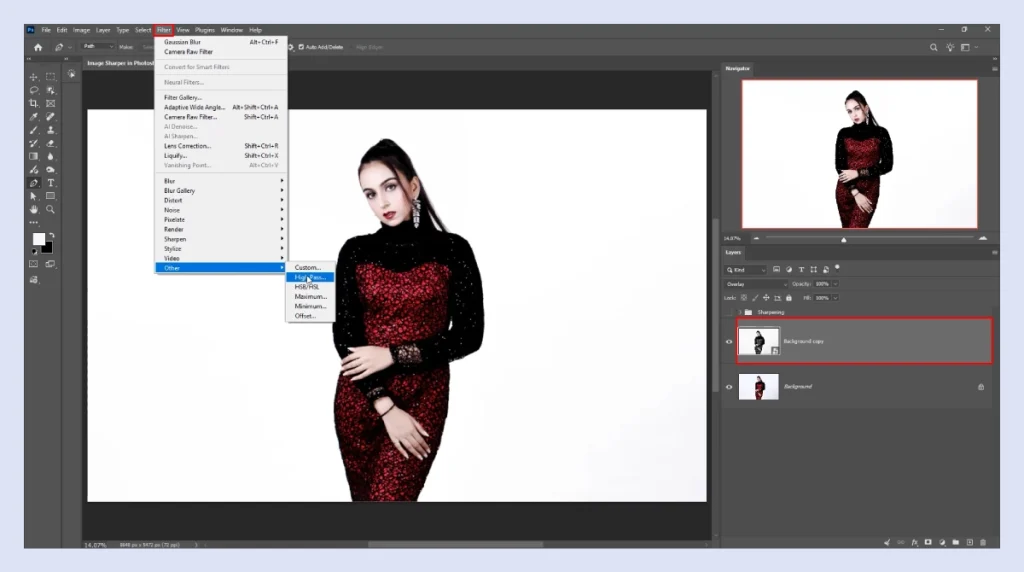
Go to Filter > Other > High Pass. Set 5 pixels in the dialogue box as a starting range for its High Pass edge-mask sharpening workflow. Treat this as a starting point, not a fixed rule, and watch the preview for the edges you actually want to enhance.
Step 3: Change the Blend Mode to Overlay
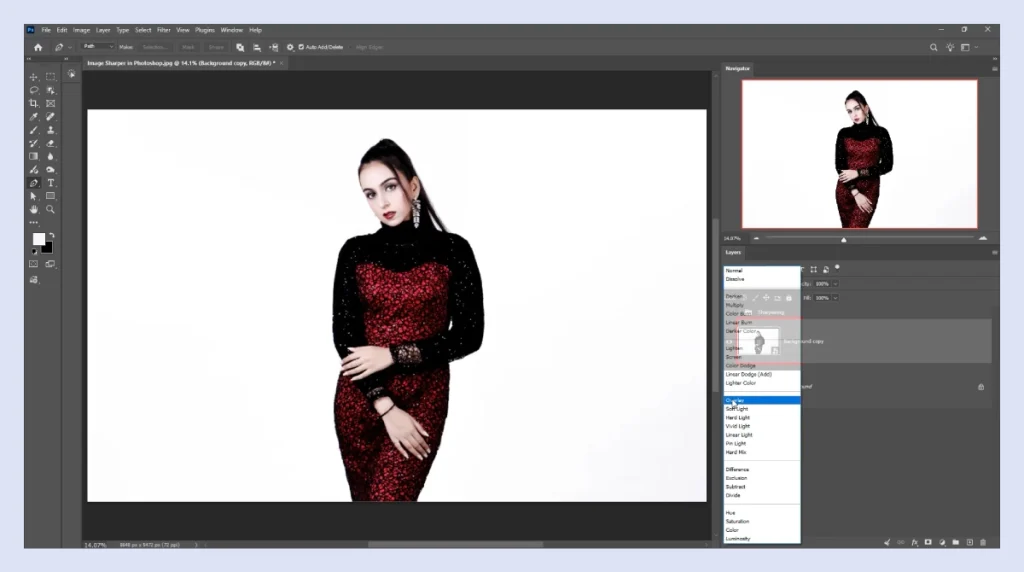
After applying High Pass, set the layer's Blend Mode to Overlay. The gray areas largely disappear while the contrast around detected edges becomes stronger.
Step 4: Control the Sharpening Strength
If the result looks too crisp, reduce the layer opacity until the sharpening feels natural. This gives you a simple way to control the overall strength without reopening the High Pass filter.
Step 5: Mask Areas That Do Not Need Sharpening
Add a layer mask when you need more selective control. Protect areas such as skin, skies, backgrounds, or other smooth surfaces where additional edge contrast could emphasize unwanted texture or noise.
High Pass is useful when you want to see the sharpening structure on its own layer. It also fits neatly into more advanced photo retouching techniques where texture, cleanup, color, and local detail may be handled separately.
Unsharp Mask: Simple, Traditional Control
Step 1: Open Unsharp Mask
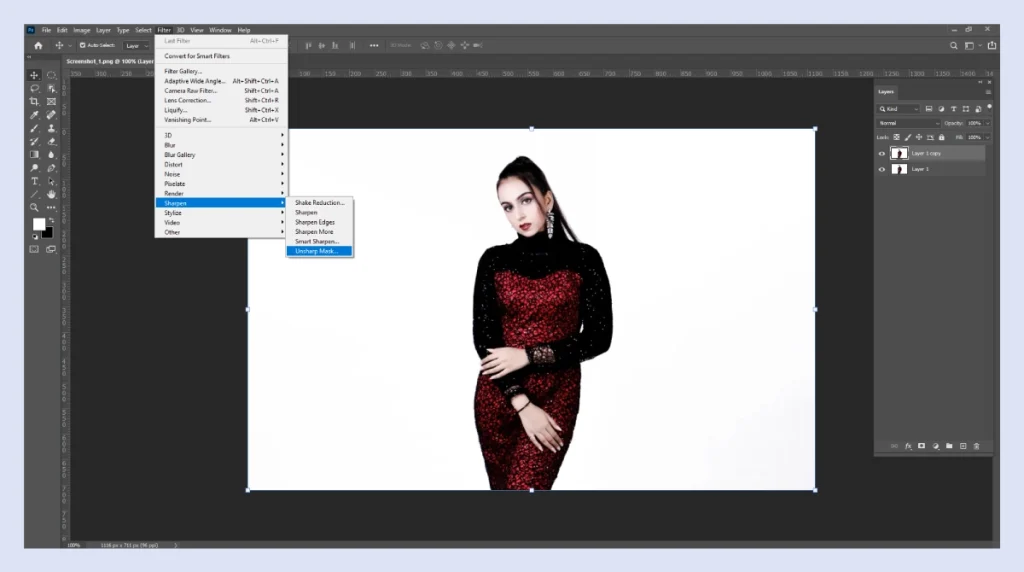
Go to Filter > Sharpen > Unsharp Mask. Photoshop will open the Unsharp Mask dialog, where you can control how the sharpening affects the image.
Step 2: Adjust the Amount
Use Amount to control the overall sharpening strength. Start conservatively rather than pushing the setting too far. Then inspect how the important details and edges respond.
Step 3: Set the Radius
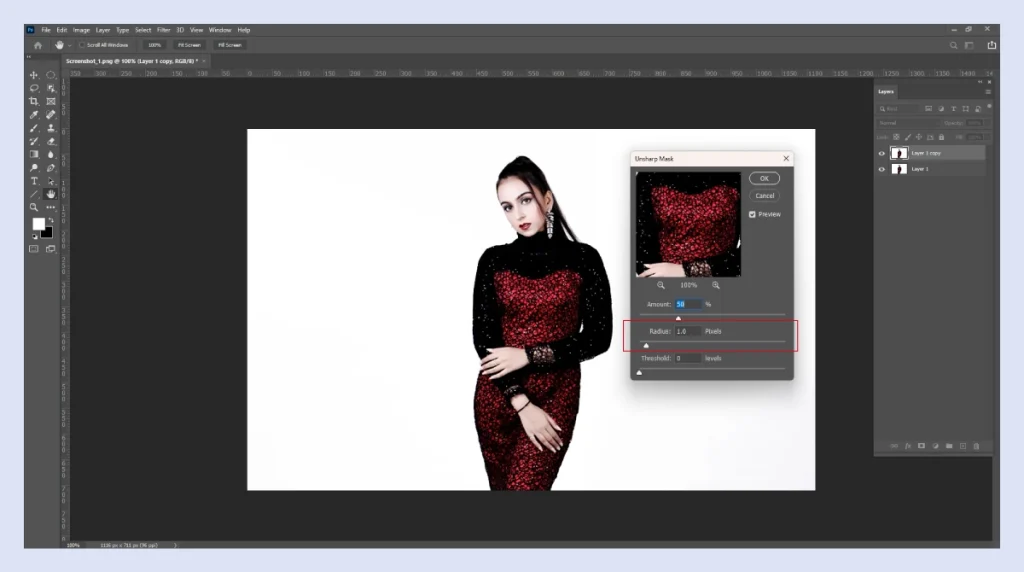
Adjust Radius to control the width of the affected area around an edge. If you begin to see noticeable edge halos, reduce the Radius or Amount until the result looks more natural.
Step 4: Adjust the Threshold
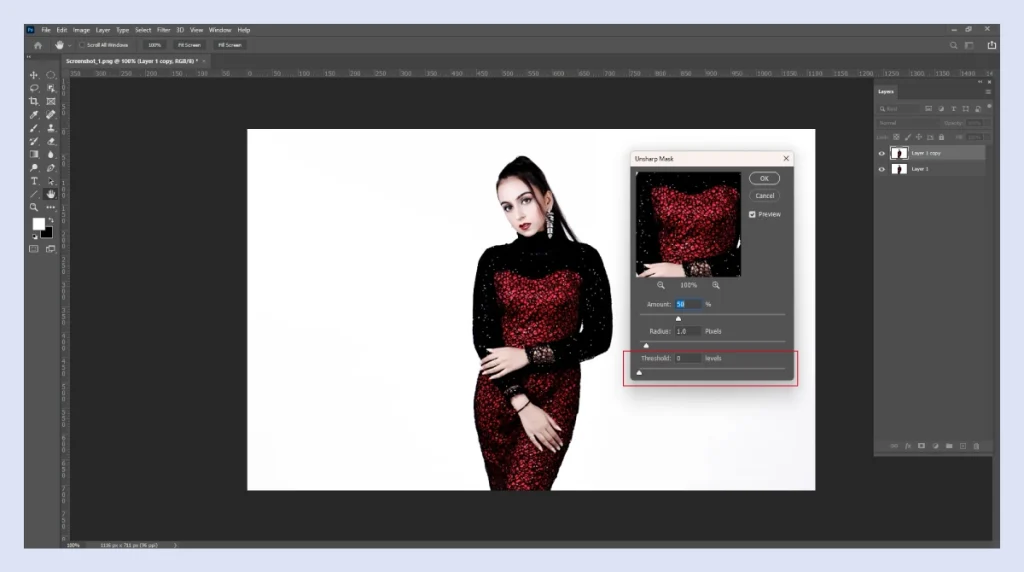
Use Threshold to control how different neighboring pixels must be. This setting can be especially useful with noisy or highly textured images.
Inspect the result at 100%. If small tonal variations are becoming harsh, raise Threshold carefully. This way, fewer subtle differences are sharpened. If edge halos appear, reduce Radius or Amount.
Smart Sharpen vs. High Pass vs. Unsharp Mask
Choose the method around the image and the control you need.
| Method | Best for | Main advantage | Watch out for |
|---|---|---|---|
| Smart Sharpen | General controlled sharpening | Amount, Radius, noise and blur controls in one dialog | Pushing Amount or Radius until halos appear |
| High Pass | Selective, edge-focused sharpening | Editable layer, blend mode, opacity and masking | Using too large a radius or sharpening smooth areas |
| Unsharp Mask | Traditional sharpening with edge threshold control | Amount, Radius and Threshold are simple to read | Sharpening noise or subtle tonal variation |
When a Sharpening Tutorial Is Not Enough for Production Work
A single image is easy to inspect closely. A full catalog is different. Think of 400 product photos going live next week, where every label, seam, and edge needs the same level of sharpness, or the store looks uneven.
Need professional support with your product images? Offshore Clipping can handle sharpening, retouching, and other post-production tasks to keep your visuals consistent and ready for publication.
FAQs About Sharpening Images in Photoshop
How can I sharpen a blurry image in Photoshop?
Convert the layer to a Smart Object, view the image at 100%, and then open Filter > Sharpen > Smart Sharpen. Balance Amount, Radius, and Reduce Noise while checking for halos and grain.
What is the best Photoshop tool for sharpening an image?
Smart Sharpen is a strong general starting point. It combines sharpening strength, radius, noise reduction, and blur-removal options. The best choice depends on the image, detail size, noise, and final output.
Does sharpening improve image quality?
Sharpening can improve perceived clarity by increasing contrast around real edges. It does not add the exact detail that was never captured.
Can Photoshop fix an out-of-focus photo?
Photoshop can improve mild softness, but it cannot fully recover detail from a severely out-of-focus photo. If the source lacks resolved detail, increasing sharpening mostly increases edge contrast and artifacts.
Should I sharpen an image before or after resizing it?
Usually, sharpen after resizing for the final output. Resizing changes pixel detail. So sharpening at the final dimensions gives you better control over the result.
Why does my image look grainy after sharpening?
Sharpening can make existing noise and grain more visible. Reduce the sharpening strength, use Reduce Noise, or sharpen only the areas that need extra detail.
Can I sharpen an image in Photoshop without losing quality?
Yes. Convert the layer to a Smart Object before sharpening. This keeps the effect editable and lets you adjust or remove it without permanently changing the original layer.
Final Thoughts
Good sharpening should look invisible. When you make an image sharper in Photoshop, start with Smart Sharpen for controlled results. Use High Pass for layer-based control. Reach for Unsharp Mask when the Threshold helps protect noisy areas.
For images that need more than sharpening, our professional photo editing team can handle the finer corrections and deliver a clean, polished result.