A great photo and a great edit are two different skills. You can nail the shot and still lose the sale, the like, or the booking if the final image looks flat, dull, or amateur. This is where photo editing comes in.
Editing is what turns a raw file into something people trust. You can implement your image editing. In short, how to edit photos comes down to a fixed order: crop and straighten; fix exposure and white balance; adjust contrast and color; make local adjustments; remove blemishes or clutter; sharpen last; then export. Follow that sequence, and almost any photo improves.
I will cover how to edit photos step by step, using Adobe Photoshop 2026 as the primary tool. You will get to know about picking the right shot and exporting a polished final image. You’ll also see how to edit photos like a pro using AI, how different photo types need different approaches, and the mistakes that quietly ruin otherwise good edits.
If you’re completely new to the basics, you should learn what photo editing is first to get the core concepts before you dive in.
Before You Start Editing a Photo

A few decisions upfront save hours of rework later, especially if you’re editing in bulk: SKU catalogs, event galleries, or a full client shoot.
Choose the Best Photo to Edit
Not every shot from a session deserves editing time. Pick the sharpest, best-composed frame from each set first, then edit that one properly rather than lightly touching ten average ones. Quality over quantity keeps turnaround fast and your portfolio consistent.
Should You Shoot in RAW or JPEG?
RAW files hold far more detail in shadows and highlights, giving you room to correct exposure and color without visible quality loss. JPEGs are smaller and faster to handle, but they compress data the moment they’re captured. If your camera supports RAW, shoot RAW, especially for product, portrait, or real estate work where accuracy matters.
Keep a Copy of the Original Image
Always duplicate your original before editing. Mistakes happen, edits go out of style, and clients sometimes ask for a different look later. A saved original means you’re never editing yourself into a corner.
Choose the Right Photo Editing Software
Adobe Photoshop remains the industry standard for control, layers, and precision retouching. That’s why it’s used throughout this guide (Photoshop 2026). Lightroom suits fast batch edits, while phone apps work for quick social posts. The right tool depends on the output: how you edit images for a print campaign and an Instagram story aren’t the same process.
Note: If you don’t want to install anything, browser-based tools for online photo editing, like Photopea or Canva, can handle basic edits. However, editing images online lags behind Photoshop for layered, detailed work.
How to Edit Photos in 9 Steps
Once your photo is selected and your software is open, this order works for almost any image type. Follow it in Photoshop 2026, and you’ll rarely need to backtrack.
Step 1: Crop and Straighten Your Image
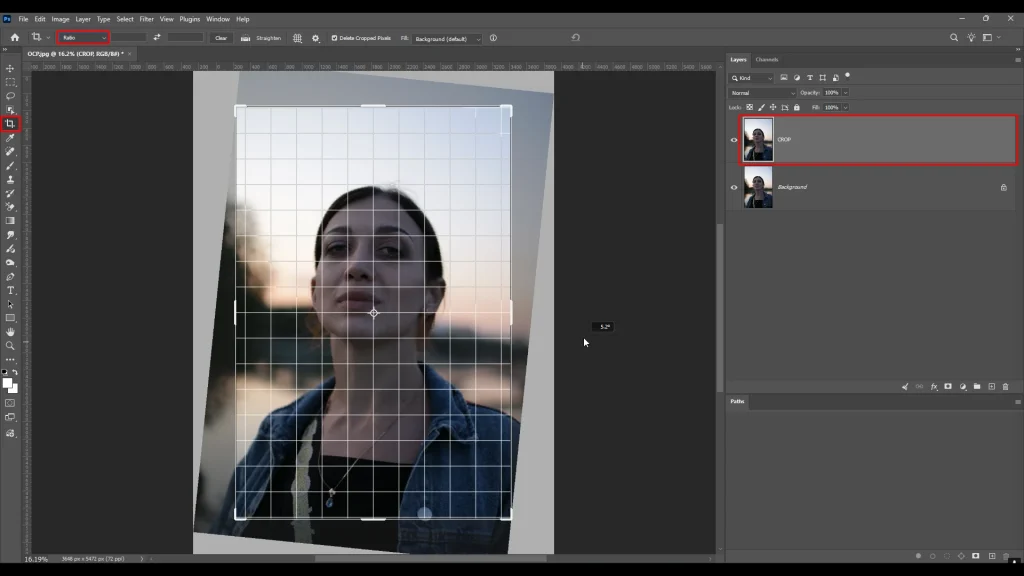
Start with composition before touching color or light. Use Photoshop’s Crop tool (shortcut: C) to straighten tilted horizons and tighten the frame around your subject. Cropping early means every adjustment after this only affects the part of the image that actually matters.
Step 2: Adjust Exposure and Lighting
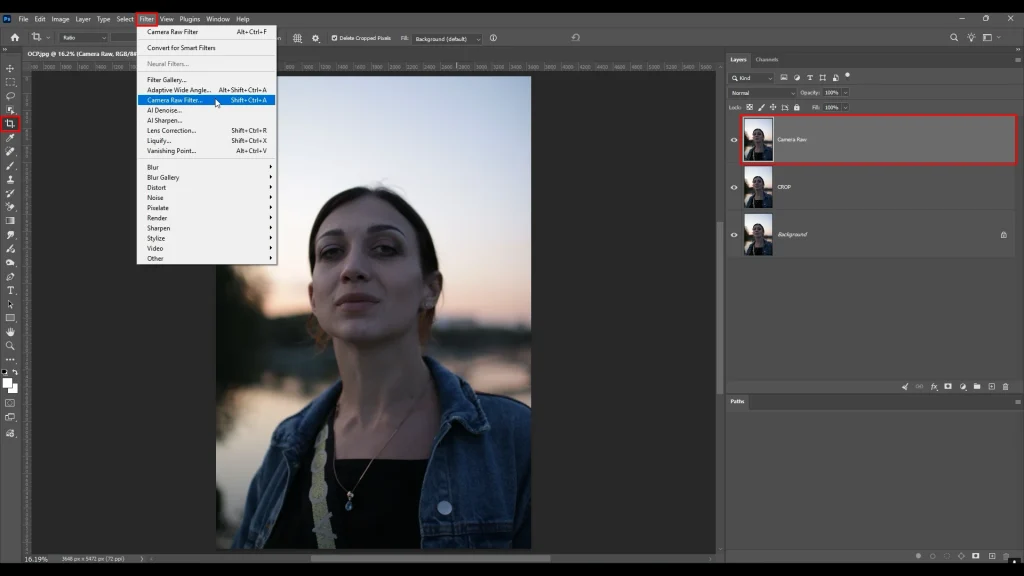
Open Camera Raw or the Adjustments panel and correct overall brightness first. Pull down blown-out highlights, lift crushed shadows, and aim for an image where detail is visible across the whole tonal range before you touch anything else. Keep an eye on the histogram as you work; it’s the fastest way to catch clipped highlights or shadows. Use an Adjustment Layer instead of editing directly whenever possible.
Note: Camera Raw is a built-in Photoshop panel that opens automatically when you edit a RAW file (and can also be used on JPEGs/TIFFs via Filter > Camera Raw Filter). Think of it as your first-stop control room for a photo. It lets you adjust exposure, white balance, contrast, highlights, shadows, color, and sharpening all in one place, non-destructively.
Step 3: Correct White Balance
Use the White Balance eyedropper or the temperature and tint sliders to remove unwanted color casts. Like the yellow tint from indoor lighting or the blue cast from shade. Accurate white balance matters most for product shots and skin tones, where even slight color shifts change how trustworthy an image looks.
Step 4: Improve Contrast, Highlights, and Shadows
Add depth by separating your darkest and lightest tones without losing detail. Photoshop’s Curves adjustment gives the most control here. It lets you brighten highlights and deepen shadows in one move while keeping midtones natural.
Step 5: Fine-Tune Colors (Saturation & Vibrance)
Vibrance boosts muted colors while protecting skin tones. This makes it the safer choice for portraits. Saturation affects every color equally and works better for punchy products or landscape shots. Adjust gradually; small increases go a long way before colors start looking unnatural.
Step 6: Make Local Adjustments
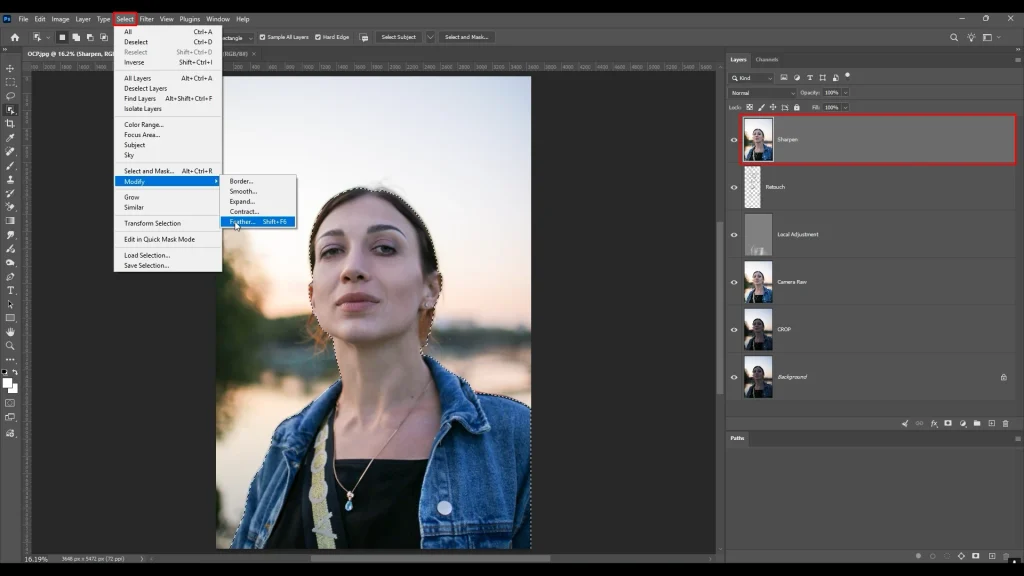
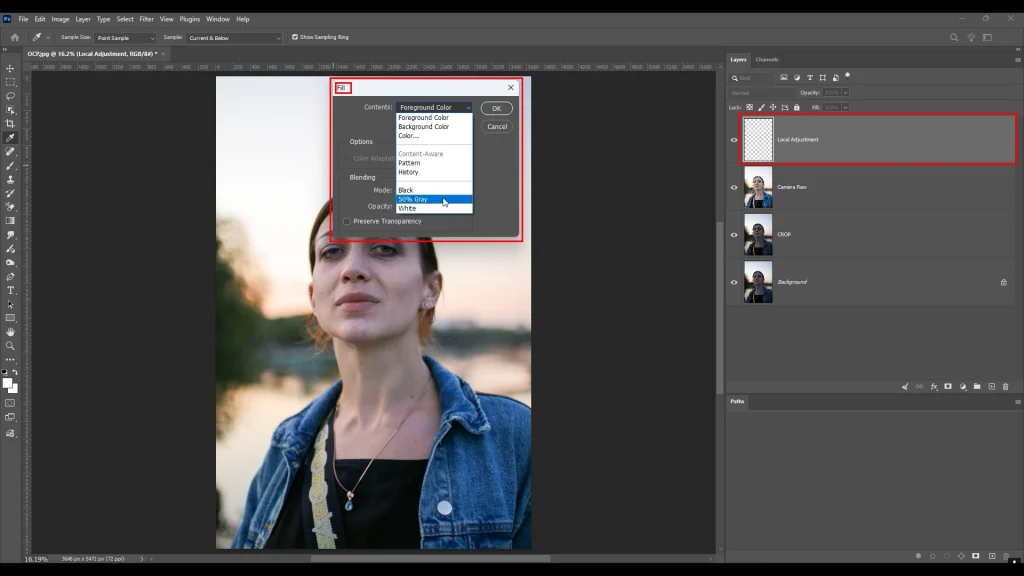
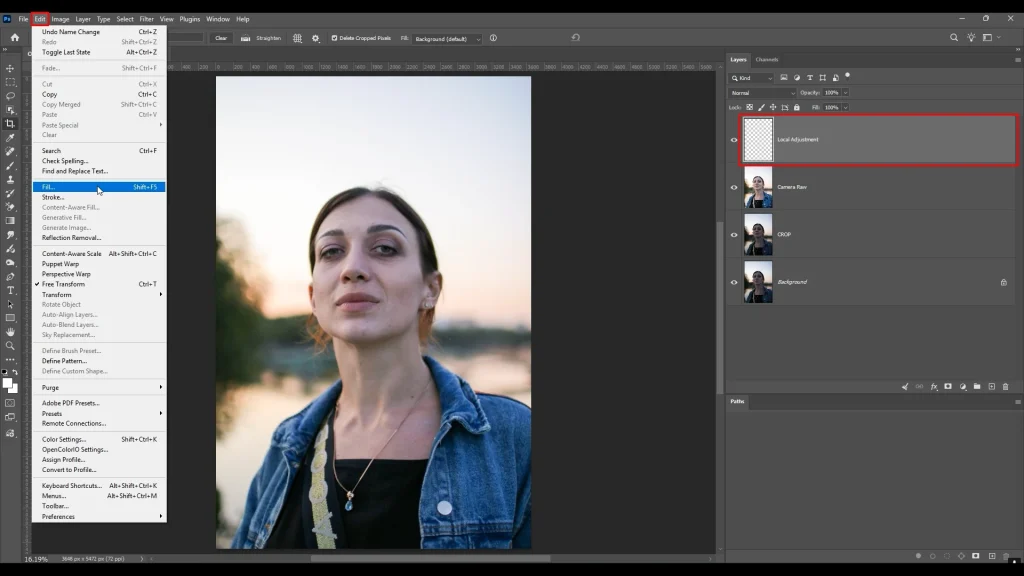
Global edits fix the whole image, but local adjustments, using masks, the Dodge and Burn tools (shortcut: O), or adjustment brushes, fix specific areas. Brighten a subject’s face, darken a distracting corner, or pull attention toward the focal point without changing the entire photo.
Step 7: Remove Blemishes and Unwanted Objects
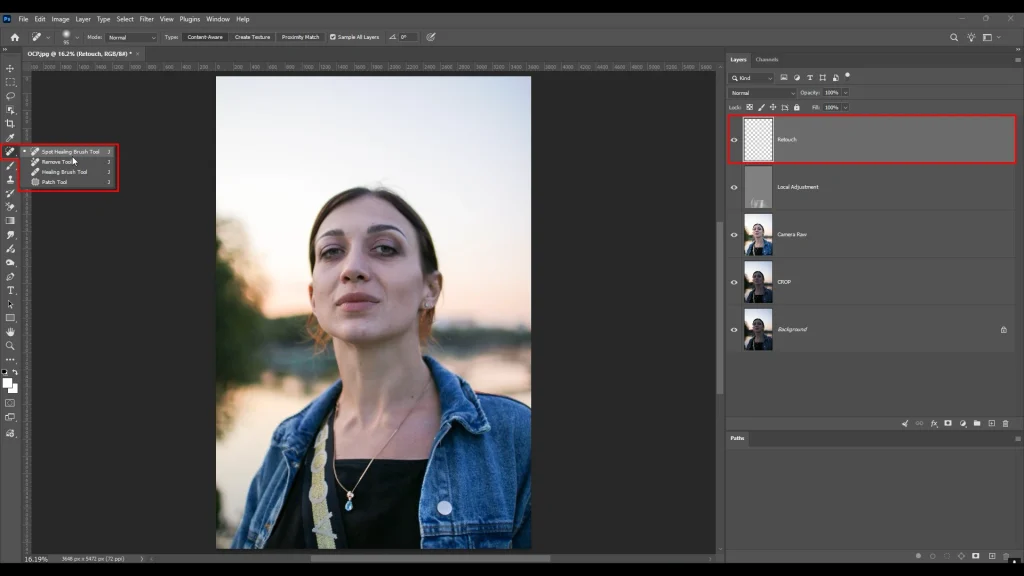
Photoshop’s Spot Healing Brush (shortcut: J) and Content-Aware Fill handle skin blemishes, stray hairs, sensor dust, and background clutter in seconds. For skin, this crosses into professional photo retouching, where consistency across dozens or hundreds of images matters as much as the technique itself.
If retouching an entire shoot manually sounds like a time sink, our photo retouching service handles it at scale while keeping every image looking natural.
Step 8: Sharpen Details and Reduce Noise
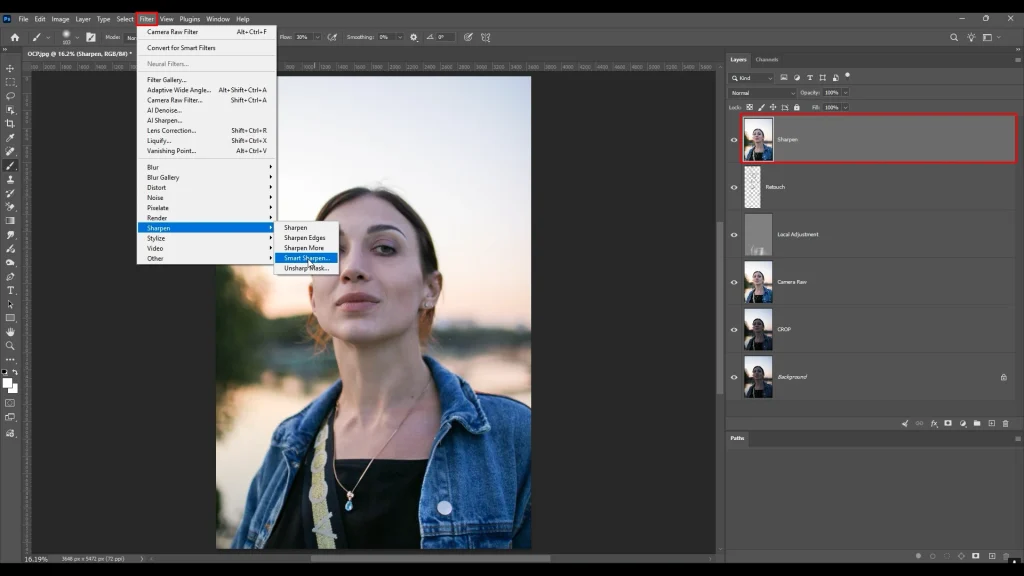
Apply sharpening last, after resizing, using Smart Sharpen for controlled results. If your shot was taken in low light, balance sharpening with Photoshop’s noise reduction so grain doesn’t get exaggerated alongside the details.
Step 9: Export Your Edited Photo
Save a layered master file first (PSD), then export flattened copies sized for their purpose: web, print, or social. Getting export settings right protects both image quality and page load speed, as covered in more detail later in this guide.
| Use | Format | Quality | Color Space | Resolution |
|---|---|---|---|---|
| Website | JPEG | 75-80% | sRGB | 72 DPi |
| Social Media | JPEG | 90% | sRGB | 72 DPi |
| E-commerce Listing | PNG/JPEG | 90-100% | sRGB | 72 DPi |
| JPEG | 60-70% | sRGB | 72 DPi | |
| TIFF | Full | Adobe RGB/CMYK | 300 DPI | |
| Archiving/Master File | PSD | Full | Adobe RGB | 300 DPI |
How AI Can Speed Up Photo Editing
AI tools inside Photoshop 2026 now handle tasks that used to take hours manually. They won’t replace editing judgment, but they remove the repetitive parts.
AI Remove Unwanted Objects
Generative Fill can erase people, wires, or trash from a background in one click, analyzing surrounding pixels to fill the gap convincingly instead of leaving a visible patch.
AI Sky Replacement
Overcast or blown-out skies can be swapped automatically, with lighting and color matched to the rest of the scene. This is useful for real estate and landscape work when the weather doesn’t cooperate on shoot day.
AI Noise Reduction
Photoshop’s AI-powered denoise tool separates grain from detail far more accurately than older sharpening-based methods. This matters for anything shot in low light, from events to interiors.
AI Portrait Enhancement
Neural filters can smooth skin, adjust expression subtly, or balance lighting across a face, though these should be used lightly to avoid an obviously artificial result.
AI Background Removal
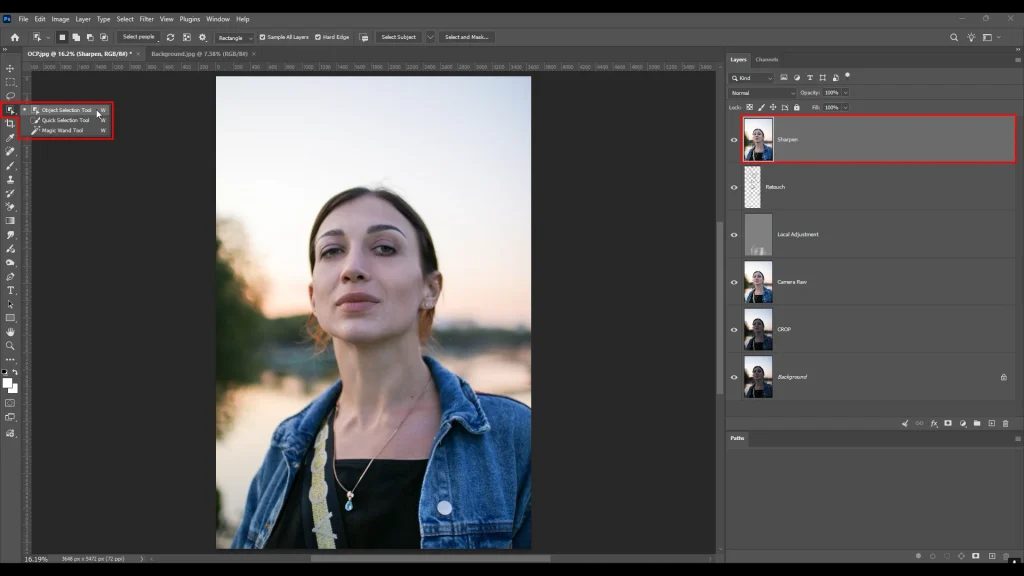
One-click background removal now handles most product and portrait shots accurately. But busy edges like hair or fabric still benefit from a manual check afterward.
For bulk product catalogs, our background removal service delivers consistent, e-commerce-ready cutouts without the manual cleanup.
AI Auto Color Correction
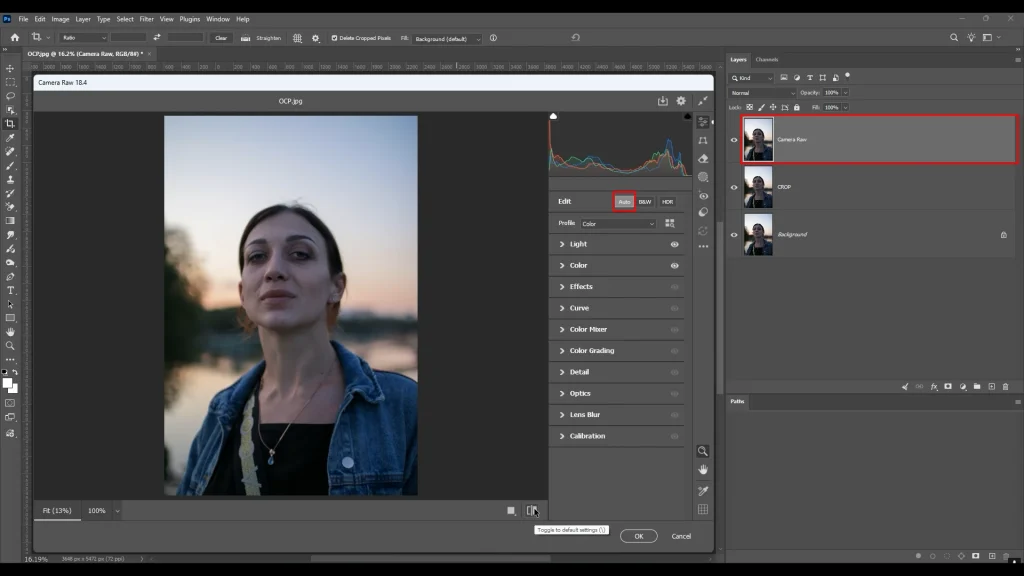
Auto color tools analyze an image and suggest a white balance and tone correction starting point. This is useful for quickly triaging a large batch before fine-tuning the ones that need more attention.
When AI Makes Photos Look Fake
AI edits fail when pushed too far, and the tells are usually easy to spot:
- Overly smooth skin: pores and fine lines vanish, leaving skin looking plastic instead of natural.
- Mismatched shadows: common after a sky swap, when the new light direction doesn’t match shadows still falling the old way.
- Ghost artifacts: faint outlines or smudged detail left behind after an object is removed, especially near hair or fabric.
Editing Different Types of Photos
The nine-step process holds up across photo types, but each one carries its own priorities worth knowing before you start.
Landscape
Landscape photo editing prioritizes dynamic range and color grading. This editing pulls detail from skies and shadows while keeping colors natural rather than oversaturated.
Portrait
This one focuses on skin tone accuracy and light retouching, smoothing texture without erasing it. Since overly perfect skin tends to read as fake. It balances technical adjustments (lighting, color correction) and detailed retouching (skin smoothing, eye brightening) to create visually stunning headshots or personal photos
Here are the elaborated versions — each opens with a clear, self-contained definition (good for AI Overview extraction), then adds the reasoning and a practical detail:
Product
Consistency matters more than creativity here, since shoppers compare listings side by side and any mismatch in lighting or color reads as unprofessional. Match brightness, background tone, and white balance across every SKU. So a catalog looks like one continuous shoot rather than ten separate ones. This is especially important for apparel and multi-angle listings.
Our e-commerce image editing service standardizes product photos across entire catalogs, so every listing matches your brand.
Food
Food editing works best when warmth and texture are boosted just enough to make a dish look fresh and appetizing. Slightly increasing contrast and clarity brings out texture, like the crisp edge of a crust or the steam off a hot dish. Keep an eye on skin-tone-adjacent colors too. An overly orange burger or unnaturally red sauce undercuts trust faster than a plain, honest shot.
Night
Night and low-light photos need careful noise management, since aggressive noise reduction can wipe out fine detail along with the grain. Avoid crushing shadows to pure black. Instead, lift them slightly so texture and depth remain visible in the darkest parts of the frame. A touch of extra sharpening on light sources and edges also helps a night shot feel crisp.
Street
Street photography generally rewards restraint, leaning on contrast and mood rather than heavy color correction or smoothing. A slightly gritty, high-contrast edit often reads as more authentic than a polished one. Keep skin tones and signage colors close to accurate, even while pushing contrast.
Travel
Travel editing is about matching the final image to how a place actually felt in person. Enhance the atmosphere, warm light at golden hour, and the blue of open water, without pushing saturation so far that skies, landmarks, or foliage start. Consistent color grading across a travel gallery also helps the set feel like one cohesive story.
Wildlife
Wildlife shots benefit from selective sharpening focused on the subject, especially the eyes and fine detail in fur or feathers. Keep the background slightly softer than the subject to preserve a sense of depth and separation. Because wildlife photos are often shot at a distance, careful cropping combined with selective noise reduction can recover apparent detail without making the image look artificial.
Sports
Sports photography editing prioritizes speed and consistency over individual perfection, since a single game or event can produce hundreds of usable images that need to be delivered fast. Apply a base correction for exposure and color across the batch first, then fine-tune only the standout shots individually. Same-day or next-day turnaround is common in this space.
Real Estate
Real estate editing starts with straightening vertical lines, since even slightly tilted walls and door frames make a room look unstable in photos. Brighten interiors evenly so no single area, like a window or lamp, blows out while the rest of the room stays dim, and correct color casts caused by mixing daylight with indoor lighting.
Wedding
Wedding galleries usually span dramatically different lighting, indoor ceremonies, outdoor portraits, and dim receptions. So, the main challenge is applying one consistent color style across all of it. Skin tone accuracy has to hold steady throughout. Couples and families will notice inconsistency in a gallery of hundreds of images faster than almost any other flaw.
Black & White
Converting to black and white works best through channel mixing rather than simply removing saturation. A flat desaturation tends to compress tonal range and leave the image looking dull. Channel mixing lets you control how each color translates to gray, darkening a blue sky or brightening skin tones independently, which preserves contrast and depth.
Why Non-Destructive Editing Matters
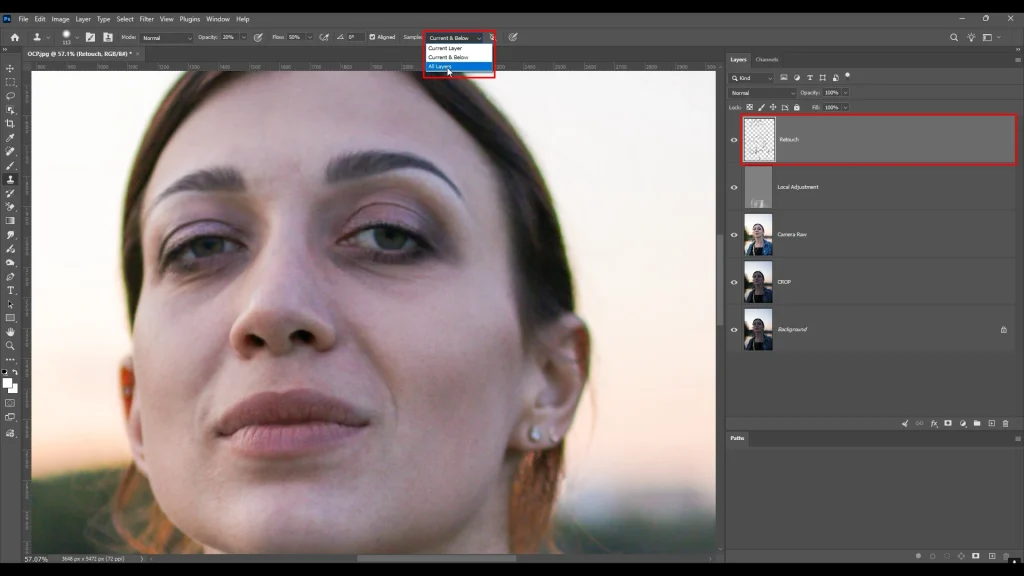
Non-destructive editing keeps your original file safe while giving you full freedom to revise your work later.
What Is Non-Destructive Editing?
It means applying edits through adjustment layers, smart objects, and masks instead of directly altering pixels. So, every change stays editable indefinitely.
Benefits of Editing Without Changing the Original File
You can revisit a project months later, adjust a single element, or create a different version for a new use case, all without starting over. This approach is central to professional photography post-processing. Here, edits are refined over days or weeks without ever risking the source file.
How Lightroom and Photoshop Support Non-Destructive Editing
Lightroom stores every edit as instructions layered over the original. Photoshop achieves the same with adjustment layers and Smart Object conversions. Also keeps raw pixel data untouched underneath.
Best Practices for Safe Editing
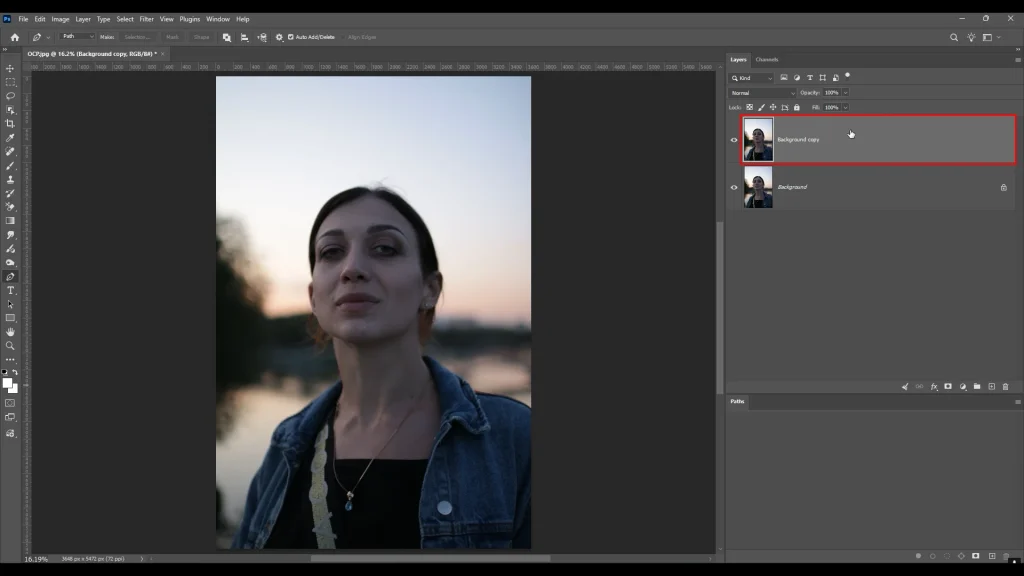
Following a few photo editing best practices keeps every edit reversible:
- Duplicate your background layer before editing
- Use adjustment layers instead of direct pixel edits
- Convert filters to Smart Filters where possible
- Save a layered master file, then export flattened copies
What Are the Essential Photo Editing Techniques?
- Cropping for Better Composition: Recomposing after the shot fixes framing issues and reinforces techniques like the rule of thirds, tightening focus on the subject.
- Global Adjustments: Edits applied to the entire image, exposure, white balance, and contrast set the overall look before any detail work begins.
- Local Adjustments: Targeted edits to specific areas, brightening a face or darkening a background, refine the image without affecting untouched sections.
- Retouching Imperfections: Smoothing skin, removing blemishes, and correcting small distractions polishes an image without altering its overall honesty.
- Removing Unwanted Objects: Content-Aware Fill and Generative Fill the space with clean-up distractions, stray objects, and wires. Photobombers that pull attention from the subject.
Which Photo Editing Tools Should Beginners Use?
Adobe Photoshop
The most complete option for layered, precise editing, ideal once you’re ready to move past basic adjustments. Adobe’s official Photoshop brings the latest features that help users edit photos with ultimate optimization.
Adobe Lightroom
Adobe Lightroom is built for fast, consistent batch editing across large photo sets. This tool provides the common need for photographers to deliver full galleries.
Canva
Canva is a simple, template-driven option for quick social graphics and light photo touch-ups. But this one is not built for detailed retouching work. You can use both the web version and the application.
Snapseed
It’s a free, capable mobile app for editing on the go. Snapseed is useful for content creators posting directly from their phone.
Apple Photos and Google Photos
These are built-in apps with basic auto-enhance tools. Apple Photos and Google Photos are good enough for casual edits but limited for anything requiring precision or layers.
What Settings Should You Adjust First?
Start with these, in order, before moving to creative adjustments:
- Exposure: Overall brightness across the image
- Brightness: Fine-tunes exposure without affecting contrast as strongly
- Contrast: The gap between your lightest and darkest tones
- White Balance: Removes unwanted color casts from lighting
- Saturation and Vibrance: Controls color intensity; vibrance protects skin tones
- Clarity and Sharpness: Adds midtone contrast and edge definition last
How Can You Make Photos Look Professional?
Here are some tips you can follow to make your photos look professional and vibrant.
Keep Colors Natural
Always resist pushing saturation and contrast too far. The most professional-looking edits are often the most restrained ones.
Improve Composition
A crop that follows the rule of thirds or leading lines does more for perceived quality than any color adjustment.
Create a Consistent Editing Style
Applying the same tone and color approach across a portfolio or catalog builds a recognizable, trustworthy brand look. Stylistic touches like grain, light leaks, or color grading fall under photo editing effects and are used sparingly. They add polish without looking artificial.
Use Selective Adjustments
Guide the viewer’s eye with local brightness and color tweaks rather than applying one blanket edit to the whole frame.
Tips to Edit Photos Faster
- Use Presets: Save your go-to adjustment combinations as presets or actions to apply your style in one click across similar shots.
- Batch Edit Similar Photos: Apply the same base correction across a whole set shot in matching conditions, then fine-tune only the outliers individually.
- Create a Repeatable Workflow: Following the same step order every time- crop, light, color, retouch, sharpen, export, cuts decision fatigue and speeds up delivery.
- Use Keyboard Shortcuts: Learning shortcuts for your most-used tools, healing brush, crop, curves, saves meaningful time across a full editing session.
Need professional photo editing service with exceptional turnaround? Offshore Clipping is always ready to meet your expectations.
Common Photo Editing Mistakes to Avoid
- Overediting the Image: Piling on too many adjustments erases the natural quality that made the photo worth editing in the first place.
- Oversaturating Colors: Pushing saturation too far looks artificial and fake. Especially on skin tones and skies, it rarely reads as professional.
- Excessive Sharpening: Over-sharpened images develop visible halos and harsh edges instead of genuine detail, an easy mistake to spot in a final review.
- Ignoring Image Composition: No amount of color correction fixes a poorly framed shot. Composition problems should be solved before any color work begins.
- Spending Too Much Time on Minor Details: Perfecting an invisible flaw at 400% zoom wastes time better spent on the adjustments viewers will actually notice.
Best Export Settings for Edited Photos
- Choosing the Right File Format: JPEG suits most web and social use, PNG preserves transparency, and TIFF or PSD keeps full quality for print or archiving.
- Export Quality for Web: Compress to roughly 70-90% quality with an sRGB color space, keeping files light enough for fast page load without visible quality loss.
- Export Quality for Print: Export at 300 DPI in CMYK or a print-ready profile your lab specifies, since screen colors and print colors don’t always match exactly.
- Optimizing File Size: Resize to the exact dimensions you need before exporting; oversized files slow down websites without adding any visible benefit.
Frequently Asked Questions
How can beginners edit photos?
Start with a simple order: crop, correct exposure and white balance, adjust color, retouch, then sharpen and export. Photoshop’s Camera Raw panel handles most of this in one place.
What is the best app for editing photos?
Adobe Photoshop offers the most control for detailed edits, while Lightroom suits fast batch work and Snapseed works well for mobile editing on the go.
What should I edit first in a photo?
Composition and exposure come first. Crop and straighten, then correct brightness and white balance before touching color or retouching detail.
How do I make my photos look professional?
Keep colors natural, maintain a consistent style across your work, and use selective adjustments rather than one heavy edit applied to the whole image.
Can I edit photos on my phone?
Yes, apps like Snapseed and Lightroom Mobile handle cropping, color correction, and light retouching well, though detailed work still suits desktop software better.
What is the difference between RAW and JPEG?
RAW captures more image data and allows deeper correction without quality loss, while JPEG is compressed and smaller but has less room to fix mistakes.
How much photo editing is too much?
If an edit removes natural texture, distorts proportions, or looks obviously artificial next to the original, it has gone too far.
What file format should I export?
Use JPEG for web and social, PNG when you need transparency, and TIFF or PSD for print or when preserving full editing quality.
Conclusion
Editing is what separates a good photo from one that actually works: one that sells a product, books a client, or earns a follow. The steps above hold up whether you’re batch-processing a product catalog or retouching a single wedding gallery, and small refinements over time build a style people recognize as yours.