If you want to become an expert graphics designer, you must know how to remove background in GIMP.
GIMP or GNU Image Manipulation Program is a software that is easily available. It is free and quite simple to use. It’s particularly a good option for beginners. If you find Photoshop too hard to use, you can try GIMP.
The GIMP interface is similar to Photoshop and other such tools. It also has a wide range of amazing tools that can help you create beautiful designs. From removing background from photographs to creating posters, you can do it all on GIMP.
In this tutorial, we are going to look at how you can download GIMP free. We will then learn how to use GIMP and how to remove background in GIMP. This extensive guide will teach you everything you need to know to use GIMP like a pro!
This tutorial is designed to help beginners get started. If you are an expert and looking to learn a new skill, this guide can prove to be quite beneficial for you.
So, let get started.
What you’ll learn in this article
How to Download GIMP?
If you want to learn how to use GIMP, you must first download this software. Good thing is, it is free, open-source software you can easily download and install on your computer. Below, you can find a step-by-step tutorial for downloading GIMP.
Step 1 – Go to the GIMP site:
Go to the GIMP site to download the setup file. You can find the link here
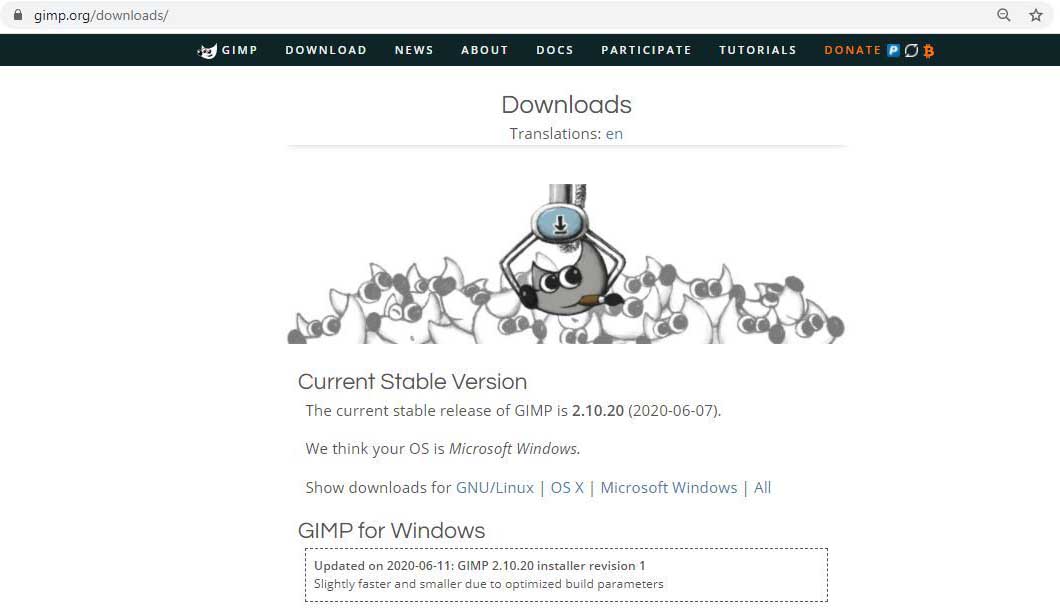
Step 2 – Download setup:
Download the GIMP setup file for your operating system. You can find setups for Windows, iOS, and Linux. You can choose to download the file directly or through a torrent program.
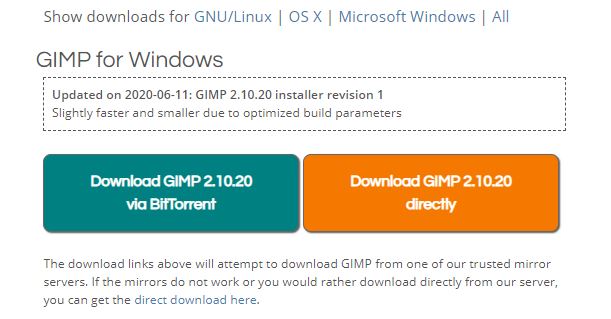
Step 3 – Install GIMP:
Once you have downloaded the .exe file, the next step is to run this file and start the GIMP installation process. Select language. Click on install. It will take some time but the software would be installed on your computer and will be ready for use.
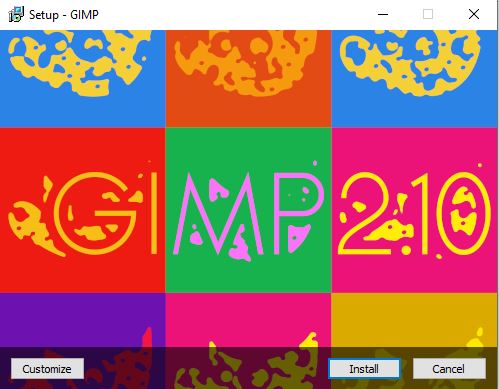
That’s all. It is a simple process and you don’t have to pay to use this software. The download is safe and there are no threats of malicious software entering your system while downloading it.
You don’t have to use any crack keys or download from suspicious sites. GIMP is free and available to everyone.
Once you have installed the software, you are now ready to learn how to remove background in GIMP.
How to Remove Background in GIMP?
If you are a graphics designer or a photographer, sometimes you are required to remove the background from an image. This may seem hard to do, but it is actually quite simple, particularly if you are using GIMP.
GIMP comes with a variety of different built-in tools. Some are very easy to use and others can be a little tough to use for the beginners.
When it comes to learning how to remove background in GIMP, you have a choice to pick the tool and method that fits your skill level and design needs.
In this tutorial, we are going to look at some of the best ways you can make the background of an image transparent in GIMP. You can practice all of these methods and find the one that you love the most. Once you get the hang of it, you can use and create professional designs in no time.
So let’s take a look at all the different tools you use to make the background transparent in GIMP.
Fuzzy Select Tool:
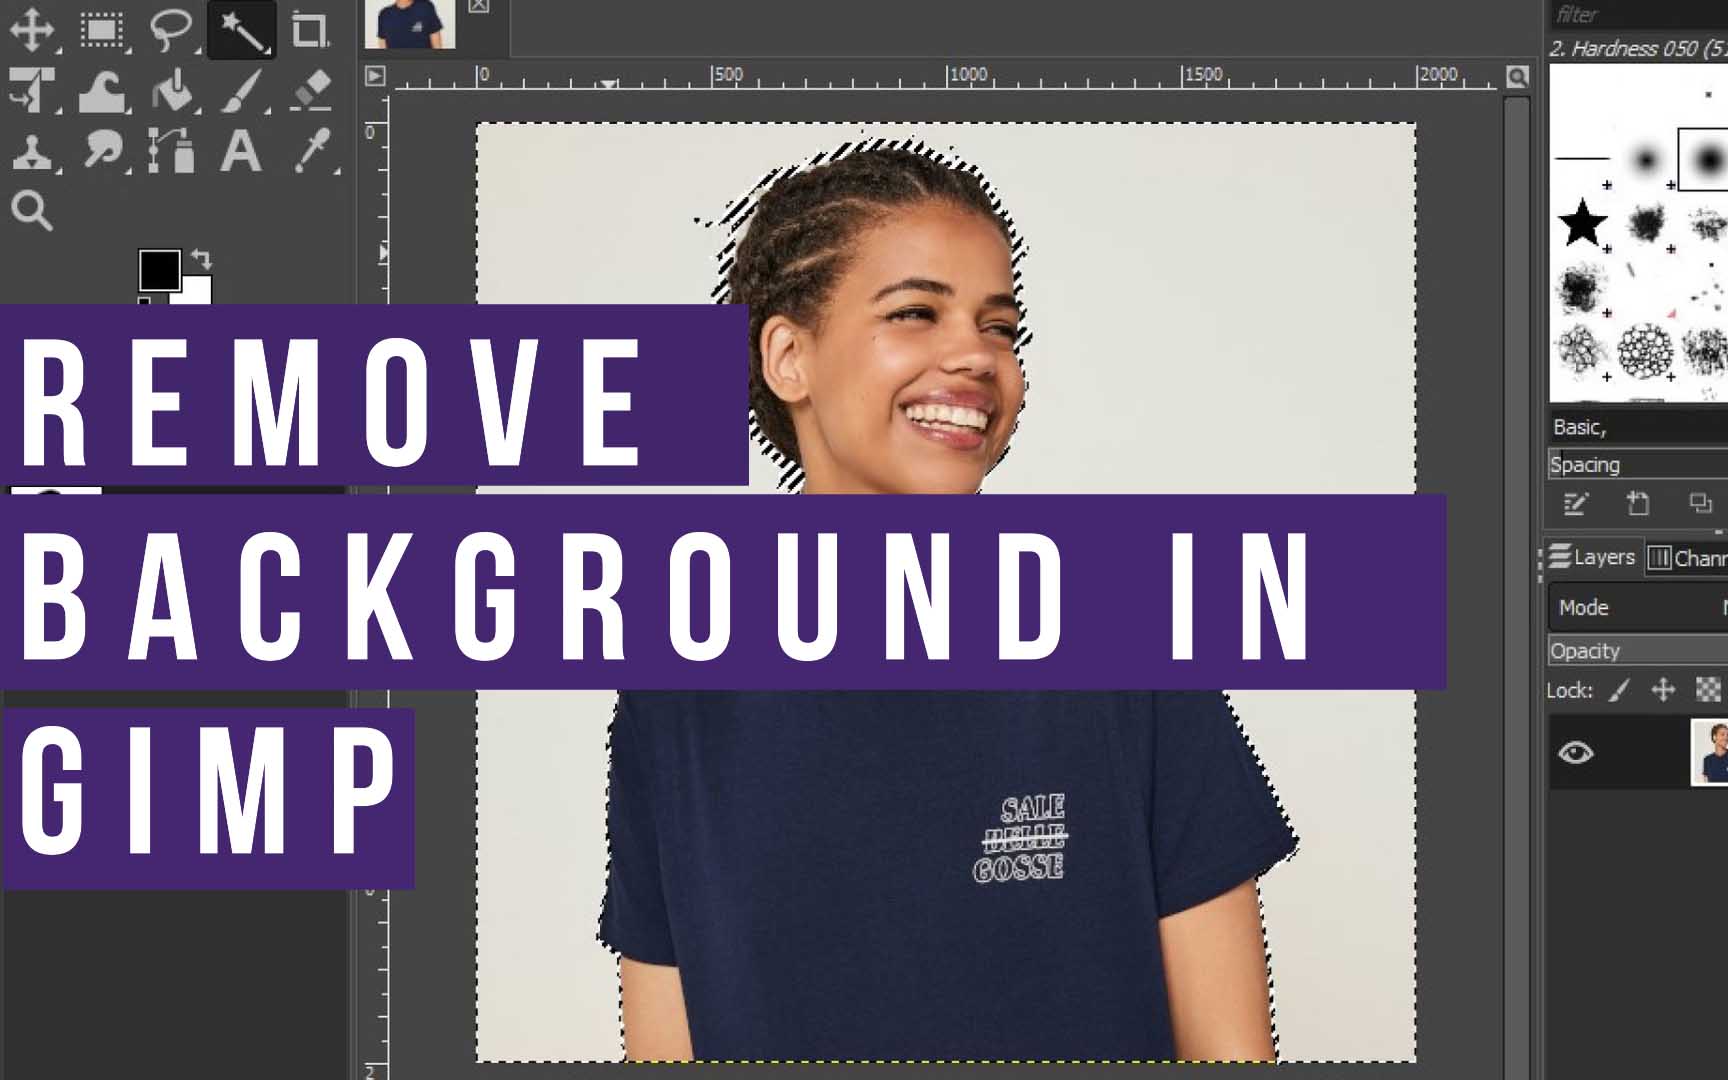
Fuzzy Select Tool in GIMP works the same way as the Magic Wand Tool in Photoshop.
It is a quick and effective method of removing the background. It can select regions that are similar in colour tone, making it useful for removing simple backgrounds. Let’s take a look at how to use this tool;
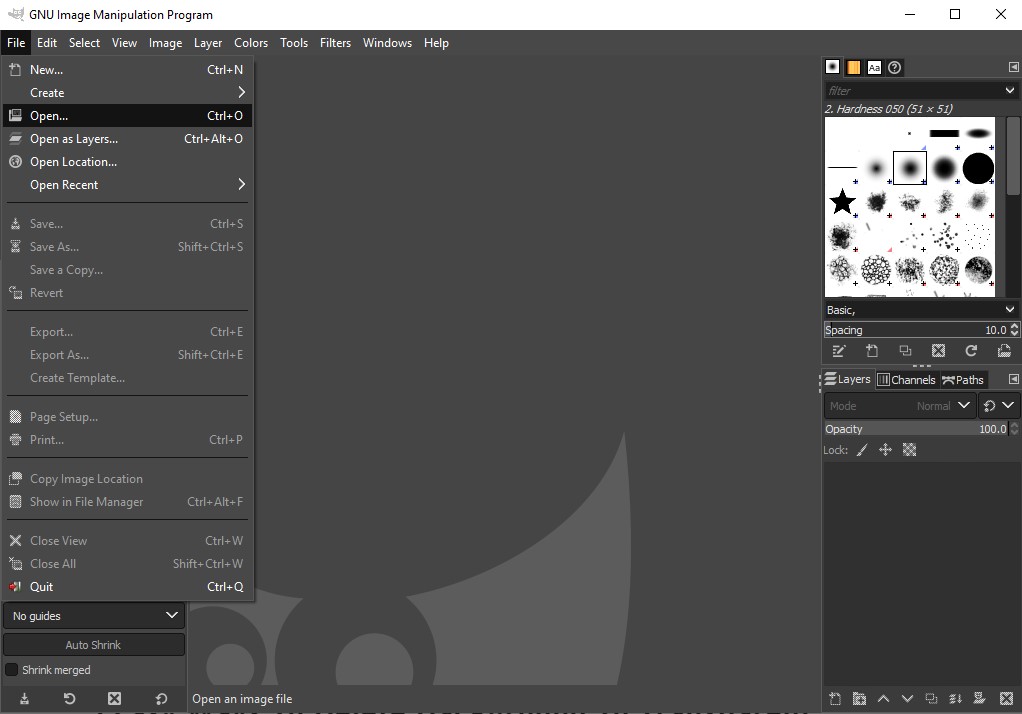
Step 1 – Open the Image:
To get started, open the image in GIMP.
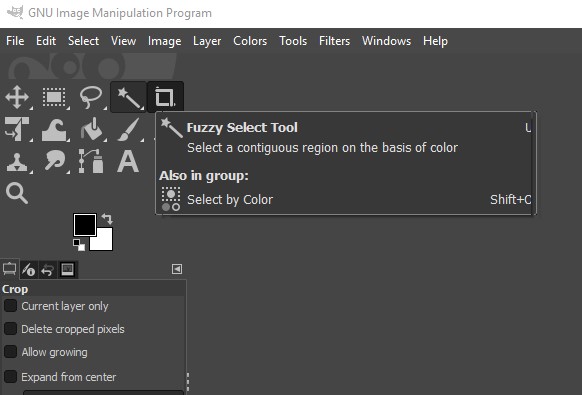
Step 2 – Select the Tool:
Now, go to the toolbar and find the Fuzzy Select Tool.
Step 3 – Select the Background:
Click on the background to select it. If your background is plain, it would take only one click to select it with this tool.
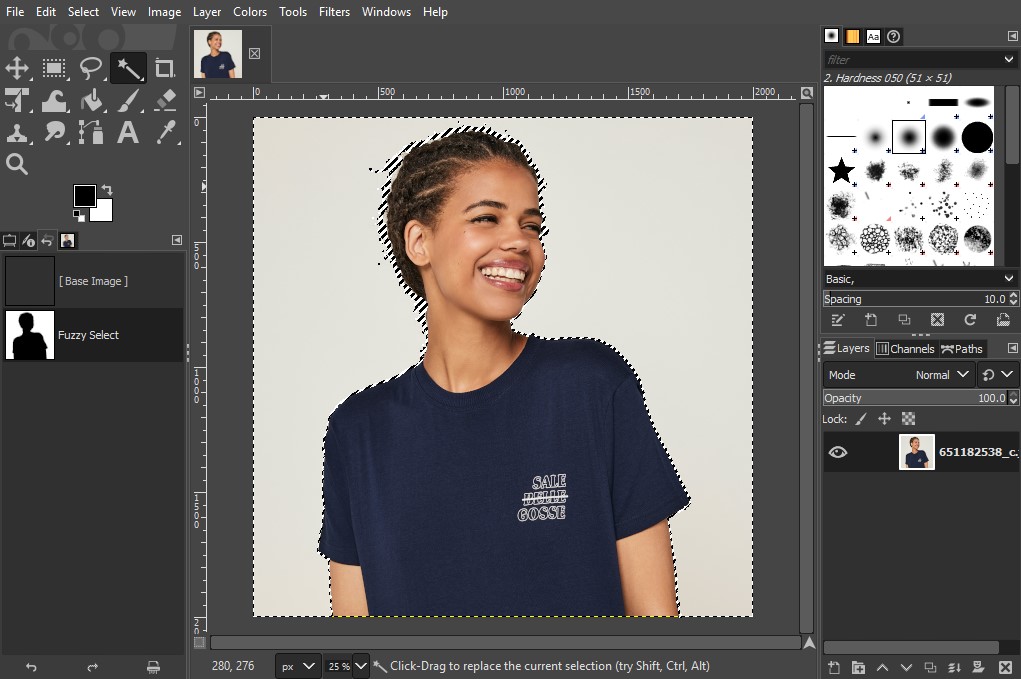
Step 4 – Remove the Background:
Simply hit delete on the keyboard to remove it.

You can zoom in to closely remove the details from the image. Fuzzy Select Tool is a quick method, but it is only suitable for simple images. If your image has a lot of details, this might not work so well.
Free Select Tool:
This tool is a little harder to use. It requires a good grip on the mouse. The Free Select Tool allows you to trace the boundary of the image with a freehand.
Once you are done, you can then remove the background.
Step 1 – Select the Tool:
Select the Free Select Tool from the menu.
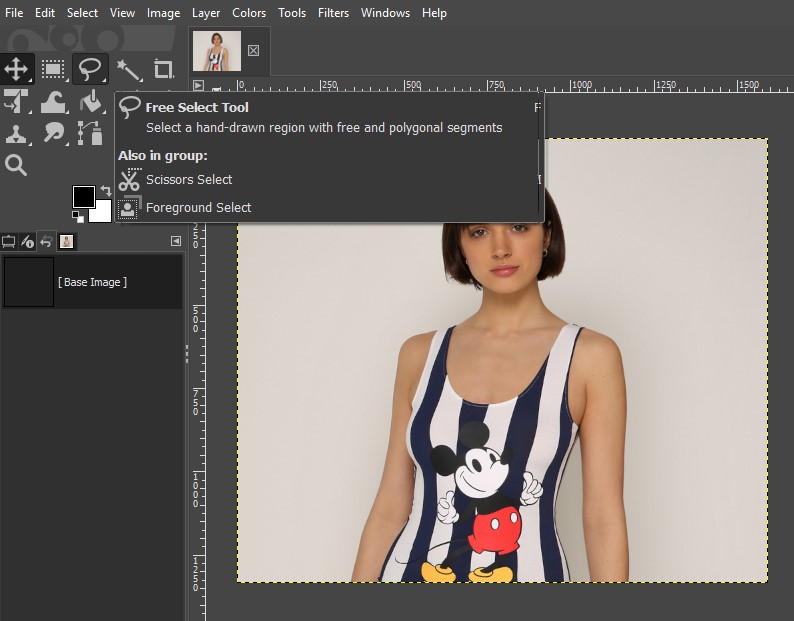
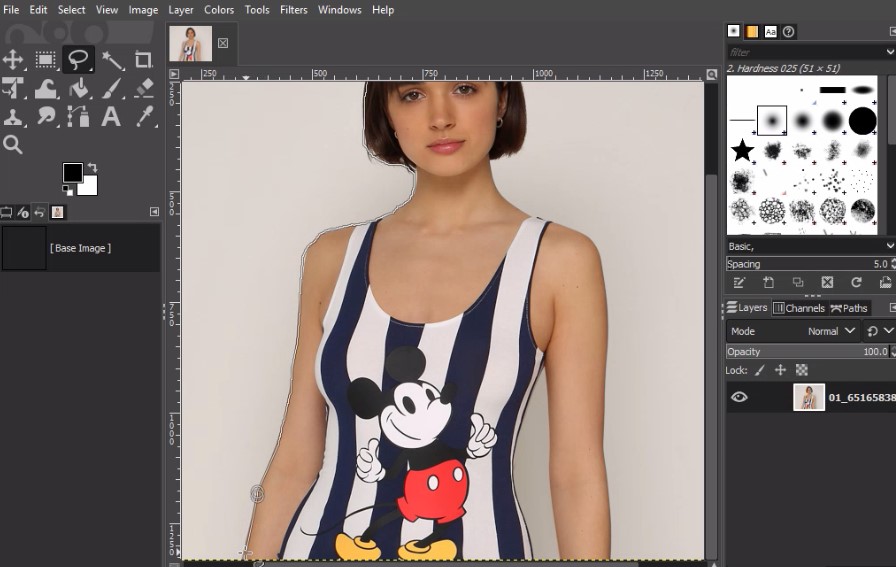
Step 2 – Trace the Image:
Using the Free Select Tool, start tracing a hand-drawn region. This might take some time so be patient.
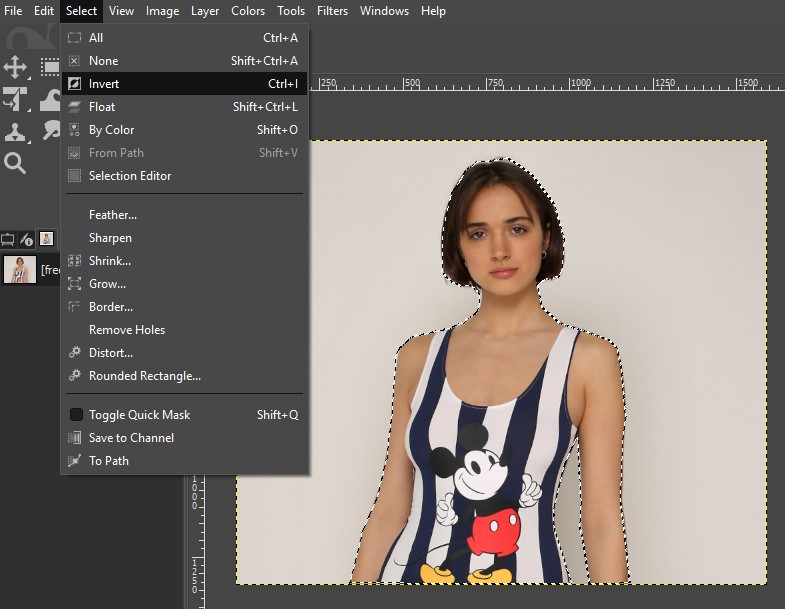
Step 3 – Invert the Selection:
Once you have traced the image, go to Select and Invert. This will select the background.
Step 4 – Delete the Background:
Simply hit Delete on keyboard and remove the background.

While the Free Select Tool is a great tool for removing background in GIMP, it cannot be used for images with fine details.
You also need to have a very steady hand to trace the image right. It is time-consuming and hard to use.
Quick Mask:
Quick Mask is an easy way to modify selections. It is not a tool, rather a series of steps. The process uses tools that can change pixels in an image to select a region.
These include the paintbrush tool or the eraser tool. You can also use it to remove a background.
It lets you make very accurate adjustments to your selections. Let’s get started.
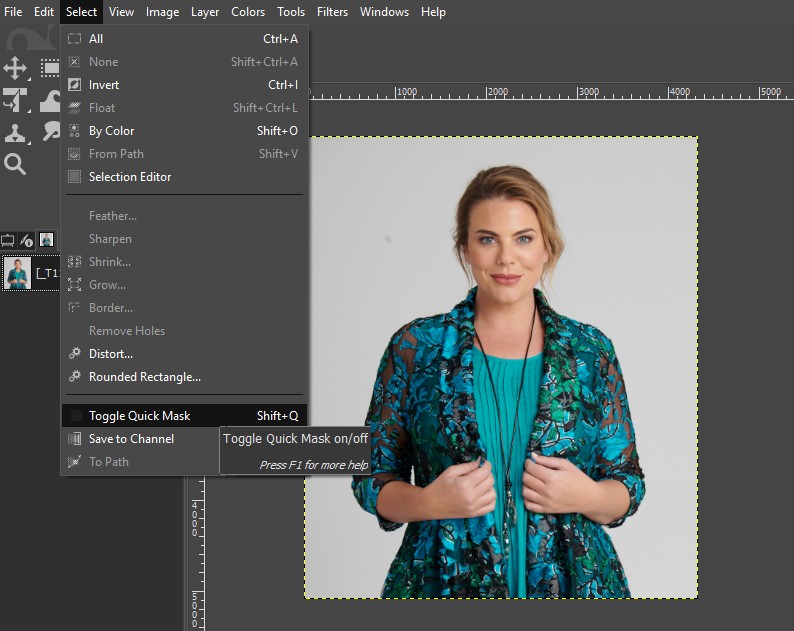
Step 1 – Turn on the Quick Mask:
To turn on the Quick Mask, you can press Shift+Q on your keyboard, or go to Select-> Toggle Quick Mask. As soon as you click it, your image will turn red.
Step 2 – Select Eraser:
To separate the background from the foreground, you need to use the eraser tool.

Step 3 – Erase:
Start erasing the foreground image. You can increase or decrease the size of the eraser by brackets ‘]’ and ‘[‘ on the keyboard. Zoom in and decrease the eraser size to closely remove the portion from the boundary of the image.
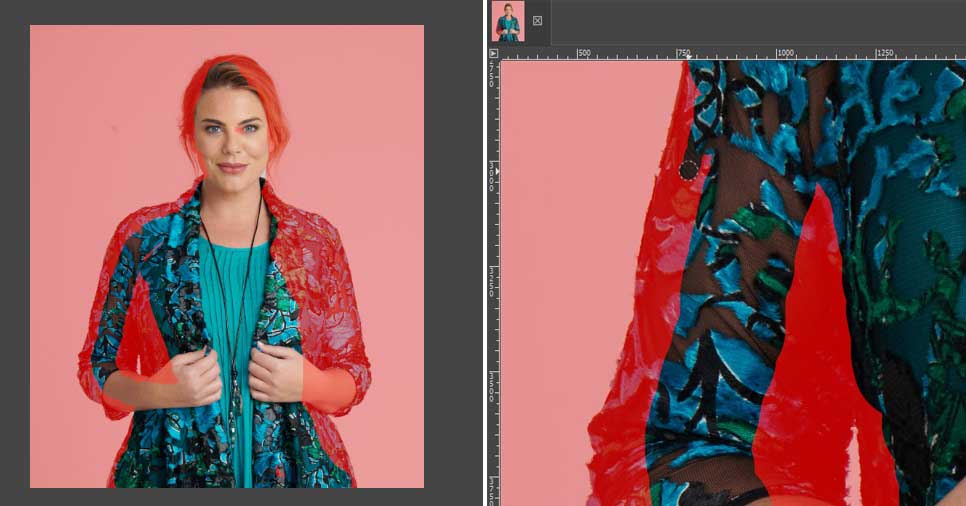
Step 4 – Erase:
Once you are satisfied, turn the Quick Mask Toggle off from the Select menu.
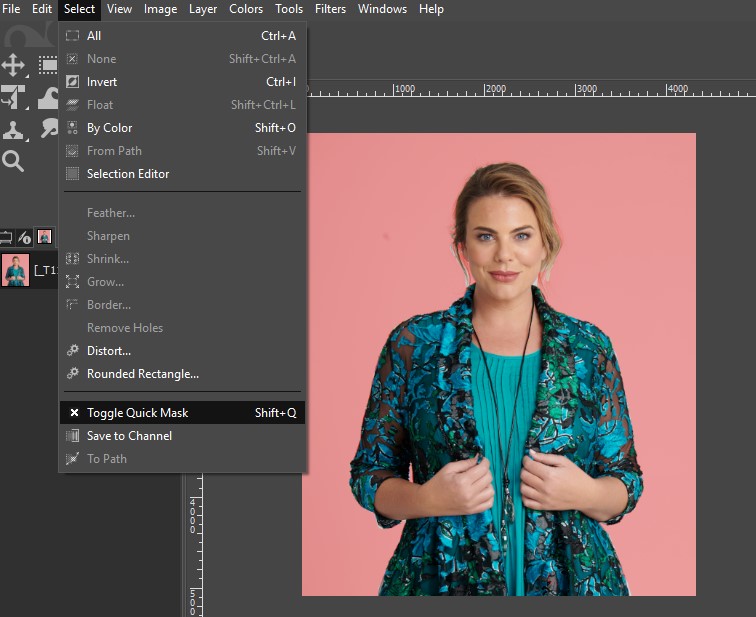
Step 5 – Invert Selection:
When you turn off the Quick Mask, the portion you erased will turn into a selection. However, we need the background, so go to Select->Invert to select the background.
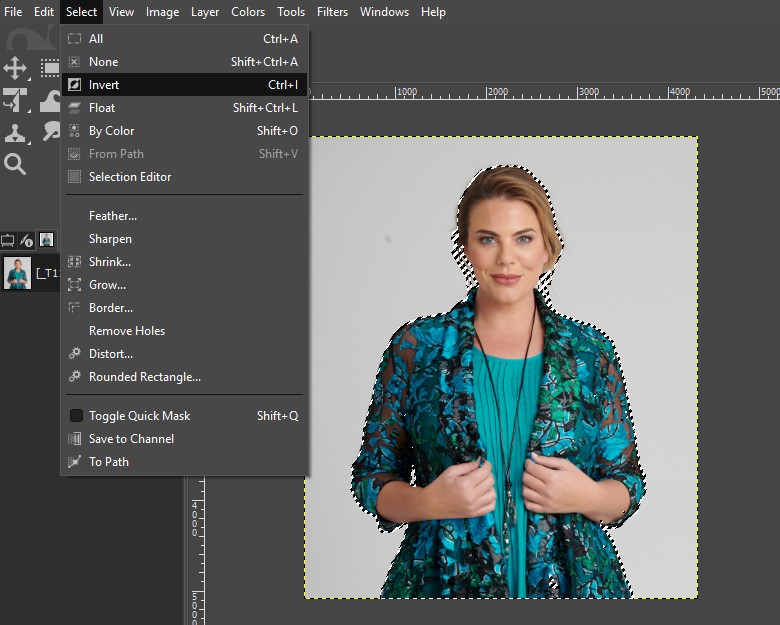
Step 6 – Delete Background:
Now hit Delete on the keyboard to remove the background.
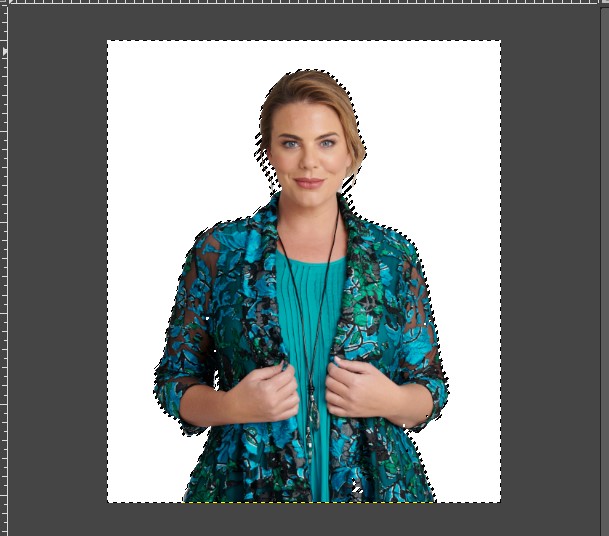
If you are learning how to remove background in GIMP, you have to use the Quick Mask method.
It is easy and can produce great results. You might need to practice a little to crop out the foreground, but it is still one of the most effective methods.
Layer Mask:
The Layer Mask is a highly recommended method for advanced users who want to learn how to remove background in GIMP. It is a series of steps that allows you to preserve all the details in the image.
However, it doesn’t work on every image. To use this tool, there must be a significant difference in the colours of background and foreground. Let’s take a look at how to use this tool.
Step 1 – Duplicate layer:
The first step is to duplicate layers with the image. We need two layers to create a layer mask. We will make three layers because the third can come in handy when fixing the final image in the end.
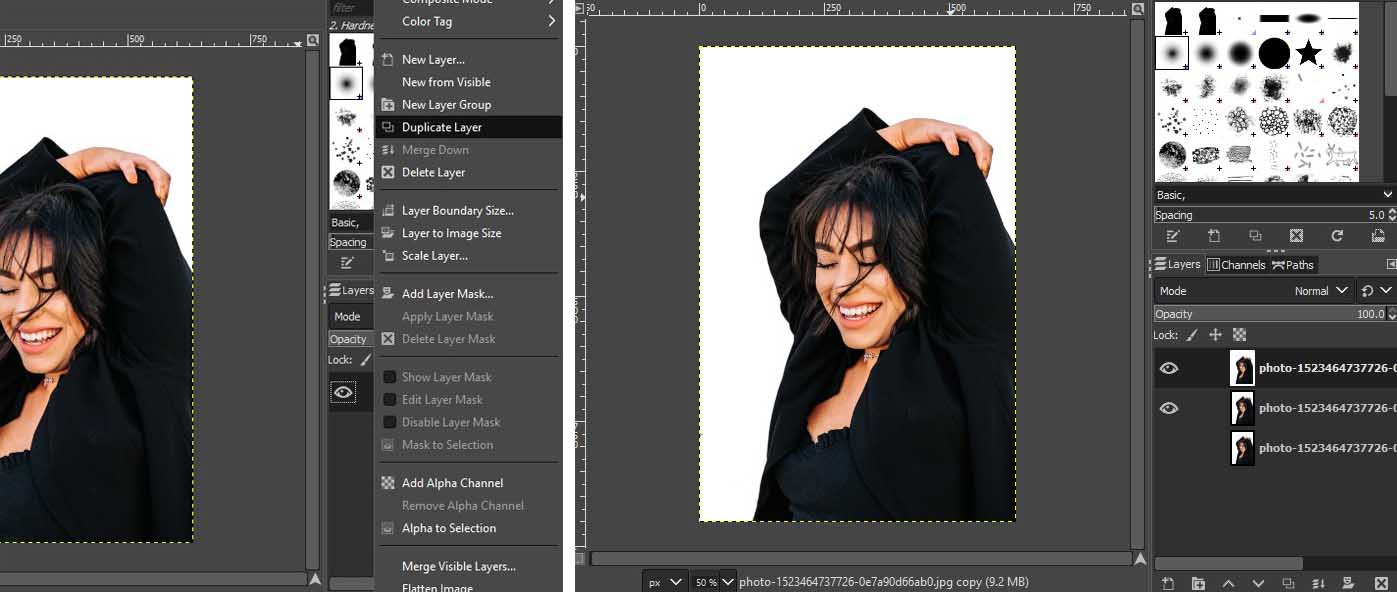
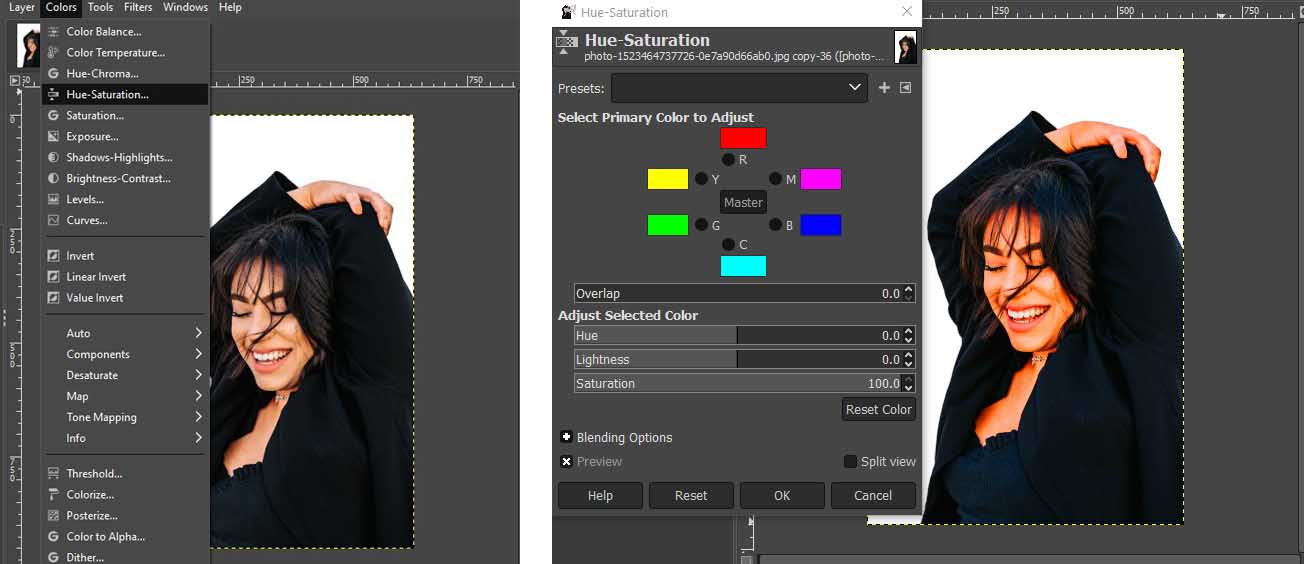
Step 2 – Increase Saturation:
To increase the colour difference between background and the image we need to increase saturation. Make sure you have selected the topmost layer when making these changes. Go to Colours and click on Hue-Saturation.
It will open a new box. Increase the saturation to the max and click OK. Do not worry if your image turns yellowish.
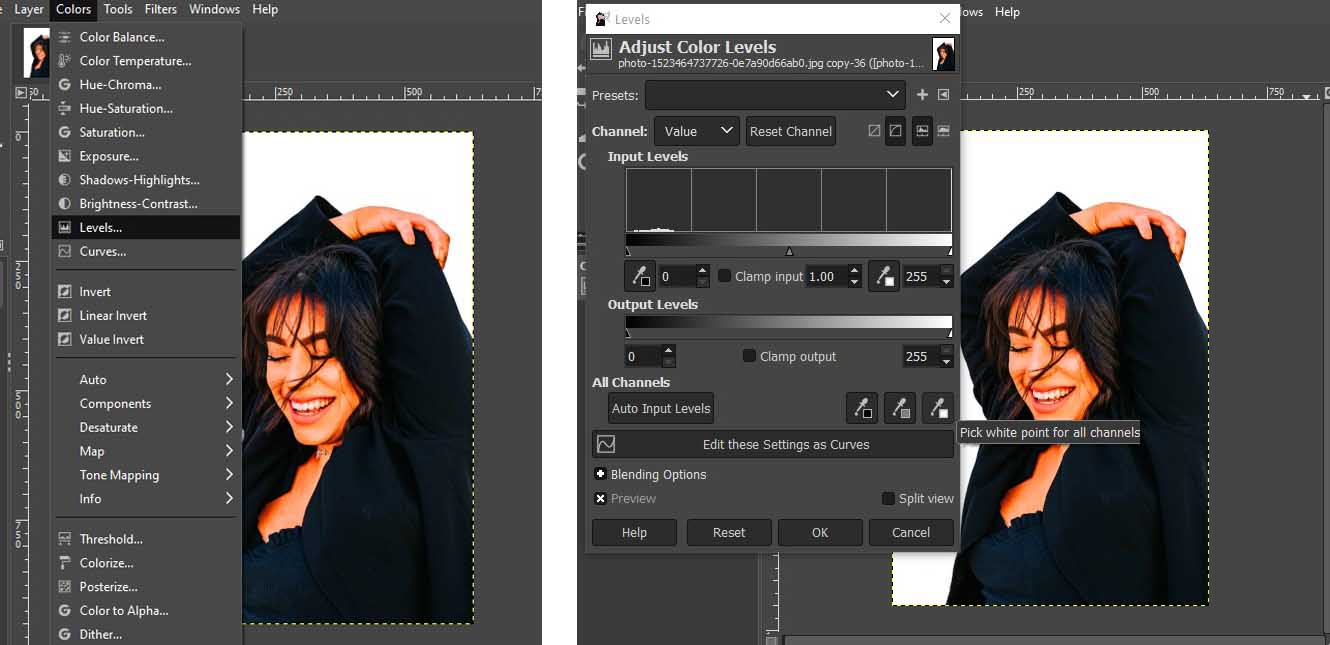
Step 3 – White Levels:
Next, we need to make sure the background is completely white. Go to Colours-> Levels. In the new menu, find the White Levels dropper tool.
With that selected, click on the darkest region in your background. This will turn your background completely white.
Step 4 – Desaturate:
If you are sure your background and foreground look visibly different you can proceed to the next step. Or you can increase the saturation of the image again, as mentioned in Step-2.
Go to Colours ->Desaturate. Choose “Luminous” as the Mode and click Ok. Remember, we are doing all of this on the topmost layer.
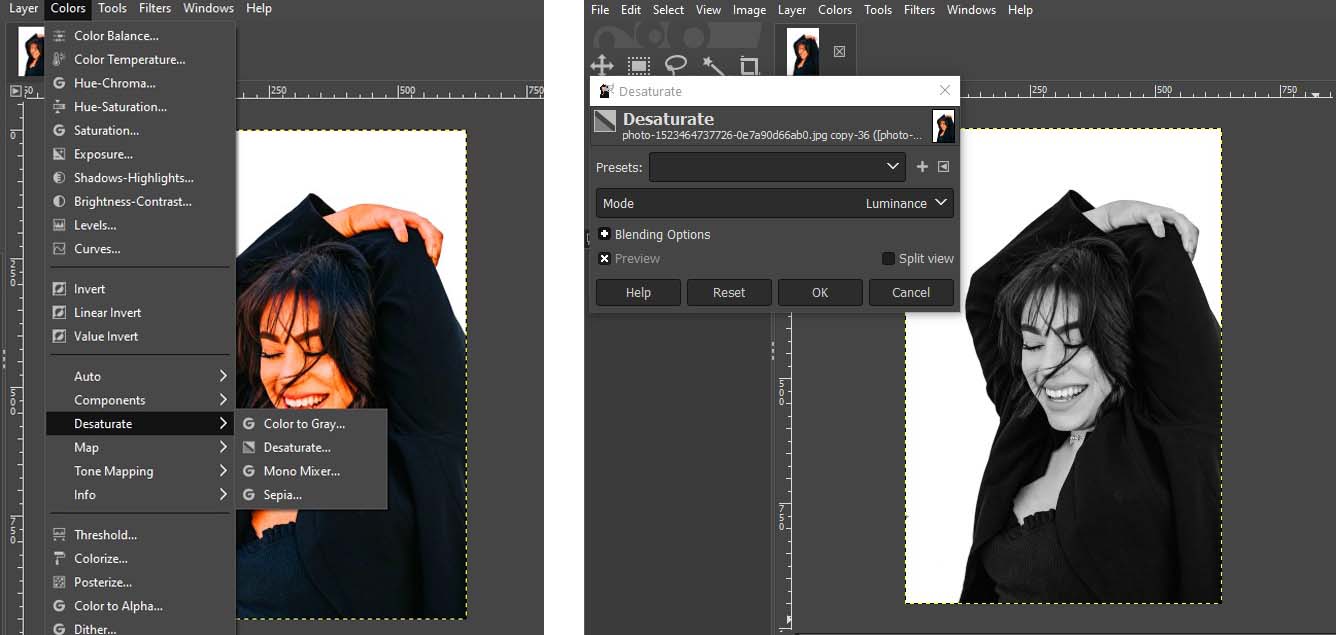
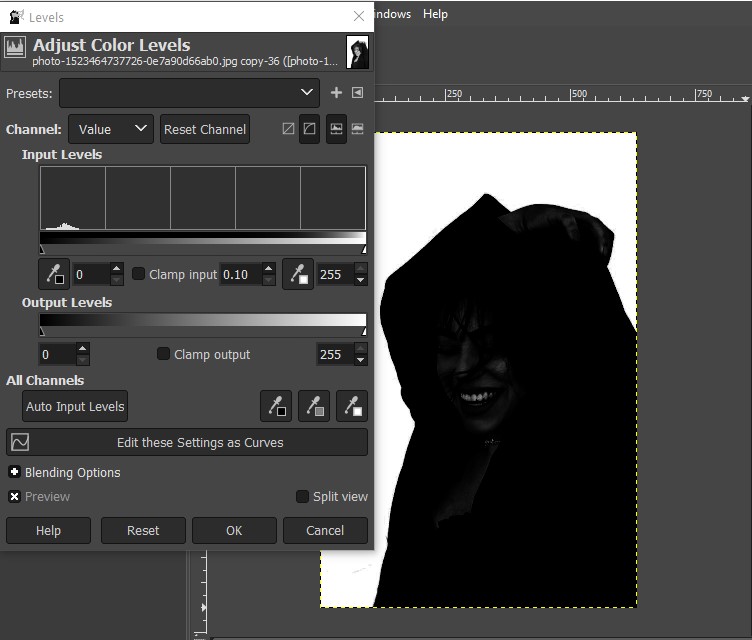
Step 5 – Change Colour Levels:
Go to Colours-> Levels. In the menu, increase the Input Levels to the max until the image turns completely black.
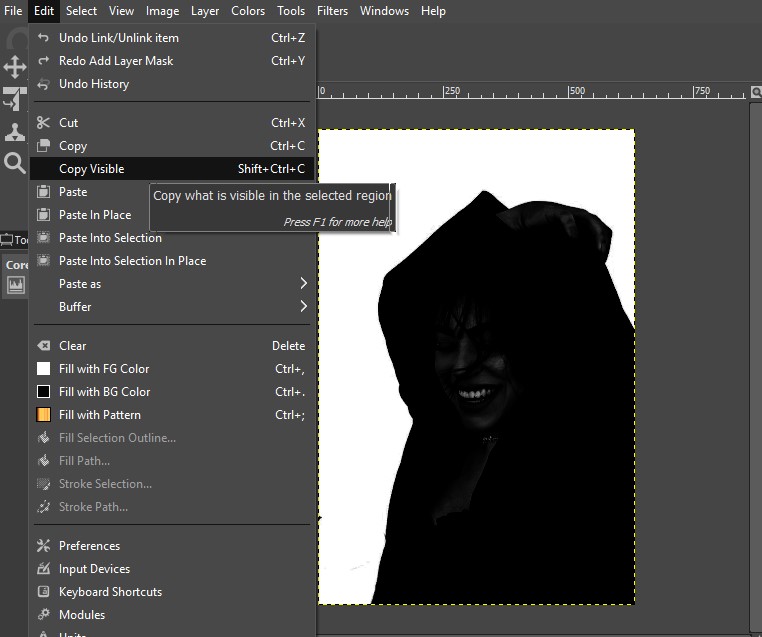
Step 6 – Copy Image:
With the topmost layer still selected, go to Edit and click on Copy Visible option.
Step 7 – Create Layer Mask:
Now select the second layer in the layer panel. Right-click on it and find the option that says “Add Layer Mask”.
Select the option that says White (full opacity) and click Add.

Step 8 – Paste:
Now with the second layer selected, go to Edit and click on Paste. This will turn your image grayish. Don’t worry that is exactly what we want.
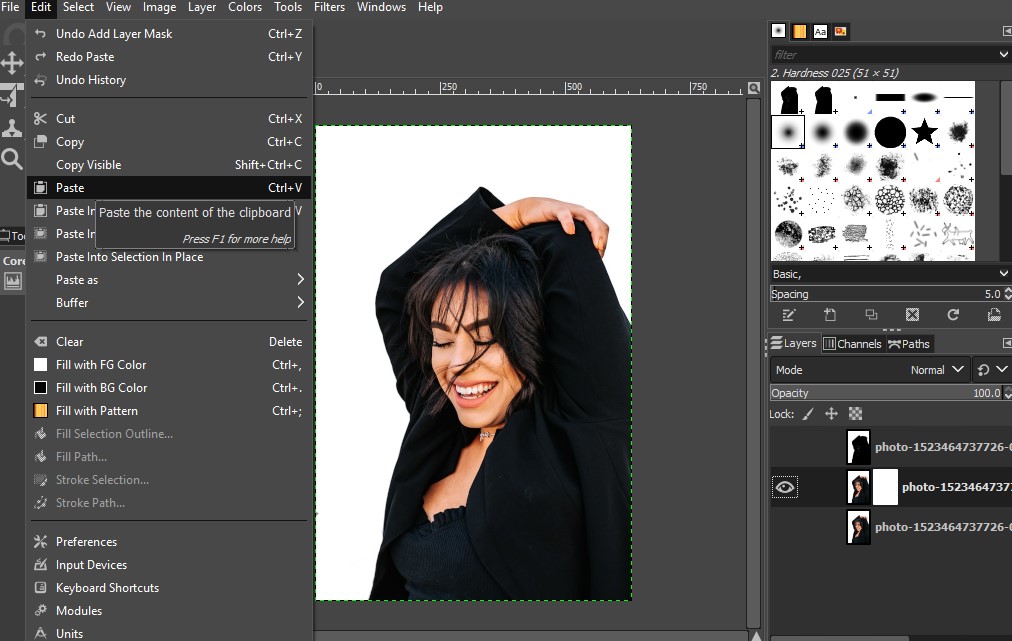
Step 10 – Anchor floating selection:
When you paste the image on top of the layer with the mask, it will create a floating selection. You can anchor it by clicking on the anchor icon on the bottom of the layer panel.
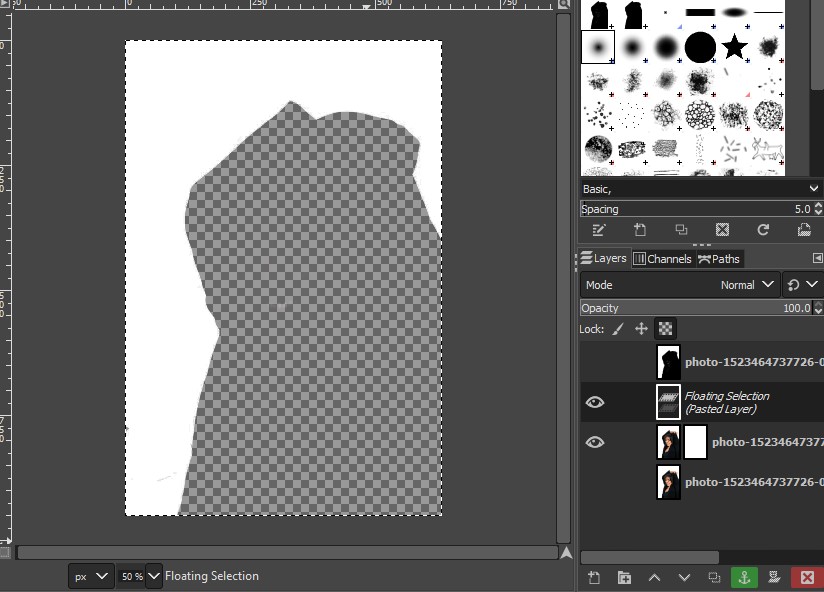
Step 11 –Invert:
Go to Select and click Invert. As soon as you do this, your image will become visible. Make sure the visibility of the topmost layer is off.
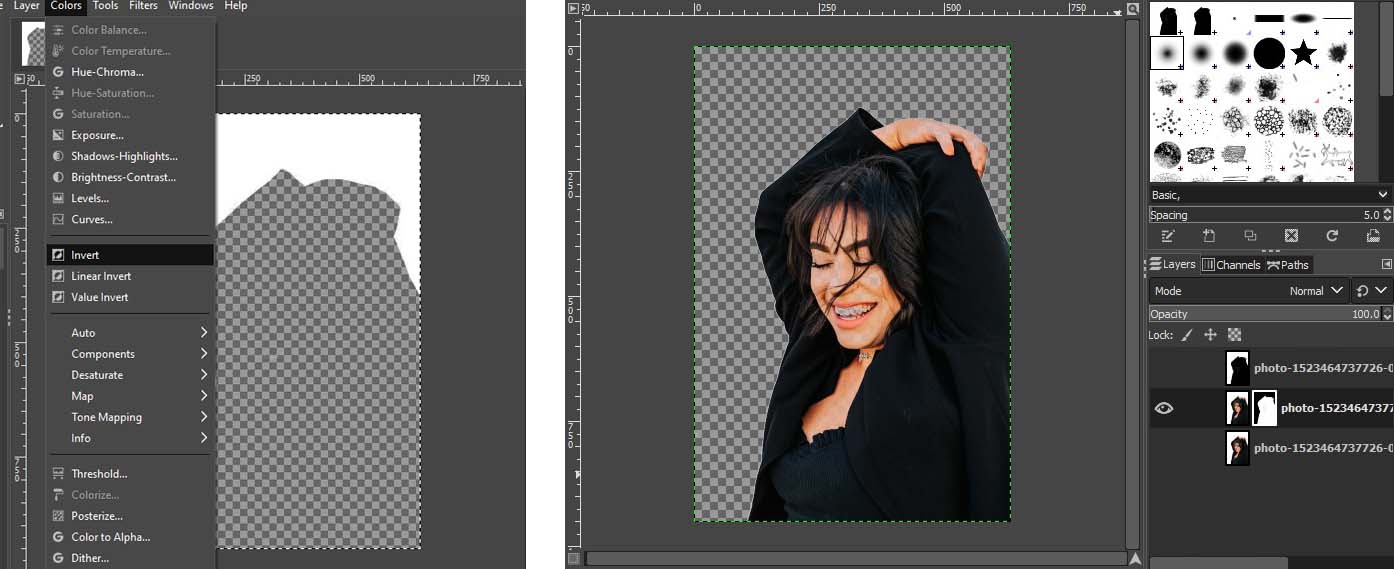
Step 12 – Brush it off:
You might notice the background peeking through the lighter portions of the image. Don’t worry you can easily fix that.
From the tools, select brush. Change the foreground colour to be white. Start brushing over the image. It will make the background disappear. At this stage, you can use the third layer as the reference.
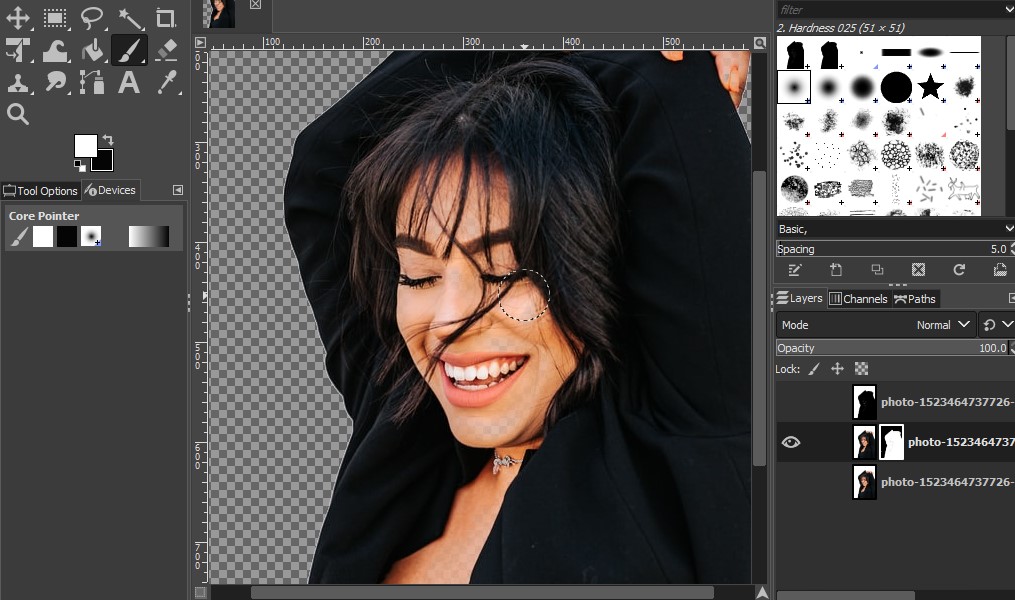
This is a very time-consuming method, and it is only suitable for images with white backgrounds. This might not work at all if your image is light in colour or has a background in a different shade. But it is a great method if you want to preserve all the details, such as hair and fine edges in the image.
Path Tool:
The Path tool in GIMP is pretty similar to the Pen Tool in Photoshop. It allows you to add anchor points and select a path.
This is also a convenient method of separating the foreground and the background. So let’s get started.
Step 1 – Select the Tool:
Find the Path Tool from the toolbar and select it.
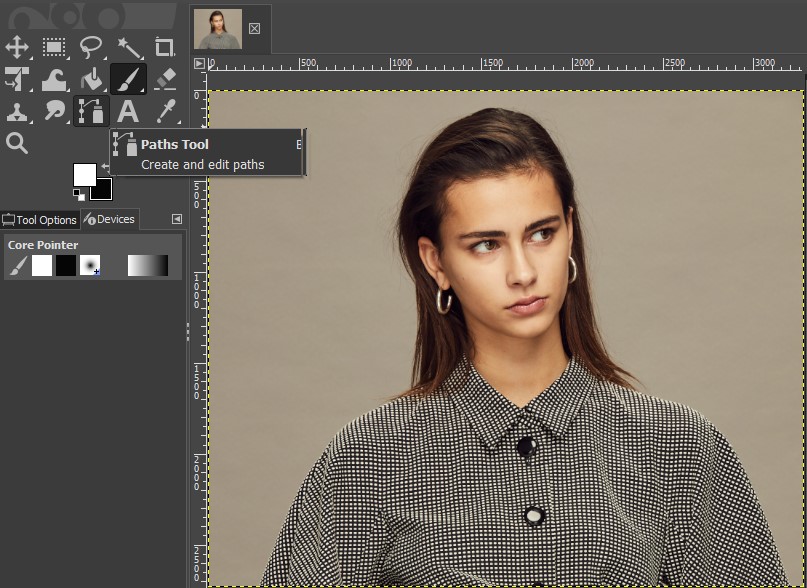
Step 2 – Draw the Path:
With the Path Tool start adding anchor points around the boundary of the image. It is a little time consuming, but with practice, you can do it like a pro.

Step 3 – Convert to Selection:
After tracing the path, convert the path into the selection by right-clicking anywhere on the path. On the menu go to Select-> From Path.
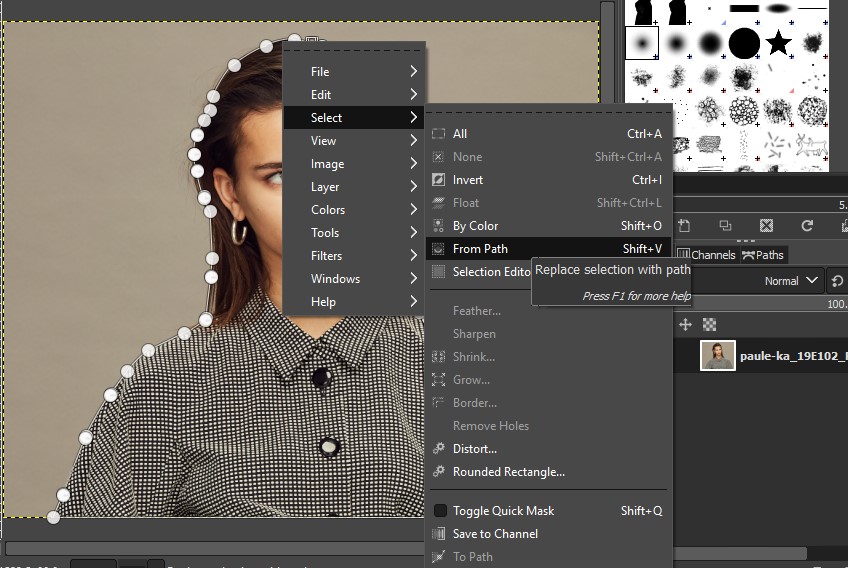
Step 4 – Invert Selection:
After converting the path into a selection, invert it to select the background. From the top menu, click on Select and then Invert.
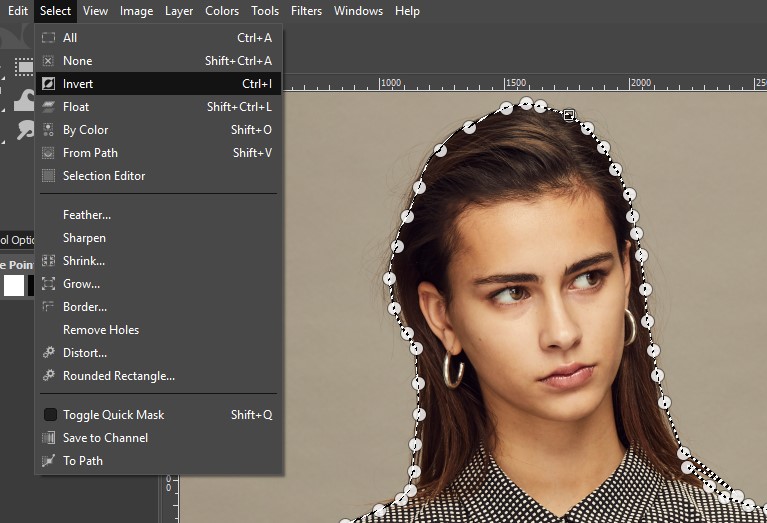
Step 5 – Delete Background:
Now simply hit Delete on the keyboard to remove the background..

That’s it. Path Tool is a great tool to use if you want to learn how to remove background in GIMP. If you are a beginner, you don’t need to be scared of using the Pen Tool.
Keep practicing and you can get the hang of it.
Final Verdict
In this tutorial, we looked at the process to download GIMP. We also discussed in detail the different tools to teach you how to remove background in GIMP.
We hope you found this tutorial useful and you will be able to use this knowledge in improving your skills.
If you are looking for online photo editing services you don’t have to look any further. Offshore clipping service provider company is offering you a free e trial to test our service quality. Whether you need background removal or photo retouching, you can trust Offshore Clipping to provide you with the best, discounted, and high-quality services.
You can upload your sample images, select a particular service, and give any required instructions. You’ll get your free trial done in 1 hour. It will give you the chance to judge our capabilities and build trust in our service quality.
We hope this tutorial gave you the chance to learn something new. You can use any of the tools we have discussed in this tutorial to learn how to remove background in GIMP.
