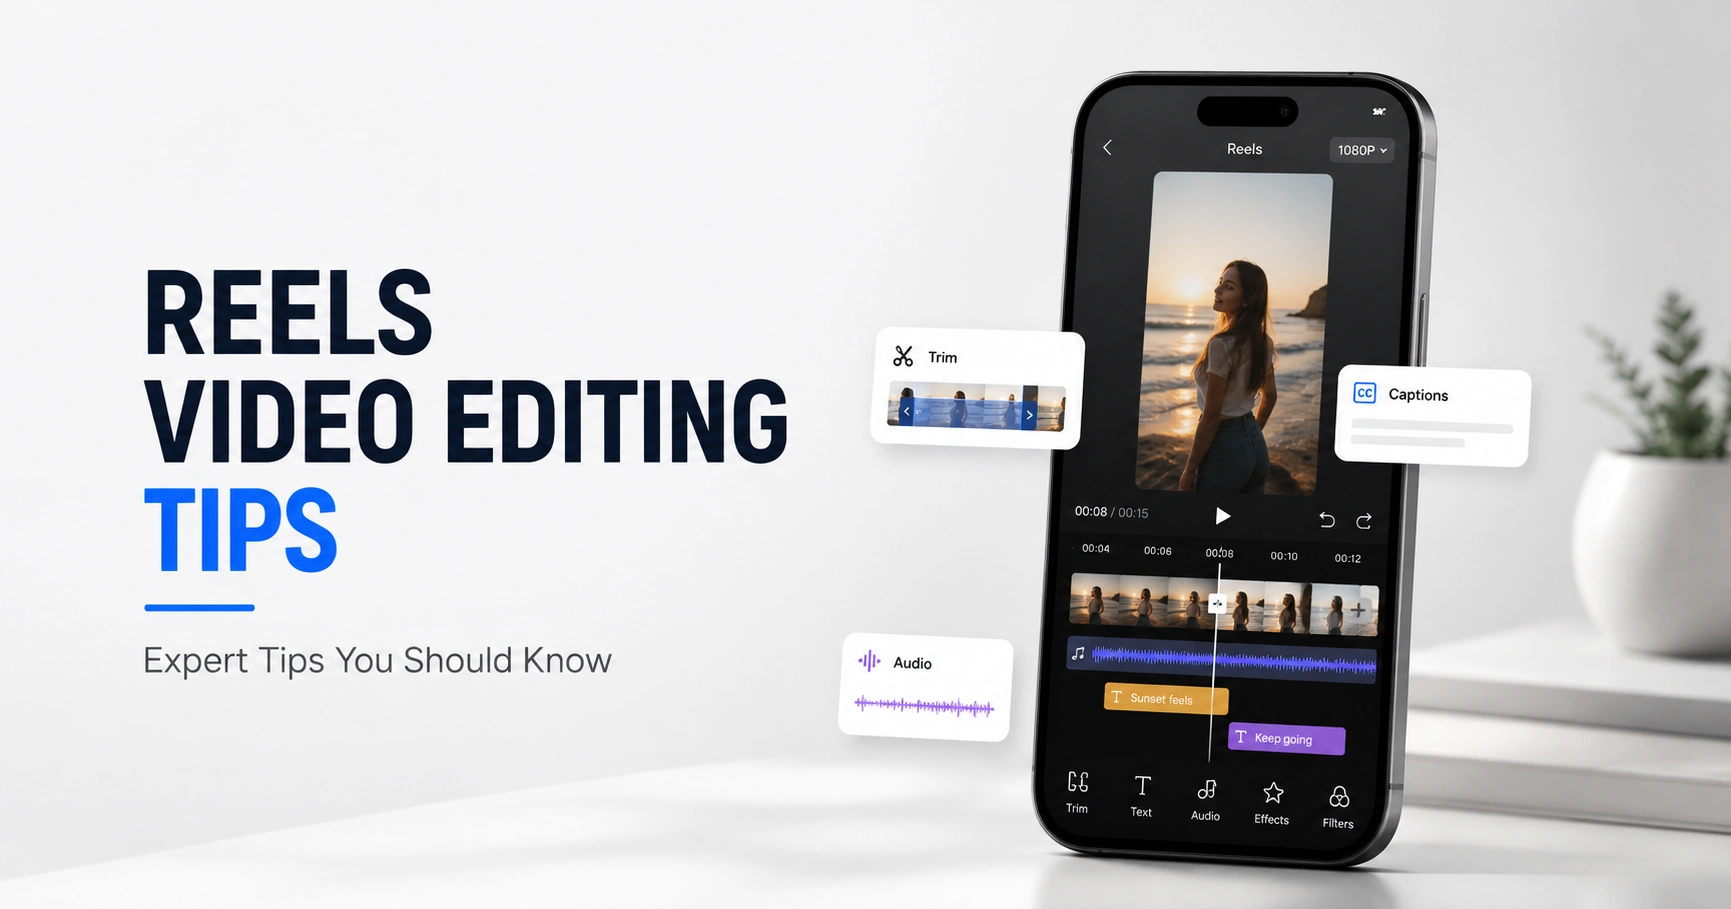
The best reels video editing tips aren’t about flashy transitions or expensive software. They’re about making smart editing decisions that keep people watching. A strong hook, faster cuts, clean audio, readable captions, and the right pacing will improve your reel far more than adding extra effects.
In this guide, you’ll learn the editing techniques that help reels hold attention and look more professional. You’ll also discover common editing mistakes, simple workflow improvements, and practical tips you can apply to your very next reel, whether you’re editing for your own brand, a client, or your business.
New to video editing? Explore our beginner-friendly guide to What Is Video Editing? Types and Techniques Explained.
11 Best Reels Video Editing Tips to Create Scroll-Stopping Videos
These reels video editing tips focus on the editing decisions that improve watch time, pacing, and viewer retention instead of relying on flashy effects.
They’re remembered because every edit keeps the viewer interested. Start with these editing tips before worrying about transitions, animations, or plugins.
Plan Your Reel Before You Start Editing
Editing shouldn’t be where you figure out your story. That’s one of the biggest reasons beginners spend hours on a 30-second reel.
Before you import your clips, answer these three questions:
- What should viewers see first?
- What’s the one message they should remember?
- What should they do after watching?
If you can’t answer those questions, don’t start editing yet. A clear plan makes every cut faster because you’re removing clips that don’t support the story instead of trying to make every clip fit.
Follow a Clear Reels Video Editing Workflow
Professional editors don’t rely on memory. They follow the same workflow for every reel because it reduces mistakes and keeps the final edit consistent.
Plan → Record → Organize Clips → Edit → Export → Upload → Analyze
Many creators start trimming clips as soon as they finish recording. That’s backwards. First, organize your footage. Then build your rough cut. Leave captions, sound effects, and final polish until the story is locked. Changing the structure after adding effects usually means doing the same work twice.
Capture Attention Within the First Three Seconds
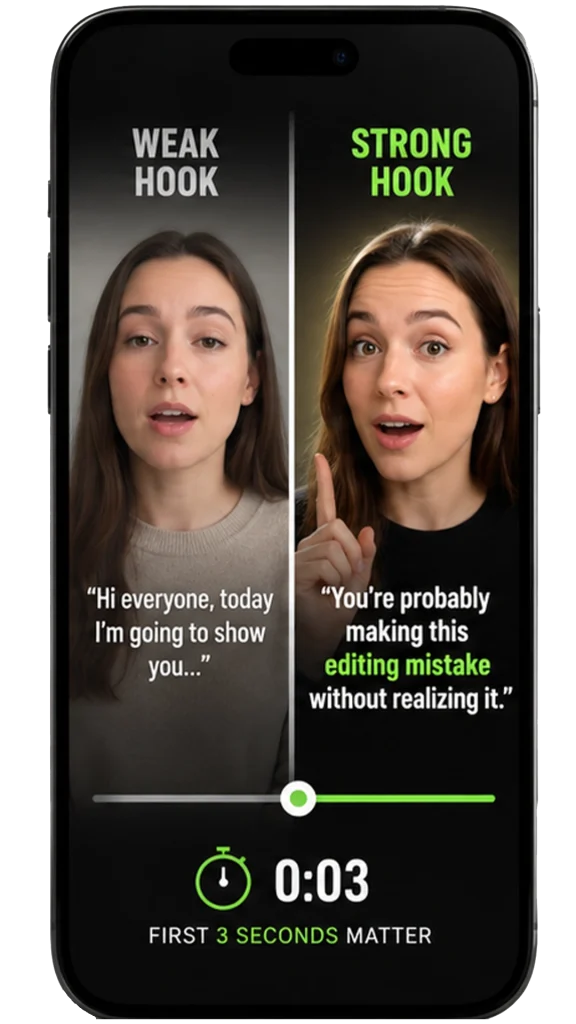
The first three seconds don’t need to explain everything. They only need to make people stop scrolling.
Instead of introducing yourself, introduce the value.
Weak Hook
“Hi everyone, today I’m going to show you…”
Stronger Hook
“You’re probably making this editing mistake without realizing it.”
Or show the final result before explaining how you achieved it. Curiosity keeps people watching. Long introductions give them a reason to leave.
Remove Pauses and Unnecessary Footage
Most viewers won’t notice a perfect transition, but they’ll notice a slow reel. Every unnecessary pause gives them another chance to scroll away.
When reviewing your edit, don’t ask, “Should I keep this clip?” Ask, “What happens if I remove it?” If the message still makes sense, cut it.
Look for:
- Long pauses between sentences
- Repeated words or ideas
- Clips that don’t add new information
- Awkward breaths that slow the pace
Edit Clips to Match the Music or Voiceover
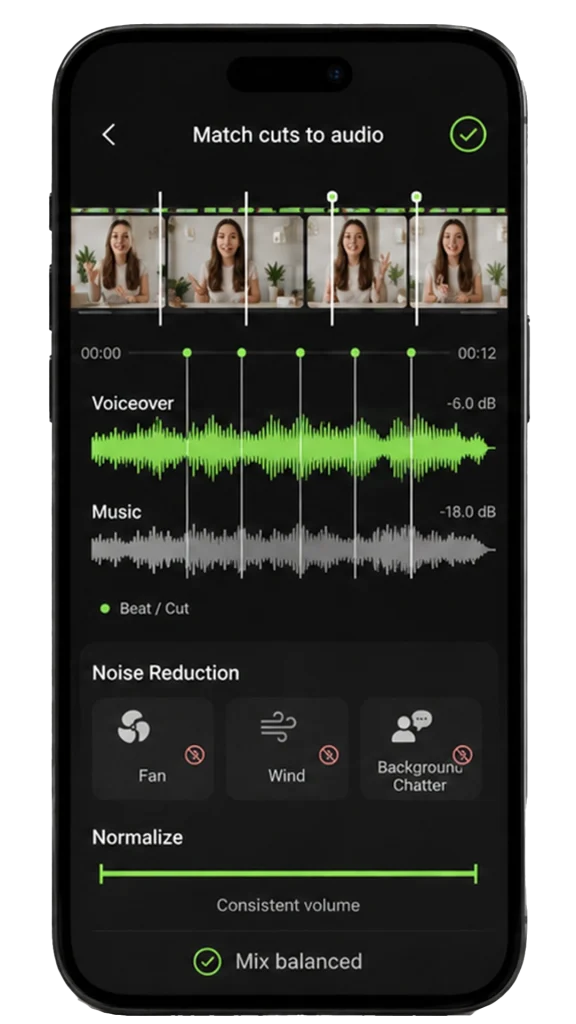
Audio sets the pace of your reel. Every cut should feel natural because it follows the voice, music, or both. Instead of adding music after the edit, build your timeline around the main audio first. Once the rhythm feels right, fine-tune it with music and sound effects.
Balance Voiceover and Background Music
Your voice carries the message. Background music should support it, not fight for attention.
A quick way to check your audio mix:
- Play the reel without looking at the screen.
- If you miss words, lower the music.
- Raise the music only during B-roll or silent moments.
Remove Unwanted Background Noise
A great edit can still feel amateur if the audio contains fan noise, traffic, keyboard clicks, or echo. Cleaning the audio before you start editing creates a stronger foundation for the entire reel.
Start by removing:
- Constant humming or buzzing
- Wind noise
- Echo in large rooms
- Background conversations
Small improvements in audio quality often make a bigger difference than adding another visual effect.
Use Audio Normalization for Consistent Volume
Nothing feels more distracting than a reel that suddenly becomes too loud or too quiet.
Before exporting, make sure:
✔ Voice volume stays consistent from start to finish.
✔ Music doesn’t overpower the speaker.
✔ Sound effects don’t surprise the viewer.
Consistent volume makes your reel feel polished, especially when people watch multiple videos in a row.
Choose Royalty-Free Music to Avoid Copyright Issues
Using the wrong music can create problems when posting outside Instagram or editing content for clients.
A safer approach is to:
- Use royalty-free music for commercial projects.
- Use licensed music from trusted libraries.
- Use Instagram’s built-in music library when publishing directly on Instagram.
This keeps your content protected while giving you more freedom to reuse it across different platforms.
Use Trending Audio Strategically
Not every trending sound fits every reel.
Imagine you’re editing a product demo or a luxury real estate reel. A viral comedy sound may be popular, but it can weaken the message and make the content feel out of place.
Choose trending audio only when it matches your content’s mood, audience, and editing style. The right sound should strengthen your story, not become the story itself.
Add Clear and Accurate Captions
Captions do more than help people watching without sound; they guide attention. Good captions tell viewers where to look. Poor captions make the screen feel crowded.
Keep captions easy to read:
- Break long sentences into short lines.
- Highlight only important words.
- Leave enough time to read naturally.
- Always proofread auto-generated captions before publishing.
A single spelling mistake won’t ruin a reel, but inaccurate captions can confuse viewers and reduce trust.
Use Transitions With Purpose
Transitions should solve a problem, not decorate the timeline.
Use them when you need to:
- Change locations
- Show time passing
- Reveal a product
- Connect two related shots
If none of those apply, a clean cut is usually the better choice. Many high-performing reels use very few transitions because the story already flows naturally.
Maintain Consistent Colours, Fonts, and Branding
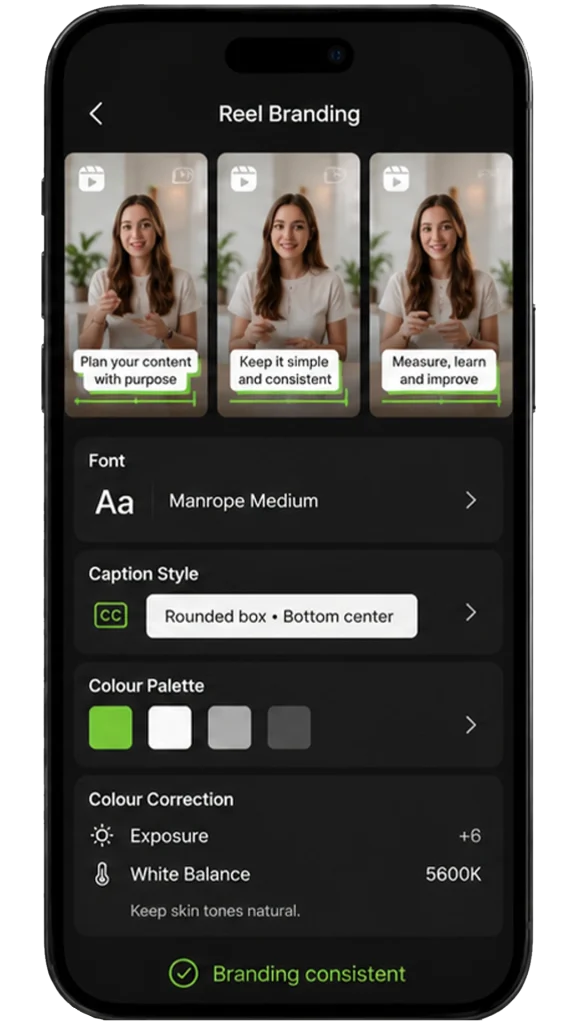
One reel can get views. Consistent branding builds recognition.
Choose one font, one caption style, and one colour palette, then use them across every reel. When your videos look consistent, people start recognizing your content before they even see your username.
Don’t over-edit colours. Correct exposure and white balance first, then make small adjustments that keep skin tones and products looking natural.
Use B-Roll to Keep Viewers Engaged
If your reel shows the same camera angle for 20 seconds, attention usually starts to drop.
B-roll gives viewers something new to look at while the story continues.
Instead of only talking to the camera, mix in:
- Product close-ups
- Screen recordings
- Behind-the-scenes clips
- Before-and-after shots
- Customer results
Keep Important Content Inside the Safe Zone
A well-edited reel can still lose its impact if Instagram’s interface hides your text or visuals. Before exporting, make sure every important element stays inside the reel safe zone so viewers can see your message clearly on every device.
Position Text Within the Instagram Reel Safe Zone
Text should guide viewers, not compete with Instagram’s interface. Keep headlines, captions, and key messages inside the readable captions so they remain fully visible from start to finish.
Before exporting, check:
- Headlines aren’t too close to the top edge.
- Text doesn’t touch the bottom of the screen.
- Important words stay centered and easy to read.
Keep Buttons and Calls to Action Away From Interface Elements
A call to action only works if people can actually see it. If it’s hidden behind Instagram’s buttons, you’ve wasted your final opportunity to drive action.
Instead of placing your CTA in the lower-right corner, keep it where viewers can read it without interface icons covering the text.
Leave Enough Space for the Caption Area
Many creators forget that Instagram’s caption area covers part of the video while people watch.
Leave enough breathing room at the bottom of the frame, especially when adding subtitles, pricing, or product details. A few extra pixels of spacing can make the difference between readable and hidden text.
Avoid Placing Content Behind the Profile Icon
Your profile picture appears over the video throughout the reel. If your logo, product, or important text sits underneath it, viewers may never see it.
Avoid placing these elements in that area:
- Brand logos
- Product names
- Prices
- Names of people
- Key keywords
Move them slightly toward the center, where they stay visible.
Keep Key Visuals Away From the Like, Comment, and Share Buttons
Instagram’s engagement buttons occupy the right side of every reel. If your product, face, subtitles, or demonstration appears underneath them, viewers lose part of the story.
When reviewing your final edit, ask yourself:
- Is the main subject still visible?
- Can viewers read every subtitle?
- Are product details blocked by interface icons?
A quick preview on your phone helps you catch these problems before your reel goes live.
End Every Reel With a Clear Call to Action
The last few seconds are your chance to tell viewers what to do next. Don’t waste them by letting the video end without direction.
Choose one clear action, such as:
- Follow for more editing tips.
- Save this reel for later.
- Comment with your biggest editing challenge.
- Visit your website.
- Watch the next reel.
Export Settings for a Professional Instagram Reel
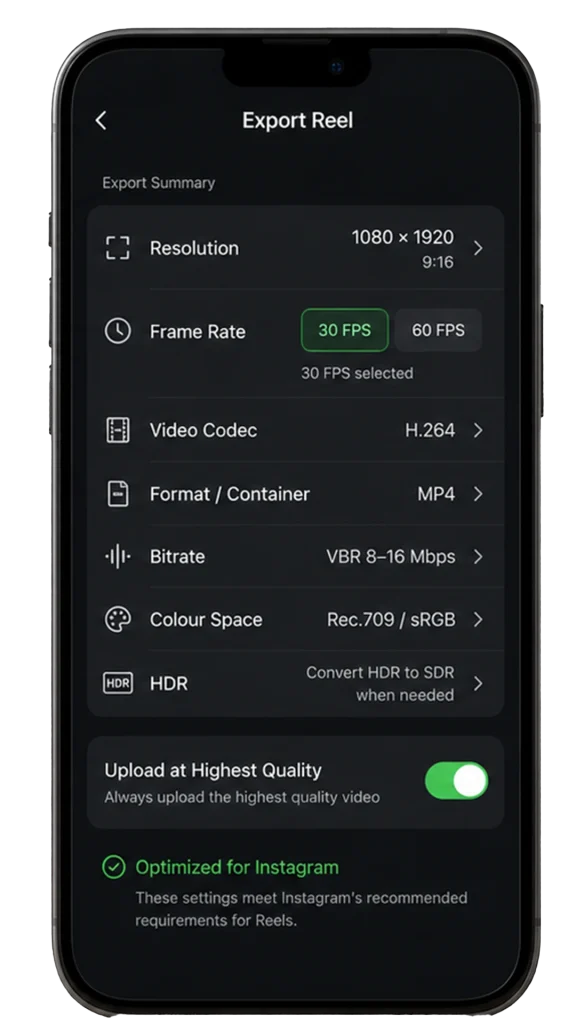
The right export settings preserve video quality before Instagram compresses your reel. Use the settings below to keep your videos sharp, smooth, and color-accurate.
Set the Resolution to 1080 × 1920 Pixels
Export every reel at 1080 × 1920 pixels (9:16). This matches Instagram’s recommended vertical format and reduces unnecessary resizing.
Choose a Frame Rate of 30 or 60 FPS
Export at 30 FPS for most reels. Use 60 FPS for sports, action, gaming, or fast-moving footage to keep motion smoother.
Export Using the H.264 Video Codec
Choose H.264 because Instagram supports it widely and compresses it more efficiently than many other codecs.
Select MP4 as the Video Container
Export your reel as an MP4 file. It offers the best compatibility across Instagram, editing software, and mobile devices.
Use the Recommended Bitrate Settings
Choose a bitrate that balances image quality and file size. A bitrate that’s too low creates compression artifacts, while an excessively high bitrate offers little benefit after Instagram recompresses the video.
Understand Variable Bitrate vs Constant Bitrate
Use Variable Bitrate (VBR) for most Insta reels because it allocates more data to complex scenes and less to simple ones, improving quality without creating unnecessarily large files.
Choose the Right Bitrate for Instagram Reels
For 1080 × 1920 reels, export at approximately 8–16 Mbps using VBR. Increase the bitrate only if your footage contains fast motion or complex details.
Use the Correct Colour Space
Export with a color space that displays consistently across Instagram and most devices.
Export in sRGB or Rec.709
Use Rec.709 for video exports. If your software exports using sRGB, it also works well for standard SDR Insta reels.
Prevent Colour Shifts After Uploading
Avoid mixing HDR and SDR color spaces in the same project. Check the exported video before uploading to confirm that colors match your timeline.
Check HDR Compatibility Before Exporting
Not every reel benefits from HDR. Choose the format that matches your footage and your audience’s devices.
Decide When to Export Reels in HDR
Export in HDR only if you recorded in HDR and your editing software fully supports an HDR workflow.
Convert HDR Footage to SDR When Necessary
Convert HDR footage to SDR (Rec.709) when compatibility matters more than HDR effects. This helps prevent washed-out colors on unsupported devices.
Enable Upload at Highest Quality on Instagram
Turn on Settings → Media Quality → Upload at Highest Quality before publishing. This allows Instagram to upload the highest-quality version available, although the platform will still apply its own compression.
Reels Video Editing Best Practices
Professional reel editing isn’t about adding more effects. They’re built through small editing decisions that improve pacing, clarity, and the overall viewing experience.
Create Seamless Looping Videos
A seamless loop makes the ending flow naturally into the beginning. Match the final movement, camera angle, or audio with the opening to create a smooth replay.
Remove Dead Space Between Clips
Trim unnecessary pauses, mistakes, and silent moments. A tighter timeline keeps the reel moving and improves viewer retention.
Add Pattern Interrupts Every Few Seconds
Refresh the viewer’s attention with a punch-in, B-roll, text animation, or camera angle change. Introduce one visual change at a time without interrupting the story.
Match Cuts to Speech and Music
Place cuts on speech pauses, subject movement, or music beats instead of random points. This creates smoother pacing and a more natural viewing experience.
Edit for Silent Viewers
Many people watch FB reels without sound. Use readable captions, highlight important keywords, and let visuals communicate the message clearly.
Maintain Consistent Colour and Audio
Keep colour, exposure, white balance, and audio levels consistent across every clip. Consistency makes the entire reel look more polished and professional.
Best Apps for Editing Instagram Reels
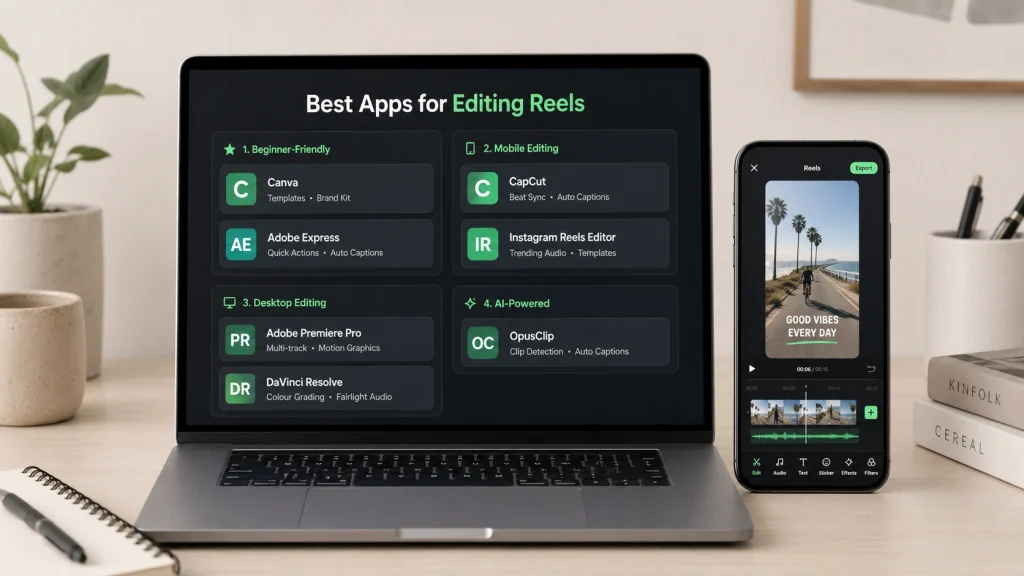
The best reel editing app depends on the type of content you create. Compare each app’s editing features instead of choosing the most popular one.
Beginner-Friendly Reel Editing Apps
These apps require little editing experience and help you create professional-looking reels with ready-made tools and templates.
Canva
Canva is best for creators who want polished reels without advanced editing skills. It offers drag-and-drop editing, Brand Kit, Magic Resize, animated text, captions, and thousands of reel templates, making it easy to create consistent marketing and educational content.
Best for: Business reels, educational content, branded graphics, and promotional videos.
Adobe Express
Adobe Express is designed for fast social media editing. It includes Quick Actions, AI background removal, auto captions, text animations, brand templates, and one-click resizing, helping you create platform-ready reels in minutes.
Best for: Social media marketers, small businesses, and creators who publish content regularly.
Best Mobile Apps for Editing Reels
Mobile apps are ideal for creators who want to record, edit, and publish Insta Reels, FB Reels, or IG Reels from the same device. Choose the app based on the editing features you need, not just its popularity.
CapCut
CapCut is used by 81% of video creators, making it one of the most popular tools for short-form editing, including Instagram Reels, FB Reels, IG Reels, Youtube shorts. CapCut editing apps offer the most complete mobile editing workflow.
Its auto captions, beat sync, keyframe animation, speed ramping, motion blur, background removal, AI object tracking, and auto cutout help you create professional-looking reels without desktop software.
If you’re editing reels with CapCut, start by mastering trimming, beat syncing, captions, and speed controls before experimenting with AI effects.
Best for: Talking-head videos, tutorials, product reels, UGC content, and creators who need advanced editing on mobile.
Instagram Reels Editor
Instagram’s built-in editor is best for publishing and making final adjustments. It provides trending audio, templates, text overlays, stickers, simple trimming, and automatic syncing while giving you direct access to Instagram’s latest creative features.
Best for: Quick edits, trending content, and publishing finished reels directly inside Instagram.
Professional Desktop Editors for Greater Creative Control
Desktop editors provide advanced tools that aren’t available in most mobile apps. They’re ideal for creators who need precise editing, better colour control, cleaner audio, and professional-quality exports.
Adobe Premiere Pro
Premiere Pro gives you full control over the editing timeline. It supports multi-track editing, keyframes, adjustment layers, audio mixing, motion graphics, Auto Reframe, and Media Encoder, making it ideal for creating polished Instagram reels with consistent quality.
Best for: Client projects, branded content, commercial FB reels, and creators who publish regularly.
DaVinci Resolve
DaVinci Resolve combines professional video editing with industry-leading colour grading. Its Color page, Fairlight audio tools, Fusion motion graphics, scene cut detection, and advanced colour correction help you create cinematic, colour-accurate Instagram reels.
Best for: Cinematic reels, product videos, travel content, and creators who prioritise visual quality.
Best AI-Powered Reel Editing App
AI is most valuable when it speeds up repetitive editing tasks, giving you more time to focus on storytelling, pacing, and viewer watch time.
OpusClip
If you’re editing reels with AI, OpusClip is one of the fastest ways to turn long-form videos into short, engaging clips. It uses AI to find engaging moments, adjust framing, focus on speakers, add captions, remove silence, and score clips, helping creators quickly turn long videos into high-quality reels.
Most Effective Storytelling Techniques for Instagram Reels
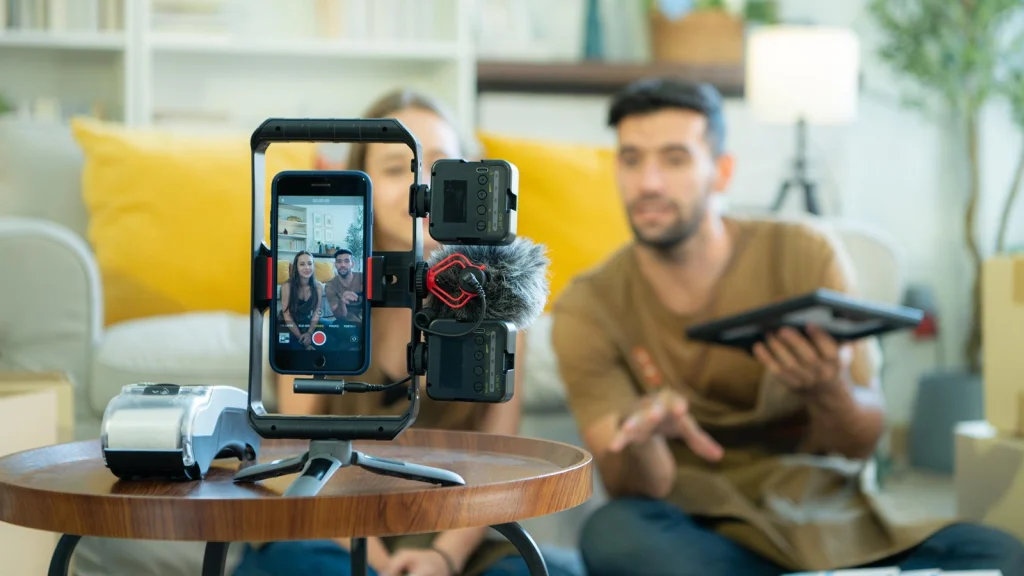
Storytelling gives viewers a reason to watch beyond the first few seconds. Use these editing techniques to improve retention, create a smoother viewing experience, and keep your Instagram reels engaging from start to finish.
Control the Pacing to Maintain Viewer Attention
Match your cuts to speech, actions, or music beats instead of using fixed timings. Faster pacing works well for tutorials and trends, while slower cuts help viewers absorb important moments.
Create a Clear and Logical Narrative Flow
Structure every reel with a clear beginning, middle, and end. Start with the hook, build the story step by step, and finish with a result or takeaway that completes the viewer’s journey.
Build Emotion Throughout the Reel
Support your message with facial expressions, close-up shots, background music, and B-roll. Every visual should reinforce the emotion you want viewers to feel instead of distracting from it.
Use Curiosity Loops to Keep Viewers Watching
Reveal the outcome gradually instead of giving everything away at the beginning. Tease the result, answer one question at a time, and deliver the final payoff before the reel ends.
Editing Instagram Reels on Mobile vs Desktop
Both mobile and desktop editors can create high-quality Instagram Reels. Choose the one that best matches your editing complexity, workflow, and content goals.
Pros and Cons
A quick comparison of mobile and desktop editing highlights their key strengths and limitations. The table below outlines the main advantages and drawbacks of each option to help you decide which suits your workflow best.
| Comparison | Mobile Editing | Desktop Editing |
|---|---|---|
| Pros | Fast and easy to edit anywhere Perfect for quick reels and daily content Simple interface for beginners Quick export and direct social sharing | Greater control over every edit Better for complex edits and longer projects Supports advanced effects, color grading, and motion graphics Handles large files and high-resolution footage more efficiently |
| Cons | Limited advanced editing featuresLess precise for detailed edits | Requires more time and a computer Requires more time and a computer |
Which Option Is Better for Editing Instagram Reels?
If you create reels regularly for social media, mobile editing is enough for simple cuts, captions, and quick publishing. If you edit for clients, brands, or commercial projects, desktop editing is the better choice because it gives you greater control, better quality, and a more efficient workflow.
How Do AI-Powered Editing Tools Improve Reels?
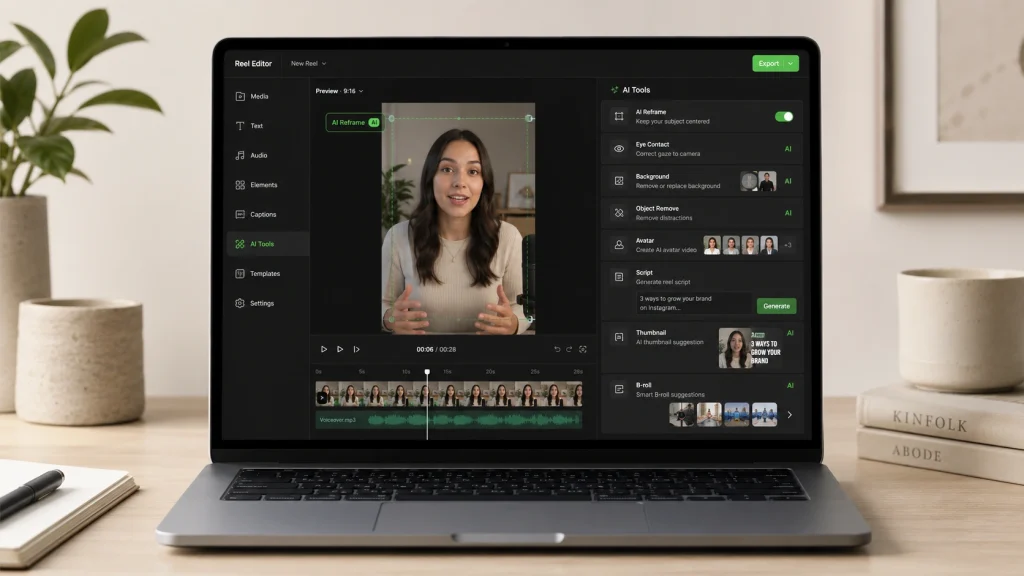
AI tools for Instagram Stories and Reels can reduce production time by as much as 70%.
Editing reels with AI can save hours of manual work, but the best results still come from combining AI automation with human editing decisions. Here are the following ways you can try:
Use AI Reframing to Keep Subjects in Focus
AI keeps your subject centered throughout the reel, creating smoother framing and a more professional viewing experience.
Correct Eye Contact With AI
AI creates more natural eye contact, helping talking-head reels feel more engaging and personal.
Remove and Replace Video Backgrounds
AI removes distracting backgrounds in seconds, making your subject stand out and keeping viewers focused on the message.
Remove Unwanted Objects From Footage
AI removes unwanted distractions, creating cleaner scenes without time-consuming manual editing.
Create AI Avatars for Reels
AI avatars help you publish consistent presenter-style reels, even when you can’t record new videos.
Generate Reel Scripts With AI
AI organizes your ideas into a clear script, making your reels easier to follow from the hook to the call to action.
Design Scroll-Stopping Thumbnails With AI
AI suggests thumbnail layouts that attract attention and encourage more viewers to open your reel.
Generate Relevant B-Roll Footage With AI
AI generates supporting footage that keeps your visuals interesting and reduces repetitive talking-head shots.
How Long Should an Instagram Reel Be?
There isn’t a single ideal reel length. The best duration depends on your content, but every second should add value and keep viewers watching.
Choose Length Based on the Content
Use 15–30 seconds for quick tips, trends, and announcements. Choose 30–60 seconds for tutorials, product demos, and storytelling that need more explanation.
Prioritise Retention Over Maximum Duration
Don’t make your reel longer than necessary. If you can deliver the same message in 20 seconds instead of 40, choose the shorter version to improve completion rates.
Test Different Reel Lengths
Compare 15, 30, and 60-second reels in Instagram Insights. Track Average Watch Time, Retention Rate, and Completion Rate to find the length your audience watches most.
Why Does Instagram Reduce My Video Quality?
Instagram recompresses every uploaded reel to optimize storage and playback. Exporting with the wrong settings increases compression, making your video look softer, blurrier, or less detailed.
Low Bitrate During Video Export
A low bitrate removes fine details before the upload starts. Instagram compresses the video again, making blurry areas and compression artifacts more noticeable.
HDR Compatibility Issues
Unsupported HDR footage can cause washed-out highlights, incorrect contrast, or oversaturated colors after Instagram processes the video.
Using the Wrong Video Codec
Codecs other than H.264 may not compress efficiently. Instagram often re-encodes these files, which can reduce video quality.
Uploading With a Weak Internet Connection
An unstable connection can interrupt uploads or delay high-quality processing, causing your reel to appear softer immediately after publishing.
Instagram Recompression After Upload
Instagram recompresses every reel to reduce file size and improve streaming. Videos exported with poor settings lose even more detail during this process.
Video Export Bugs in Editing Apps
Incorrect export settings, color profiles, or frame rates can create quality issues before the upload begins, leaving Instagram with a lower-quality file to process.
8 Reels Video Editing Checklist You Must Follow

Before you publish your Instagram reel, complete this final quality check. These eight checkpoints help you catch editing mistakes before they affect watch time, engagement, or video quality.
✔ Strong Opening Hook
Confirm that your reel delivers a clear benefit, question, bold statement, or visual change within the first 1–3 seconds.
Common Hook Formats
- Question Hook: Want to double your Instagram reel views?
- Problem-Based Hook: Your reels aren’t getting views because of this editing mistake.
- Bold Statement Hook: Most Instagram reels fail before the first three seconds.
- Curiosity Hook: I changed one editing setting, and my watch time doubled.
- Result-Driven Hook: Here’s how I edited this reel in under 10 minutes.
- List-Based Hook: Five editing mistakes ruining your Instagram reels.
- Before-and-After Hook: Watch this ordinary clip turn into a viral-looking reel.
✔ Smooth Transitions
Confirm that every cut follows speech, movement, or music beats. Remove transitions that interrupt the story instead of improving it.
✔ Clear Audio
Confirm that background noise is removed, dialogue stays clear, and background music never overpowers the speaker.
✔ Readable Captions
Confirm that captions use large, high-contrast text, stay inside Instagram’s safe zone, and remain easy to read on mobile devices.
✔ High-Quality Export
Confirm that your reel exports at 1080 × 1920, H.264, MP4, and the correct bitrate before uploading.
✔ Eye-Catching Cover Image
Confirm that your cover clearly shows the topic with a strong subject, high contrast, and a short, easy-to-read title.
✔ Trending Audio Added Inside Instagram
Confirm that trending audio is added inside Instagram whenever it supports your content without distracting from your original message.
✔ Proofread On-Screen Text
Confirm that every title, caption, and graphic is free from spelling mistakes, grammar errors, and incorrect timing before publishing.
Bad Reel vs Good Reel: A Side-by-Side Comparison
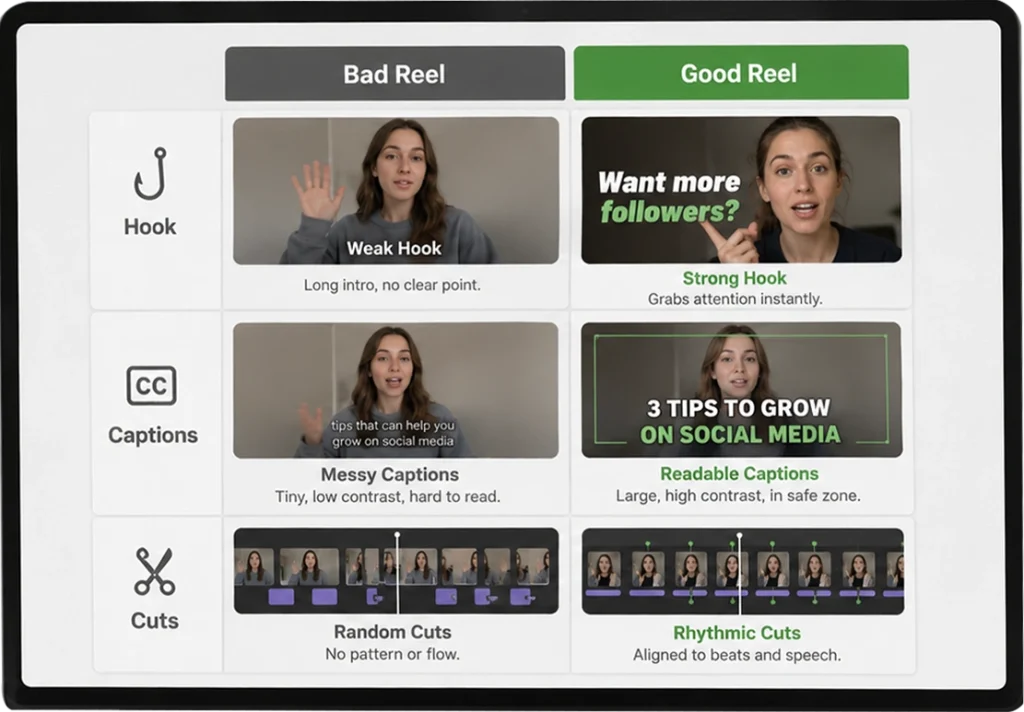
Small editing choices can significantly affect watch time, retention, and completion rates. Compare these examples to understand what separates a poor reel from a high-performing one.
Poor Hook vs Strong Hook
See how the first few seconds determine whether viewers stay or scroll.
| Bad Reel | Good Reel |
|---|---|
| Starts with a logo or long greeting | Opens with a question, bold statement, or final result |
| No clear value in the first few seconds | Delivers value within the first 1–3 seconds |
| Static opening with no visual change | Uses a jump cut, punch-in, or motion to grab attention |
Why This Works
A strong hook combines a clear value proposition with a visual pattern interrupt. This captures attention quickly and reduces early viewer drop-offs.
Messy Captions vs Readable Captions
Compare how caption design affects readability and viewer experience.
| Bad Reel | Good Reel |
|---|---|
| Small text with low contrast | Large, bold text with high contrast |
| Long paragraphs on screen | Short phrases synced with speech |
| Text placed outside the safe zone | Captions positioned inside Instagram’s safe zone |
Why This Works
Readable captions use clear typography, proper spacing, and safe-zone placement. This helps viewers follow the reel without missing important information.
Random Cuts vs Rhythmic Cuts
Notice how editing rhythm changes the overall flow of a reel.
| Bad Reel | Good Reel |
|---|---|
| Cuts happen at random points | Cuts follow speech, movement, or music beats |
| Uneven pacing with long pauses | Dead space is removed to maintain momentum |
| Scenes feel disconnected | Every cut naturally supports the next scene |
Why This Works
Rhythmic editing follows natural timing instead of random cuts. This creates smoother pacing, improves viewer flow, and increases completion rates.
Common Reels Editing Mistakes to Avoid
Apart from knowing different Reels video editing tips, you also need to stay aware of the common mistakes that usually occur when creating a reel. Even great footage can underperform because of poor editing. Avoid these mistakes to improve retention, video quality, and overall reel performance.
Weak Opening Hook
A slow intro loses viewers fast. Deliver a result, question, or bold statement within the first 1–3 seconds.
Poor Audio Quality
Background noise or loud music makes dialogue hard to hear. Keep the voice clear and audio balanced.
Low-Resolution Exports
Low resolution, bitrate, or the wrong codec reduces quality before upload. Export at 1080 × 1920, H.264, and MP4.
Covering Important Content With Instagram UI
Text or graphics near the screen edges can be hidden by Instagram’s interface. Keep key elements inside the safe zone.
Using Long or Unclear Introductions
Long intros increase early drop-offs. Get to the main message as quickly as possible.
Adding Too Many Effects and Transitions
Too many effects distract from your message. Use transitions only when they improve the story.
Using Small or Poorly Positioned Text
Small or low-contrast text is difficult to read. Use large captions and place them inside the safe zone.
Publishing Inaccurate Auto-Captions
Auto-captions often contain errors. Review and correct them before publishing.
Using Low-Quality or Watermarked Footage
Watermarked or compressed footage looks unprofessional. Use clean, high-resolution clips.
Making the Background Music Too Loud
Music should support your voice, not compete with it. Lower the music during speech.
Ignoring Instagram’s Safe Zones
Instagram’s interface can cover content outside the safe zone. Preview the layout before publishing.
Uploading Without Previewing the Final Video
Skipping the final review can leave caption, audio, or export errors unnoticed. Always preview your reel before uploading.
Frequently Asked Questions
What is the best app for editing Instagram reels?
The best app depends on your needs. CapCut editing apps is great for beginners, Premiere Pro offers advanced editing, and Instagram works well for quick edits and publishing.
How do professionals edit Instagram reels?
Professionals plan the story first, edit in software like Premiere Pro or DaVinci Resolve, optimize export settings, then review the final reel before publishing.
What video size is best for Instagram reels?
Export Instagram Reels at 1080 × 1920 pixels with a 9:16 aspect ratio. This matches Instagram’s recommended format and helps maintain video quality.
Why do my reels lose quality after uploading?
Low bitrate, incorrect export settings, HDR compatibility issues, or Instagram’s video recompression can reduce quality. Export using Instagram-friendly settings to minimize quality loss.
Should I use trending audio?
Yes, if it fits your content. Adding relevant trending audio inside Instagram can increase discoverability without affecting your original edited video.
How long should Instagram reels be?
Choose the length based on your content, not the maximum limit. Focus on keeping viewers engaged from start to finish instead of making longer reels.
Can I edit reels on a PC?
Yes. Desktop editors like Premiere Pro, DaVinci Resolve, and Final Cut Pro provide better control for complex edits, color grading, and motion graphics.
How often should I post Instagram reels?
Post consistently rather than frequently. A regular schedule with high-quality reels usually performs better than publishing low-quality content every day.
Conclusion
Great Instagram reels don’t happen by chance. They come from following the right editing process, making smart creative decisions, and avoiding common mistakes.
Start with one reel at a time. Apply the above reels video editing tips, test different video editing styles, and refine every edit using Instagram Insights. These video editing tips for reels will help you create content that looks cleaner, keeps viewers engaged, and performs more consistently.
The more you edit, test, and refine, the better your Instagram reels will become.