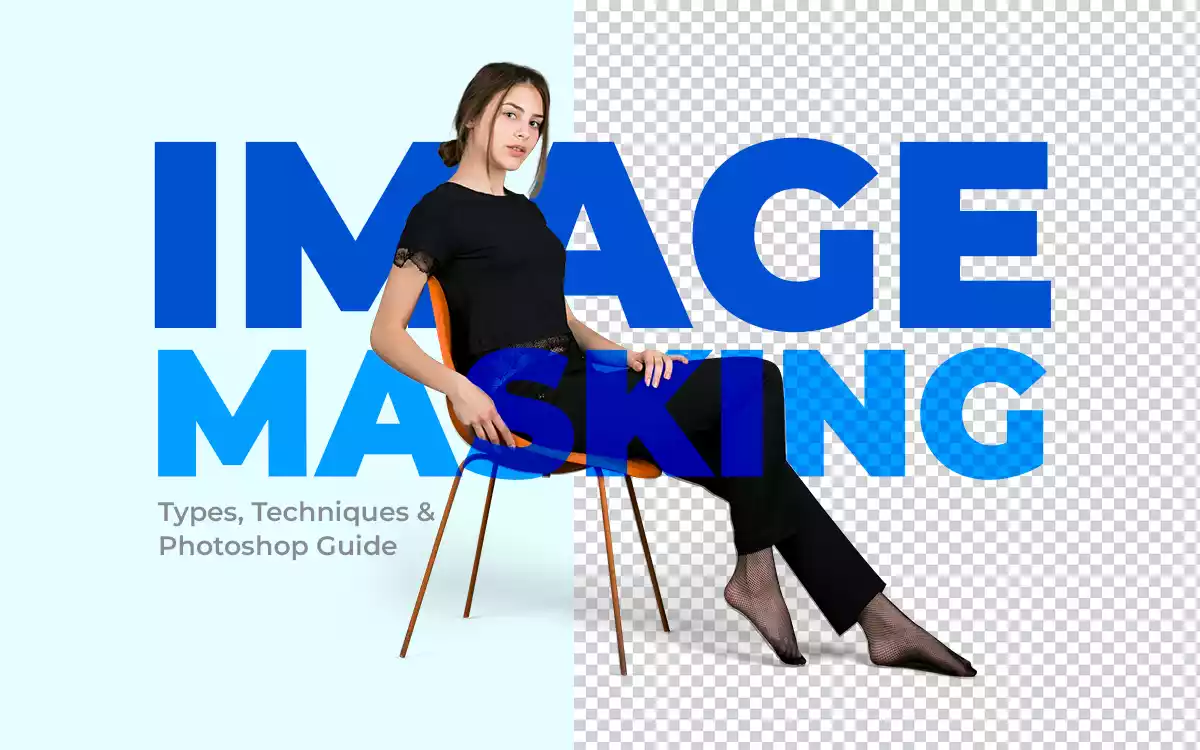
Image masking is a photo-editing technique that uses selective editing to remove sharp-edged and transparent objects in photos. The process is harmless and keeps the original pixels of the images for later advanced editing. Most popular masking types include layer masking, alpha channel masking, transparency/translucent masking, complex/advanced image masking, and collage/composite masking.
Common masking tools are the layer mask, the select and mask workspace, the brush tool, the quick selection tool, the pen tool, and the channels panel. This Photoshop technique is used in e-commerce products, fashion photos, apparel photos, advertising, and magazine photo editing to preserve fine details of complicated edges and activate non-destructive editing.
What is Image Masking in Photoshop?
Image masking in Photoshop is a non-destructive, safe, and flexible image editing method of selectively hiding or revealing layer parts to edit without deleting pixels. This editing technique is applied to edit soft and pointy-edged objects, such as hair and fur, to control the visibility through a grayscale mask in the following manner.
- White reveals the image.
- Black hides the image.
- Gray creates partial transparency.
Professional portrait photographers, product photographers, the e-commerce industry, advertising companies, fashion houses, apparel stores, and boutiques mostly use Photoshop image masking for background editing, making image collages, adjusting selected areas, refining complex edges, etc.
What is Image Masking in Photography?
Image masking in Photography is a post-production task used to selectively edit and isolate or remove the background of a subject with soft edges. Professional photographers use masking to locally control the edits without altering the original pixels.
Some examples of masking images included are as follows.
- Highlighting a model’s face.
- Darkening the sky without affecting the foreground.
- Enhancing product details while keeping shadows natural.
- Creating a cutout of wool-made clothing, etc.
What is Image Masking in Image Processing?
Image masking in image processing is the adjustment made without harming the original pixels through selective editing on specific areas. It works as a controlled editing layer guiding the software where adjustments should be applied and where they should be protected.
Masking allows photo retouchers to make precise and targeted corrections without damaging the original photo, such as adjusting the exposure, enhancing colors, replacing backgrounds, etc.
What is the Difference Between Masking and Background Removal?
The difference between masking and background removal is the background removal process from an image. Photoshop image masking preserves image data, while background removal permanently extracts the subject. Masking hides areas non-destructively, but background removal prioritizes a final cut-out image.
Other differences between masking and background removal are as follows.
| Topic | Masking | Background Removal |
|---|---|---|
| Editing method | Non-destructive | Often destructive or export-based |
| Reason to use | For selective editing control | For subject isolation |
| Edge handling | Preserves each edge detail with accuracy | Simplifies edges |
| Transparency Control | Adjustable opacity | Binary cut-out result |
| Use cases | Used for complex refinements | Used for creating marketplace-ready images |
What is the Difference Between Layer Mask vs Image Masking?
The difference between a layer mask and image masking is what they are; a layer mask is a Photoshop tool used for hiding or revealing specific parts of a layer, while professional photo masking is the overall editing technique used to control visibility within an image selectively.
Other differences between layer masks and image masking are as follows.
| Topic | Layer Mask | Image Masking |
|---|---|---|
| Identity | Photoshop feature | Editing technique |
| Scope | Single-layer control | Multiple masking approaches |
| Software dependency | Tool-specific | Software-independent idea |
| Application | Works per layer | Applies across workflows |
| Learning curve | Tool-based learning | Technique-based understanding |
| Editing control | Linked to the layer panel | Can involve channels or selections |
What is the Difference Between Clipping Mask vs Image Masking?
The difference between a clipping mask and image masking is their application of layer visibility; clipping depends on layer hierarchy, whereas masking depends on pixel transparency. A clipping mask limits visibility using another layer’s shape, while photo masking controls visibility using tonal selections.
Other differences between a clipping mask and masking are as follows.
| Topic | Clipping Mask | Image Mask |
|---|---|---|
| Control method | Shape-based restriction | Tone/selection-based control |
| Editing dependency | Requires an underlying layer | Independent mask control |
| Transparency handling | Follows base layer edges | Adjustable soft transitions |
| Editing purposes | Constrain content placement | Refine image areas |
| Editing flexibility | Limited to layer shape | Highly customizable edits |
| Use cases | Textures inside shapes | Hair, smoke, soft edges |
When Should You Use Image Masking Instead of Clipping Path?
You should use image masking instead of a clipping path in the following 7 situations.
Situation 1: To preserve the natural details of the subject having hair, fur, or soft edges.
Situation 2: To edit semi-transparent objects such as veils, glass, fabric, or smoke, etc.
Situation 3: To edit edges that contain fine flyaway strands or texture that a hard path cannot follow.
Situation 4: To blend images into a new background.
Situation 5: To extract images with soft and pointy edges from their background.
Situation 6: To ensure gradual transparency instead of sharp cut-outs.
Situation 7: To edit images of high-end fashion, portrait, or beauty retouching, where realism matters.
Note: Choose a clipping path instead of masking for subjects with hard and defined edges and when you need fast outputs.
Is Image Masking a Non-Destructive Editing Technique?
Yes, image masking is a non-destructive editing technique that conceals parts of an image without permanently deleting any pixels or damaging other parts of the image. The method involves using a mask layer to control visibility, not to delete areas. As a result, editors can edit, refine, or restore details anytime while keeping the original image data.
What Are the Different Types of Image Masking?
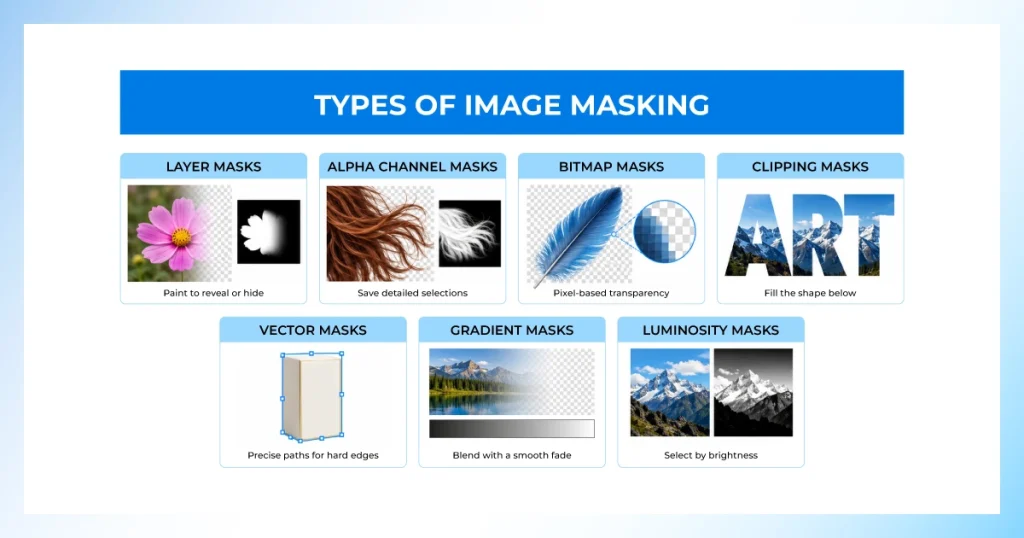
Not every mask works the same way. Each method suits a different edge or transparency problem.
| Mask Type | What It Controls | Best For |
|---|---|---|
| Layer Masks | Visibility of an entire layer via grayscale painting | General non-destructive image editing, background swaps |
| Alpha Channel Masks | Selections stored in separate color channels | Fur, hair, and sharp, high-contrast edges |
| Bitmap Masks | Pixel-based transparency data | Complex raster images with fine detail |
| Clipping Masks | Visibility of one layer based on the shape below it | Text effects, image fills, layered compositions |
| Vector Masks | Resolution-independent shapes made with the Pen Tool | Hard-edged products like packaging or electronics |
| Gradient Masks | Smooth, graduated transitions between visible and hidden areas | Blending skies, backgrounds, composite seams |
| Luminosity Masks | Selections based on brightness values | Highlight and shadow control in high-end retouching |
Layer Masks
The default, most-used masking method in Photoshop. Add one to any layer and paint with black, white, or gray to control what shows. Fully reversible, and it handles everything from a background swap to detailed hair isolation. Most jobs start here; our layer mask tutorial walks through the steps.
Alpha Channel Masks
Also called raster masking, this stores a selection in its own channel separate from the image’s color data. It’s the method of choice for fur, feathers, and other high-contrast, pointy edges, isolated in the channel first, then loaded as a mask.
Bitmap Masks
Bitmap masks work at the pixel level, storing transparency as raster information rather than vector paths. They’re the standard for complex images with irregular detail, though they’re resolution-dependent and don’t scale up as cleanly as vector-based methods.
Clipping Masks
A clipping mask uses the shape or opacity of one layer to control the visibility of the layer above it. It’s common in text effects, image fills, and layered composites. It lets an existing layer’s silhouette do the work instead of hand-painted visibility.
Vector Masks
Vector masking in Photoshop uses Pen Tool paths instead of grayscale painting. So they stay sharp and resolution-independent at any size. They suit hard-edged subjects like packaging, electronics, or furniture, or anything with a defined geometric shape.
Gradient Masks
Gradient masks create a smooth, graduated transition between visible and hidden areas instead of a hard line. They’re the go-to for blending skies, fading a background into a color, or hiding a composite seam, and they save significant brush time.
Luminosity Masks
Luminosity masks build a selection from an image’s brightness values rather than shapes or colors. Editors use them to target just the highlights, shadows, or midtones, a technique favored in high-end retouching and landscape work.
Why is Image Masking Used?
Image masking is used mainly for 2 reasons: to preserve fine details of complex edges and to activate non-destructive editing through a selective process. It allows photo editors to edit images by selecting specific areas of images containing hair, fur, fabric, etc., without damaging the whole image.
Why is Image Masking Used by Portrait Photographers?
Image masking is used by portrait photographers as it allows selective retouching without affecting skin texture, hair strands, or background depth. Refining flyaway hair, adjusting exposure on faces only, or blending backgrounds becomes easy and non-harming with masking while keeping fine details realistic.
Why Does E-Commerce Need Photo Masking?
E-commerce businesses need photo masking to handle complex product edges like fur, fabric fibers, and transparent materials to prepare unified visuals for product listing. Masking creates a clean background, consistent and on-brand look, and accurate product representation that builds buyer trust and boosts conversion rates.
Why is the Image Masking Technique Used by Fashion and Apparel Store Owners?
The image masking technique is used by fashion and apparel store owners to preserve fabric texture, lace patterns, and semi-transparent materials. There are different types, designs, and patterns of clothes that need to be displayed with accuracy. Masking helps apply non-destructive and advanced-level editing while maintaining the garment’s original look, which directly impacts perceived quality and return rates.
Why Do Advertising and Magazine Industries Need Masking?
Advertising and magazine teams need to apply the masking image for high-precision compositing, dramatic background replacement, and controlled lighting adjustments. The image masking process ensures meticulous and creative output of images, seamless integration of subjects with natural edges, and tonal balance, creating print-quality visuals.
Which Types Of Images Require Image Masking?
Images containing soft edges, transparency, complex shapes, irregular structures, and intricate textures require Photoshop image masking because they aren’t workable with hard, vector-based selections. Masking is also needed in images that involve delicate details, layered transparency, and gradual transition to maintain original image details without harming them.
Additional types of images that require masking photos are as follows.
- Soft edge preservation, such as hair, fur, feathers, or fine fabric edges.
- Semi-transparent surfaces like glassware, sheer fabrics, smoke, or veils.
- Complex or irregular shapes, products with uneven outlines, jewelry, or decorative items.
- Micro-level textures, for example, lace, mesh, netting, or intricate embroidery.
- Fuzzy or diffused boundaries, for example, carpets, wool, or textured props.
- Overlapping depth layers, such as stacked products, layered clothing, or floral arrangements.
- Motion blur on edges, for example, moving objects or flowing fabrics.
- Shadow or reflection retention, such as jewelry, glossy products, or mirrored surfaces.
- Color spill or edge contamination, products photographed on colored backgrounds that bleed into the edges.
What Are the Main Features of Masking Tools in Photoshop?
The main features of masking tools in Photoshop are the Layer Mask, the Select and Mask workspace, the Brush Tool, the Quick Selection Tool, the Pen tool, and the Channels Panel. These Photoshop tools help select, refine, and control the visibility of specific image areas in a non-destructive and precise way.
The masking tools in Adobe Photoshop, their positions, and their functionality are as follows.
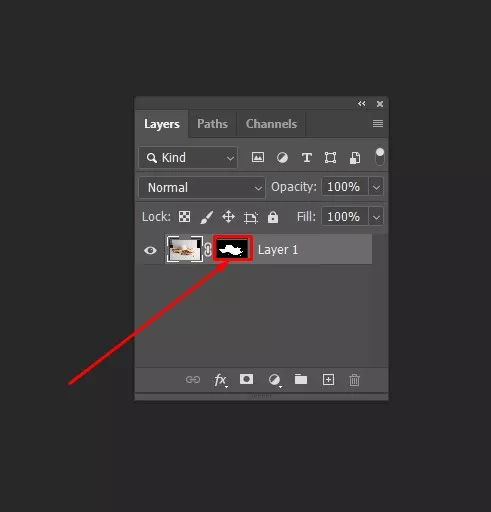
1. Layer Mask
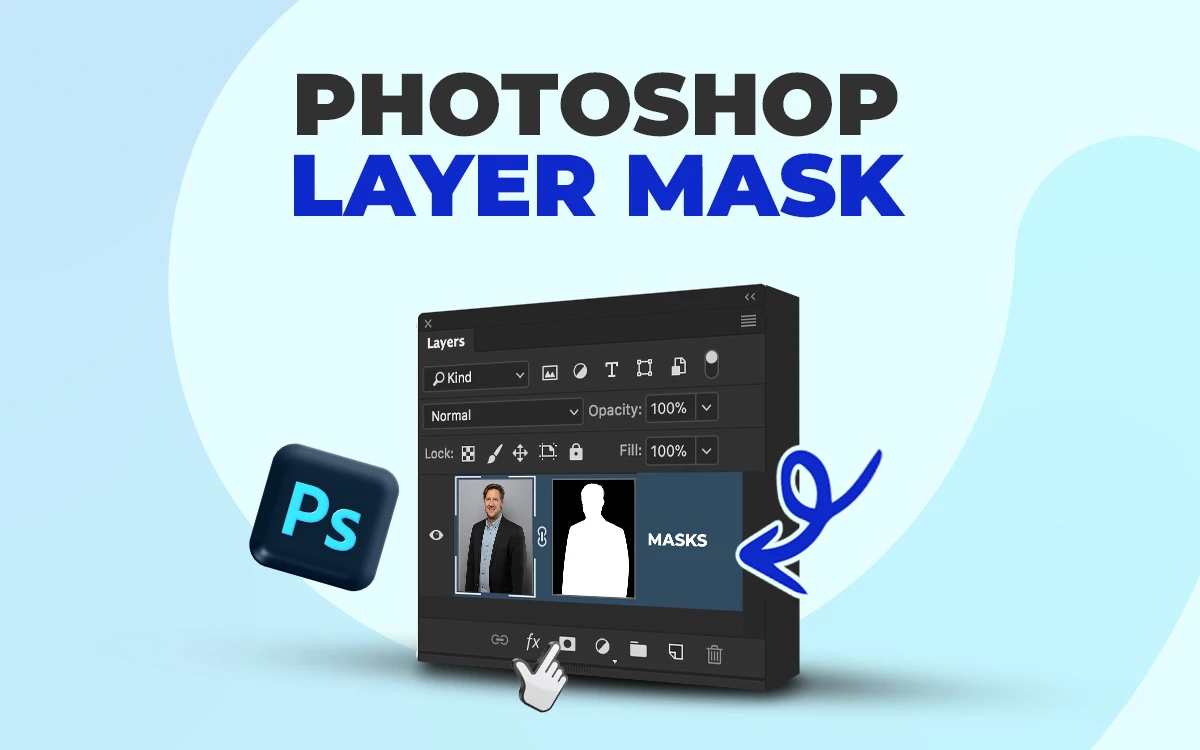
Layer mask is the primary non-destructive tool that is used for controlling the hiding or revealing parts of a layer without deleting pixels. You will find it in the Layers Panel by clicking the Add Layer Mask icon (rectangle with a circle). To use it, select a layer, click the icon, then paint on the mask with black (hide) or white (reveal).
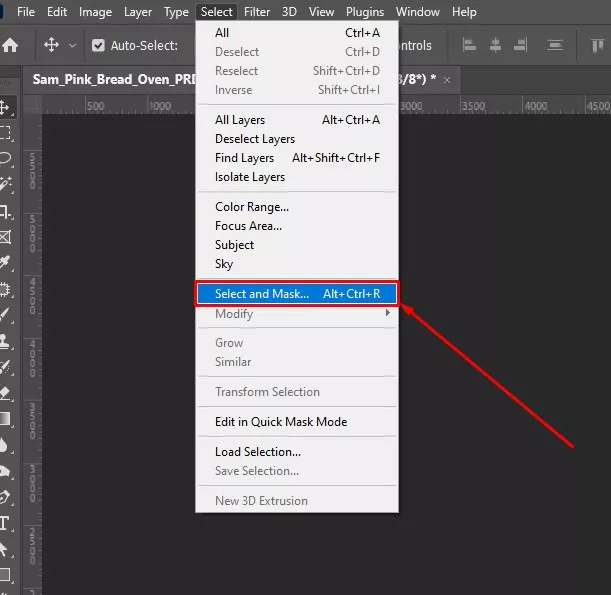
2. Select and Mask Workspace
Select and Mask Workspace is used for improving selections before turning them into masks. It is vital to clean images with hair, fur, and soft transitions. To find it, go to Select and then click Select and Mask, or it appears after making a selection. To use it, refine edges using the Refine Edge Brush and adjust Smooth, Feather, Contrast, and Shift Edge.
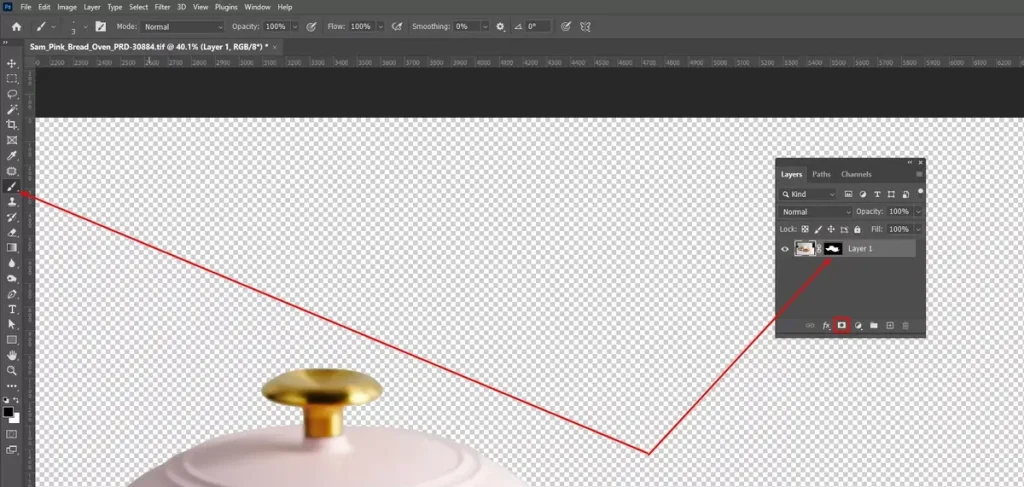
3. Brush Tool
The Brush Tool is used for manually refining masks by painting visibility adjustments and is essential for precise edge correction and detail restoration. You will find it in the Toolbar (B). To use it, select the mask thumbnail, then paint with black to hide or white to reveal areas. Adjust opacity and hardness for better control.
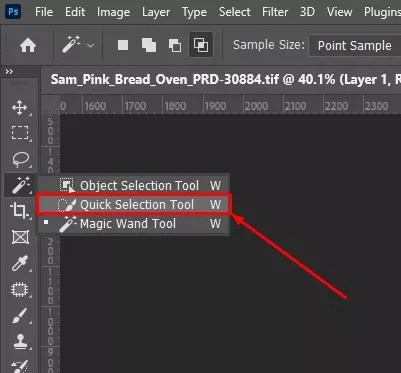
4. Quick Selection Tool
The Quick Selection Tool is an automatic selection tool that detects subject edges based on color and contrast. To find it in the Toolbar (W). To use it, drag over the subject to create a selection, then convert it into a layer mask.
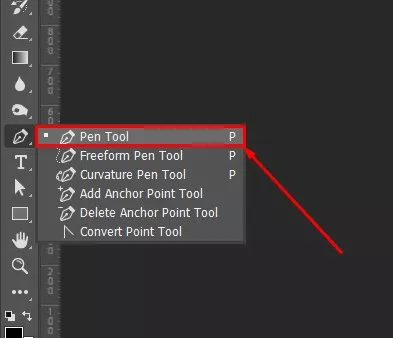
5. Pen Tool
The Pen Tool is a path-based selection tool used to create precise outlines and works best for sharp, clean, well-defined edges. You will find it in the Toolbar (P). To use it, draw anchor points around the subject, convert the path into a selection, and then apply a mask.
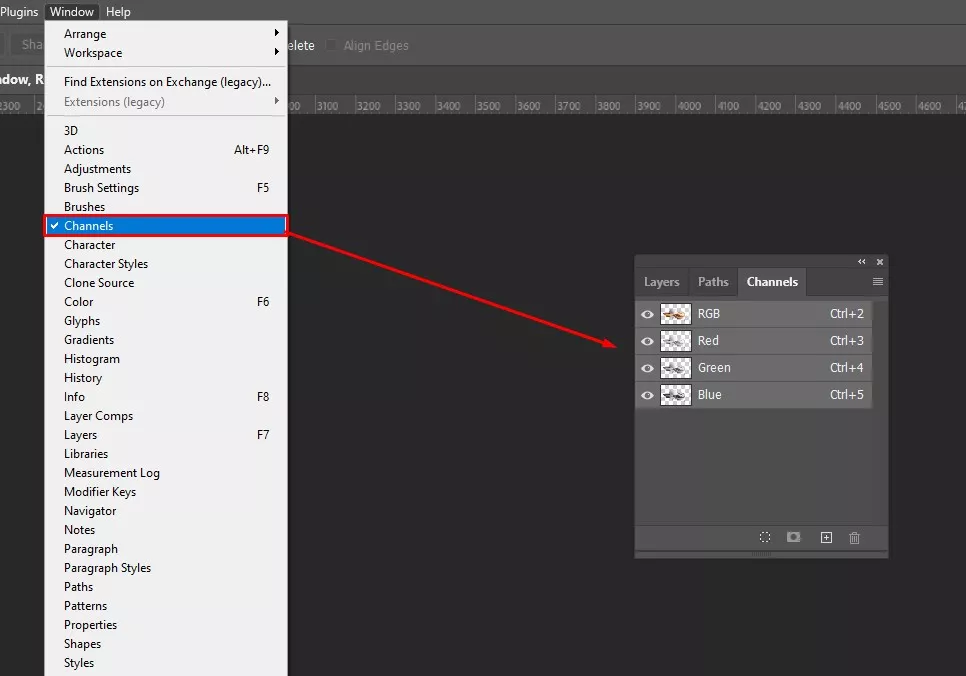
6. Channels Panel
The Channels Panel is an advanced masking method that uses contrast information from color channels and is effective for separating complex details. You will find it under Windows and click Channels. To use it, duplicate a high-contrast channel, enhance the contrast, then load it as a selection and apply a mask.
How Do You Mask an Image in Photoshop?
To mask an image in Photoshop, follow this image masking process, including creating a clipping mask and using layer masks for precise editing.
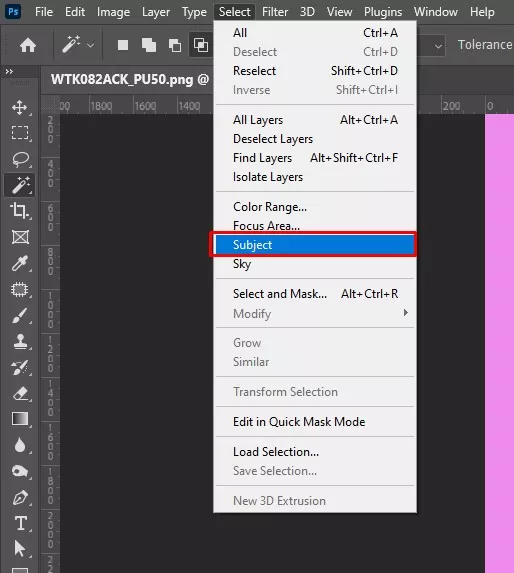
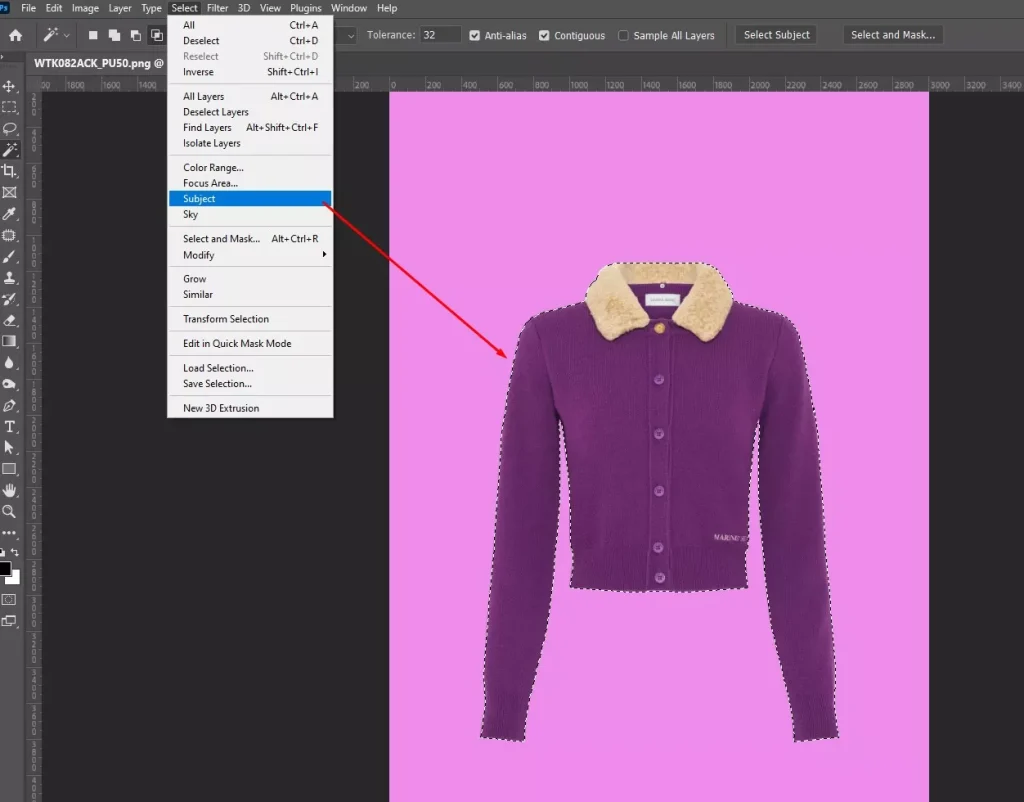
Step 1: Select the Subject
- Go to Select.
- Click Subject to create an initial selection around the object you want to isolate.
Alternatively, use the Quick Selection Tool to manually drag over the subject and refine the selection.
Step 2: Refine the Edges
- Click Select and Mask.
Use the Refine Edge Brush for hair and soft details. Adjust Smooth, Feather, and Contrast as needed.
Step 3: Apply the Layer Mask
- Choose Output to: Layer Mask
- Click OK
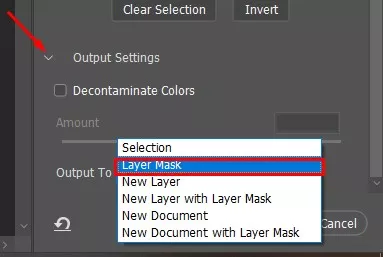
This will hide the background without deleting any pixels.
Step 4: Manually Refine the Mask and Adjust Background
Select the mask thumbnail in the Layers panel and use the Brush Tool (B) to refine edges.
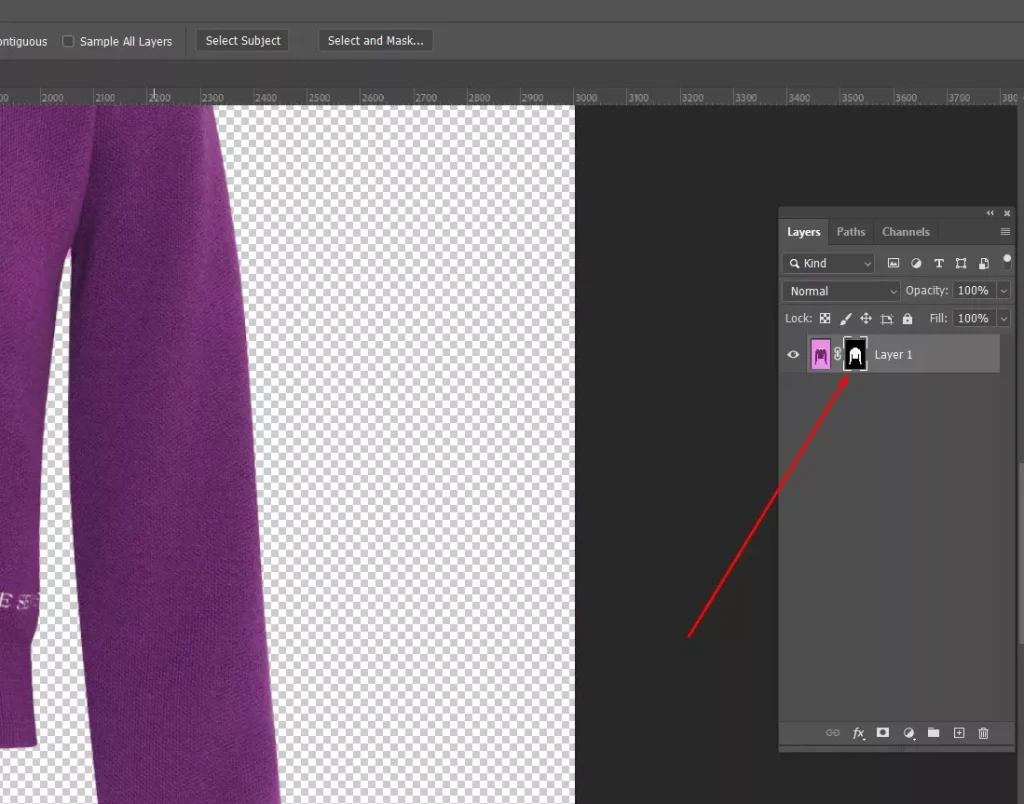
- Paint black to hide unwanted areas.
- Paint white to restore details.
- Lower brush opacity for smoother blending.
Then, add a new background layer beneath the masked subject to check edge quality and make final refinements.
How Do You Find a Professional Image Masking Service Provider in the USA?
Find a professional image masking service provider in the USA through online searches, freelancer platforms, acquaintance referrals, social media portfolios, or industry-specific marketplaces. Check and compare their experience, work style, through free trial, portfolio quality, client reviews, and pricing, before choosing a reliable provider.
Here is a list of things to consider for hiring a professional image masking service provider.
- Portfolio: Check their editing works through hair, fur, and complex edges to ensure realistic masking.
- Experience: Learn about their speciality and experience in e-commerce, fashion, or portrait masking, depending on your needs.
- Turnaround Time: Ensure they can deliver projects within your required deadlines.
- Pricing: Compare their pricing, ask about a bulk discount or seasonal cut price to avoid hidden fees.
- Client Reviews: Look for verified feedback to learn about their reliability and consistency.
How Much Does Professional Image Masking Cost in the United States?
Professional image masking cost starts at $0.60 in the USA. The pricing differs based on the image type, project volume, level of masking, single editors or agency, turnaround times, etc.
Here is a chart on the professional masking service based on different timelines.
| Category | Price | What It Includes |
|---|---|---|
| Simple | $0.65 – $1.50 | Straightforward edges or basic hair masking. |
| Medium | $1.60 – $2.50 | Detailed edge work or semi‑transparent materials. |
| Complex and Custom | Over $2.50 | Dealing with very fine details, translucency, or layered subjects, or any custom requirements. |
FAQ’s
What is the image masking effect?
Image masking is a non-destructive photo editing technique of partially hiding and revealing areas of images to control visibility so that no pixels are permanently deleted. Photo editors can adjust specific regions, such as color or background, while keeping the original image unaffected. They use a grayscale mask to decide which areas remain hidden or exposed.
1. White areas are completely shown.
2. Black areas remain concealed.
3. Gray tones show partially transparent areas.
Why is image masking best for hair and fur?
Image masking is best for hair and fur, along with any objects with soft and pointy edges, because it preserves fine strands and flyaway hairs, keeps realistic edge transitions, and maintains natural transparency and softness. As hair, fur-like objects contain immeasurable semi-transparent strands, traditional cut-out methods create harshness and a fake look of such objects, where masking is the safe option.
What is the role of the brush tool in masking features?
The role of the brush tool in masking features is to manually refine visibility by revealing or hiding specific areas of a photo. It helps painting visibility as follows. Black hides unwanted areas, white reveals details, and soft brushes blend transitions smoothly. Professional changes brush opacity, hardness, and flow to ensure precision, clean edges, restore details, etc.
What are common uses for masked images?
Common uses for masked images involve precise separation and selective editing, for example, e-commerce product background removal, product photo editing for SKU listings, portrait retouching, applying color correction, photo manipulation, light and shadow adjustment, and image compositing. As the photo masking process allows partial hide and reveal, you can edit without affecting the other layers of the image.