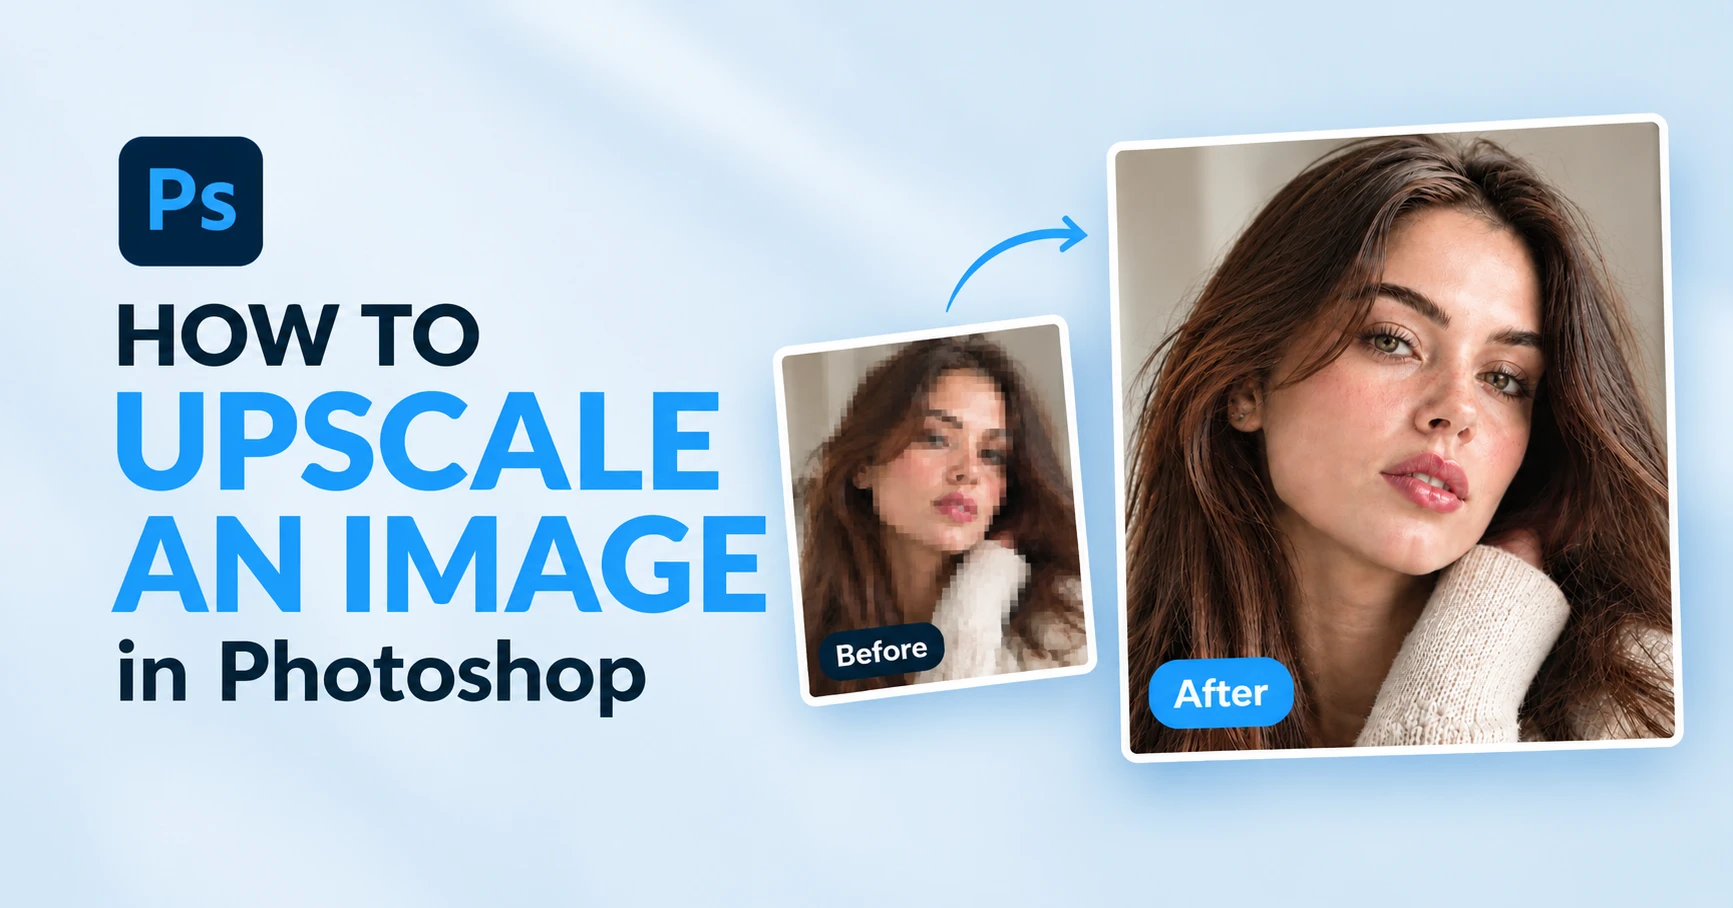
A blurry product photo can cost you a sale. A pixelated print can cost you a client. Low-resolution images cause more problems than most people expect. They usually show up at the worst possible time, right before a deadline.
This used to mean an expensive reshoot or exporting the file to a separate app just to make it bigger. Photoshop 2026 fixes that with tools built directly into the program. So you never have to leave your workflow.
To upscale an image in Photoshop, open your file, go to Image > Generative Upscale, choose an AI model, pick 2x or 4x, and click Upscale. Photoshop builds a new document with more pixels while its AI model reconstructs fine detail; no manual resampling is required.
Here you’ll learn five simple ways to upscale an image in Photoshop, from the newest AI-powered method to easy manual techniques anyone can follow. So, you can enlarge an image without losing quality.
What Is Image Upscaling?
Image upscaling means increasing a photo’s pixel dimensions while rebuilding the detail that would normally be lost. This is not just stretching a small file and hoping it holds up. Every photo is made of a fixed grid of pixels. Once you go past that native resolution, older tools could only guess new pixel values from their neighbors. That guesswork is exactly why enlarged images used to look soft or blocky.
Photoshop 2026 approaches it differently. Rather than averaging nearby pixels, its AI models reconstruct texture, edges, and fine detail from scratch. This is how modern tools increase image resolution without the mushy look older methods produced. For a studio prepping gallery prints or a brand scaling a product shot for a billboard, that difference decides whether a client approves the file or sends it back.
Upscaling vs. Resizing
Resizing and upscaling get used interchangeably, but they solve different problems. Resizing simply changes an image’s dimensions or file size. This often shrinks a photo to fit a web page or export it smaller. Upscaling specifically increases pixel count while trying to preserve or add detail.
If you only need to shrink a photo or resize an image in Photoshop without losing quality for a smaller output, standard resizing tools handle that fine. Upscaling exists for the harder problem: making a small image genuinely bigger.
How AI Upscaling Works
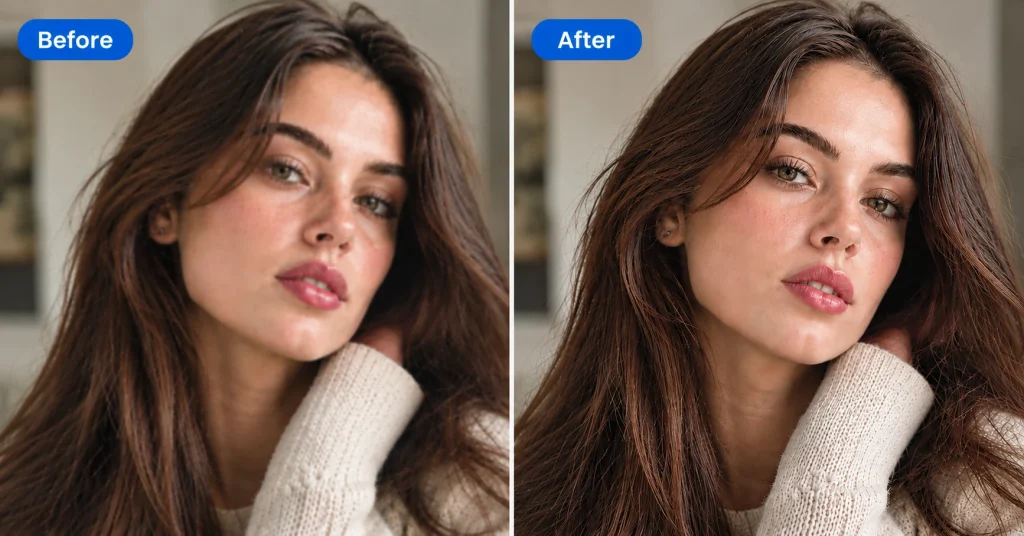
AI image upscaling in Photoshop runs on a trained neural network rather than simple pixel interpolation. The machine learning model has studied millions of image pairs: low-resolution and high-resolution versions of the same scene. It also learned what realistic detail should look like at a larger size.
When you upscale a photo, the model predicts new pixels based on patterns it recognizes, instead of just blending existing ones. That’s why hair strands, fabric weave, and skin texture hold up far better than they did with older bicubic methods.
Which Photoshop Version Do You Need?
Generative Upscale and the latest Super Resolution improvements are exclusive to Photoshop 2026 and require an active Creative Cloud subscription with cloud credits for AI generations. Photoshop 2025 and earlier versions still include Super Resolution and Preserve Details 2.0. Both of which work well but don’t offer the same generative detail reconstruction. If you’re running an older version, Methods 2 through 4 in this guide will still work. You’ll just skip Method 1.
How to Upscale an Image in Photoshop (Quick Overview)
Not sure which method fits your project? Here’s a quick breakdown of all five ways to upscale an image in Photoshop. So, you can jump straight to the one that matches your file type and goal.
- Generative Upscale: AI-based, best for most photos, available in Photoshop 2026
- Super Resolution: Ideal for RAW files and Camera Raw workflows
- Preserve Details 2.0: Solid non-generative option for moderate enlargements
- Smart Object + Free Transform: Flexible, non-destructive, best for design layouts
- Neural Filters: Not for upscaling directly, but cleans up images before you enlarge them
Before You Start: Formats & Resolution Basics
Photoshop’s upscaling tools work with JPEG, PNG, TIFF, PSD, and RAW files. RAW files get the most accurate results since they hold more original detail to work from. Before upscaling anything, it helps to understand two numbers: PPI (pixels per inch), which determines print sharpness, and native resolution. The original pixel dimensions your camera or scanner captured. A photo’s bit depth also matters. 16-bit files upscale more cleanly than 8-bit JPEGs. Because they hold more tonal information for the AI model to work with.
Method 1: Generative Upscale (Recommended)
Generative Upscale is Photoshop 2026’s flagship tool for anyone who needs to enlarge an image without losing quality. For most photographers and brands, it’s the first method worth trying. It’s built specifically for cases where you need to genuinely enlarge an image, not just resize it, while keeping faces, product labels, and fine textures believable.
Step 1: Open Your Image
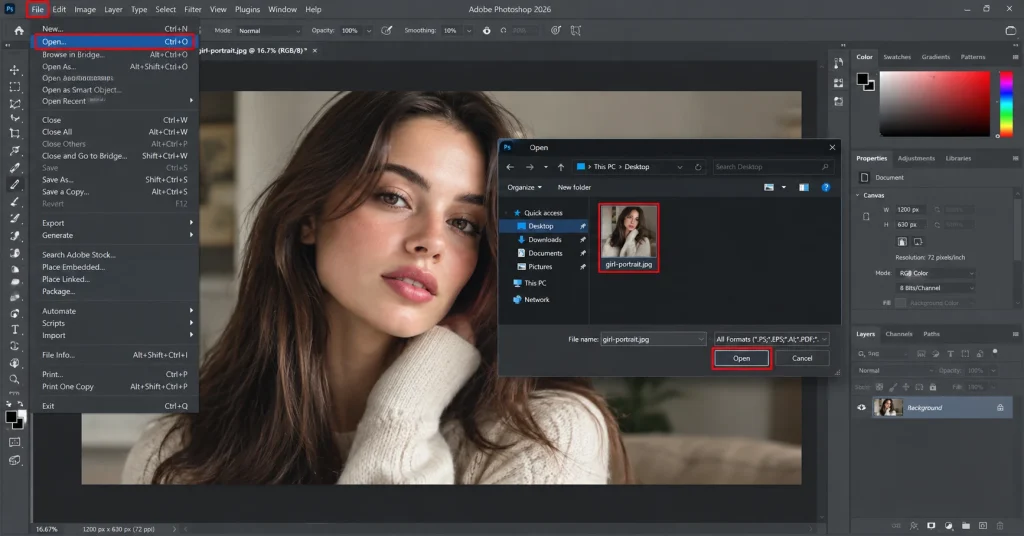
Open the photo in Photoshop 2026. Generative Upscale works on flattened images and most standard file types. So, if you’re working from a layered PSD, it’s worth duplicating the file first in case you need to return to the original layers later.
Step 2: Go to Image > Generative Upscale
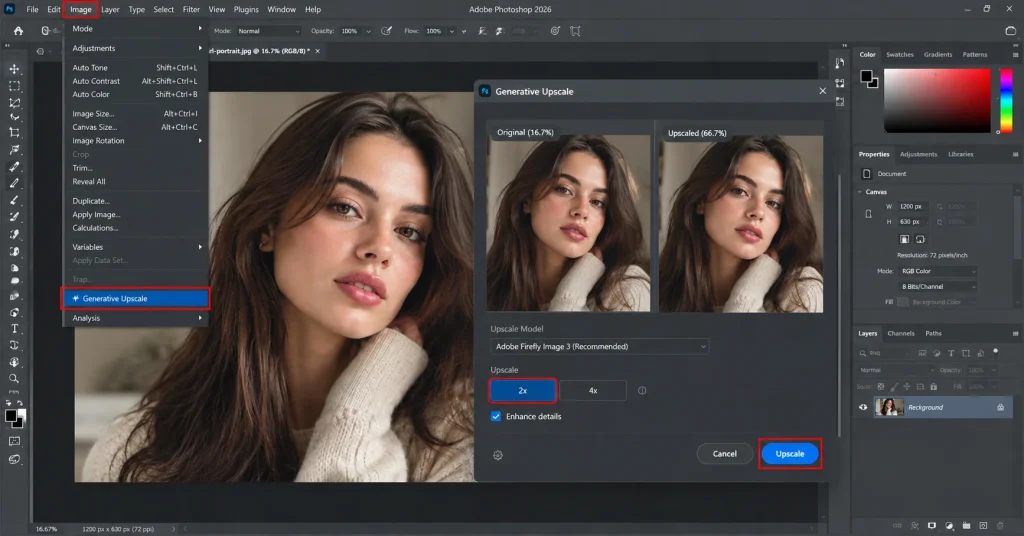
From the top menu, select Image, then Generative Upscale. Photoshop opens a preview panel showing your image alongside the upscaling controls. So, you can compare the before-and-after in real time before committing.
Step 3: Choose an AI Model
Photoshop 2026 lets you pick between available AI models for the upscale. Some optimized for photographic detail, others tuned for illustrations or product shots. For portrait and commercial photography, the photographic model typically produces the most natural skin tones and fabric texture.
Step 4: Choose 2x or 4x
Select your target scale. 2x roughly doubles pixel dimensions and works well for moderate enlargements like social graphics or medium prints. 4x is a bigger jump, better suited for large-format prints, event signage, or billboard-sized outputs where you’re starting from a smaller original.
Step 5: Click Upscale
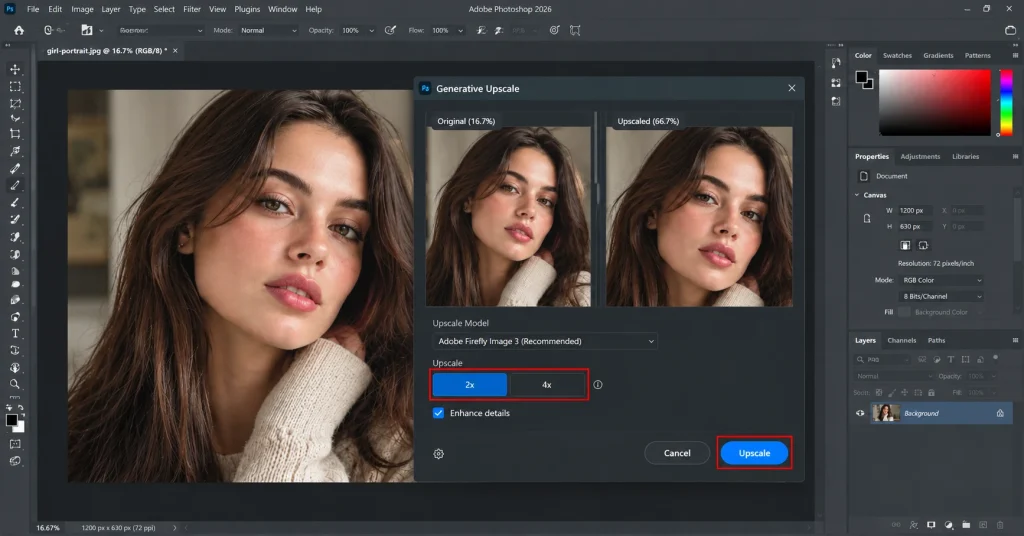
Once your settings are locked in, click Upscale. Photoshop sends the image through its AI model to generate the enlarged version. Larger jumps and higher-resolution originals will take longer to process.
Step 6: Review the New Document
Photoshop creates a brand-new document at the upscaled resolution. It keeps your original file untouched. This non-destructive approach means you can always go back and try a different model or scale without redoing your edits from scratch.
Pro Tip: Keyboard shortcuts worth knowing while you work: Ctrl/Cmd+T for Free Transform. Ctrl/Cmd+Alt+I to jump straight to Image Size. And Shift+Ctrl/Cmd+A to open the Camera Raw Filter for Super Resolution or denoising.
Inspecting the Result
Zoom in on faces, text, logos, and fine patterns first. These are the areas where AI upscaling is most likely to introduce small artifacts. If something looks off, undo and try a different AI model or drop from 4x to 2x for a cleaner result.
Pros & Cons
| Pros | Cons |
|---|---|
| Reconstructs realistic detail using AI | Uses Creative Cloud credits |
| Handles faces, fabric, and textures well | Slower processing, especially at 4x |
| Non-destructive; the original file stays untouched | Only available in Photoshop 2026 |
| Scales up to 4x in one pass | Complex images may need manual touch-ups |
Generative Upscale is the best choice for hero product shots, wedding and portrait galleries, and any image a client will view up close.
Don’t have time to upscale and retouch every gallery yourself? Our editors handle the full pass. These include upscaling, skin and texture cleanup, and color correction. So files come back print-ready. See Photo Retouching Services →
Method 2: Super Resolution (Camera Raw)
Photoshop Super Resolution lives inside Camera Raw and is the better choice when you’re starting from a RAW file. Since it’s built to work with the extra data RAW files capture. It uses Adobe’s AI model to double an image’s resolution while preserving edge sharpness. This is a strong option before you crop tightly or print large.
Step 1: Open Your File in Camera Raw
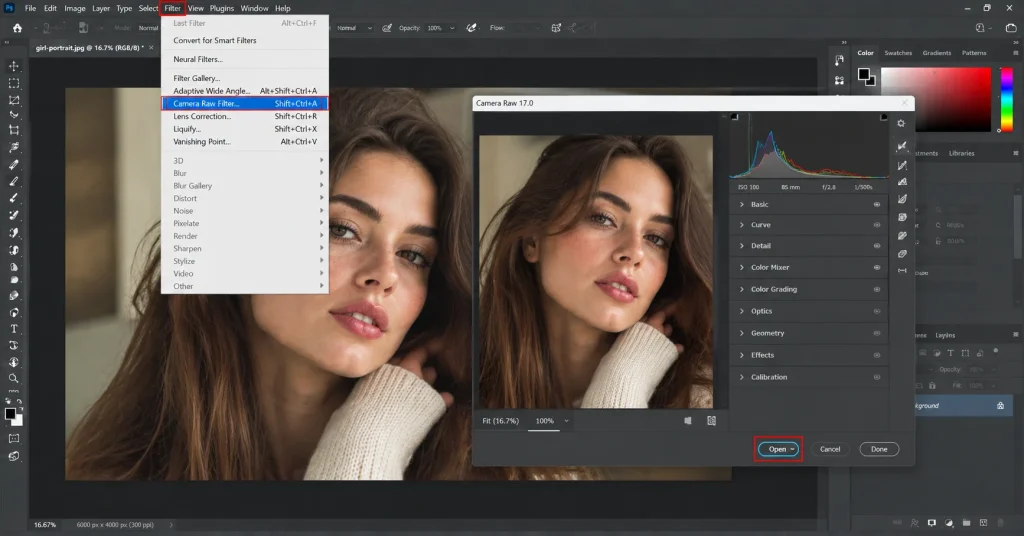
Open your RAW file directly in Camera Raw, or go to Filter > Camera Raw Filter if you’re working with a JPEG or TIFF instead.
Step 2: Right-Click and Select Enhance
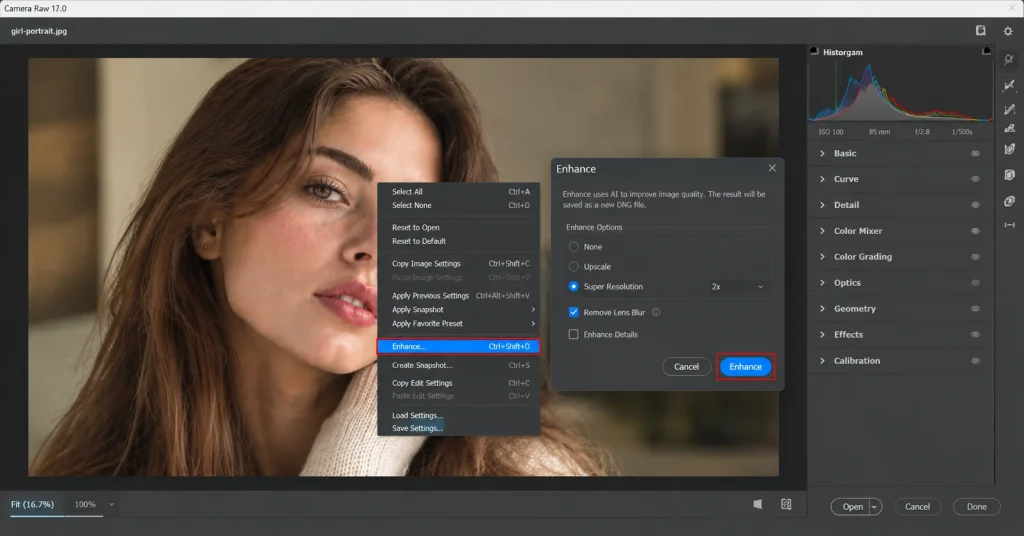
Right-click the image preview inside Camera Raw and choose Enhance. This opens a small dialog with your enhancement options.
Step 3: Check the Super Resolution Box
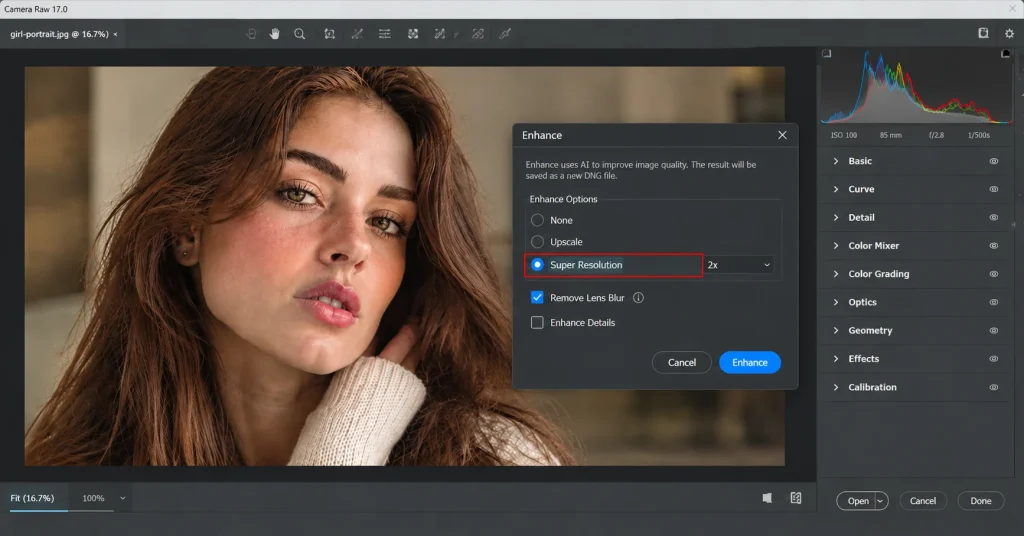
In the Enhance dialog, check Super Resolution. This tells Photoshop to run the AI model that doubles your image’s pixel dimensions.
Step 4: Click Enhance to Process
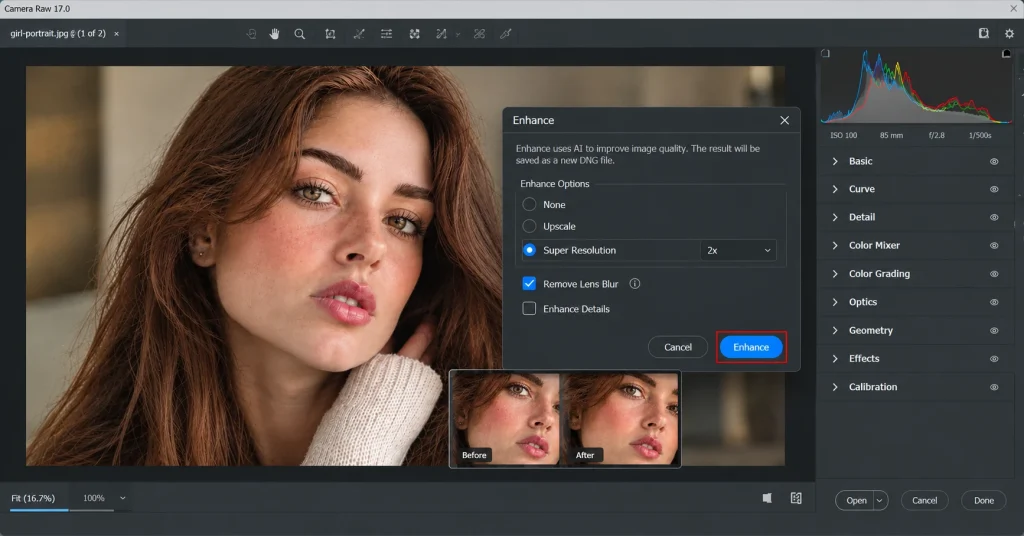
Click Enhance and let Photoshop process the file. The result saves as a new DNG file with roughly double the width and height, while your original file stays untouched. So you can compare both before deciding which to use.
Pros & Cons
| Pros | Cons |
|---|---|
| Excellent results on RAW files | Fixed at 2x, no 4x option |
| Fast, with no AI model to pick | Best used as a preprocessing step |
| Preserves edge sharpness well | Saves as a new DNG, an extra file to manage |
| Keeps the original file untouched | Less effective on heavily compressed JPEGs |
Method 3: Preserve Details 2.0
Preserve Details 2.0 is Photoshop’s non-generative upscaling algorithm. This is built into the standard Image Size dialog. It won’t reconstruct detail the way Generative Upscale does, but it’s fast, predictable, and doesn’t need Creative Cloud credits. This one is a solid option for moderate enlargements where speed matters more than maximum quality.
Step 1: Open Image Size
Go to Image > Image Size to open the dialog where all your resizing controls live.
Step 2: Turn On Resample
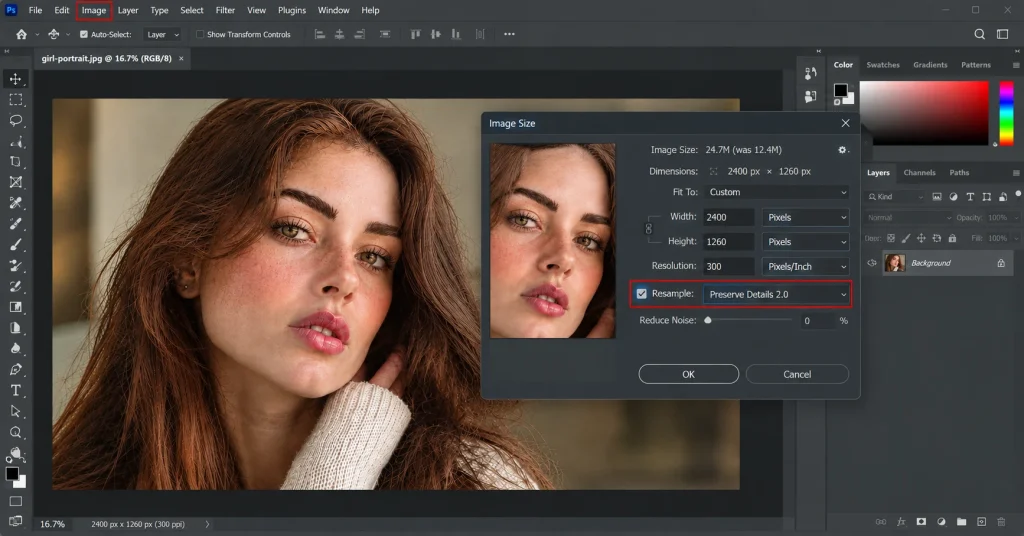
Make sure the Resample checkbox is turned on. Without it, Photoshop can’t add new pixels. It can only change print dimensions.
Step 3: Select Preserve Details 2.0
Open the resample method dropdown and choose Preserve Details 2.0 from the list.
Step 4: Set Your Width and Height
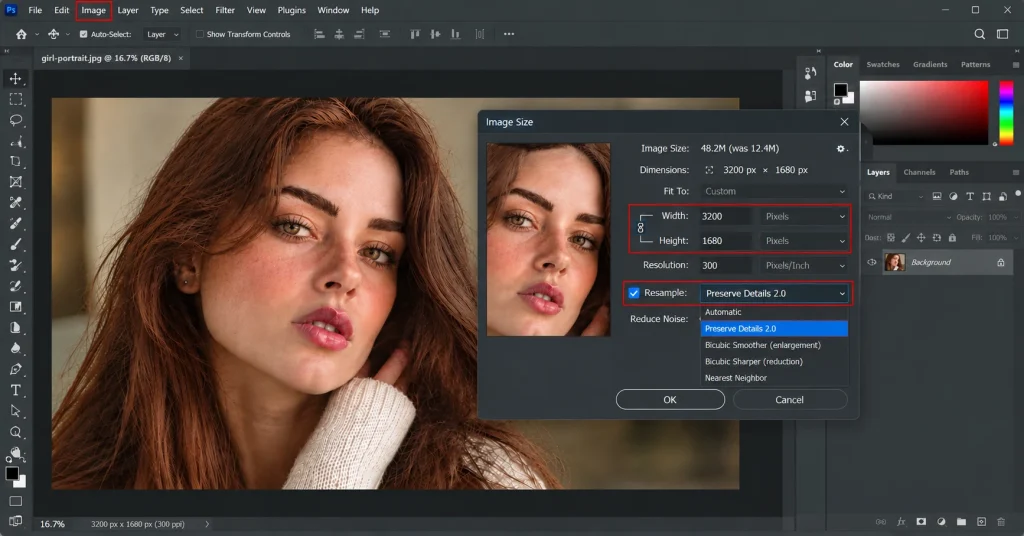
Enter your target width and height and keep the link icon enabled so the image scales proportionally without stretching.
Step 5: Adjust the Reduce Noise Slider
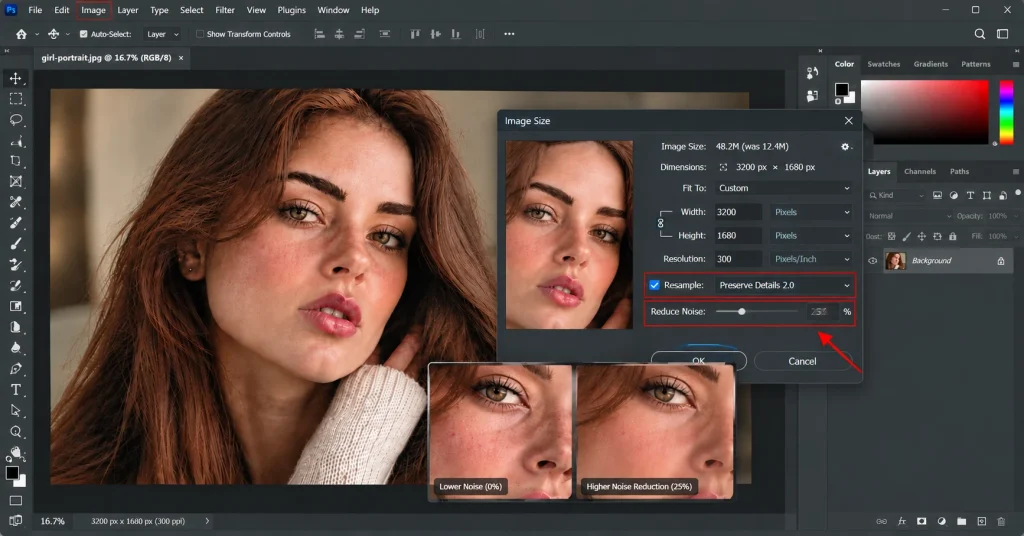
As you increase the size, use the Reduce Noise slider to balance sharpness against any grain the upscale introduces.
Step 6: Click OK to Apply
Click OK, and Photoshop resamples the image at your new dimensions.
Pros & Cons
| Pros | Cons |
|---|---|
| Fast and doesn’t use AI credits | Doesn’t generate new detail |
| Full manual control over noise and sharpness | Quality drops past roughly 200% enlargement |
| Works in every version of Photoshop | Less realistic than AI-based methods |
| No cloud processing required |
Method 4: Smart Object + Free Transform
Converting a layer to a Smart Object before enlarging it keeps your file flexible. You can scale up, then scale back down, without permanently degrading the original pixel data. This matters most in design work, where a product image might get resized several times across different layouts.
Step 1: Convert the Layer to a Smart Object
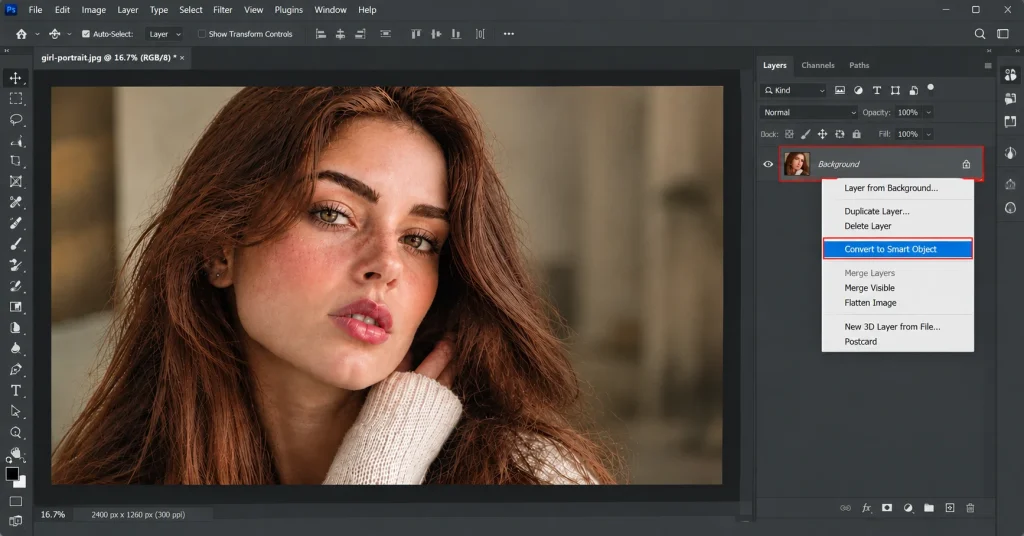
Right-click the layer in the Layers panel and choose Convert to Smart Object.
Step 2: Open Free Transform
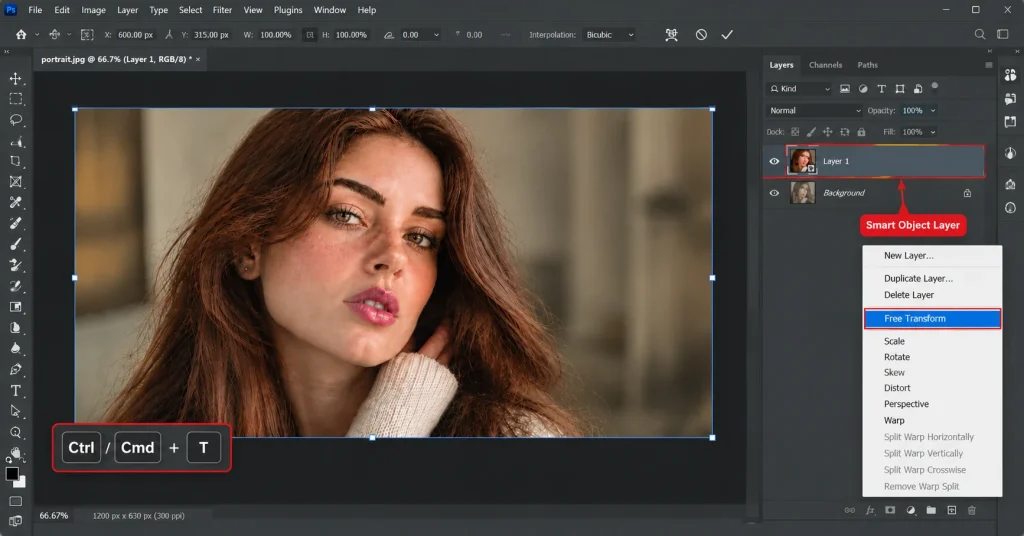
Press Ctrl/Cmd+T to open Free Transform on the Smart Object layer.
Step 3: Scale the Image Up
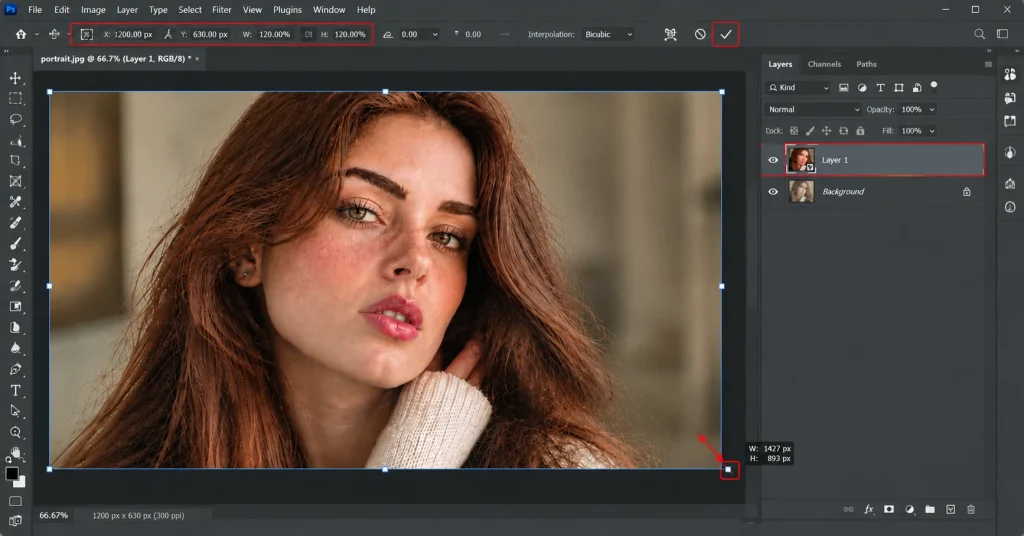
Drag a corner handle to scale the layer up to your target size, then press Enter to commit the change.
Step 4: Pair It With Another Method
Smart Objects don’t add new detail on their own. So run Preserve Details 2.0 or Generative Upscale first. Then use this method to keep the result editable inside a larger composition.
Pros & Cons
| Pros | Cons |
|---|---|
| Fully non-destructive | Doesn’t add new detail on its own |
| Easy to scale up or down repeatedly | Works best paired with another method |
| No Creative Cloud credits needed | Not a complete upscaling solution alone |
| Keeps files flexible for design work | Limited by the original pixel data |
Method 5: Neural Filters for Pre-Upscale Cleanup
Neural Filters won’t enlarge an image. But running one before you upscale often produces a noticeably cleaner final result, especially on older or lower-quality source photos.
Photo Restoration
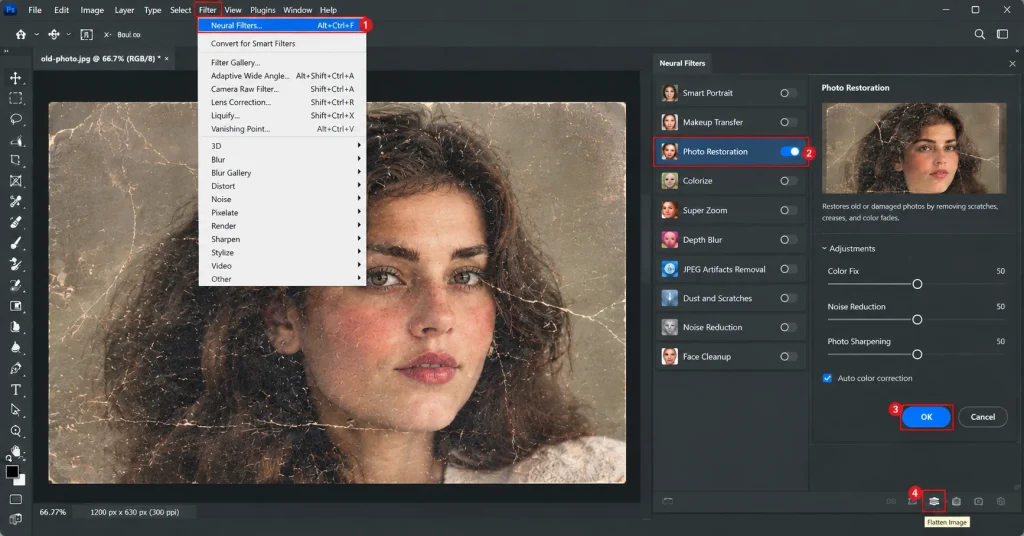
For scanned or damaged photos, the Photo Restoration filter repairs scratches, creases, and faded color before you enlarge. So the AI model isn’t upscaling existing damage alongside real detail.
- Go to Filter > Neural Filters and turn on Photo Restoration
- Let Photoshop scan the image and apply automatic repairs, or adjust the sliders manually
- Preview the before-and-after, then click OK to apply
- Flatten the image before moving on to your upscale method
JPEG Artifact Removal
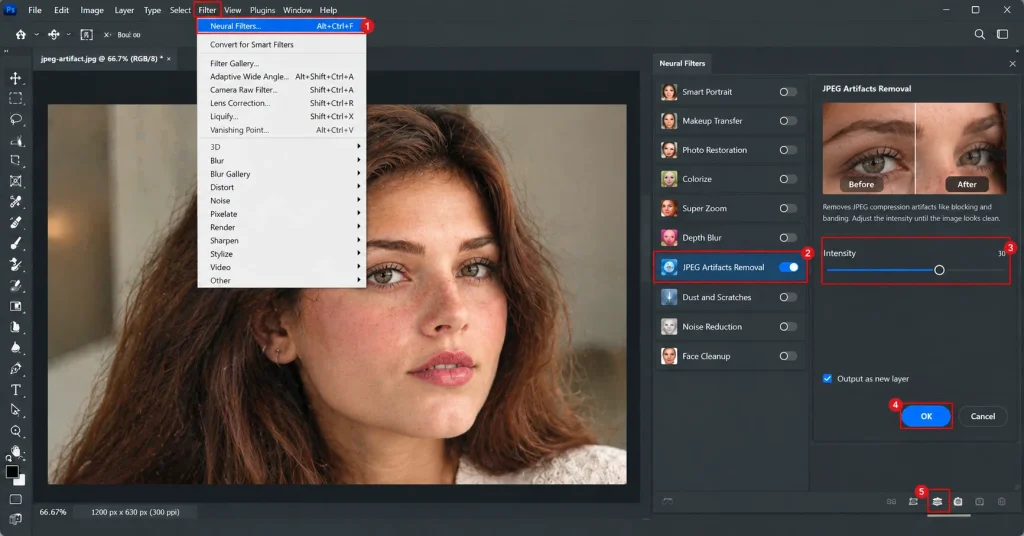
Heavily compressed JPEGs carry visible blocking and banding that gets more obvious at a larger size. Running JPEG Artifact Removal first gives Generative Upscale a cleaner starting point to work from.
- Open Filter > Neural Filters and turn on JPEG Artifacts Removal
- Adjust the intensity slider until blocking and banding disappear
- Apply the filter, then proceed to Method 1 or Method 2
Smart Portrait / Skin Smoothing
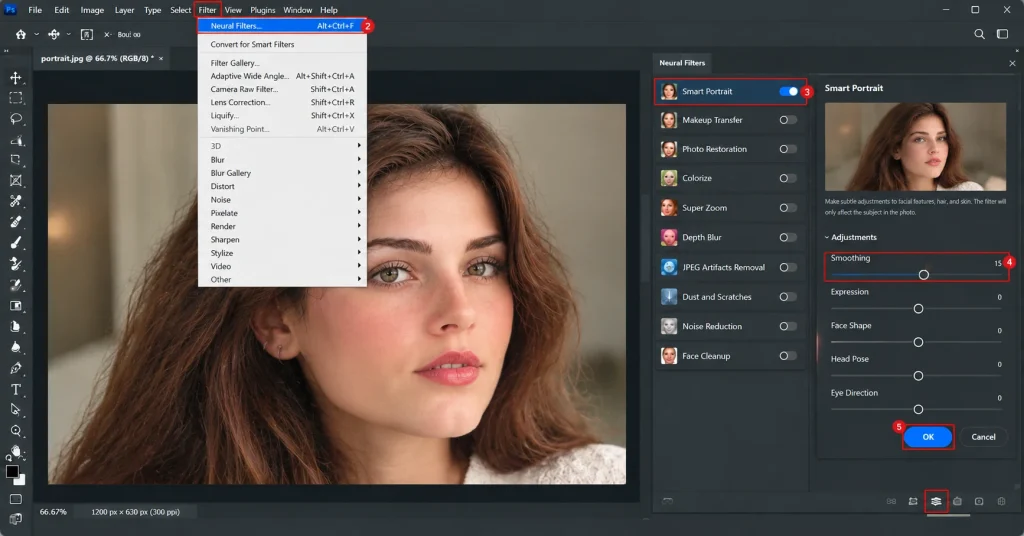
For headshots and beauty photography, a light pass of Smart Portrait or skin smoothing before upscaling helps skin texture enlarge naturally instead of exaggerating blemishes or uneven tone at 4x.
- Open Filter > Neural Filters and select Smart Portrait
- Keep adjustments light; small moves on the smoothness slider go a long way
- Apply, then move on to Generative Upscale for the final enlargement
Generative Upscale vs. Super Resolution: Quick Comparison
Both tools use AI, but they’re built for different jobs. Use this quick comparison to decide which one fits your file and project.
| Feature | Generative Upscale | Super Resolution |
|---|---|---|
| Best for | JPEG, PNG, PSD, general photos | RAW files |
| Max scale | Up to 4x | Fixed 2x |
| Detail reconstruction | AI-generated, greatest detail | Edge-preserving, no new detail |
| Speed | Slower, credit-based | Faster, included in Camera Raw |
| Best use case | Large prints, hero images | RAW preprocessing |
Fixing Noise After Upscaling: Denoise Then Sharpen
Even a clean upscale can pick up faint noise, especially at 4x. A quick two-step cleanup keeps the result crisp instead of grainy, and the order you do it in matters.
- Open Filter > Camera Raw Filter
- Use the Denoise slider to smooth out any grain the AI introduced
- Apply Filter > Sharpen > Smart Sharpen at a moderate setting
- Zoom to 100% to confirm edges look clean, not over-sharpened
Common Mistakes to Avoid
A few small missteps are behind most disappointing upscales. Avoid these, and your results will improve right away:
- Upscaling a heavily compressed JPEG without cleaning it up first
- Jumping straight to 4x when 2x would preserve more natural detail
- Skipping the zoom-in check on faces, text, and logos before delivering a file
- Flattening layers before upscaling instead of preserving a Smart Object backup
- Ignoring bit depth, upscaling an 8-bit file expecting 16-bit-level results
Best Export Settings for Print, Web & Social
Getting the resolution right is only half the job. Exporting at the right settings is what actually makes an image you upscale in Photoshop usable across print and digital.
Print (300 DPI)
For anything headed to a printer, export at 300 DPI. A 4x upscale from a 1000×1000px original gets you to 4000×4000px. Plenty for a 13×13 inch print at full quality, with room to spare for gallery wraps or signage.
Instagram, Etsy, Amazon Sizes
E-commerce and social platforms each have their own sweet spot:
- Instagram: 1080×1080px (square) or 1080×1350px (portrait)
- Etsy: 2000×2000px minimum, so the zoom feature stays sharp
- Amazon: 1600px minimum on the longest side, 2000px+ recommended for the zoom-to-inspect feature buyers rely on before checkout
Photoshop vs. Standalone AI Upscales (Topaz, Upscale. media & More)
Dedicated tools like Topaz Gigapixel AI, Upscale.media, and Let’s Enhance are built purely for upscaling. These can edge out Photoshop on raw speed for simple batch jobs. Where Photoshop pulls ahead is context. You’re not exporting to a separate app and back.
When you upscale an image in Photoshop, it happens inside the same file where you’re already retouching, color correcting, and prepping it for delivery.
| Tool | Best For | Max Scale | Inside Photoshop? |
|---|---|---|---|
| Photoshop (Generative Upscale) | Full editing + upscaling in one file | 4x | Yes, native |
| Topaz Gigapixel AI | Batch jobs, extreme enlargements | Up to 6x | No, standalone app |
| Upscale.media | Quick, free single-image upscales | Up to 4x | No, browser-based |
| Let’s Enhance | E-commerce batch upscaling | Up to 4x | No, cloud-based |
For teams already working in Photoshop for photo-editing software and full post-production, that built-in integration usually outweighs the marginal speed difference standalone tools offer.
Frequently Asked Questions
Can you upscale a blurry image?
Yes, though results depend on the cause of the blur. Generative Upscale can sharpen mild softness and reconstruct texture, but severe motion blur or out-of-focus shots will still show some softness. This pairs it with a filter to fix blurry photos first, which improves the outcome.
In Photoshop 2026, go to Image > Generative Upscale. For Super Resolution, right-click a photo in Camera Raw and select Enhance, then check Super Resolution in the dialog.
Does upscaling reduce image quality?
Done well, no. Modern AI upscaling adds detail rather than removing it. Quality loss usually comes from starting with a heavily compressed source file or pushing the scale too far past what the original supports.
Is it possible to upscale an image in Photoshop?
Yes. Photoshop 2026 offers five practical methods, from AI-driven Generative Upscale and Super Resolution to manual options like Preserve Details 2.0 and Smart Object scaling.
Is it better to upscale or enhance?
They solve different problems. Upscaling increases pixel dimensions; enhancing improves color, contrast, or sharpness at the existing size. Most professional workflows use both. Enhance first, then upscale, or the reverse, depending on the source file.
What is the best free image enhancer?
Photoshop’s Neural Filters (Photo Restoration, JPEG Artifact Removal) offer strong enhancement tools within a Creative Cloud subscription. For a fully free option, enhance image quality tools online can handle basic fixes before a full Photoshop pass.
How does upscaling relate to quality?
Upscaling directly affects perceived quality by adding pixel-level detail that a small image lacks. The better the AI model reconstructs texture and edges, the closer the enlarged image looks to a native high-resolution photo.
Can you upscale an image in Photoshop without AI?
Yes. Preserve Details 2.0 and standard bicubic resampling in the Image Size dialog don’t use generative AI. This makes them useful when speed or credit usage matters more than maximum detail reconstruction.
Final Thoughts
Between Generative Upscale, Super Resolution, and the manual methods covered here, Photoshop 2026 covers nearly every scenario where a photo needs to be bigger without looking worse. The right method comes down to your source file and end use.
RAW files lean toward Super Resolution, hero shots benefit most from Generative Upscale, and quick layout work is often better served by Smart Objects. Whichever way you choose to upscale an image in Photoshop, testing at a smaller scale first is always worth the extra minute before committing to a full 4x render.