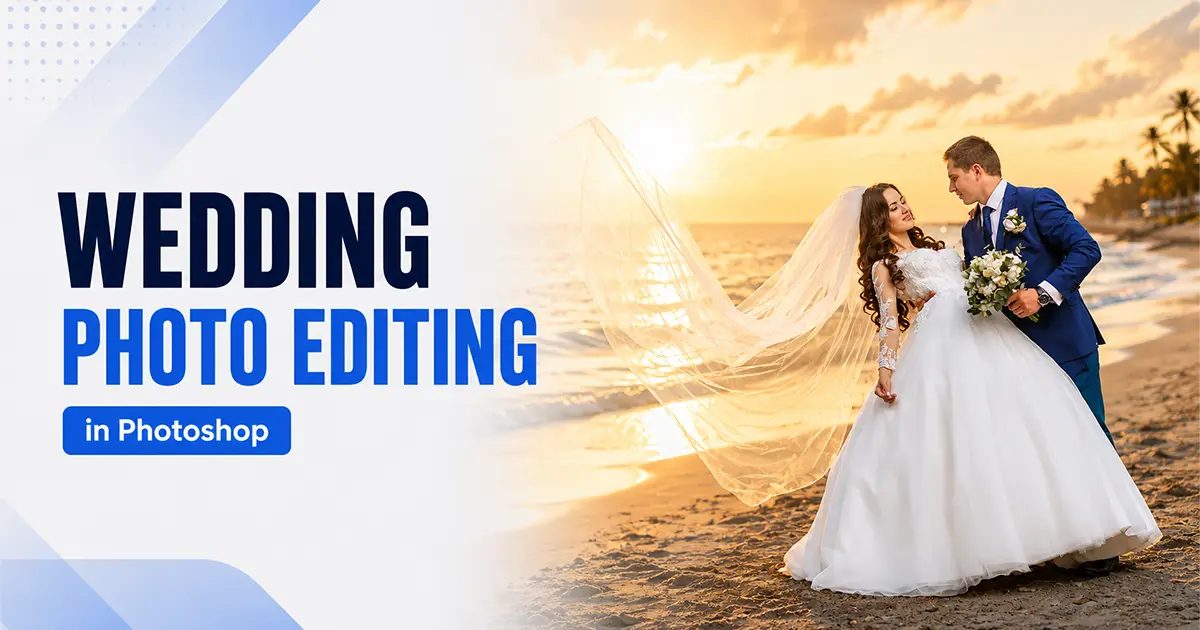
A wedding lasts one day. The photos last a lifetime.
But here’s the reality most people don’t talk about. Even the most perfectly shot wedding image can fall flat without the right edit. Blown-out dress whites, muddy skin tones, and inconsistent color across a 700-image gallery. These are the things that separate a forgettable delivery from a gallery a couple will treasure for decades.
Editing is where you can tell the story. It’s where you can lock emotion.
If you’re a freelance photographer,
- handling your first bridal client,
- a studio owner managing back-to-back wedding seasons, or
- a photography professional looking to sharpen your post-production workflow
Offshore Clipping delivers everything you need to know about how to edit wedding photos like a professional. We walk you through the best software, a proven step-by-step workflow, the most popular wedding photo editing styles, expert tips, and the smart decision of when to handle it yourself versus when to hand it off.
What Makes Wedding Photo Editing Different?
Not all photo editing is created equal. Wedding editing contains a unique set of demands that sets it apart from commercial, product, or portrait photography.
- Emotional accuracy: Skin tones, dress whites, and golden-hour glows must feel true to life. It should not feel clinical or overprocessed.
- Volume pressure: A typical wedding produces 500 to 2,000+ raw images. Efficiency is significant and non-negotiable.
- Gallery consistency: Every image from the ceremony to the reception must share the same visual tone and mood.
- Complex lighting conditions: Indoor chapels, outdoor gardens, golden-hour portraits, and neon-lit reception halls all appear in a single event.
- Client expectations: Couples are emotionally invested. A mismatched color grade or an over-retouched face can seriously damage trust.
For photography studios, freelance photographers, and event firms, meeting these demands builds reputation and drives repeat referrals.
How to Edit Wedding Photos
At its core, wedding photo editing comes down to three things:
- Correcting what the camera got wrong
- Enhancing what makes the image emotionally powerful
- Delivering a gallery that looks and feels consistent from the first frame to the last.
Every wedding image moves through the same fundamental process in Photoshop. You open the RAW file through Adobe Camera Raw to balance exposure, reduce the overly bright parts of the clothing, lift shadow detail in darker areas, and correct white balance so skin tones feel warm and natural. From there, the image opens on the Photoshop canvas where the real creative work happens.
Color correction refines what Camera Raw started. You can use the Hue/Saturation adjustment layer and Color Grading panel to finalize your own style of skin, whites, and ambient tones.
Skin retouching follows with Photoshop’s Healing Brush for day-of blemishes, frequency separation for texture-preserving smoothing, and targeted dodge and burn to sculpt dimension back into flat-lit portraits. Make sure you take every step of working on separate layers so every decision stays reversible.
The final stage is consistency. Photoshop Actions let you record and replay your entire editing sequence across multiple images. You can align the full gallery without starting from zero on every shot. When volume becomes too large for a single editor to manage without sacrificing quality or turnaround time, that is where professional editing services step in.
Best Software for Wedding Photo Editing
Adobe Photoshop is the professional standard for wedding photo editing, and for good reason. It gives you complete, non-destructive control over every aspect of an image:
- RAW processing through Camera Raw
- Precise color work through adjustment layers
- Advanced skin retouching through frequency separation and dodge and burn
- Clean final exports optimized for both print and digital delivery.
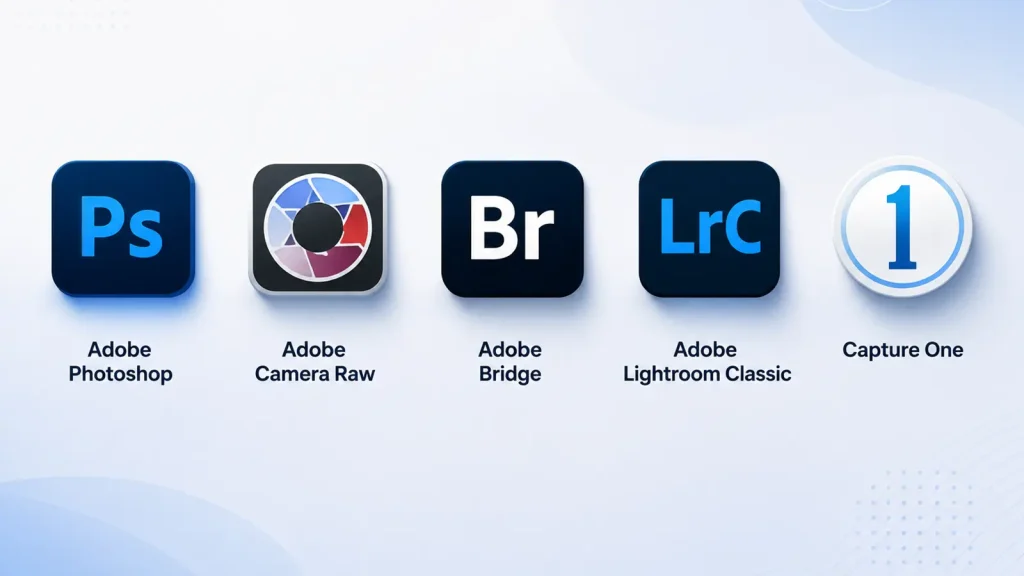
Every editing technique in this guide is performed in Photoshop. Here is how the broader software ecosystem fits around it:
1. Adobe Photoshop: Primary Editing Tool
The complete editing environment for all color correction, retouching, compositing, and export work. Photoshop handles everything from your first exposure adjustment in Camera Raw to your final export setting. If you are editing wedding photos professionally, this is your main tool.
2. Adobe Camera Raw: RAW Processing Inside Photoshop
Camera Raw is built directly into Photoshop and opens automatically when you load a RAW file. It handles exposure, white balance, tone curve, HSL color adjustments, and lens corrections before the image ever reaches the Photoshop canvas. Think of it as your first-pass editing environment: fast, non-destructive, and powerful.
3. Adobe Bridge: Free File Organization
Bridge is Adobe’s free file browser and comes included with a Creative Cloud subscription. It lets you organize, cull, rename, and batch-process files before opening them in Photoshop. For photographers who do not want to pay for Lightroom, Bridge handles file management cleanly and hands work directly to Photoshop.
4. Adobe Lightroom Classic: For Import and Culling Only
Lightroom is not an editing tool in this workflow. It is an organizational one. If you are managing a 1,500-image shoot, Lightroom is excellent for culling, star-rating, and initial import organization. Once your selections are identified, the editing work moves entirely into Photoshop. For photographers already in the Adobe ecosystem, this round-trip workflow is seamless.
5. Capture One: Optional Tethered Import
Some studio owners and commercial photographers use Capture One for tethered shooting and initial RAW import due to its strong color engine. Like Lightroom, it serves the import and organization phase; Photoshop handles everything that follows.
At a glance:
| Software | Role in Wedding Editing | Photoshop Dependency | Best For |
| Adobe Photoshop | Primary editing tool, all color, retouch, export work | Core tool | All editing tasks end-to-end |
| Adobe Camera Raw | RAW processing inside Photoshop, exposure & white balance | Built into PS | RAW file editing before Photoshop canvas |
| Adobe Lightroom Classic | Culling, organizing & importing large galleries only | Pairs with PS | Managing 500+ image shoots before editing |
| Capture One | Optional tethered shooting & initial RAW import | Pairs with PS | Studio tethered workflows, color-critical import |
| Bridge (Adobe) | Free file browser & batch rename before Photoshop | Built into CC | Organizing files without Lightroom |
For studios and photographers who edit at high volume, hundreds of weddings per year, many choose to outsource the heavy lifting to a professional editing service, freeing their own time for creative decisions and client relationships.
Step-by-Step Wedding Photo Editing Workflow in Photoshop
This is a complete Photoshop wedding photo editing workflow. We covered the process from raw import to final export. Follow these steps in sequence for consistent, client-ready results.
Reading is often not easy for many to understand. A visual guide can bring out your solution and make it easy to follow:
1. Import & Organize Photos
Before opening Photoshop, organize your shoot. Use Adobe Bridge or Lightroom to create a folder structure by event segment: Getting Ready, Ceremony, Portraits, Reception. Apply metadata templates on import:
- Photographer name,
- Copyright,
- Event date, and
- Location.
Then cull. Go through every frame and reject blurs, closed eyes, duplicates, and unflattering blinks. Reducing a 1,500-image shoot to your best 600 before any Photoshop work saves hours of unnecessary editing time.
2. Adjust Exposure & White Balance in Camera Raw
Open your RAW files in Photoshop. They automatically launch in Adobe Camera Raw. In the Basic Panel, adjust Exposure to bring your overall brightness into range, then use Highlights and Shadows to recover detail at both ends.
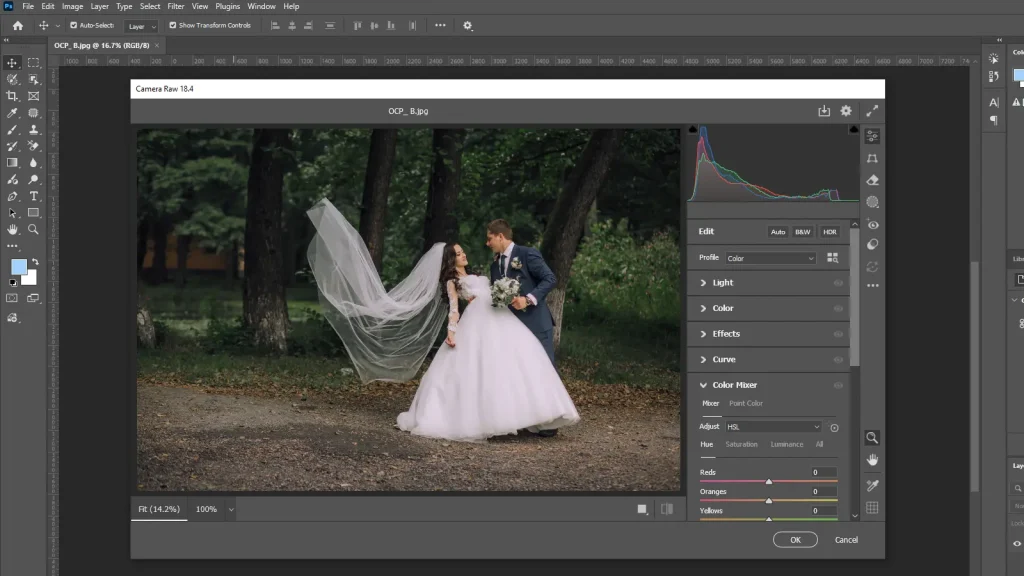
- Pull down blown-out dress whites with the Highlights slider.
- Lift shadow detail in dark suit areas with Shadows.
- Use the Whites and Blacks sliders to set your tonal range with precision.
- For white balance, use the Eyedropper tool on a neutral gray in the frame: a white wall, a table linen, or the inside of a lapel for accuracy.
- Then fine-tune Temperature and Tint by eye until skin tones feel warm and natural.
3. Color Correction in Photoshop
Once the image opens on the Photoshop canvas,
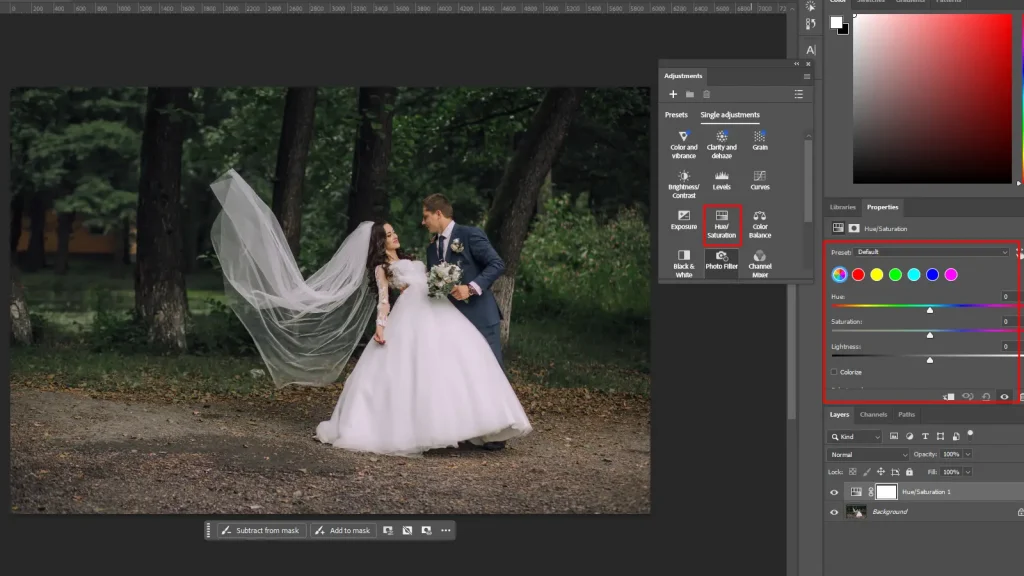
- Add a Hue/Saturation adjustment layer for per-channel color control.
- Target the Red and Orange channels to refine skin tone warmth without blowing out the channel.
- Target the Yellow channel to protect dress whites from going creamy or golden.
- For outdoor images, target Green and Cyan to boost environmental richness without pushing into neon.
- Use a Color Balance adjustment layer to add warmth to shadows and highlights separately — this creates depth and dimension across the full tonal range.
The Camera Raw Filter (Filter > Camera Raw Filter) is also available directly on the canvas for further HSL and Color Grading work after your initial adjustments.
4. Skin Retouching in Photoshop
- Create a new layer above your image and use the Healing Brush Tool set to Sample All Layers for temporary blemishes, breakouts, and day-of redness.
- For a more controlled approach, use the Spot Healing Brush in Content-Aware mode on minor imperfections.
- For high-end portrait retouching, use Frequency Separation: duplicate your layer twice, apply Gaussian Blur to the lower copy to isolate tone, and apply High Pass to the upper copy to isolate texture.
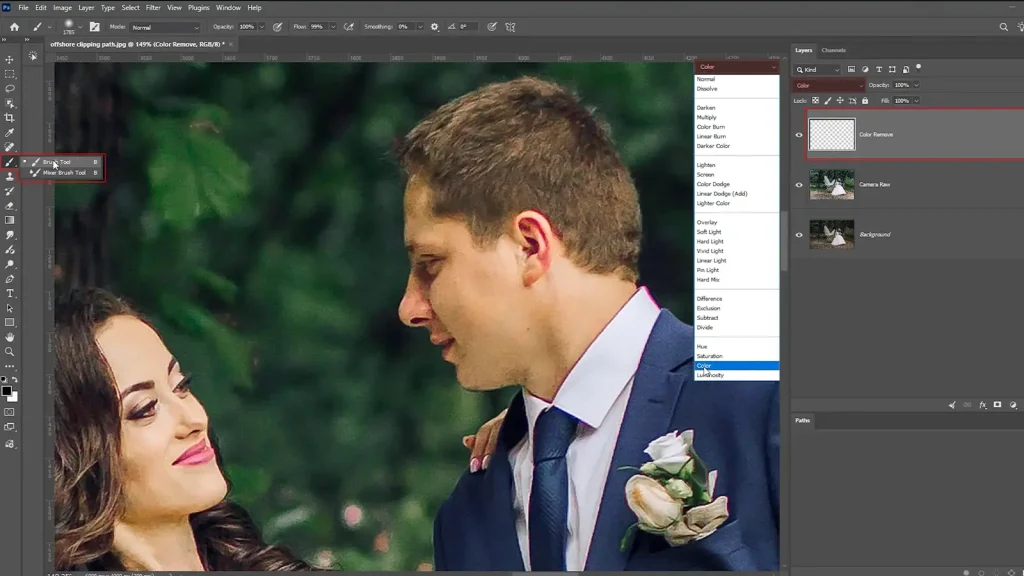
This lets you smooth uneven skin tone on the blur layer without touching the texture layer, so skin looks smooth but never plastic.
- Finish with a Curves adjustment layer set to Soft Light blending mode with black fill mask, then paint in Dodge and Burn selectively to sculpt dimension and bring depth back to flat-lit faces.
- Remove stray hairs with the Healing Brush, and reduce shine with a Hue/Saturation layer targeting the highlights.
- Never alter natural facial structure, permanent features, or body proportions.
5. Crop & Straighten
Select the Crop Tool (keyboard shortcut C) from the Photoshop toolbar. Use the Straighten button in the Options Bar to auto-correct tilted horizons. Drag along a horizon line and Photoshop aligns it automatically.
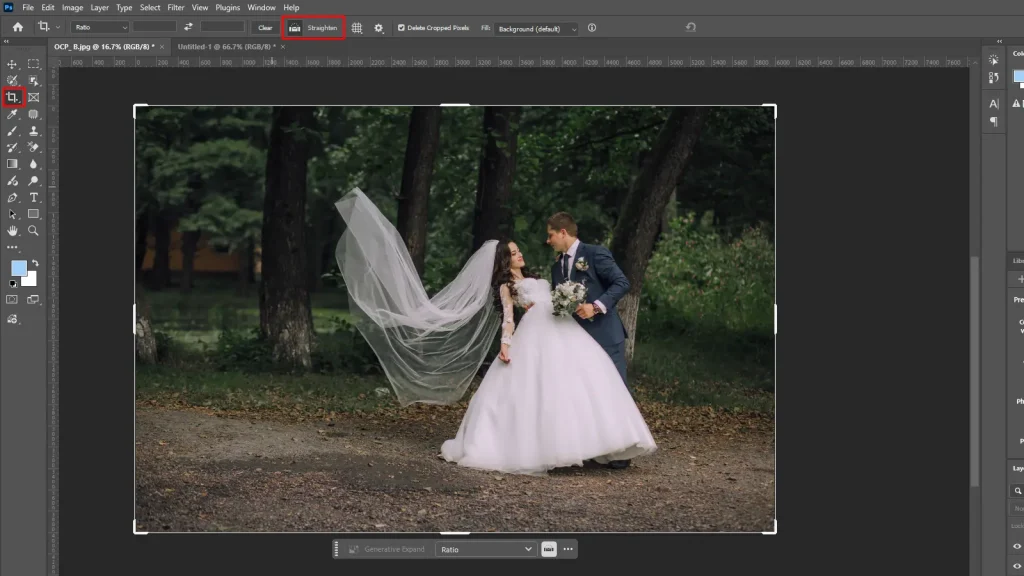
For outdoor ceremonies, a tilted skyline reads immediately as a technical error. Always check this before exporting. Set your aspect ratio in the Options Bar based on delivery:
- 2:3 for print and albums
- 1:1 for square crops
- 4:5 for Instagram portrait format
- 16:9 for digital slideshows and highlight videos
Crop to tighten emotional focus, remove distracting edges, and improve composition where a shot was slightly loose at capture.
6. Apply Actions for Consistency
Photoshop Actions are the equivalent of presets in a Photoshop-native workflow. Record your full editing sequence: Camera Raw adjustments, adjustment layers, and retouching steps as an Action. Then replay it across similar images from the same scene with a single click.
Open the Actions Panel (Window > Actions), click Record, perform your edits, then Stop. For batch processing, a specific scene — all church ceremony shots with similar tungsten lighting.
For example, use File > Automate > Batch to apply that Action across an entire folder of images automatically. This is how consistency is maintained across a full gallery without manually repeating every step.
7. Final Adjustments & Export
Before exporting, flatten a merged copy of your layers and do a final review.
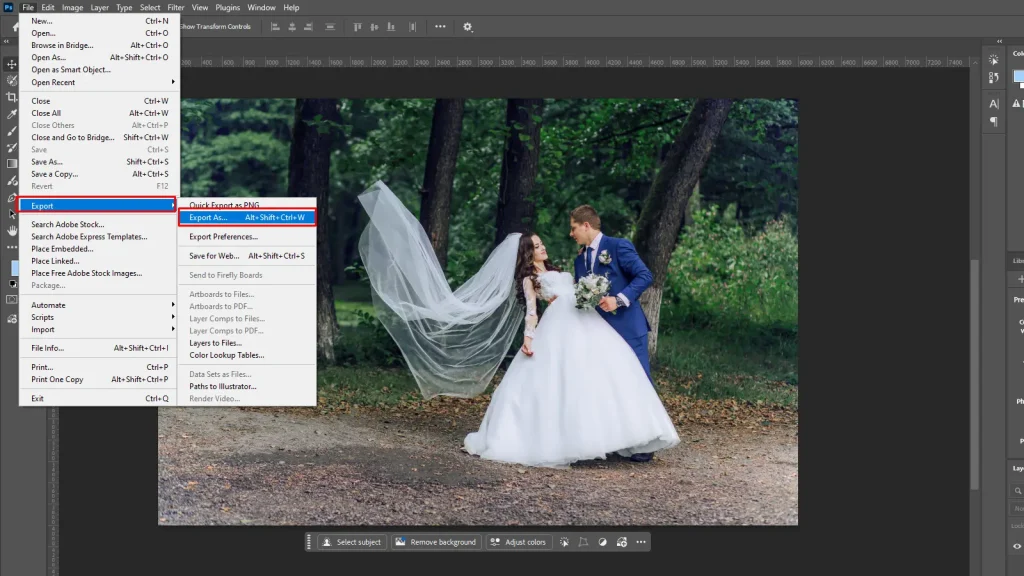
- Use View > Proof Colors with the correct output profile to soft-proof how the image will look in print.
- Check for any color inconsistencies across your gallery by reviewing images side by side in Photoshop’s Arrange Documents view.
- For print and album delivery: go to File > Export > Export As, set format to JPEG, quality to maximum, resolution to 300 PPI, and color space to Adobe RGB or as specified by your print lab.
- For web and digital galleries: set resolution to 72 PPI, color space to sRGB, and size to your platform’s recommended dimensions.
- Always keep your layered PSD as the master file. Export from a flattened copy, never overwrite the original.
Use the quick-reference table below as your Photoshop workflow cheat sheet during any editing session:
| Step | What You’re Doing | Photoshop Tool / Panel |
| 1. Import & Organize | Cull, folder structure, apply metadata | Bridge / Lightroom (import only) |
| 2. Exposure & White Balance | Balance highlights, shadows, skin tone warmth | Camera Raw Filter — Basic Panel |
| 3. Color Correction | HSL adjustments, protect whites, fix color casts | Camera Raw HSL Panel / Hue-Saturation Layer |
| 4. Skin Retouching | Remove blemishes, smooth texture, dodge & burn | Healing Brush, Frequency Separation, Dodge & Burn |
| 5. Crop & Straighten | Tighten composition, fix horizons, set aspect ratio | Crop Tool (C) — Straighten & Ratio controls |
| 6. Apply Presets / Actions | Lock in consistent style across full gallery | Photoshop Actions / Camera Raw Presets |
| 7. Final Export | Resolution, color profile, format per delivery type | Export As / Save for Web / Image Size dialog |
Popular Wedding Photo Editing Styles
One of the most important decisions a photographer makes is their wedding photo editing style. Your style is your brand — it defines the clients you attract and the work you are known for. Each of these styles is fully achievable in Photoshop through Camera Raw, adjustment layers, and Color Grading.
- Light & Airy: This is about soft highlights, lifted shadows, muted saturation, and a bright, dreamy atmosphere. In Photoshop, achieve this by lifting the Shadows slider in Camera Raw. Reduce Clarity slightly, and desaturate the Saturation channel globally while boosting Luminance on skin tones.
- Dark & Moody: Deeper shadows, rich contrast, and desaturated or cool tones are included. Pull down Shadows and Blacks in Camera Raw, add a Curves S-curve for contrast, and shift the Color Grading Shadows toward deep blue or teal. This style creates a cinematic editorial feel popular with dramatic venues and nighttime receptions.
- Classic & Timeless: True-to-life color, balanced contrast, and natural skin tones. Minimal stylization includes accurate white balance, clean exposure, and neutral Color Grading. This style ages beautifully and is favored by photographers who want their work to look just as relevant in 20 years as it does today.
- Film / Analog: This style emulates the look of 35mm film: faded blacks, organic grain, slightly desaturated colors, and natural color casts. In Photoshop, lift the Blacks slider in Camera Raw to fade shadows, add Film Grain through Filter > Noise > Add Noise. Then shift Color Grading Shadows to warm amber or green for an authentic analog cast.
- Editorial / High-Fashion: This one is Bold, polished, and deliberately styled. Strong contrast via a steep Curves adjustment, vibrant or intentionally shifted color grades through targeted Hue/Saturation layers, and very purposeful composition. This style is common in luxury weddings and styled shoots featured in bridal publications.
For photography studios and established freelance photographers, your editing style is as much a business decision as an aesthetic one. It defines your ideal client and tells the market exactly who you are.
Tips for Professional Wedding Photo Editing
These are the habits that separate professionals from hobbyists. All built around a Photoshop-first workflow.
- Always shoot in RAW: RAW files open in Adobe Camera Raw with full latitude to recover highlights, correct white balance, and make creative edits non-destructively before the image ever hits the Photoshop canvas.
- Work non-destructively: Always edit on adjustment layers and Smart Objects, never directly on the background layer. This keeps every decision reversible and your master PSD fully editable.
- Cull before you edit: Reducing a 1,500-image gallery to 600 selects before opening Photoshop is one of the highest-leverage efficiency decisions you can make.
- Build and save Photoshop Actions: Record your editing sequence for each common lighting scenario: golden-hour portraits, church interiors, reception halls. Replay them across similar shots for consistency and speed.
- Calibrate your monitor: Color grading in Photoshop on an uncalibrated screen looks completely different when printed or viewed on another device. Use a colorimeter and soft-proof before every final export.
- Use Smart Filters on Camera Raw: Apply the Camera Raw Filter as a Smart Filter on a Smart Object so your RAW adjustments remain fully editable even after the image is on the canvas.
- Know when to outsource: When back-to-back shoot weekends push your Photoshop editing backlog past a comfortable turnaround window, professional editing services are not a shortcut; they are smart capacity management.
When to Outsource Wedding Photo Editing
Even with a fast, optimized Photoshop workflow, editing a full wedding gallery of 600 final images takes 15 to 25 hours. For a photographer shooting every weekend during peak season, that backlog compounds quickly, and client turnaround expectations do not flex.
Outsourcing your wedding photo editing is not a shortcut. It is a business decision. The table below helps you identify which approach fits where you are right now:
| Factor | Editing In-House (Photoshop) | Outsourcing to Professionals |
| Time Cost | 15–25 hours per wedding in Photoshop | Near zero — you review, not edit |
| Consistency | Depends on your skill & energy per session | High — dedicated editors, defined standards |
| Volume Capacity | Limited by your hours and machine speed | Scales with your shoot volume instantly |
| Turnaround Speed | Slower during back-to-back peak weekends | Faster — dedicated Photoshop editing team |
| Skill Required | High — Photoshop proficiency takes years | Not required from your end |
| Upfront Cost | Photoshop subscription + your time | Per-image or project pricing |
| Best For | Low volume, full creative control, early career | Studios, busy freelancers, high-volume seasons |
Here is when outsourcing makes the most sense:
- You are shooting multiple weddings per month and cannot maintain a 2-week turnaround without your editing quality slipping.
- You want to focus your time on shooting, client communication, and business growth — not 20 hours of Photoshop work per job.
- You need consistent, high-quality Photoshop retouching across a large volume of galleries but do not have an in-house editing team.
- You have specific technical requirements — frequency separation skin work, background cleanup, color matching across a large catalog — that need specialist-level Photoshop skill.
Photography studios, event firms, and established freelance photographers who outsource their Photoshop editing consistently report faster delivery times, more consistent gallery quality, and more time to invest in booking the next client.
Offshore Clipping has served over 1,000 photography professionals globally since 2012, delivering professional Photoshop retouching, color correction, and image editing at competitive pricing with fast turnaround. Learn more about our photo editing services.
Skin Retouching for Wedding Portraits: A Closer Look
Skin retouching is the most delicate part of wedding photo editing. Done well, it is invisible. Done poorly, it is the first thing anyone notices.
What to Retouch
- Temporary blemishes, breakouts, and skin redness on the wedding day
- Shine and oiliness under warm venue lighting
- Stray hairs falling across the face, bouquet, or dress
- Slight eye redness from emotional moments during the ceremony
What to Leave Alone
- Permanent freckles, birthmarks, and natural skin texture
- Natural facial structure, body shape, and proportions
- Character lines and features that define a person’s face
Makeup artists and beauty professionals put significant work into preparing a couple on their wedding day. The final images should honor that work — accurate, flattering, and entirely natural-looking.
Frequently Asked Questions
How do photographers edit wedding photos?
Most wedding photographers use Adobe Lightroom for the bulk of their editing: exposure, white balance, color, and gallery consistency. They use Adobe Photoshop for detailed retouching on key portrait images.
What is the best software for wedding photo editing?
Adobe Lightroom Classic is the industry standard for its non-destructive workflow, batch editing, and preset system. Photoshop is used alongside it for advanced retouching.
How long does it take to edit wedding photos?
Editing a full gallery of 500 to 700 final images typically takes 15 to 25 hours. Professional photographers usually deliver within one to three weeks. Outsourcing to a professional editing service can significantly shorten timeline.
Can beginners edit wedding photos?
Yes. Lightroom has an accessible learning curve and beginners can achieve solid results by mastering basic exposure and color adjustments. Building the speed, consistency, and eye that a client-ready gallery demands.
What style is best for wedding photos?
The best wedding photo editing style is the one that aligns with the couple’s vision and the photographer’s brand identity. Light and airy, dark and moody, and classic timeless are the most widely chosen. Study your client’s inspiration board and your own strongest portfolio work before committing to a direction.
Should you edit wedding photos in RAW or JPEG?
Always shoot and edit in RAW. RAW files retain far more information than JPEGs. It gives you the flexibility to recover overexposed dress whites or underexposed ceremony interiors in post-processing. Export as JPEG only at the final delivery stage.
How do you maintain consistency across a full wedding gallery?
Apply a base preset to your entire gallery first, then adjust scene by scene — ceremony, portraits, reception. Use Lightroom’s Sync Settings feature to apply matching adjustments across similar shots from the same lighting environment.
What color profile should you use for wedding photo exports?
Export in sRGB for all digital delivery and web galleries. It is the universal standard for screens and online platforms. Use Adobe RGB or ProPhoto RGB only when delivering to a professional print lab that specifically requests it.
Do wedding photographers use presets or edit from scratch?
Most professionals use a custom preset as a starting point, then fine-tune each image individually from there. Building your own preset from your best-edited work creates a faster, more personalized workflow than starting from scratch every time.
How many photos should you deliver to a wedding client?
A standard delivery is roughly 50 to 100 final edited images per hour of coverage. For an 8-hour wedding, that means approximately 400 to 800 images. Quality matters far more than quantity.
Conclusion
Wedding photo editing is where technical skill meets emotional storytelling. Every color grade, every retouched portrait, every cropped frame either deepens the story or pulls the viewer out of it.
Edit with consistency, shoot in RAW, build your Photoshop workflow around non-destructive habits, and develop a style that is unmistakably yours. When volume exceeds what you can handle without cutting corners, that is exactly what a professional editing service is for.
The best galleries are never an accident.