A product shoot is ready, but now you have a folder of images needing the same edits. Opening every file, repeating the adjustments, and saving each version quickly becomes a production headache.
Photoshop batch processing lets you record editing steps as an Action and apply them to multiple images through File > Automate > Batch. You can automate repeatable resizing, adjustments, and saving tasks while keeping time for edits that need individual attention.
My rule is simple: automate what should remain consistent, then check the results before delivery. If individual images need different masking, retouching, color matching, or cleanup, those still need image-by-image attention.
What Is Photoshop Batch Processing, and How Does It Work?
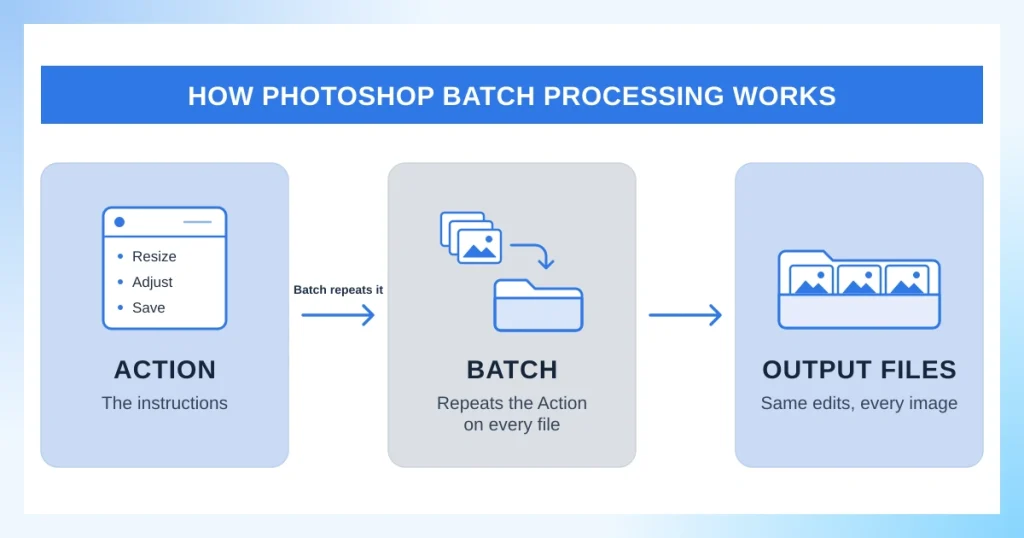
In Photoshop, batch processing means running the same recorded sequence of commands across a set of images. You create an Action in Window > Actions, then use File > Automate > Batch to choose the Action, source files, and saving options. Adobe documents this as the Batch command’s main purpose.
Action is the instructions, and Batch is the tool that repeats them. It is one part of digital image processing, a broader field covering image correction, enhancement, conversion, and preparation. For that wider subject, see our guide to photography post-processing.
Photoshop batch processing works best when the photos start from similar conditions and need the same technical edits. Mixed lighting, unusual crops, and image-specific blemishes still need review.
What Can You Automate When Batch Editing Photos in Photoshop?
The Batch command does not invent the edits for you. It follows a recorded Photoshop Action. So the range of tasks depends on what the Action contains and whether each command works on every input file.
Common repeatable tasks include:
- Resize images: Apply a recorded Image Size change to suitable files.
- Apply standard adjustments: Repeat appropriate exposure, contrast, or sharpening commands.
- Prepare delivery versions: Use recorded saving steps for JPEG, PSD, or other supported output formats.
- Process a source folder: Run the same Action across selected images and optional subfolders.
- Organize results: Use destination and file-naming options in the Batch dialog, then review the finished folders.
For example, product photos shot against the same setup may need consistent dimensions and a shared finishing pass. A fashion campaign with studio and outdoor shots may need separate batches. The Action cannot know which creative adjustment each photograph deserves.
Before You Batch Process a Large Folder of Images
I treat preparation as part of the editing job. A small problem in one recorded Action can affect every file it touches. A quick test with different source images is much easier to fix than an entire batch with the wrong edits or names.
- Protect the originals: Keep a separate source folder or backup. Avoid Save and Close when you need to preserve the original files.
- Group similar photographs: Separate studio images, mixed-lighting shots, portrait and landscape orientations, or files with different layer structures when they need different instructions.
- Decide the output: Confirm the format, pixel dimensions, color profile, file naming, and client or platform requirements before recording.
- Test the Action: Run it on a small selection first, including an image that could expose a mismatch.
- Set a review standard: Compare the output against an approved sample, not only the first image. Our photo editing tips explain why repeated adjustments still need visual checks.
Production tip: A batch is only as reliable as its starting files. If some images have different dimensions, layer names, color modes, or lighting, test them separately before using one Action across the complete folder.
How to Batch Process Images in Photoshop Using Actions
To batch process images in Photoshop, you first need to record the edits you want to apply and then run them across multiple files. I'll teach you everything from creating a Photoshop Action to processing an entire folder and checking the final results.
Step 1: Check the Image Size and Prepare a Sample
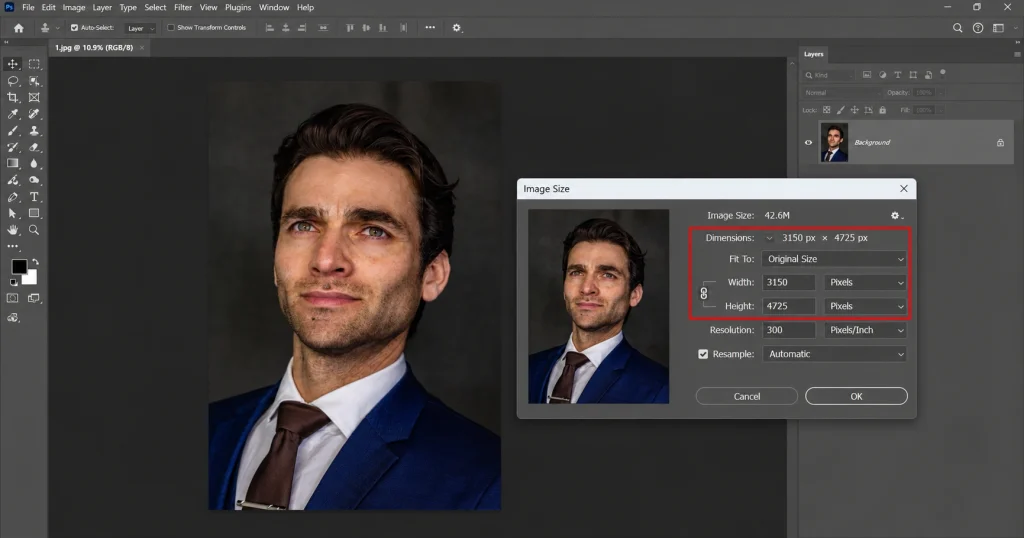
Open one representative image and check its dimensions from Image > Image Size.
If resizing needs to happen across every file, make sure that the resize command is included while recording the Action. For more control, see how to resize an image in Photoshop.
Step 2: Open the Actions Panel
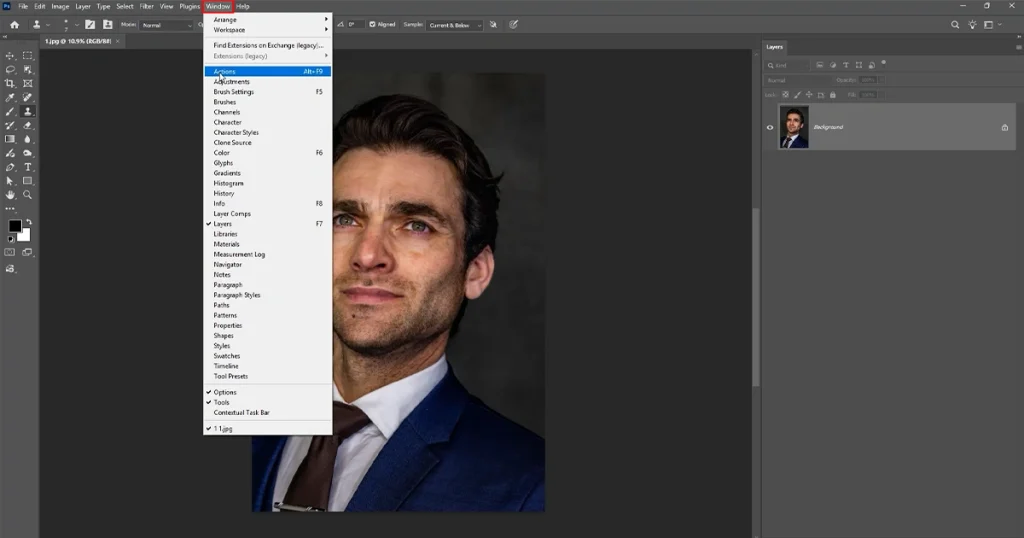
Go to Window > Actions to open the Actions panel.
Instead of using Photoshop’s existing Actions, create a separate Action set for your workflow. Click the folder icon and give the set a clear name so your custom batch-processing tasks stay organized.
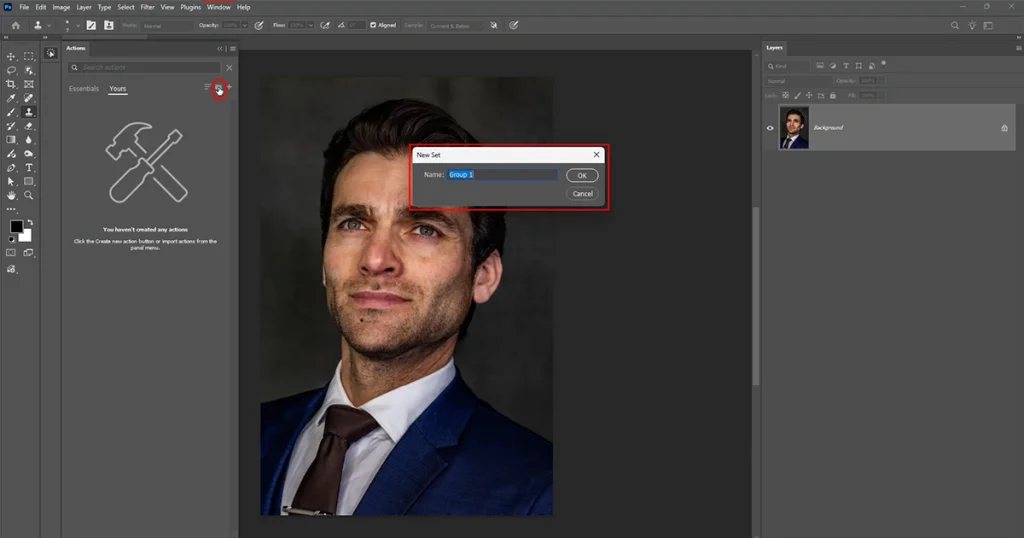
Step 3: Create a New Photoshop Action
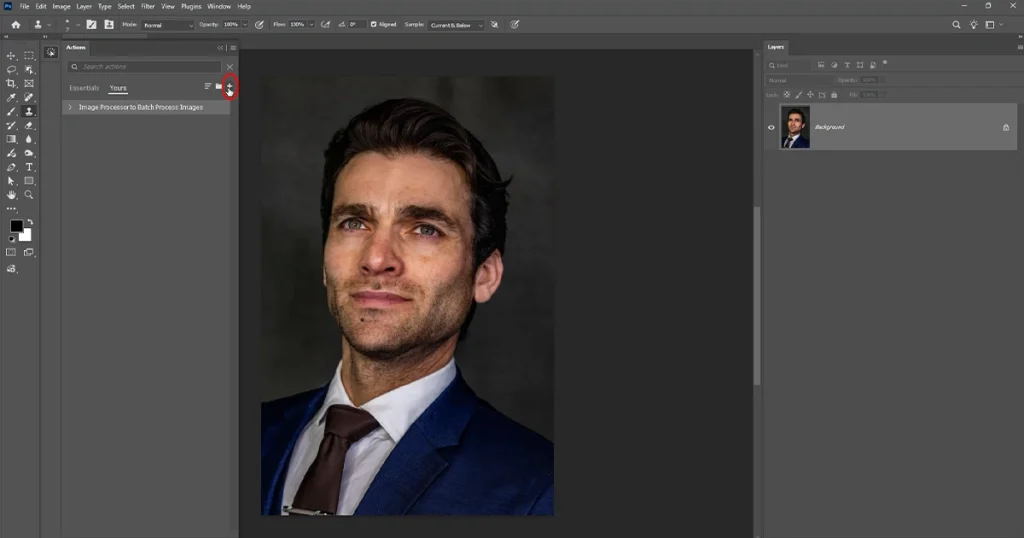
Click the Plus icon and create a new Action. Give it a descriptive name such as Batch Processing Images.
You can also add a description, icon, or keyboard shortcut if needed. These are optional, but clear naming becomes useful when you manage several automated image-processing workflows.
Step 4: Record the Edits You Want to Repeat
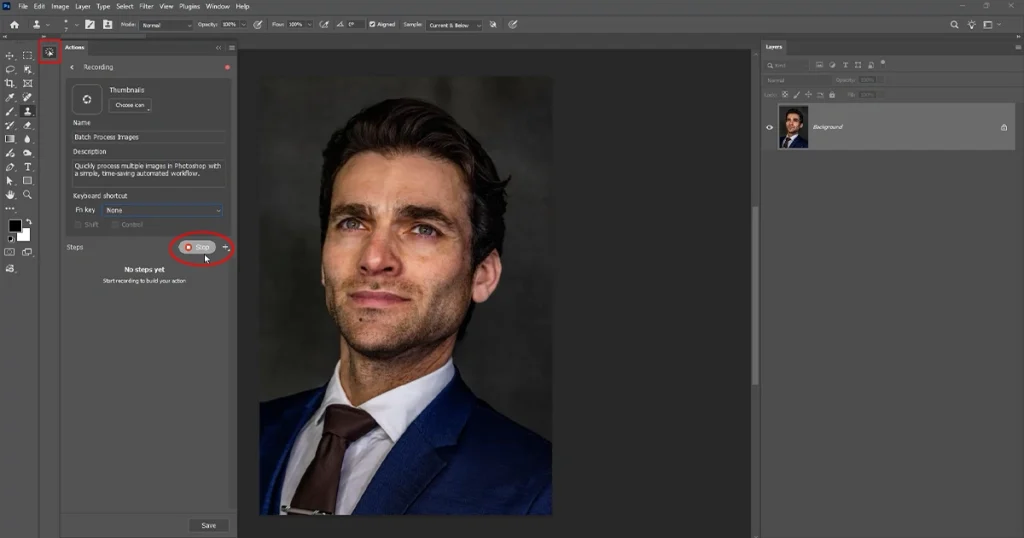
Click Record, then perform the edits that should apply to every image.
Photoshop records supported commands as you work. These may include image resizing, tonal adjustments, sharpening, or other repeatable edits.
Once the sequence is complete, stop recording.
Tip: Only automate adjustments that work consistently across the whole image set. Detailed retouching, masking, product color matching, and object removal usually require individual judgment.
Step 5: Open the Batch Processing Window
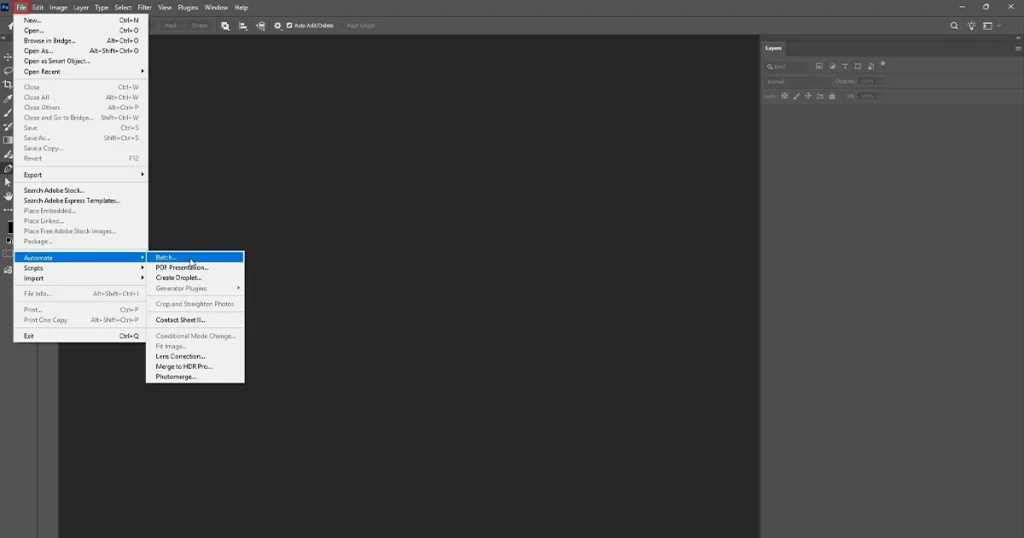
Now go to File > Automate > Batch.
Choose the Action set you created, then select your Batch Processing Images action.
This tells Photoshop which recorded editing sequence it should repeat across the source images.
Step 6: Select the Source and Destination Folders
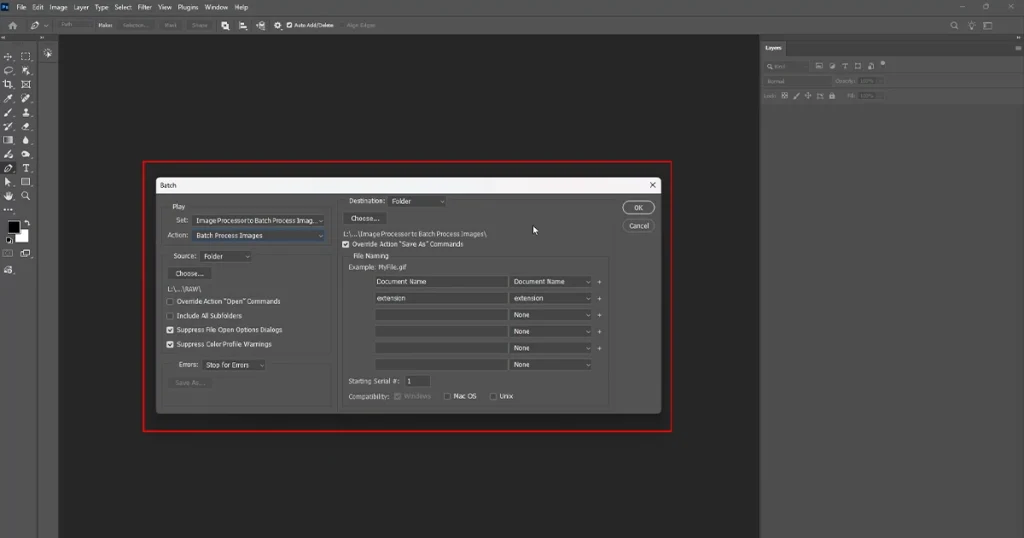
Under Source, choose Folder, then select the folder containing your original images.
Next, choose a Destination folder for the processed files. I prefer keeping source files and output files separate so the originals remain untouched and the finished batch is easier to manage.
Step 7: Run the Batch and Organize the Output Files
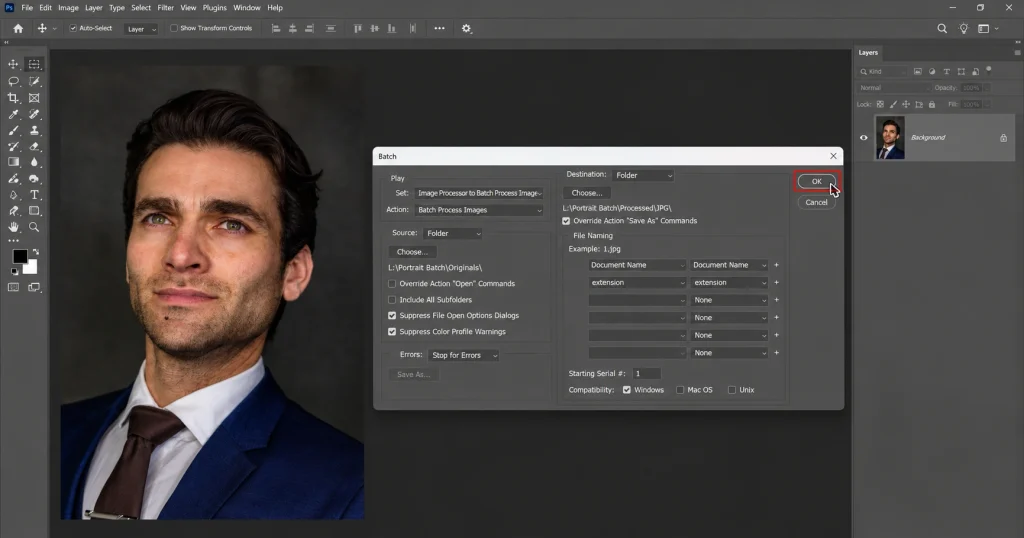
Once the Action, source folder, and destination are correct, click OK. Photoshop will process the files using the recorded Action.
After processing, organize each file format into separate folders. Keeping JPG, PSD, and original files apart makes large photography, ecommerce, and creative production projects much easier to manage.
Working with hundreds of images that need more than repeatable edits? Let Offshore Clipping handle the detailed work while you keep your production moving. Explore Photoshop Service
Best Photoshop Batch Processing Settings for Different Workflows
There is no universal Action that suits every delivery. I would choose the recorded edits and saving method based on where the files are going. Here is the plan:
| Workflow | Suitable repeated task | Likely output | Main check |
|---|---|---|---|
| Ecommerce product catalog | Consistent dimensions and suitable base adjustments | JPEG for publishing, PSD if editable copies are needed | Product color, crop, scale, and background consistency |
| Fashion or retail campaign | Separate Actions for matching studio setups or deliverables | JPEG or layered PSD | Fabric texture, skin, color, and campaign continuity |
| Studio client proofs | Resize and prepare preview versions | JPEG | Proof size, exposure, filenames, and client specifications |
| Marketing and social assets | Create consistent campaign dimensions and export variants | JPEG, PNG, or the format required by the platform | Text, logos, framing, and compression |
| Print or design handoff | Prepare agreed dimensions and compatible working files | TIFF, PSD, or specified format | Color profile, resolution, and downstream compatibility |
Common Photoshop Batch Processing Problems and Practical Fixes
Batch processing can save time, but incorrect Actions or settings may affect the entire image set. Here are some common issues I encounter and how to fix them.
- Files not saving: Check whether your Action includes a Save As command. Also review the destination folder, file naming, and Override Action “Save As” Commands settings.
- Original images overwritten: Avoid using Save and Close when you need to preserve source files. Choose a separate output folder and keep a backup.
- Wrong dimensions or crops: Make sure you recorded the resizing step. For mixed portrait and landscape images, use separate Actions when necessary.
- Inconsistent colors: Check color profiles and recorded adjustments. If individual product images need accurate shade matching, consider professional photo color correction services.
- Action stops unexpectedly: Check for missing layers, selections, incorrect file paths, or commands requiring manual input. Test the Action on a single image to find the problem.
- JPG or PSD files missing: Confirm that your recorded saving steps create both formats. Photoshop won't automatically generate both just because you selected an output folder.
For better results, avoid these common photo editing mistakes before applying the same edits across hundreds of images.
When Photoshop Batch Editing Is Not Enough for Professional Images
Photoshop batch processing is effective when the same instruction applies to every file. It cannot reliably decide how to preserve a necklace edge, correct a unique reflection, clean a model’s skin, or match a product shade against an approved sample. Those decisions depend on the image.
For detailed product or fashion work, I would separate the repeatable preparation from the manual finish. A recorded Action can prepare dimensions and export settings. Professional photo retouching can then address dust, unwanted distractions, texture, and other image-specific issues when needed.
This matters to studios, ecommerce catalog managers, and creative production teams because consistent output is more than matching pixel dimensions. A file can be exported correctly and still be unusable for the final campaign or product listing.
Frequently Asked Questions About Photoshop Batch Processing
u003cstrongu003eCan I batch edit photos in Photoshop without creating an Action?u003c/strongu003e
Yes, for certain tasks. u003cstrongu003eFile u003e Scripts u003e Image Processoru003c/strongu003e can convert, resize, and save multiple images without an Action. Adobe Camera Raw also supports shared adjustment workflows.
u003cstrongu003eCan Photoshop batch resize images while keeping their proportions?u003c/strongu003e
Yes, but the result depends on the recorded resize method and source aspect ratios. If you need to fit mixed files inside a maximum size without distortion, Image Processor’s u003cstrongu003eResize to Fitu003c/strongu003e is often simpler.
u003cstrongu003eHow can I save multiple images as JPG and PSD through Batch?u003c/strongu003e
Record and test saving instructions for the required formats, then check the Batch destination and file-naming settings. For simple JPEG and PSD copies without extra edits, Image Processor can also create both output types.
u003cstrongu003eWhy does my Photoshop Action stop during batch processing?u003c/strongu003e
The Action may require a specific layer, selection, document mode, path, or user response. Test it on a problem file and inspect the recorded commands.
u003cstrongu003eWill Photoshop Batch overwrite my original files?u003c/strongu003e
It can, depending on your destination and recorded saving commands. u003cstrongu003eSave and Closeu003c/strongu003e may write changes back to originals. Use a separate output folder and test the saving behavior.
u003cstrongu003eWhat is the difference between digital image processing and batch processing?u003c/strongu003e
Digital image processing includes many ways to edit, analyze, or prepare digital image data. Batch processing is narrower. In Photoshop, it refers to applying repeatable operations across multiple files.
Make Batch Editing Faster Without Losing Image Quality
Photoshop batch processing makes repetitive editing tasks easier to manage, especially when working with large image collections. By recording the right Actions and applying them consistently, you can reduce manual work and maintain a more organized editing workflow.
However, automation works best with proper preparation and quality control. Always test your Actions, protect the original files, and review the processed images to ensure they meet your expected standards.