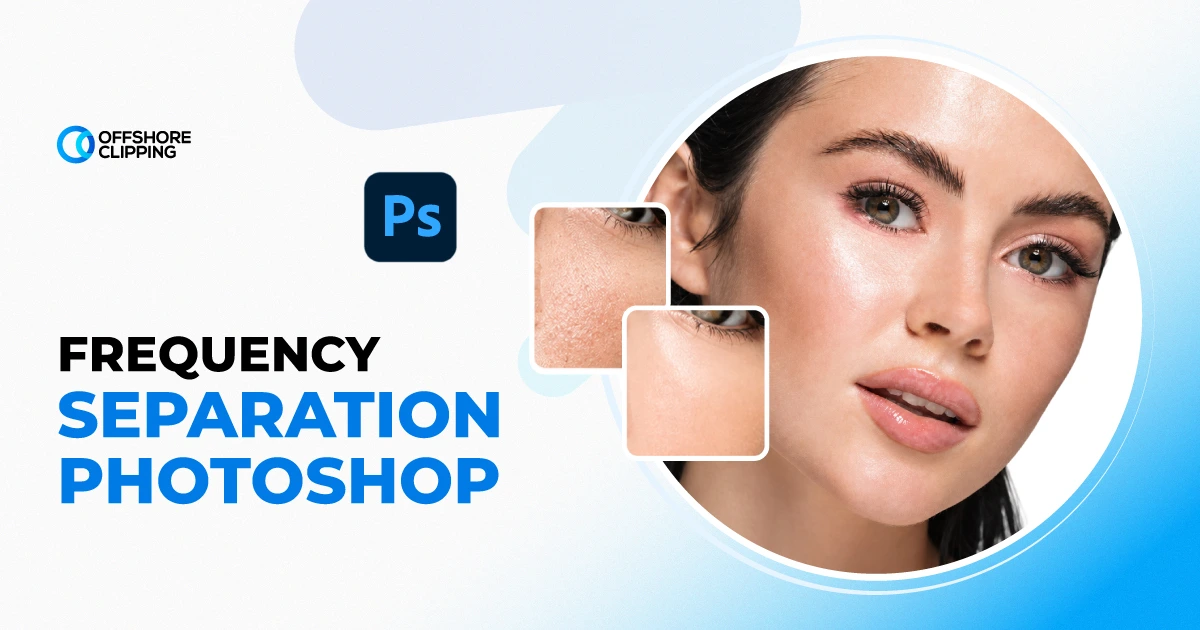
Push skin retouching too hard, and it turns to plastic. Hold back, and every blemish still catches the studio light. Frequency separation in Photoshop is the technique that solves both problems in the same pass. It separates texture from tone and lets you fix one without touching the other.
Frequency separation in Photoshop splits an image into two layers: one holding color and tone, the other holding texture and detail. You retouch skin tone on the low-frequency layer and clean texture on the high-frequency layer. So, blemishes disappear while pores, lines, and grain stay untouched.
Retouchers reach for it because it is the only method that keeps a face looking like skin instead of a filter. Wedding photographers use it to smooth complexions without erasing the freckles. Beauty and skincare brands use it to show product results while keeping pores and texture intact. Fashion catalogs use it to keep every SKU photo consistent under different lighting setups.
What Is Frequency Separation in Photoshop?
Frequency separation is a Photoshop retouching method that splits a photo into two layers based on visual information rather than color alone. One layer carries texture. The other carries color and tone. Because the layers are separated, you can smooth uneven skin tone on one without softening the texture on the other.
High-Frequency and Low-Frequency Layers
The low-frequency layer holds soft, blurred color and lighting information. Think of it as the shape and shading of the skin. The high-frequency layer holds sharp detail, like pores, fine lines, and fabric grain. Together, using the Apply Image command and a Linear Light blend mode, they reconstruct the original photo exactly until you start editing.
How Frequency Separation Works
Gaussian Blur removes fine detail to create the low-frequency layer. Photoshop then subtracts that blurred version from the original using Apply Image. It isolates everything the blur removed into the high-frequency layer. Set to Linear Light blend mode, the high-frequency layer sits back on top, and the two combine to look like the untouched photo.
Why Professional Retouchers Use It
It keeps skin looking like skin. Basic healing and cloning tools blur texture along with blemishes. Which is why over-retouched photos look waxy. Frequency separation targets only the layer that needs fixing. So, pores and natural grain stay exactly where they were.
Photoshop Tools Required
A short toolkit covers the entire workflow, no plugins required.
Blur and Frequency Creation Tools
- Gaussian Blur: Builds the low-frequency layer by smoothing out fine detail.
- Apply Image: Isolates texture into the high-frequency layer.
- Linear Light Blend Mode: Recombines both layers so the image looks unedited until you retouch.
Skin Retouching Tools
- Healing Brush: Blends tone smoothly across larger, uneven areas.
- Spot Healing Brush: Removes small blemishes in a single click.
- Clone Stamp: Duplicates clean texture over stubborn marks.
Need a full breakdown of brush settings and techniques. Read our guide on how to use the Spot Healing Brush in Photoshop.
Color and Texture Refinement Tools
- Mixer Brush: Blends skin tone transitions naturally.
- Brush Tool: Paints in soft tonal corrections by hand.
- Lasso Tool: Isolates areas for targeted, controlled edits.
Layer Management Tools
- Layer Masks: Keep every edit reversible and precise.
- History Panel: Lets you step back instantly if an edit goes too far.
Skip the Learning Curve!
Frequency separation takes practice to get right, and one heavy-handed pass can undo hours of shooting.
Explore!
Preparing Your Image
- Start with a High-Resolution Image: Frequency separation depends on fine detail. A low-resolution file has little texture to preserve, so the technique loses most of its value. Work from the highest-resolution version available.
- Choose RAW Over JPEG When Possible: RAW files hold more tonal range, which gives the low-frequency layer smoother data to work with and reduces banding during color correction later.
- Crop and Straighten the Image: Finish composition decisions first. Cropping after frequency separation risks misaligning the two layers if any transform is applied unevenly.
- Remove Dust and Sensor Spots: Clean up sensor spots and stray hairs before splitting the layers, so you are not chasing the same flaw twice across two layers.
- Apply Basic Exposure and Color Corrections: Get global exposure, white balance, and contrast right beforehand. This groundwork mirrors the basic photo-retouching process, and it keeps frequency separation focused on texture, not color fixes.
- Convert to 16-bit (Optional): 16-bit mode gives Photoshop more tonal data to redistribute, which helps avoid banding on skin with visible gradients. It is optional but recommended for high-end beauty and commercial work.
How to Create/Use Frequency Separation in Photoshop 2026
Photoshop 2026 keeps the classic frequency separation workflow but speeds up a few steps with refined Apply Image previews and smarter blur estimation. Here is the full process.
Step 1: Duplicate the Background Layer
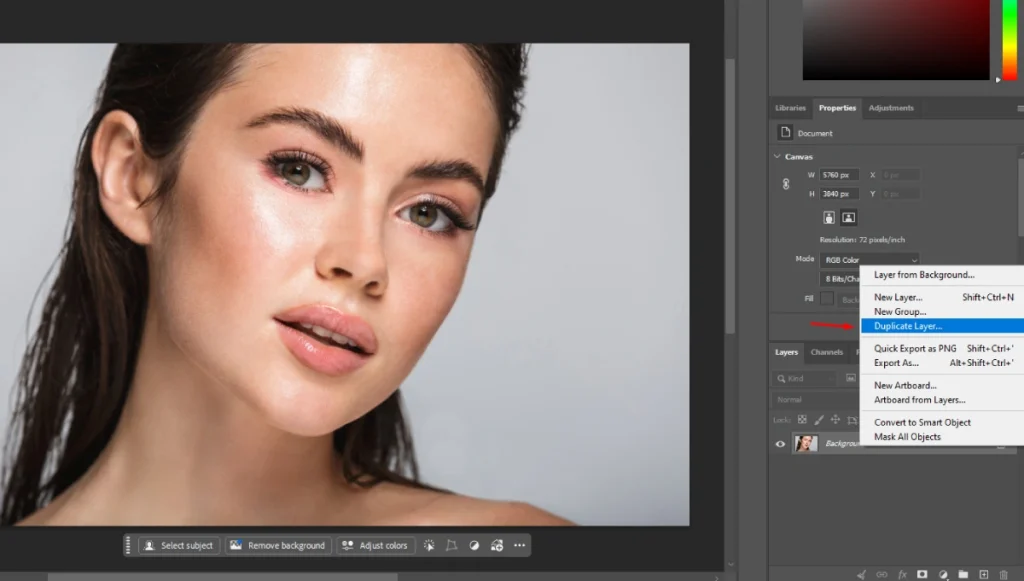
Open your image and duplicate the background layer (CTRL + J / CMD + J) twice, so you end up with three layers total: the untouched original underneath and two working copies on top. Keeping the original layer hidden below acts as a safety net you can return to anytime.
Step 2: Rename and Organize Your Layers
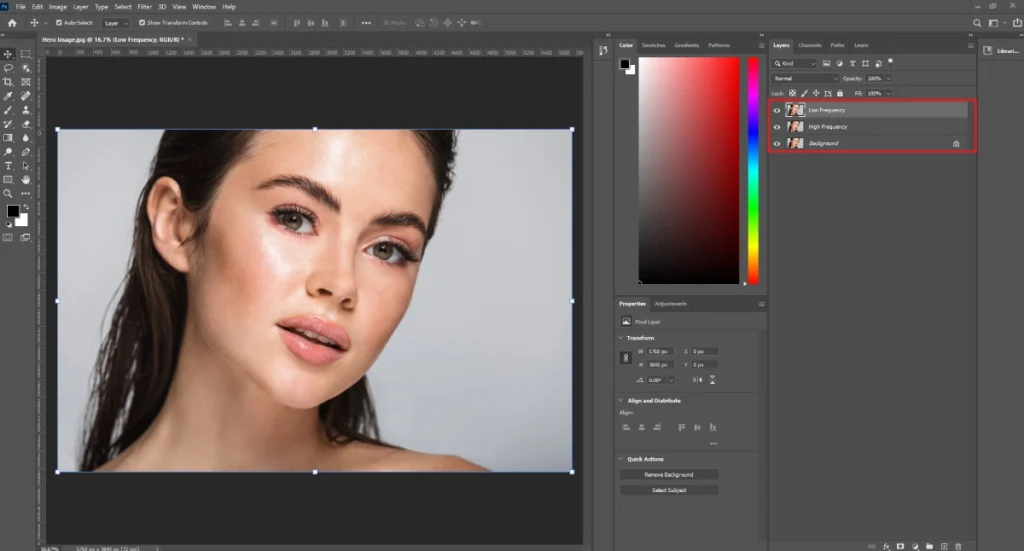
Label the two working copies clearly, for example, “Low Frequency” and “High Frequency.” Photoshop 2026’s layer panel search makes this especially useful once a project grows to dozens of layers, so naming early saves time later.
Step 3: Create the Low-Frequency Layer
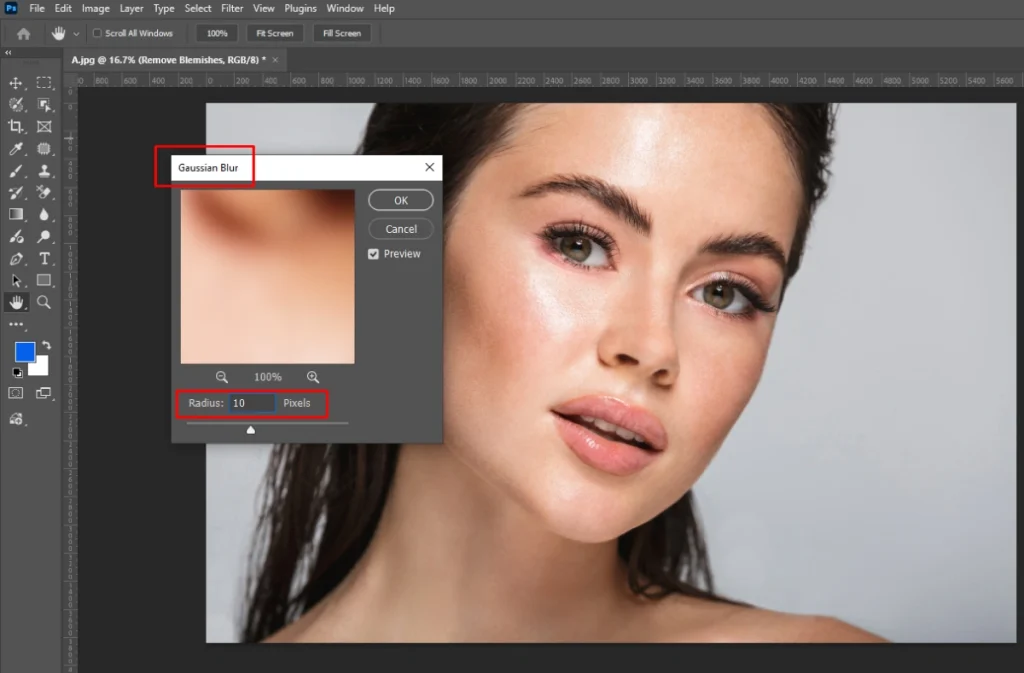
Select the layer meant to hold color and tone, then apply Gaussian Blur. Set the radius high enough to erase fine texture but low enough that major shapes, like the outline of the cheekbone, stay recognizable. A radius between 8 and 15 pixels is a common starting point for high-resolution portraits.
Step 4: Create the High-Frequency Layer
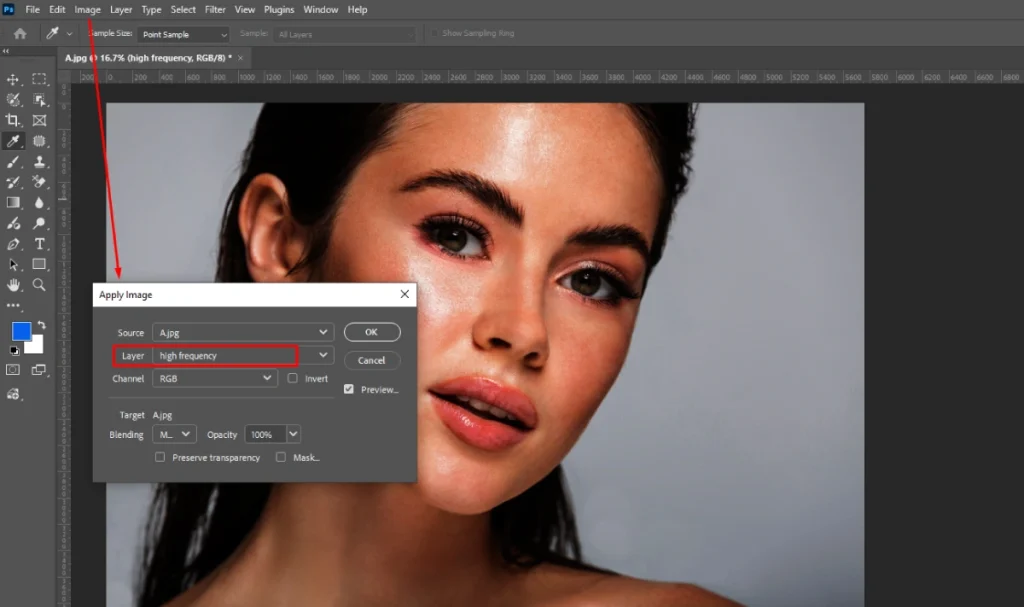
Select the second working layer, then open Apply Image. Set the source to the Low Frequency layer, the blending mode to Subtract, scale to 2, and offset to 128. This step pulls out everything the blur removed and stores it here as pure texture data.
- Settings for 8-bit Images
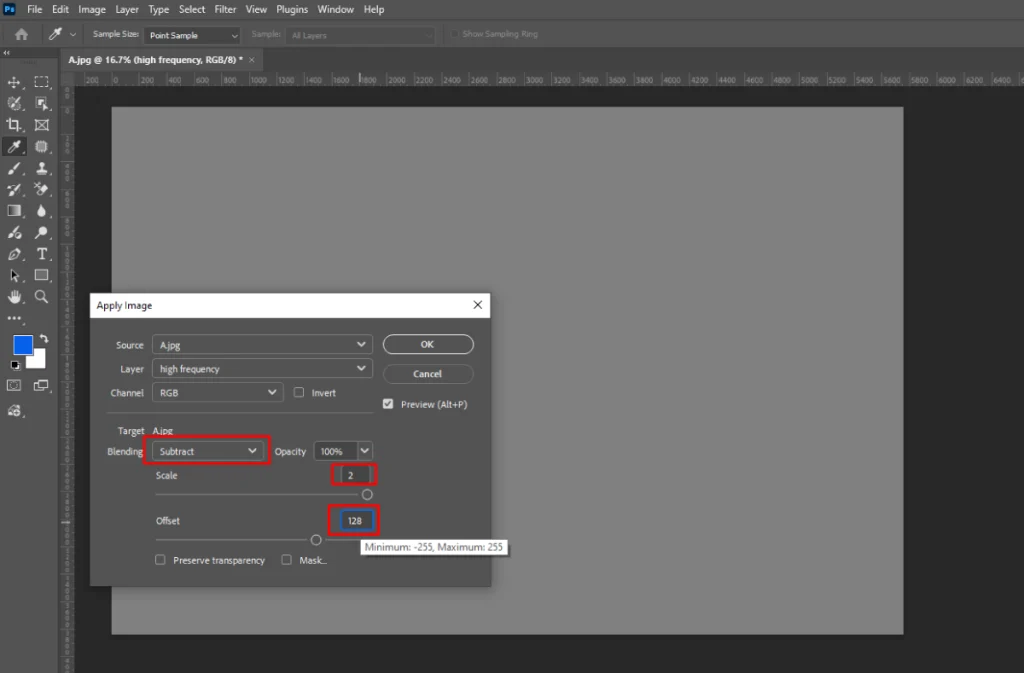
Use subtract mode with scale 2 and offset 128. This is the standard configuration for most JPEG and 8-bit workflows.
- Settings for 16-bit Images
Switch the blending mode to Add instead of Subtract, keep the scale at 2, and set the offset to 0. 16-bit files handle tonal math differently, and using Subtract here often produces a flat, gray result.
Step 5: Set the Blend Mode to Linear Light
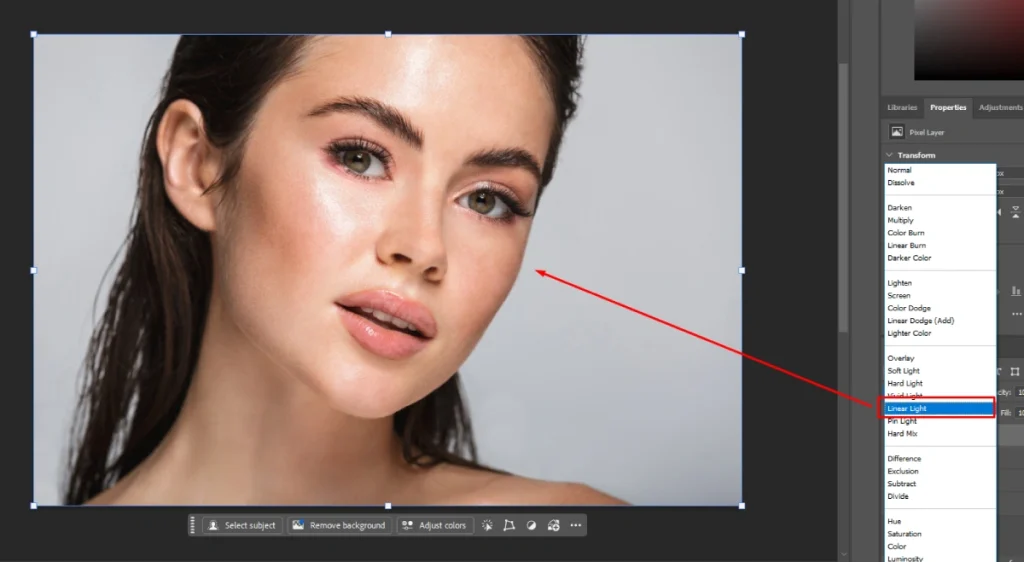
Change the high-frequency layer’s blend mode to Linear Light. The image should snap back to looking exactly like the original photo. If it looks flat, gray, or oddly contrasted, the Apply Image settings need adjusting before you continue.
Step 6: Group the Frequency Layers
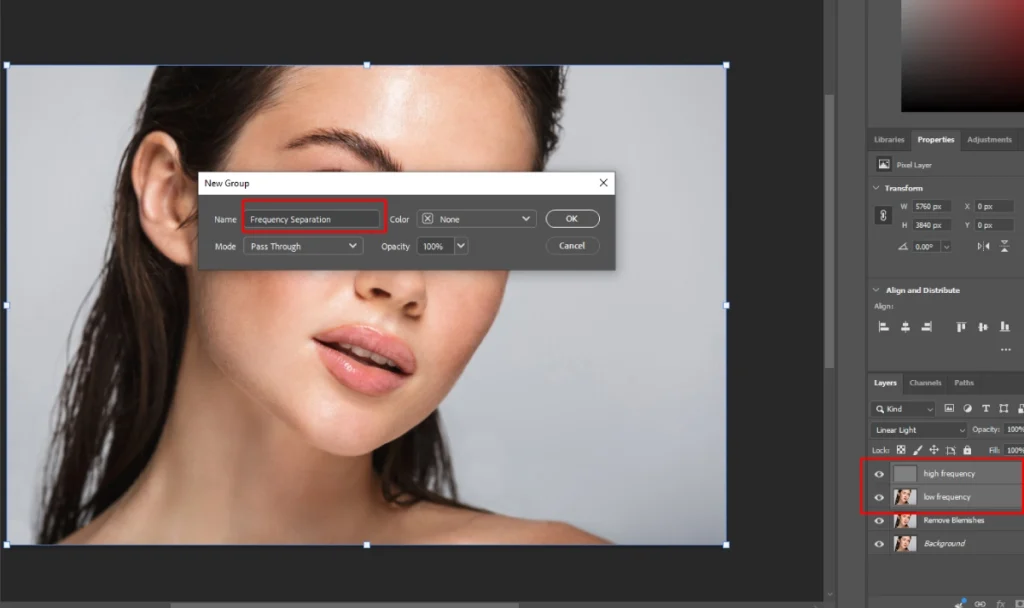
Select both layers and group them together, naming the group something like “Frequency Separation.” This keeps your working layers organized and separate from any retouching layers you add afterward.
Step 7: Verify the Result Before Editing
Zoom in at 100% and compare the combined layers against the original background copy. They should be identical. This one check prevents wasted retouching time on a setup that was never built correctly.
Pro Tip If your image changes appearance after creating the layers, your Apply Image settings are likely incorrect; double-check the blending mode and offset values before doing any retouching.
How to Retouch Using Frequency Separation
- Retouching Skin Texture
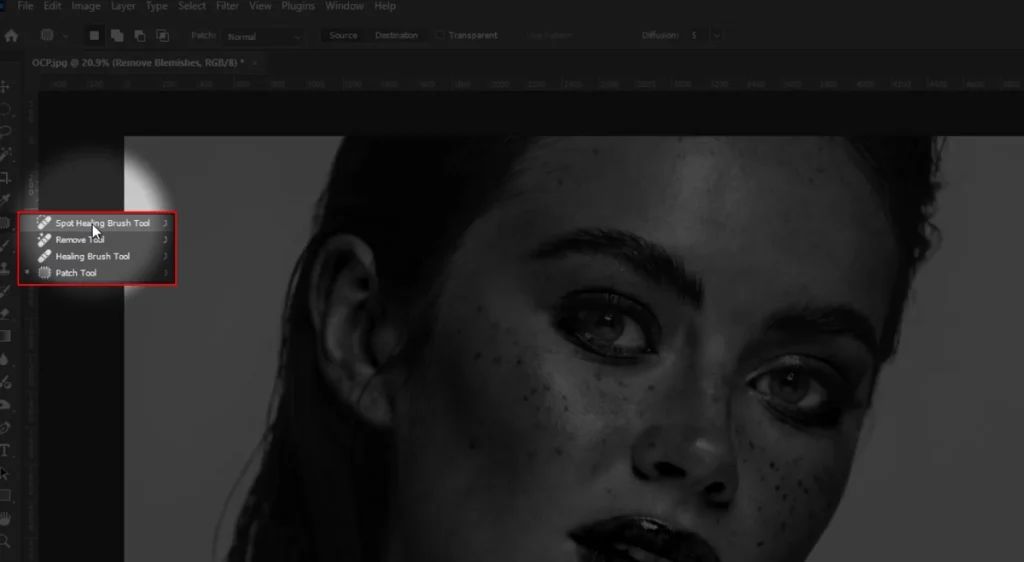
Work on the high-frequency layer using the Healing Brush or Clone Stamp set to Sample: Current Layer. This lifts blemishes and texture flaws without touching the underlying color, which is what keeps pores looking natural instead of smoothed away.
- Correcting Uneven Skin Tone
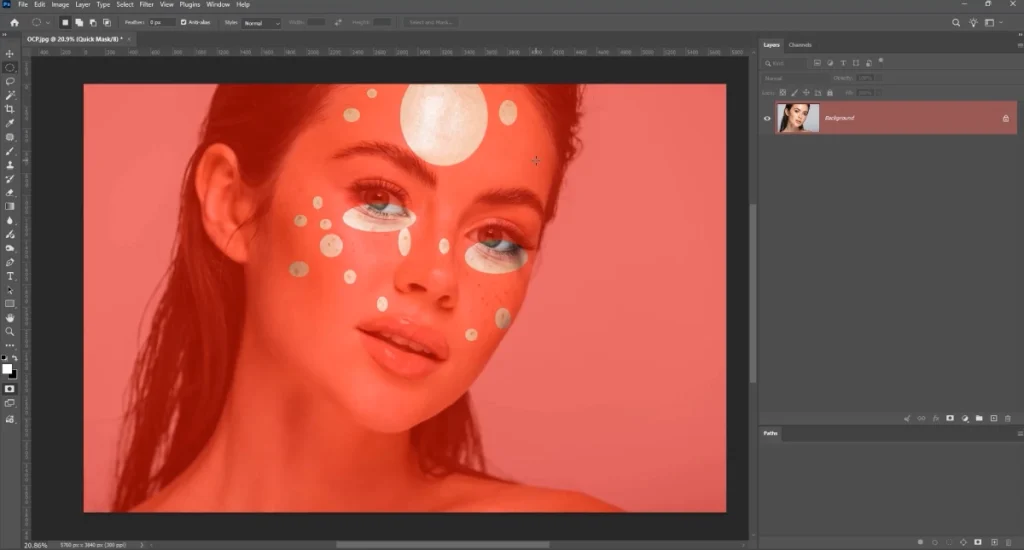
Switch to the low-frequency layer for tone work. Use the Lasso Tool to select a blotchy area, then the Mixer Brush or a soft brush with a sampled color to even it out. Because texture lives on a separate layer, tone corrections stay smooth without softening detail.
- Retouching Facial Features (Eyes, Lips & Neck)
Treat these areas gently. Eyes and lips benefit from small tone adjustments on the low-frequency layer, while the neck often needs texture cleanup similar to the rest of the skin. Avoid brightening eyes so much that they lose natural depth.
- Cleaning Hair and Small Distractions
Stray hairs and flyaways are texture-layer fixes. Small clone stamp strokes at low opacity keep the correction invisible, since hair patterns are easy to spot if overdone.
- Maintaining Natural Texture While Editing
Check your retouching at 100% zoom regularly. If skin starts to look smooth in a way that feels artificial, reduce the opacity of your retouching layer rather than undoing the work entirely.
This layer-by-layer approach is the same standard used in high-end photo retouching projects. This is where consistency across hundreds of images matters as much as the quality of any single photo.
Need the same natural retouching standard applied? Consistent results across hundreds of images
Get in Touch!
Best Settings for Frequency Separation Photoshop
- Choosing the Correct Blur Radius
The right radius depends on image resolution and how much texture the skin naturally shows. As a general rule, larger, higher-resolution files need a higher radius to fully separate texture from tone.
- Recommended Settings for 8-bit Images
Gaussian Blur radius: 8 to 15px. Apply Image: Subtract, scale 2, offset 128.
- Recommended Settings for 16-bit Images
Gaussian Blur radius: 8 to 15px. Apply Image: Add, scale 2, offset 0.
| Setting | 8-bit Images | 16-bit Images |
|---|---|---|
| Apply Image Mode | Subtract | Add |
| Scale | 2 | 2 |
| Offset | 128 | 0 |
| Typical Blur Radius | 8–15px | 8–15px |
- Best Brush Hardness, Flow, and Opacity
Keep brush hardness low, around 0 to 30 percent, with flow near 40 to 60 percent. This avoids hard edges while retouching and keeps corrections blending naturally into the surrounding texture.
- Recommended Zoom Levels
Retouch at 100% zoom for accuracy, then check your work at 50% and fit-to-screen to confirm it holds up at normal viewing distances.
Benefits You Will Enjoy
- Preserve Natural Skin Texture: Pores and fine detail stay intact instead of being blurred away.
- Edit Color Without Damaging Texture: Tone corrections happen independently of detail.
- Remove Blemishes Non-Destructively: Every edit sits on its own layer and can be adjusted or undone.
- Improve Skin Tones Naturally: Smoothing uneven tone doesn’t require softening the whole face.
- Speed Up Professional Retouching: Once set up, the workflow repeats quickly across large batches of images.
Common Mistakes to Avoid
- Using Too Much Blur: An overly high blur radius pulls too much detail into the low-frequency layer, making tone edits harder to control and texture edits less precise.
- Creating Plastic Skin: Over-smoothing the high-frequency layer removes pores entirely, leaving skin looking artificial rather than professionally retouched.
- Editing on the Wrong Layer: Tone fixes on the high frequency layer, or texture fixes on the low frequency layer, undo the entire purpose of the technique.
- Incorrect Apply Image Settings: Wrong scale or offset values distort the recombined image before any retouching even begins.
- Overusing the Clone Stamp: Repeated cloning from the same source spot creates visible patterns. Vary your sample points often.
- Forgetting Layer Masks: Editing directly on pixels instead of through a mask removes your ability to adjust or reverse a correction later.
- Applying Frequency Separation to Every Portrait: Not every photo needs it. Simple, evenly lit headshots may only need basic healing.
Advanced Techniques
1. Combining Frequency Separation with Dodge and Burn
Apply frequency separation first for texture and tone cleanup, then dodge and burn on a separate layer above to sculpt light and shadow across the face.
2. Using Layer Masks for Selective Editing
Mask your retouching layers to specific areas rather than applying changes globally; this keeps edits fully reversible and precise.
A deeper walkthrough of masking is covered in the guide to non-destructive layer masking in Photoshop, which pairs well with this workflow.
3. Refining Color with the Mixer Brush
The Mixer Brush blends sampled tones directly into the low-frequency layer, useful for correcting patchy redness or discoloration without a hard edge.
4. Professional Workflow Tips for High-End Retouching
Batch your frequency separation setup as an action, then customize the retouching by hand for each image. This balances speed with the quality that commercial clients expect.
Read and get a further overview of advanced photo retouching techniques
Can I Use Frequency Separation Outside Photoshop?
Yes! You can use Frequency Separation outside Photoshop, such as in
- Lightroom: Lightroom doesn’t support true frequency separation since it lacks layer-based editing, though its texture and clarity sliders offer a lighter alternative.
- Photoshop Elements: Elements includes layers and blend modes, so a simplified version of the technique is possible, though some tools are limited compared to full Photoshop.
- Affinity Photo: Affinity Photo supports the same layer and blend mode structure, making frequency separation achievable with a similar step-by-step process.
- AI-Powered Skin Retouching Tools: Newer AI tools automate a version of this process, but they often apply changes uniformly and offer less manual control than a hand-built Photoshop workflow.
Real-World Applications
- Beauty Photography: Showcasing skincare and cosmetic results while keeping texture visible and credible.
- Portrait Photography: Natural-looking headshots and personal portraits.
- Fashion Photography: Consistent skin quality across full campaign sets.
- Wedding Photography: Smooth, natural skin under harsh flash or outdoor light.
- Commercial and E-commerce Photography: Polished product and model shots at scale.
- Professional Headshots: Clean, camera-ready results for corporate and personal branding use.
What service are you getting from Offshore Clipping? We cover all kinds of image and video editing services, covering your business needs! Interested?
Get a Free Trial!
Frequency Separation Photoshop Actions
An action records a sequence of steps, like duplicating layers, blurring, and applying image settings, so you can replay the entire setup with one click.
Free vs Premium Actions
Free actions handle the basic setup well. Premium actions often add automatic blur-radius detection and cleaner layer organization.
| Feature | Free Actions | Premium Actions |
|---|---|---|
| Basic frequency separation setup | Yes | Yes |
| Blur radius | Manual, fixed default | Often auto-detected based on resolution |
| Layer naming & organization | Basic | Cleaner, pre-organized for batch work |
| 8-bit vs 16-bit handling | Usually, one preset only | Often includes both presets built in |
| Best suited for | Learning, occasional use | High-volume, professional workflows |
| Support & updates | Rare or none | Regularly updated |
| Cost | Free | Paid |
How to Install a Frequency Separation Action
Open the Actions panel from the Window menu, then load the .atn file through the panel’s dropdown menu. Once it appears in your list, duplicate your background layer first, select it, and run the action. Photoshop will automatically build the low and high-frequency layers using the settings baked into that action.
Should Beginners Use Actions?
Actions save real time, but they work best once you already understand what each step is doing. Learning the manual process first makes it much easier to fix settings when an image needs a different blur radius or offset than the action’s default. Once that foundation is solid, actions become a shortcut rather than a crutch.
Professional Tips for Better Results
- Always Zoom In and Zoom Out: Details look right up close but can look off at normal viewing size, and vice versa.
- Work Non-Destructively: Keep every edit on its own layer or mask.
- Use Smaller Brushes: Smaller, more controlled strokes blend more naturally than broad ones.
- Avoid Over-Smoothing: Texture is what makes skin look real, don’t erase it.
- Compare Before and After Frequently: Toggle layer visibility to catch changes that have gone too far.
- Combine Frequency Separation with Color Correction: Global tone and color work should still happen alongside, not instead of, this technique.
Frequently Asked Questions
When Should You Use Frequency Separation?
Use it whenever tone and texture need different treatment: close-up portraits, beauty campaigns, headshots, and any commercial photo where skin quality carries the shot. For quick social posts or low-resolution images, simpler tools usually get the job done faster.
When Should You Avoid Frequency Separation?
Skip it on low-resolution images, portraits with just a few minor blemishes, and landscape or wildlife shots – simpler tools like the Spot Healing Brush or Camera Raw’s smoothing sliders get the job done faster in these cases.
What blur radius should I use for frequency separation?
Most high-resolution portraits work well between 8 and 15 pixels, adjusted based on image size and how much natural texture the skin shows.
How does frequency separation work?
Gaussian Blur creates a tone-only layer, Apply Image extracts the remaining texture into a second layer, and Linear Light blend mode recombines them to match the original image.
Can I do frequency separation in Lightroom?
Not in the traditional layer-based sense, since Lightroom lacks layers, but its texture and clarity sliders offer a simplified alternative.
Is frequency separation destructive?
No, when set up correctly with grouped layers and masks, every edit remains fully reversible.
Is frequency separation better than Dodge and Burn?
They solve different problems. Frequency separation handles texture and tone, while Dodge and Burn sculpt light and shadow. Most professional workflows use both.
How do you fix skin imperfections in Photoshop?
For small, isolated blemishes, the Spot Healing Brush works quickly. For overall texture and tone control across a full portrait, frequency separation gives more precision.
Should beginners use frequency separation?
Yes, with practice. Starting with the manual step-by-step process, rather than an action alone, builds a clearer understanding of how the settings affect the final result.
Conclusion
Frequency separation rewards patience. It is not a one-click fix; it’s a discipline that separates what should be smoothed from what should be preserved. Practice on duplicate layers, keep texture intact, and pair it with Dodge and Burn and solid color correction for retouching that looks professional.
Getting this consistent across dozens or hundreds of images, on a deadline, is where most in-house teams run out of time. Offshore Clipping’s retouching specialists apply this exact workflow daily for photographers, studios, and brands that need every image to meet the same natural, high-end standard.