A black background in Adobe Photoshop can be removed in several simple ways, depending on your image. Select Subject quickly isolates people or objects. The Magic Wand tool removes solid black areas in one click.
Layer Masks clean up edges without harming the original image. “blend if” strips out dark tones for smooth results. Each method solves a specific problem and keeps your cutout sharp and natural.
What you’ll learn in this article
- 1 How Do You Get Rid of Black Background in Photoshop?
- 1.1 How Do You Get Rid of Black Background in the Magic Wand Tool?
- 1.2 How Do You Get Rid of Black Background in the Quick Selection Tool?
- 1.3 How Do You Get Rid of Black Background in Select Subject + Select and Mask?
- 1.4 How Do You Get Rid of Black Background in the Pen Tool?
- 1.5 How Do You Get Rid of Black Background in the Channels Method?
- 1.6 How Do You Get Rid of Black Background in Blend If & Layer Styles?
- 1.7 How Do You Get Rid of Black Background Using a Layer Mask in Photoshop?
- 2 Where to Get Professional Background Removal Service?
- 3 FAQ’s
How Do You Get Rid of Black Background in Photoshop?
To get rid of the black background in Photoshop, start by removing the background button in the properties panel. It automatically creates a layer mask and separates the subject in one click.
If the background is pure black, change the layer blend mode to Screen or Linear Dodge (Add) to instantly hide dark pixels, especially for light subjects like fire, smoke, or light effects.
For more control, open Layer Style > Blend If and drag the black slider to make dark tones transparent while keeping highlights clean.
Here are the top methods of getting rid of a Black Background in Photoshop:
- Remove Background Tool: This automatic feature detects the main subject in the image and removes the background with a single click, creating a transparent layer mask.
- Magic Wand Tool: The Magic Wand selects pixels of similar color, which makes it useful for quickly selecting and deleting a solid or plain black background.
- Color Range Selection: The Color Range option lets you select specific colors across the image, allowing you to target black tones and remove them more accurately.
- Select Subject + Layer Mask: This feature uses Photoshop’s AI to identify the main subject, after which a layer mask can hide the background while keeping the subject visible.
- Blend If: The Blend If sliders remove darker tones from a layer by blending them with the layer below, which works well for eliminating pure black backgrounds.
- Background Eraser Tool: This tool removes background pixels as you paint over them, while trying to preserve the edges and details of the foreground subject.
- Quick Selection Tool: The Quick Selection tool allows you to brush over the subject to create a selection, which can then be inverted or masked to remove the background.
- Pen Tool: The Pen Tool creates precise vector paths around objects, making it ideal for manually cutting out subjects from complex or detailed backgrounds.
How Do You Get Rid of Black Background in the Magic Wand Tool?
To remove a black background using the Magic Wand Tool, select the tool and click on the black area. Adjust the tolerance if some parts aren’t selected. Once the black is highlighted, delete it or add a layer mask, then refine edges to clean up any leftover pixels.
Follow these steps to get rid of the black background using the Magic Wand Tool in Photoshop:
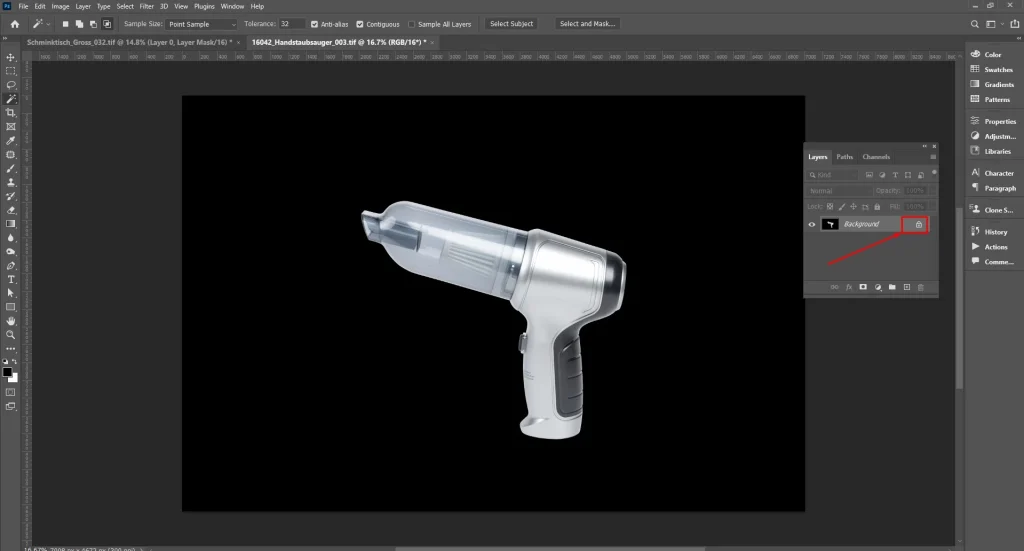
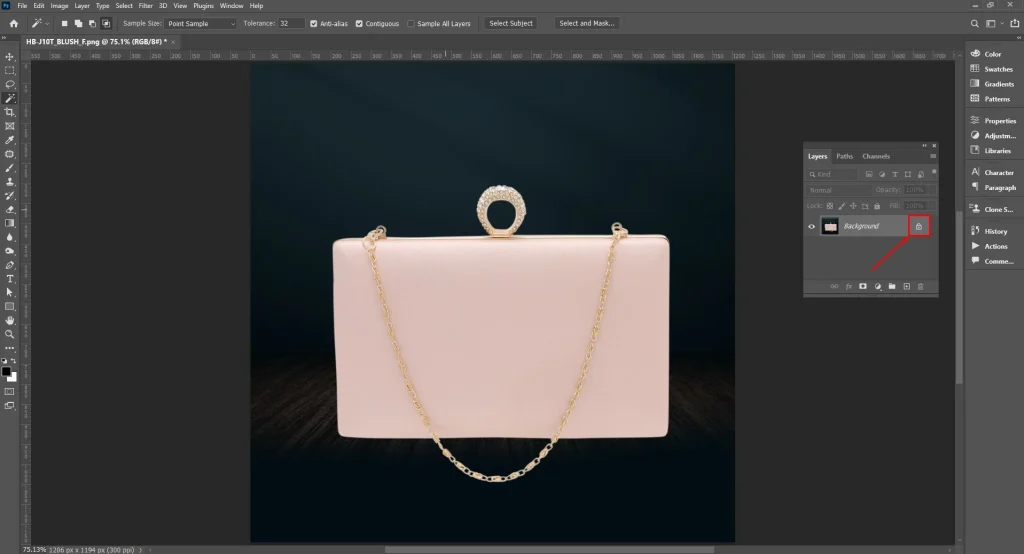
Step 1: Unlock the Background Layer
Open your image in Photoshop.
- Go to File.
- Click Open, and select your image.
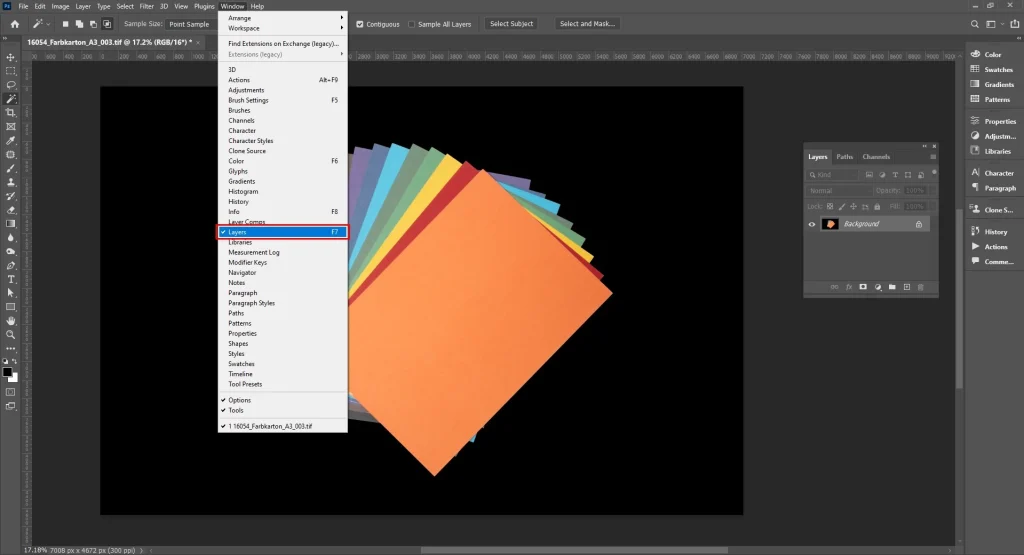
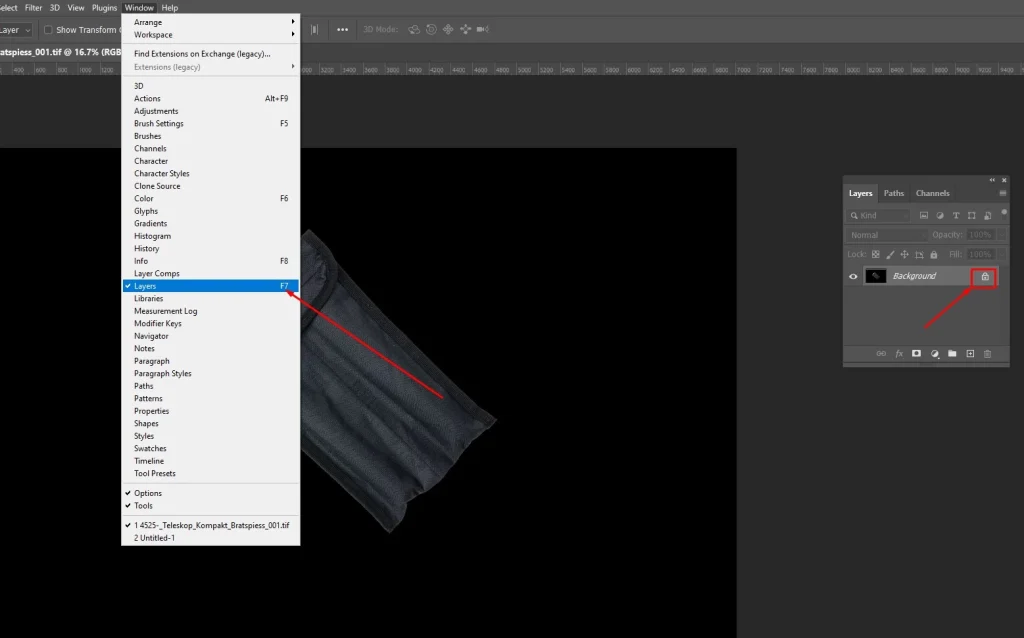
- Open the Layers panel by going to Window < Layers if it’s not already visible.
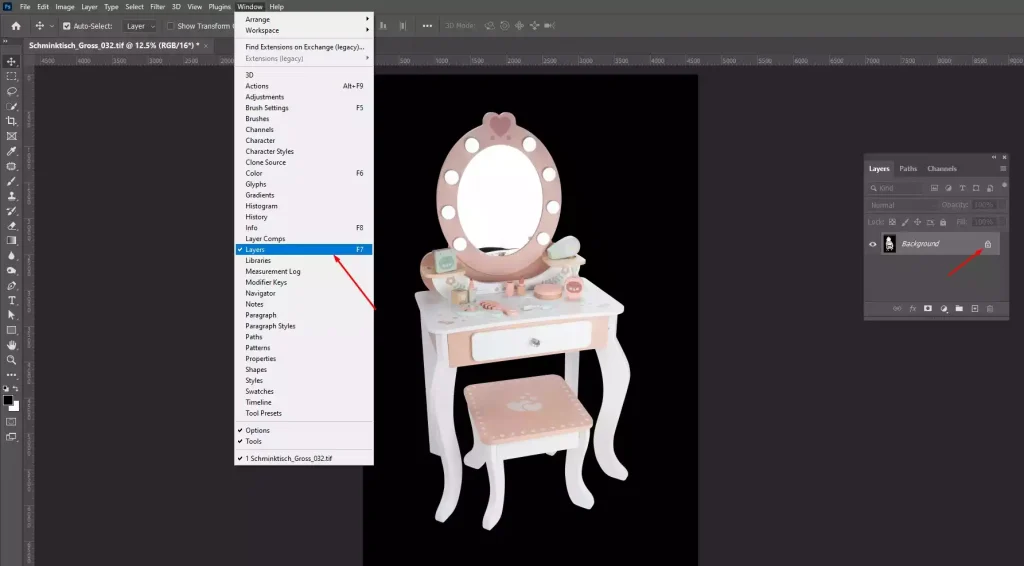
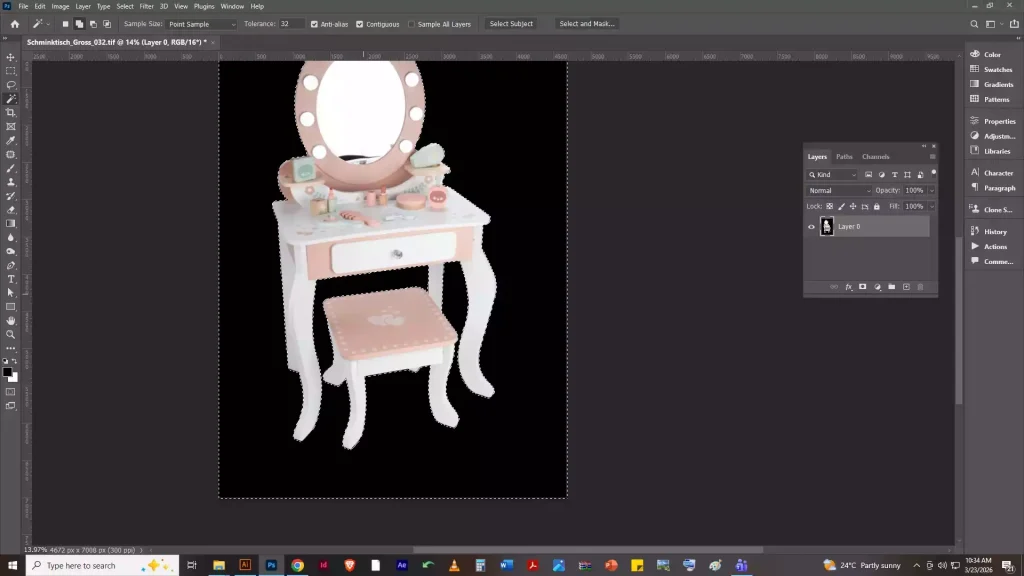
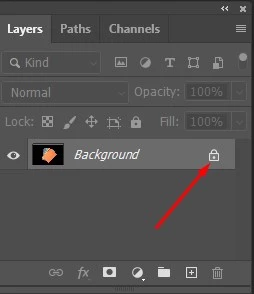
Unlock the Background Layer: In the Layers panel, double-click the layer named “Background.” Rename it to “Layer 0” and click OK. If you see a padlock icon next to the layer, click it to unlock the layer. The layer is now editable, and you can remove or mask the black background.
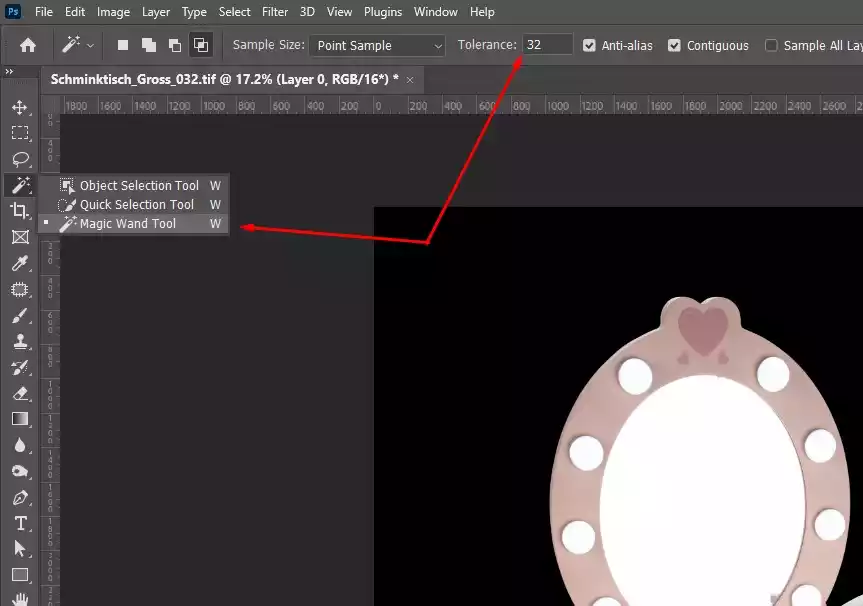
Step 2: Select the Magic Wand Tool
Press W on your keyboard or click the Magic Wand Tool in the toolbar. Check the Tolerance in the options bar. Start with 20–30 for black backgrounds.
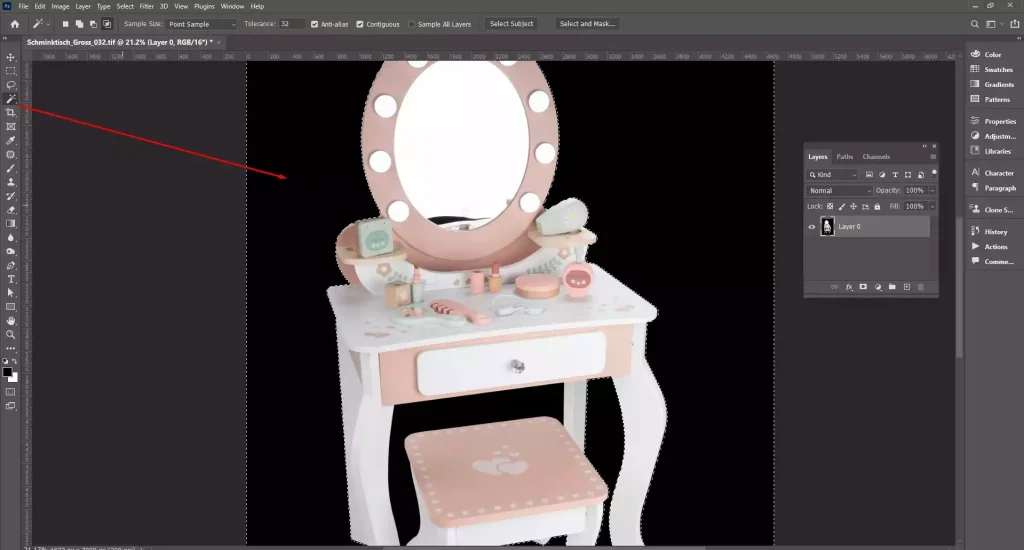
Step 3: Click the Black Background
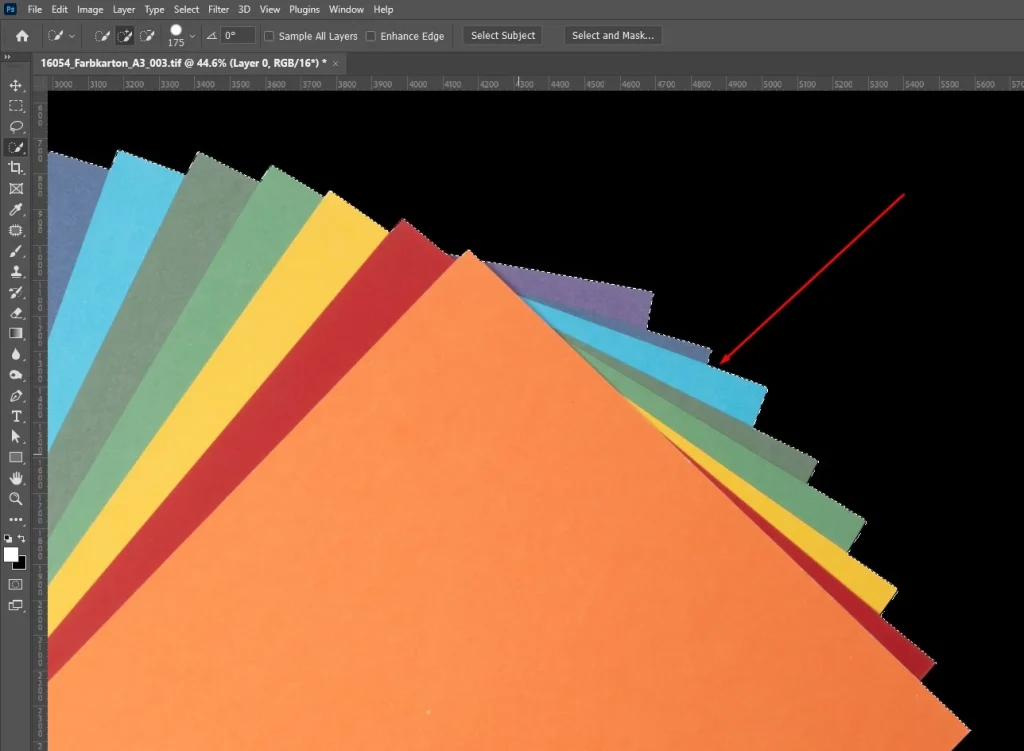
Click anywhere on the black background. The Magic Wand will select all the connected black areas (both selected and adjusted pixels). If some black areas are missing, adjust the tolerance in the options bar (20-30).
Step 4: Add or Subtract from Selection
Hold Shift and click on missing areas to add the selection. To remove areas accidentally selected, hold Alt (Windows) / Option (Mac) and click the unwanted sections.

Step 5: Create a Layer Mask
Click the Layer Mask icon at the bottom of the Layers panel. The black background is now hidden, without permanently deleting it, making your editing non-destructive and reversible.

Step 6: Refine the Edges
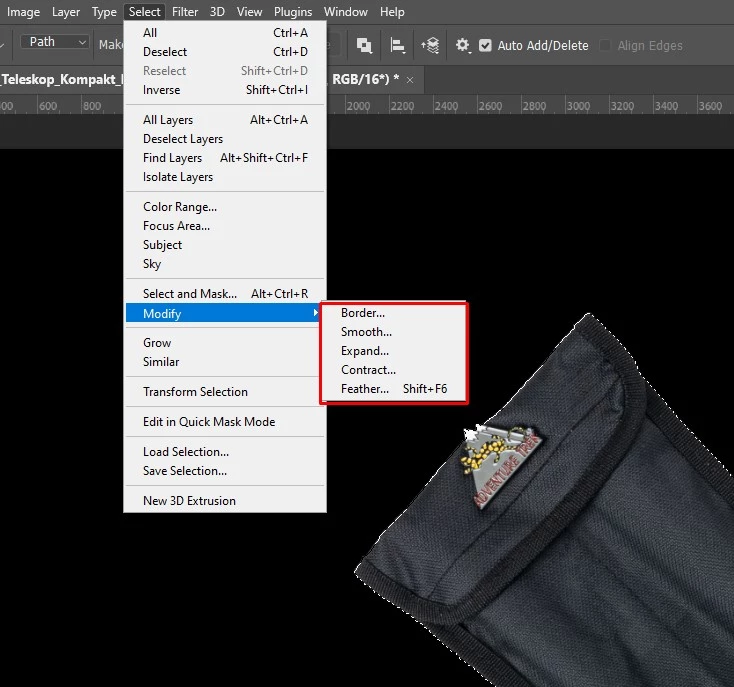
- Go to Select
- Click Modify
- Click Expand
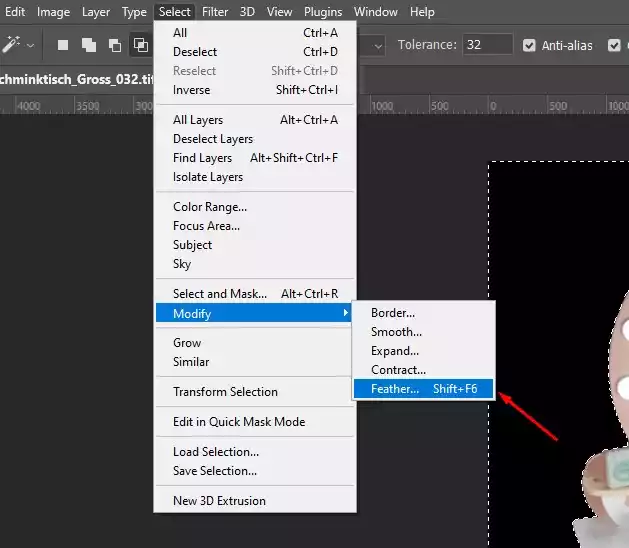
It will slightly enlarge the selection and remove leftover black edges. Then, go to Select < Modify < Feather to soften the edges for a natural look.
Step 7: Clean Up
Click the Layer Mask thumbnail to make it active. Use a soft brush with black or white to remove leftover pixels or fix detailed areas like hair or fur.
How Do You Get Rid of Black Background in the Quick Selection Tool?
To remove the black background using the Quick Selection Tool in Photoshop, unlock your image layer, select the tool, and drag over the subject to create a selection. Invert the selection, delete or mask the background, and refine edges for a clean finish.
Follow these steps to easily get rid of the black background in the Quick Selection Tool:
Step 1: Open and Unlock Your Image
Open your image in Photoshop.
- Go to File.
- Open the Layers panel via Window > Layers if it’s not visible.
- Double-click the Background layer, rename it Layer 0, and click OK to unlock it.
Step 2: Select the Quick Selection Tool
Press W on your keyboard or click the Quick Selection Tool in the toolbar. Adjust the brush size in the options bar for more precise selection.
Step 3: Select the Subject
- Click and drag over your subject. The tool will automatically detect edges and create a selection. And Zoom in for detailed areas and adjust brush size as needed.
Step 4: Refine Your Selection
Hold Shift and drag over any parts you missed to add them to the selection. To remove areas that were accidentally included, hold Alt (Windows) / Option (Mac) and drag over them.
This helps you make the selection as accurate as possible before removing the background.
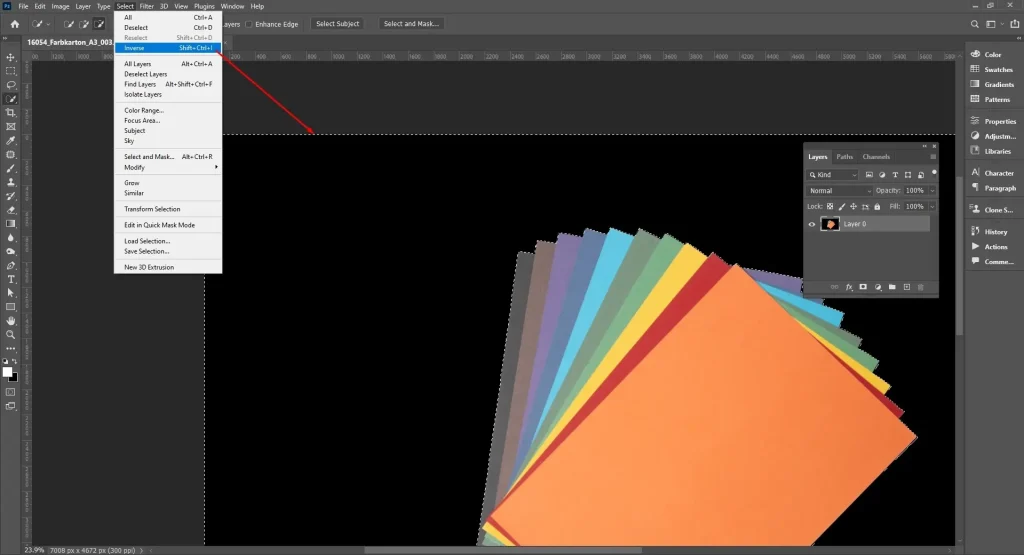
Step 5: Invert the Selection
Go to Select < Inverse or press Shift + Ctrl/Cmd + I. The selection will now highlight the black background, allowing you to remove or mask it without affecting your subject.
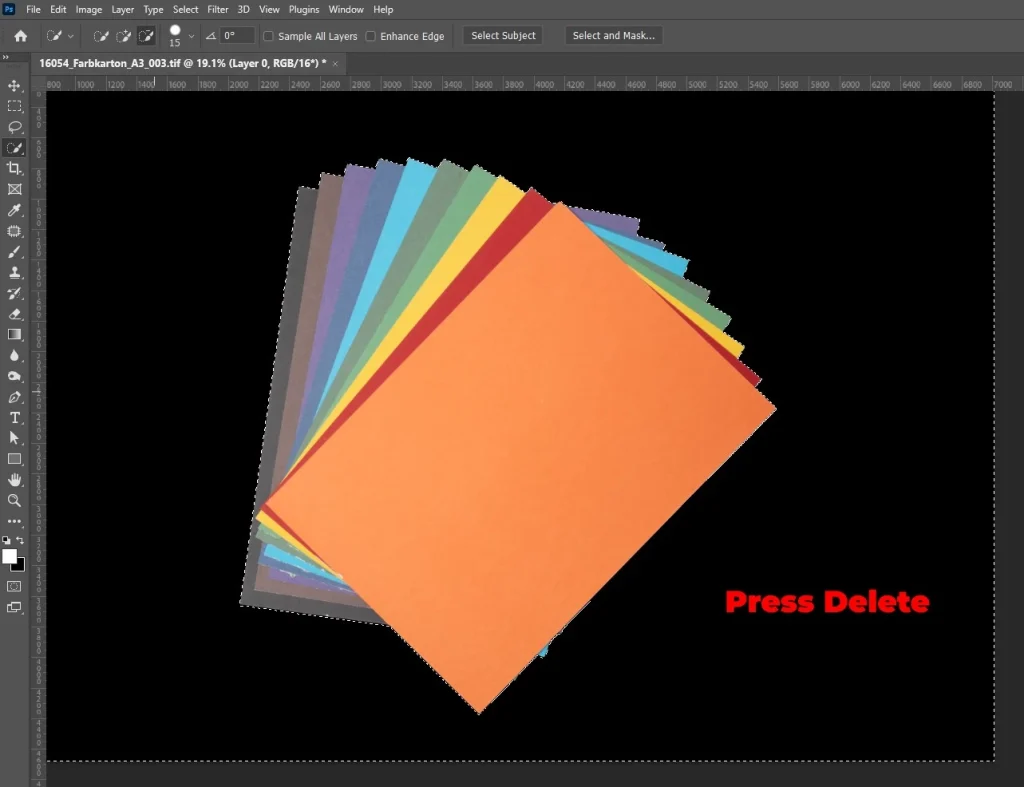
Step 6: Remove the Black Background
Press Delete to remove it immediately, or click the Layer Mask icon to hide it non-destructively. Using a mask keeps the original image intact, so you can restore or adjust the background later.
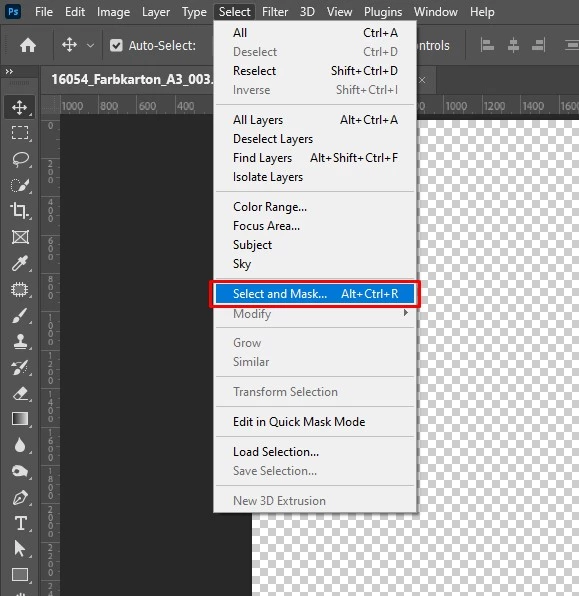
Step 7: Refine the Edges
Go to Select < Select and Mask. Use the workspace tools to smooth edges, remove leftover pixels, and refine hair, fur, or other fine details for a polished result.
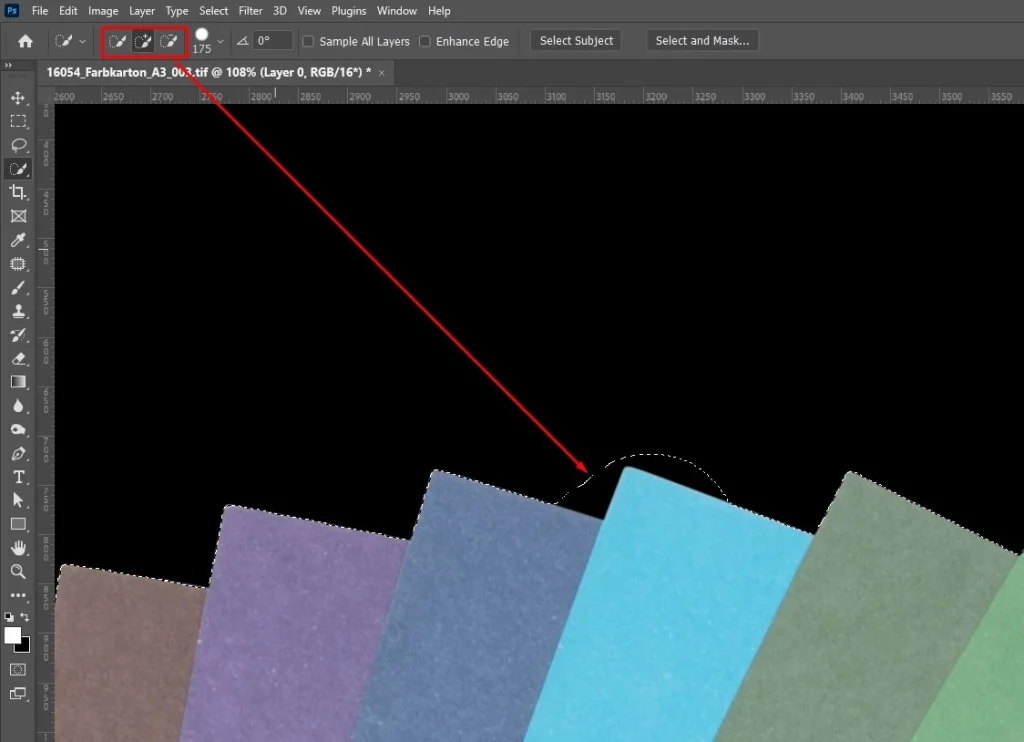
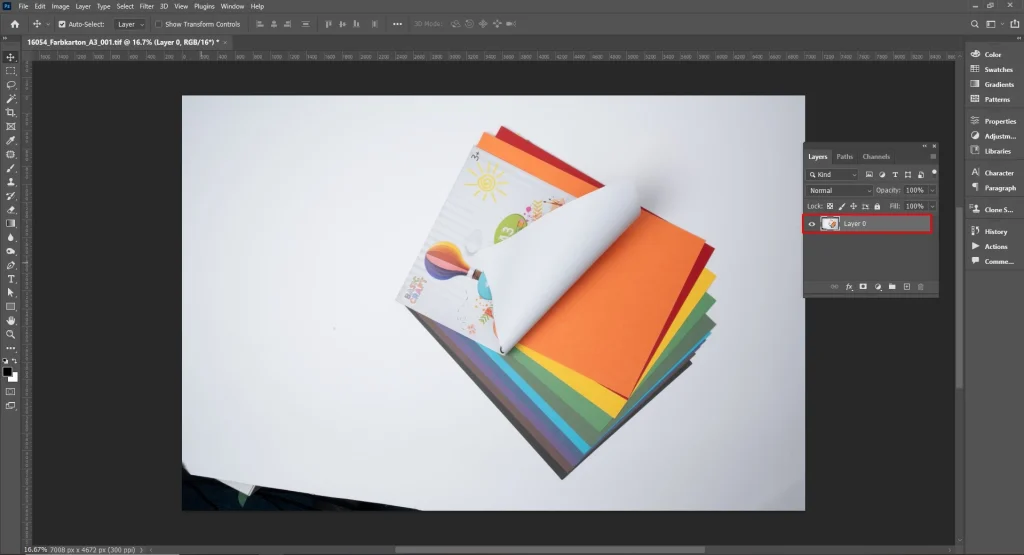
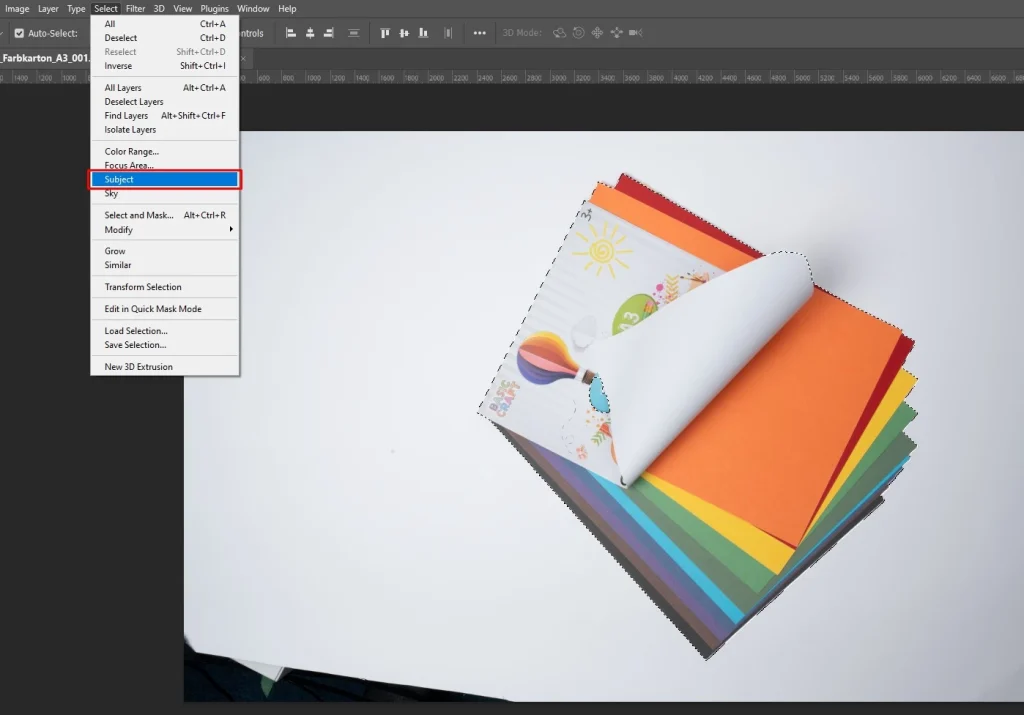
How Do You Get Rid of Black Background in Select Subject + Select and Mask?
To remove a black background using Select Subject and Select and Mask in Photoshop, you can quickly isolate your main subject while refining edges for a polished result. This method works well for complex objects, hair, or fur.
Follow these steps to remove a black background efficiently using Select Subject and Select and Mask:
Step 1: Open and Unlock Your Image
Open your image in Photoshop.
- Go to File < Open to select your image.
- Open the Layers panel via Window > Layers if it’s not visible.
Double-click the Background layer, rename it Layer 0, and click OK to unlock it.
Step 2: Select Your Subject
Let Photoshop quickly select your main subject automatically.
- Go to Select < Subject.
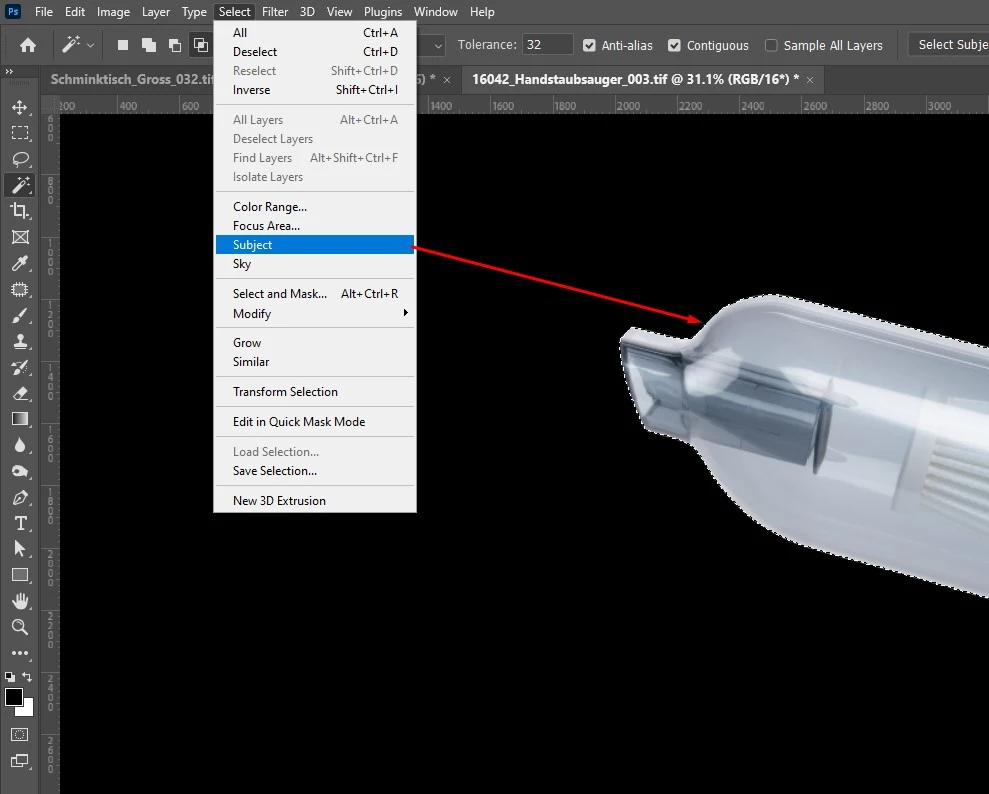
Photoshop will detect and highlight the primary subject in your image, creating an initial selection you can refine further.
Step 3: Open Select and Mask
- Go to Select < Select and Mask or Ctrl+Alt+R / Cmd+Option+R.
- Notice the right-hand panel, navigate the “View Mode” dropdown menu.
- Switch it to Onion Skin or Transparent (checkerboard).
If the background still appears dark, adjust the Transparency slider until the checkerboard pattern is clearly visible. This makes it easier to refine edges and spot any leftover background.
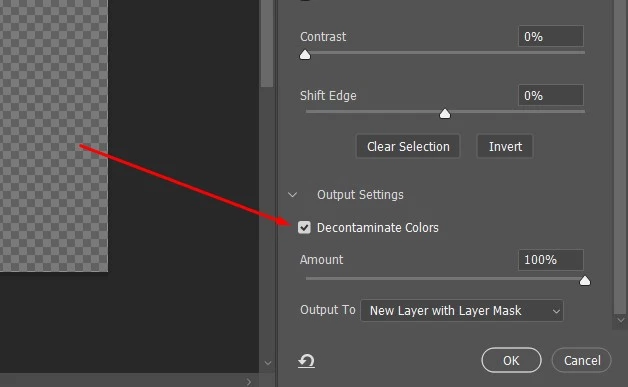
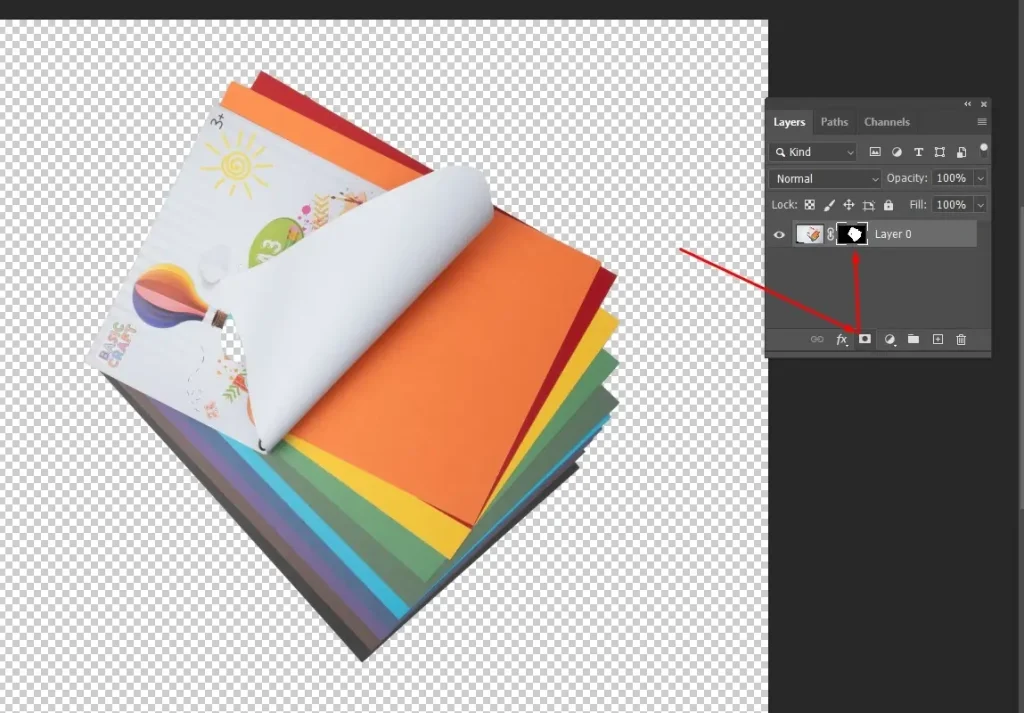
Step 4: Output the Selection
Finalize your selection and remove color fringes around your subject.
- Navigate to the right panel and scroll down to Output Settings.
- Turn on the Decontaminate Colors option.
- Adjust the Amount Slider until the dark edge around the subject fades away.
- Set Layer Mask or New Layer with Layer Mask.
- Click OK to apply.
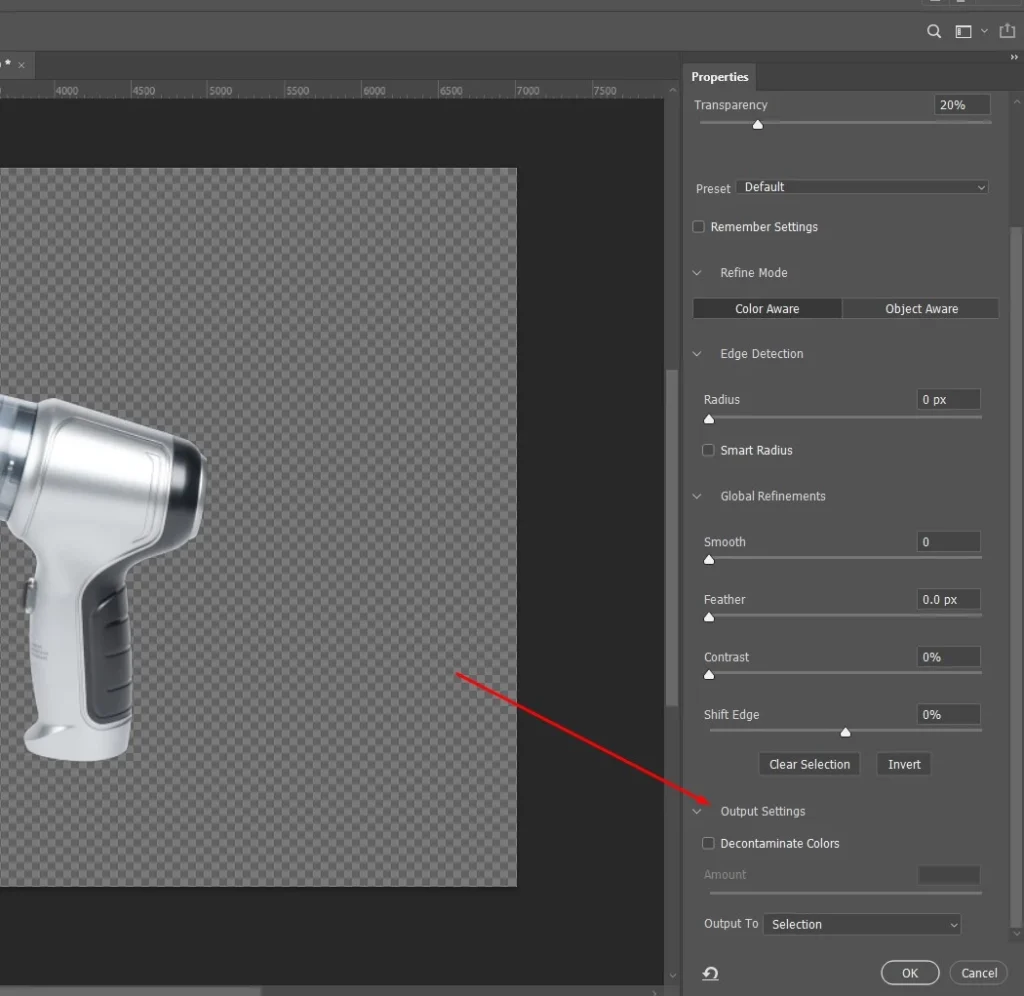
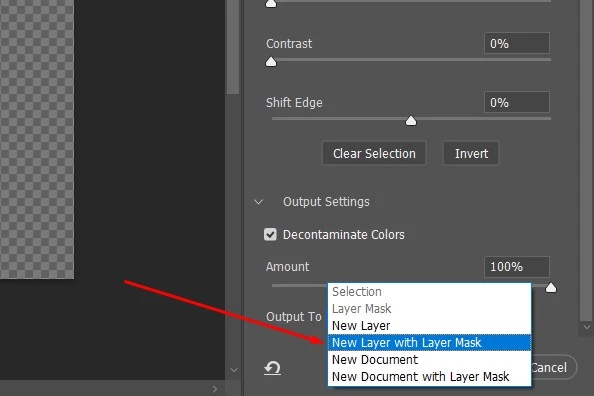
The black background is now hidden without permanently deleting it.
Step 5: Invert the Selection
Refine your selection to remove unwanted black areas from around your subject.
- Open Select and Mask, then pick the Quick Selection tool.
- Go to the “Subtract option”, or simply hold Alt (Windows) or Option (Mac) while dragging, to erase the black parts from the selection.

This helps clean up the edges and ensures only your subject remains selected.
How Do You Get Rid of Black Background in the Pen Tool?
To remove a black background with the Pen Tool, you create a precise path around your subject and convert it into a selection. This method is ideal for images with sharp edges, complex shapes, or where other selection tools struggle to capture fine details.
Follow these steps to remove a black background accurately using the Pen Tool:
Step 1: Open and Unlock Your Image
Open your image in Photoshop.
- Go to File < Open, then select your image.
- Open the Layers panel via Window < Layers.
Double-click the Background layer, rename it Layer 0, and click OK to unlock it.
Step 2: Select the Pen Tool
- Press P or click the Pen Tool in the toolbar.
- Make sure the tool is set to Path mode in the options bar, not Shape mode.
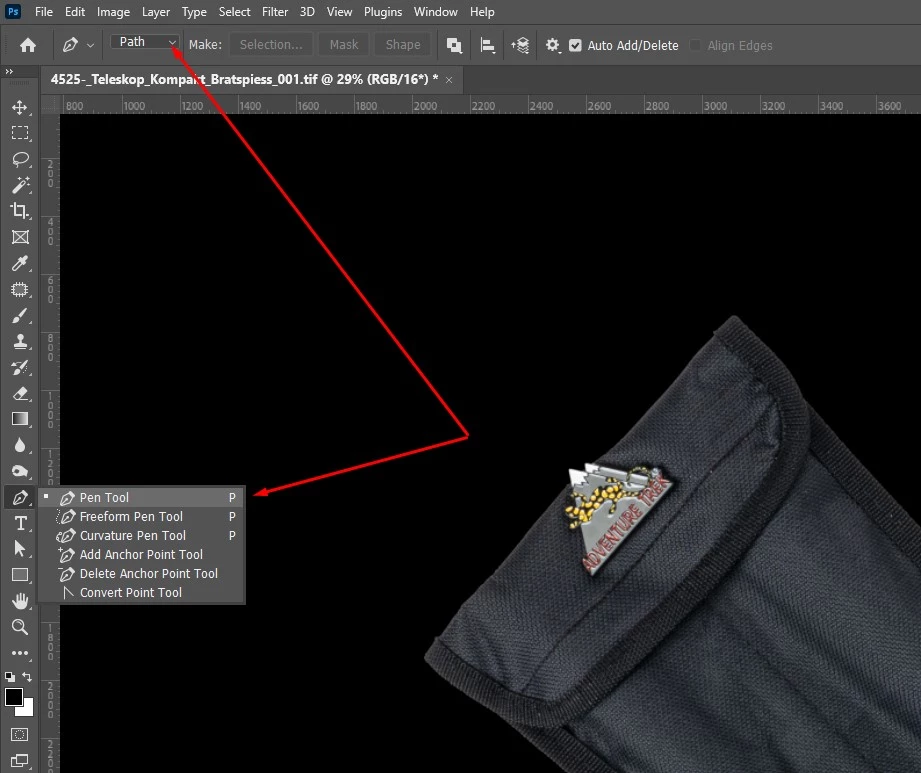
This allows you to draw a precise path for selections or masks.
Step 3: Create a Path Around Your Subject
Use the Pen Tool to outline your subject precisely.
- Click to create anchor points along the edges.
- Click and drag to form curves for rounded or irregular edges.
- Continue placing points until the path fully surrounds the subject.
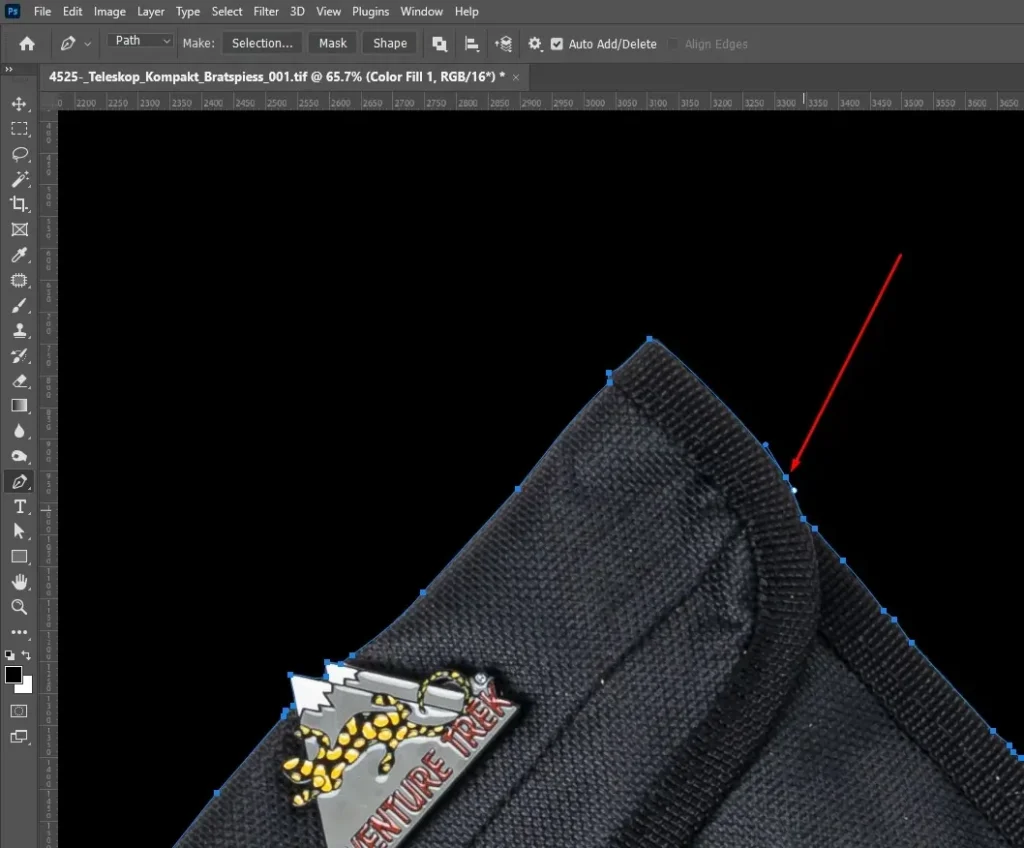
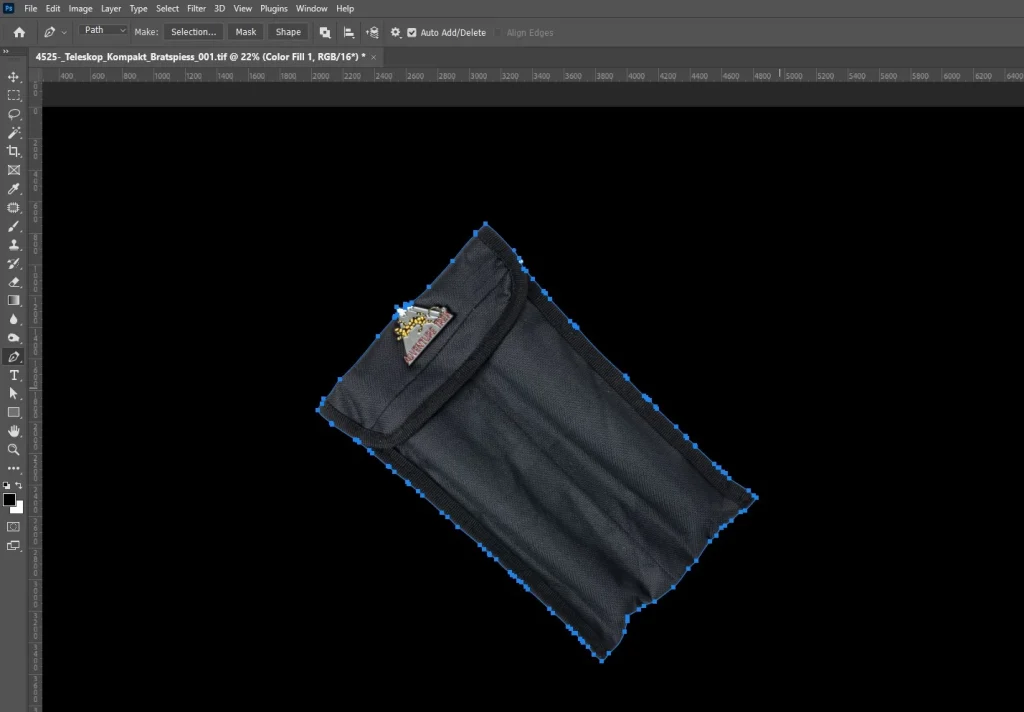
This path will serve as the basis for creating a clean selection or mask.
Step 4: Convert Path to Selection
- Right-click inside the path and choose Make Selection.
- Set the feather radius to 0–1 px for a sharp edge, then click OK.
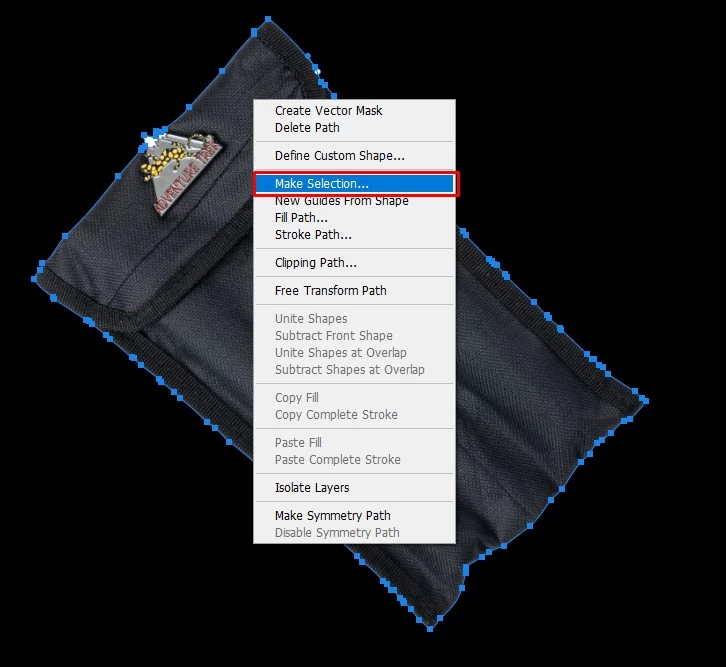
This ensures your selection closely follows the path for precise editing or masking.
Step 5: Remove the Black Background
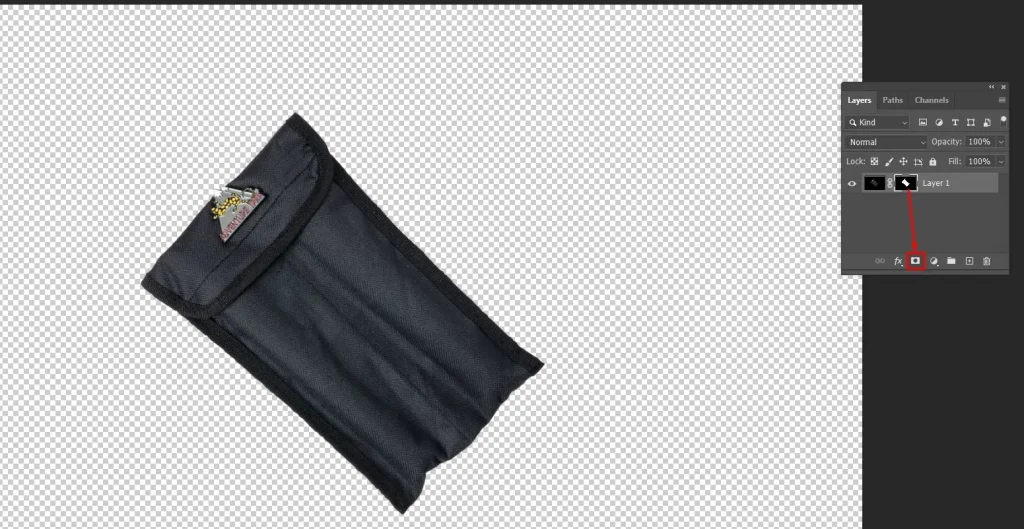
Press delete or Layer Mask < Vector Mask < Current Path. Using a mask keeps the original image intact while removing or hiding the unwanted areas.
Step 6: Refine the Edges
Use Shift + F6 or Select < Modify < Feather or Select and Mask. This process will smooth the edges if needed. Clean up remaining pixels with a soft brush on the mask for a polished result.
How Do You Get Rid of Black Background in the Channels Method?
To remove a black background using the Channels Method, you isolate the subject by working with the image’s color channels. This technique is ideal for complex images with fine details, such as hair, fur, or semi-transparent objects, where other selection tools may struggle.
Follow these steps to remove a black background precisely using the Channels Method:
Step 1: Open and Unlock Your Image
Open your image in Photoshop.
- Go to File > Open to select your image.
- Open the Layers panel via Window > Layers if it’s not visible.
Double-click the Background layer, rename it Layer 0, and click OK to unlock it.
Step 2: Open the Channels Panel
- Go to Window < Channels to open the Channels panel.
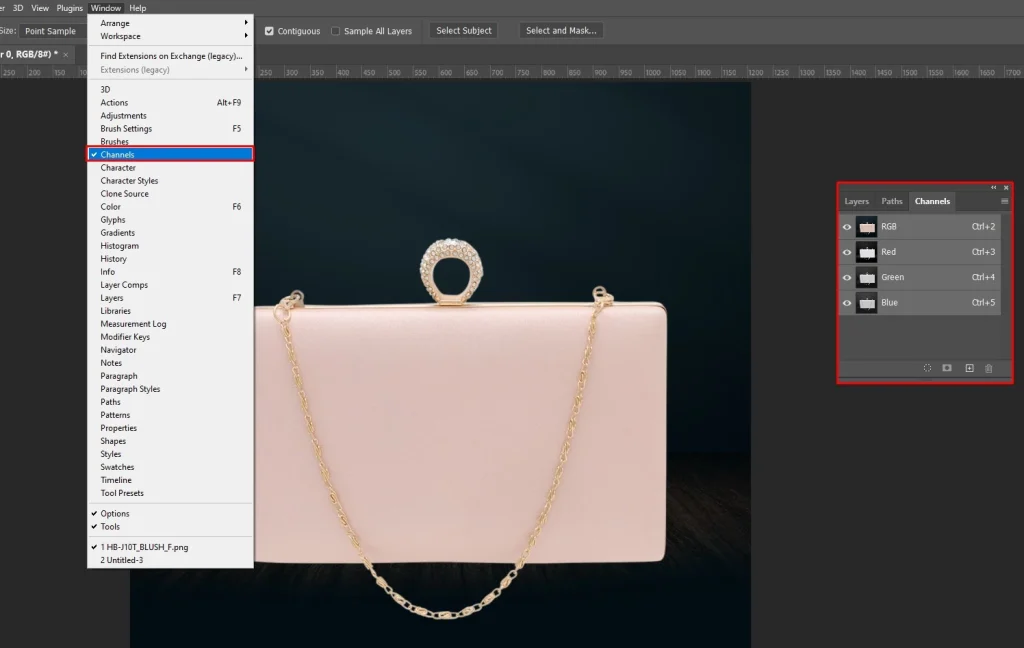
You’ll see Red, Green, and Blue channels for an RGB image. These channels help identify which color provides the clearest contrast for isolating your subject.
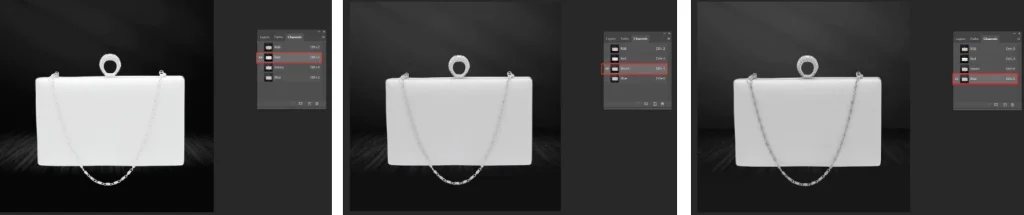
Step 3: Select the Channel with The Most Contrast
Check each color channel to find the one with the clearest contrast between your subject and the background.
- Click each channel (Red, Green, Blue) individually to see which highlights the subject best.
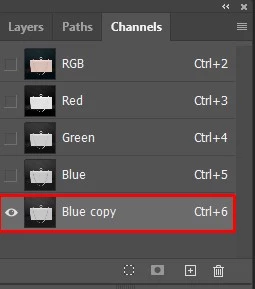
- Drag the channel with the strongest contrast to the New Channel icon to create a duplicate.
This duplicated channel will serve as a base for creating a precise selection.
Step 4: Adjust the Channel
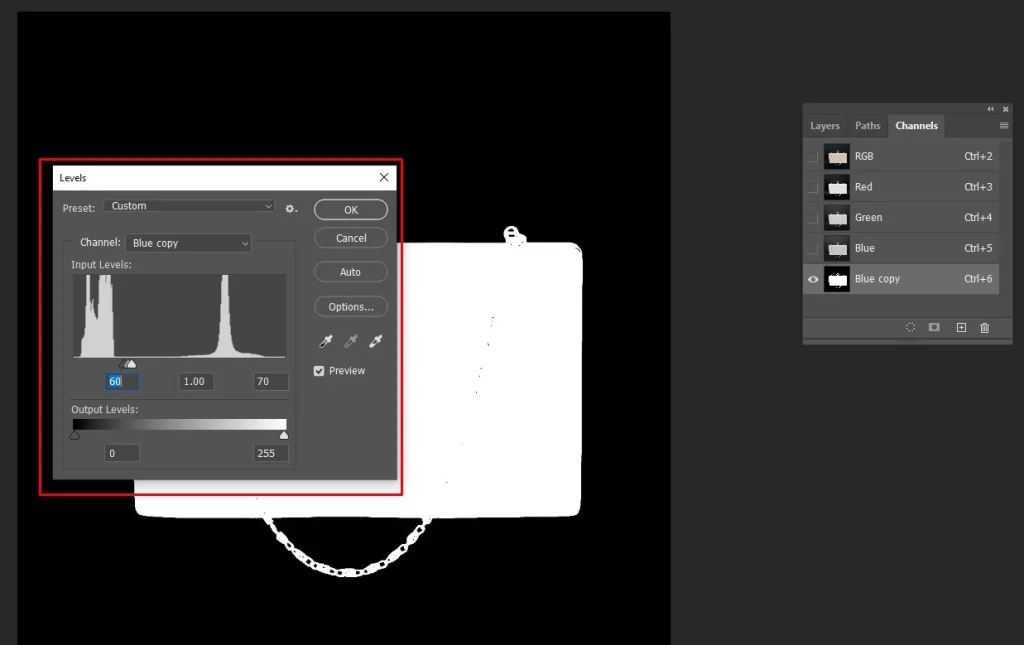
Open the Levels adjustment to increase contrast between your subject and the background.
- Press Ctrl/Cmd + L to open Levels.
- Adjust the sliders to make the subject white and the background black, enhancing contrast.
Step 5: Load Channel as Selection
Use the duplicated channel to create a precise selection of your subject.
- Hold Ctrl (Windows) / Cmd (Mac) and click the duplicated channel’s thumbnail to load it as a selection.
- If the black background is selected instead of the subject, press Ctrl+Shift+I (Windows) / Cmd+Shift+I (Mac) to invert the selection.
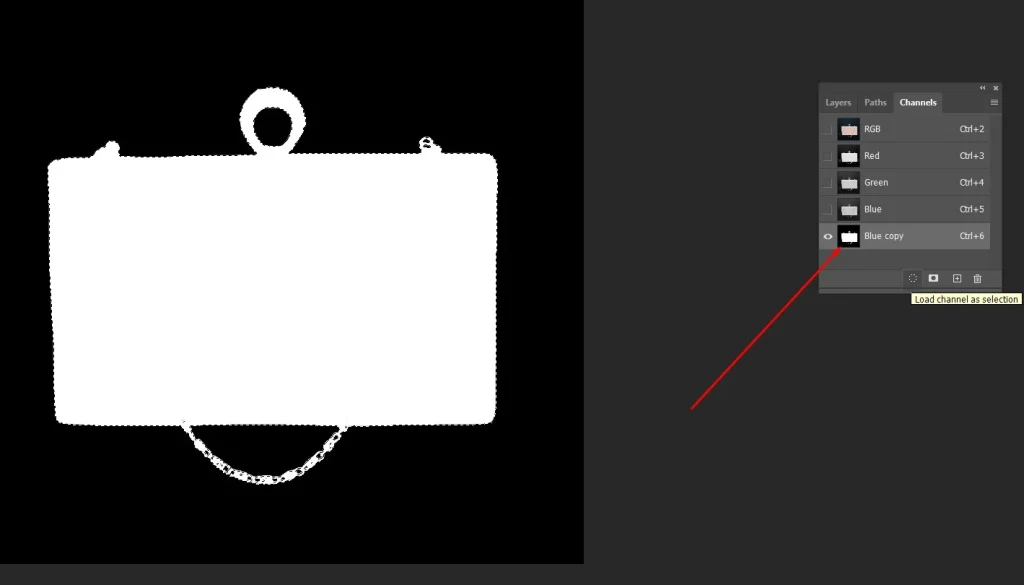
This ensures your subject is correctly isolated for further editing.
Step 6: Apply the Selection to Your Layer
- Go back to the Layers panel.
- Click the Layer Mask icon to hide the black background.
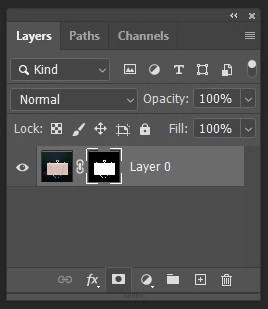
This will hide the selected black background non-destructively while keeping the original image layer intact for further edits.
Step 7: Refine the Mask
If you still notice a thin black halo around the subject, you can refine the mask to make the edges cleaner. Photoshop provides a few simple tools to tighten the mask and remove residual dark pixels.
- Click Filter > Other > Minimum, then set the value to 1–2 pixels.
- Go to Select > Select and Mask.
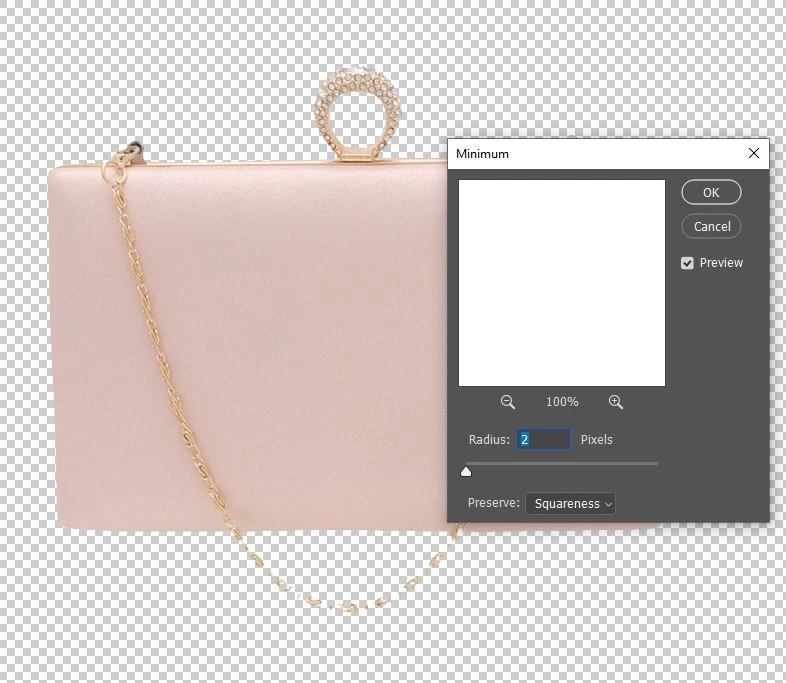
Select the mask thumbnail in the Layers panel and use a soft brush to gently paint over any leftover black pixels or to refine edges around hair and fine details.
How Do You Get Rid of Black Background in Blend If & Layer Styles?
To remove a black background using Blend If and Layer Styles, you use Photoshop’s blending sliders to hide black areas without permanently deleting pixels. This method works well for textured images, gradients, or semi-transparent subjects where precise masking is tricky.
Follow these steps to remove a black background efficiently using Blend If and Layer Styles:
Step 1: Open and Unlock Your Image
Open your image in Photoshop.
- Go to File > Open to select your image.
- Open the Layers panel via Window > Layers if it’s not visible.

Double-click the Background layer, rename it Layer 0, and click OK to unlock it.
Step 2: Open Layer Styles
- Double-click your image layer.
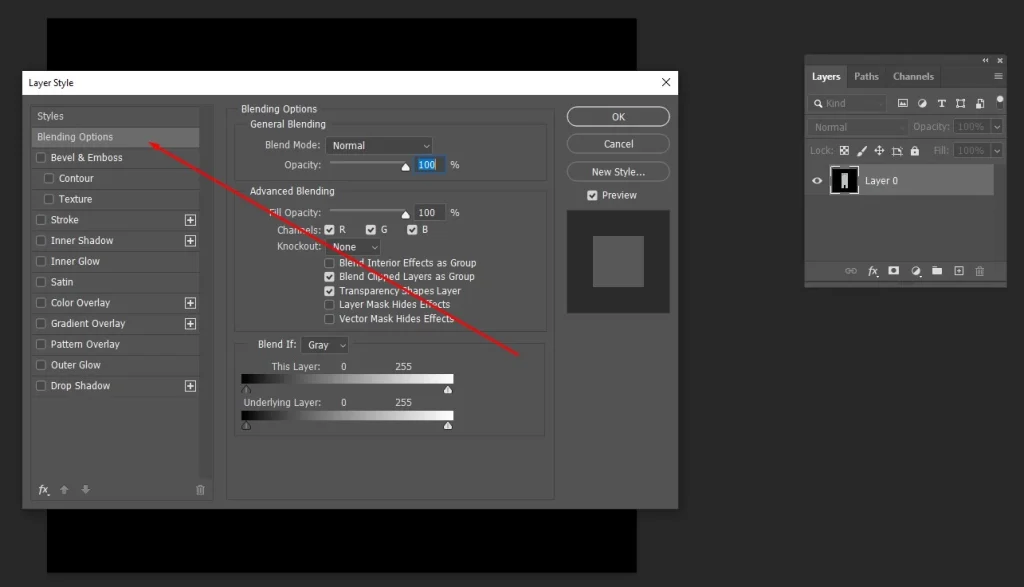
This will open the Layer Style dialog box, where you can adjust advanced settings such as blending options and other layer effects.
Step 3: Use Blend if Sliders
- Locate the This Layer sliders in the Blend If section.
- Drag the black slider to the right to hide the dark areas of the background.
- Hold Alt (Windows) or Option (Mac) and drag the slider to split it for smoother blending and softer edges.
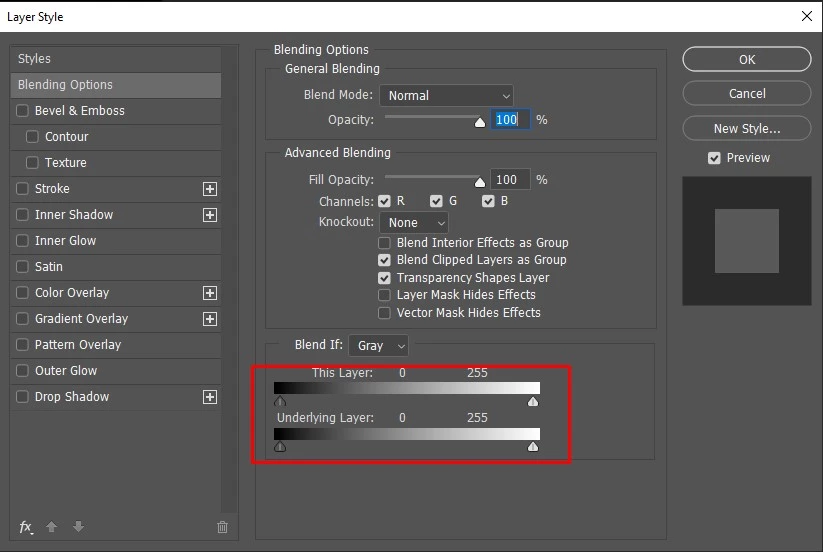
This helps remove black tones from the background while keeping the edges of your subject looking natural.
Step 4: Refine the Effect
- Drag the black slider to remove the black background.
- Use a Layer Mask to clean up edges.
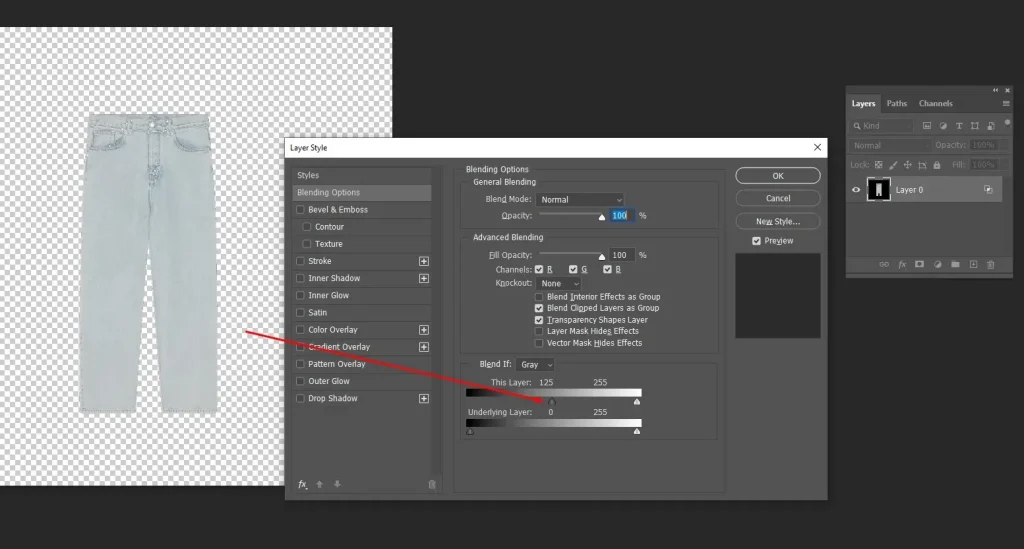
This combination helps you remove leftover dark areas while keeping the subject looking natural.
Step 5: Final Touches
Zoom in on your image to check for any leftover black pixels around the subject. Working closely ensures a clean final result.
- Select the layer mask.
- Use a soft brush to paint away the remaining black pixels.
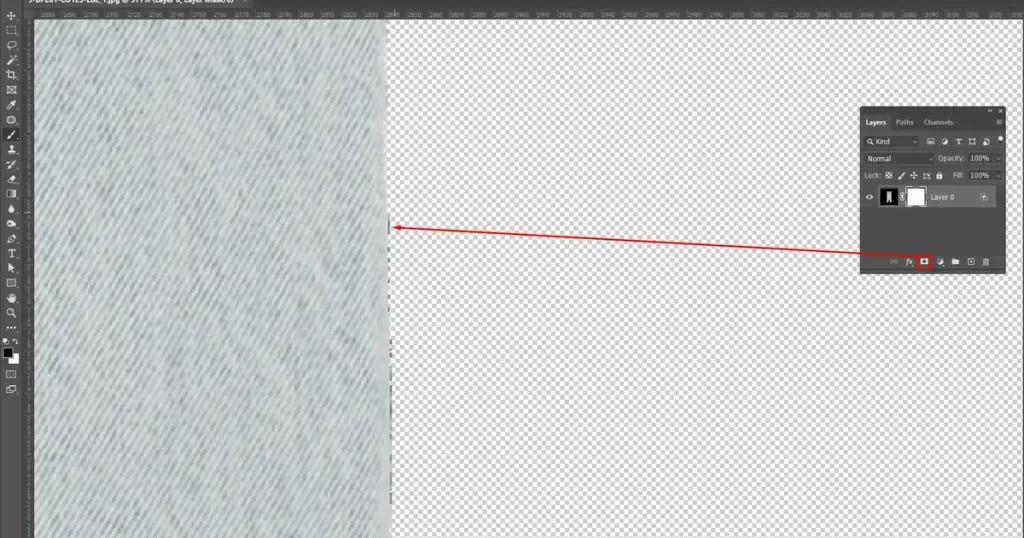
Once finished, your subject will be fully isolated, ready to sit on a transparent background or a new background of your choice.
How Do You Get Rid of Black Background Using a Layer Mask in Photoshop?
To remove a black background using a Layer Mask, you hide the background non-destructively, giving you full control to refine edges and preserve your subject. This method is ideal for any image, especially when you want to keep the option to edit later.
Follow these steps to remove a black background safely and precisely using a Layer Mask:
Step 1: Open and Unlock Your Image
Start by opening your image in Photoshop.
- Go to File > Open and select the image you want to edit.
- Open the Layers panel by going to Window > Layers if it isn’t already visible.
- Double-click the Background layer, rename it Layer 0, and click OK to unlock it for editing.
Step 2: Select Your Subject
Choose a selection tool like Magic Wand, Quick Selection, Pen Tool, or Select Subjectto isolate your subject.
- Click or draw around your subject to create the selection.
Step 3: Apply a Layer Mask
- With your selection active, go to the Layers panel.
- Click the Layer Mask icon at the bottom of the panel to hide the black background.
Your subject will now remain visible while the background is hidden.
Step 4: Refine the Mask
Select the mask thumbnail on your layer to make it active.
- Use a soft brush with black to hide any leftover background.
- Switch to white to reveal parts of the subject that may have been accidentally hidden.
This lets you fine-tune the mask without altering the original image.
Step 5: Smooth the Edges
With your layer mask active, open the Select and Mask workspace to refine the edges of your subject.
- Go to Select > Select and Mask while the mask is selected.
- Use the available tools to smooth edges, feather, or refine hair and other fine details for a cleaner, more polished result.
Where to Get Professional Background Removal Service?
The specialized companies that provide professional Background Removal Service is Clipping Path Studio, Zenith Clipping, Color Experts International, and Path Edits. They deliver precise, clean cutouts using advanced tools to eliminate unwanted backgrounds and enhance image focus, ensuring your photos look polished and professional.
Here is a list of specialized companies that provide professional Background Removal Service:
1. Clipping Path Studio: Clipping Path Studio specializes in professional background removal, offering precise and clean cutouts for product images, portraits, and marketing materials. Their team uses advanced tools to enhance image focus, ensuring polished, high-quality results suitable for e-commerce and advertising.
2. Zenith Clipping: Zenith Clipping provides expert background removal services with attention to detail. They handle complex images, hair, and transparent objects, delivering clean, accurate results. Their service improves image clarity and is ideal for online stores, catalogs, and professional photography projects.
3. Color Experts International: Color Experts International offers comprehensive background removal solutions for businesses and individuals. They use advanced editing techniques to remove unwanted backgrounds while enhancing image focus. Their team ensures every image is refined, consistent, and ready for e-commerce, advertising, or portfolio use.
4. Path Edits: Path Edits delivers professional background removal and image retouching services. They specialize in creating clean, precise cutouts while maintaining natural details. Their services are perfect for e-commerce products, fashion photography, and marketing visuals, ensuring polished and visually appealing results.
How Do You Choose the Best Background Removal Service Provider in the USA?
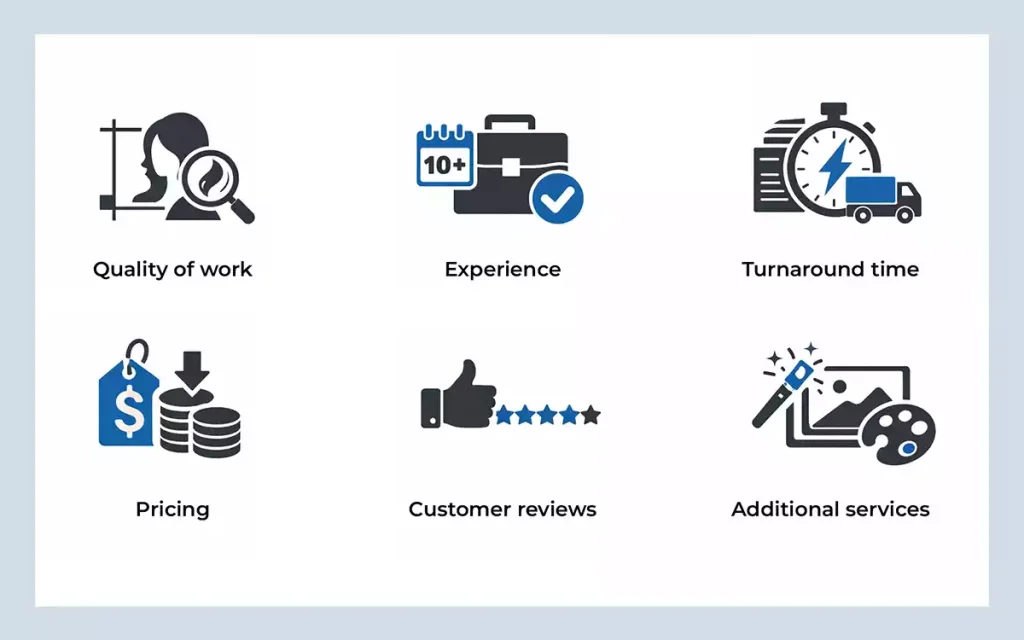
To choose the best background removal service provider in the USA, consider quality, experience, faster turnaround time, AI-assistant editing, free trials, and pricing. Reliable providers ensure accurate background removal, smooth edges, and enhanced image clarity, managing even tricky details like hair or transparent objects, while offering extra services such as retouching and color correction to make images ready for commercial or personal use.
Evaluating these factors helps you pick a service that meets both your budget and quality expectations.
- Quality of Work: Look for clean, precise cutouts with smooth edges, even on hair, fur, or complex objects.
- Experience: Check how long the company has been handling e-commerce, portraits, or commercial images.
- Turnaround Time: Make sure their delivery matches your schedule, especially for bulk orders.
- Pricing: Compare rates per image and bulk discounts. Cheap isn’t always better if quality suffers.
- Customer Reviews: Look for consistent positive feedback and examples of completed work.
- Additional Services: Some providers offer retouching, shadow creation, or color correction, which can save time.
How Much Does Background Removal Service Cost in the USA?
Typically, background removal service costs in the USA vary based on image complexity, volume, and turnaround time. Prices generally start from $0.29 and can go up to $7.00 per image.
Here are breakdown of the cost structure of Background removal in the USA:
| Image Type | Price per Image | Description |
|---|---|---|
| Simple Images | $0.29 | Clean cutouts with minimal details, such as product photos on plain backgrounds. |
| Medium Images | $1.49 | Moderate complexity, including some hair, shadows, or multiple objects. |
| Complex Images | $7.00 | Intricate subjects, fine hair, transparent objects, or detailed multi-object compositions requiring advanced editing. |
FAQ’s
Why does my PNG file show a black background?
The PNG file shows a black background because the transparent areas of the image are not supported by the software, viewer, or website. When transparency fails to load, those areas may appear black instead of clear or blend with the background.
Can I remove the black background using mobile apps?
Yes, I can remove the black background using mobile apps. Many apps, like background remover or photo editor tools, let me erase a dark background and replace it with a clean or transparent one in just a few simple steps.
Can I remove a black background without Photoshop?
Yes, I can remove the black background without Photoshop. Many free tools like remove.bg, Canva, or Photopea let you upload an image and erase the background in seconds. You only need a browser and a few clicks.