")
To learn photography as a beginner, you should start by capturing shots with your phone or camera (if you have one). Direct practice is the best method to make this skill consistent. Understand the settings, use available resources, and learn through structured courses.
Start with knowing camera basics, exposure settings, composition, lighting, etc., and practice them. Instead of taking shots of everything, it’s better to stick to a specific niche to understand your improvement. Some popular photography types are fashion photography, e-commerce product photography, beauty/glamour photography, portrait photography, etc.
What you’ll learn in this article
- 1 Photography for Beginners: Where Do I Even Start?
- 2 Photography: Introducing the Basic Concepts for Beginners
- 3 Understanding the Exposure Triangle
- 4 Composition Matters in Photography
- 5 Practice to Improve Your Photography Skills
- 6 10 Types of Photography You Can Explore
- 7 How to Challenge Yourself to Maximize Your Photography Abilities?
- 8 How Do You Keep Learning New Photography Skills?
- 9 What are the Common Challenges When Getting Started in Photography?
- 10 FAQ’s
- 11 Take the First Step to Becoming a Pro Photographer!
Photography for Beginners: Where Do I Even Start?
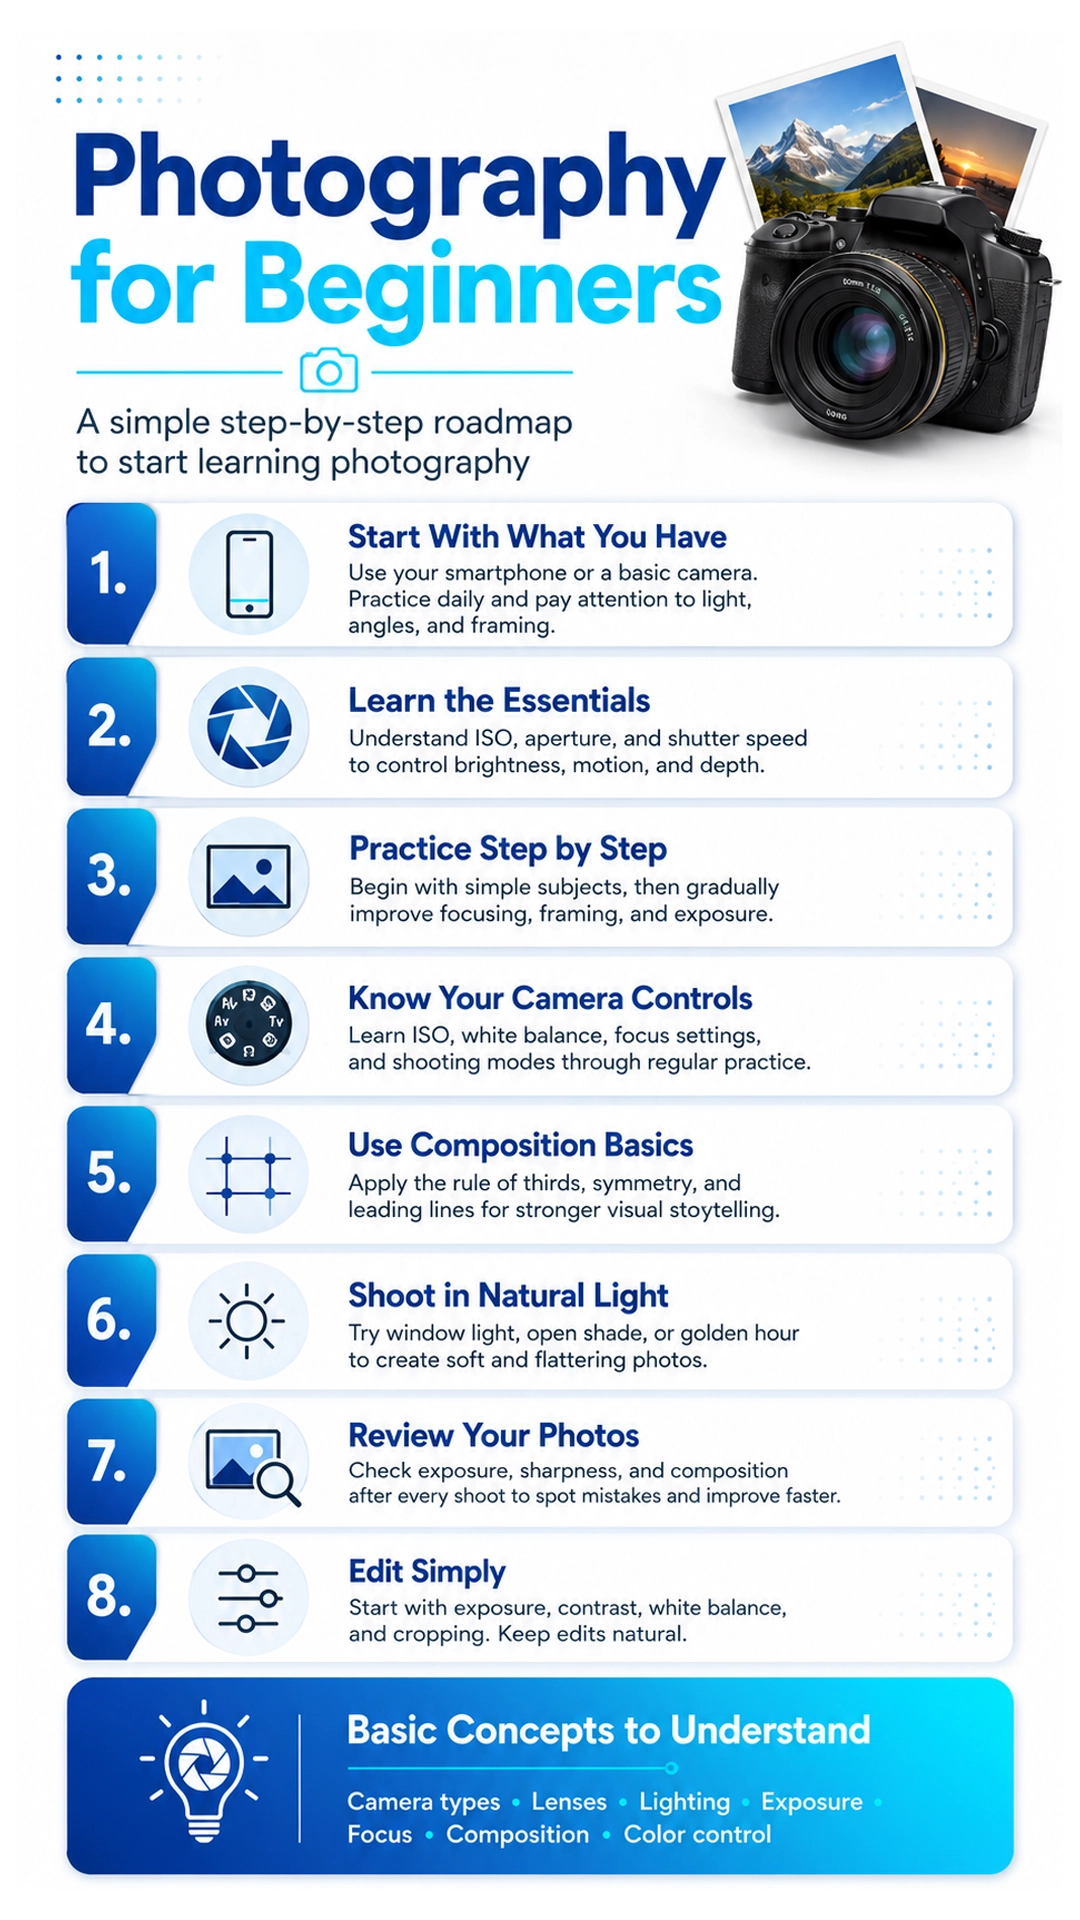
Photography beginners should start by using available gear, learning core fundamentals, practicing step-by-step, understanding camera controls, applying composition basics, using natural light, reviewing photos, and editing simply.
A structured set of steps to help you start and build momentum to learn photography skills is as follows.
Step 1: Start With What You Have
Use your smartphone or basic camera to begin. Practice daily shooting, explore subjects, and focus on light, angles, and framing.
Step 2: Learn Photography Essentials
Understand camera functions and terminologies: ISO, aperture, and shutter speed, control of brightness, motion, and depth for better exposure control.
Step 3: Practice Basic Skills Step-by-Step
Start with simple subjects, then progress gradually. Practice focusing, framing, and exposure while moving from auto to semi-manual modes.
Step 4: Understand Camera Controls
Learn key settings like ISO, white balance, focus, and modes. Practice regularly to build speed and confidence in handling your camera.
Step 5: Practice Composition Basics
Use the rule of thirds, symmetry, and leading lines. Improve framing, angles, and subject placement for stronger visual storytelling.
Step 6: Shoot in Natural Light
Use soft light from windows, shade, or golden hour. Learn how light direction affects shadows, tone, and image quality.
Step 7: Review Your Photos
Check exposure, sharpness, and composition after each shoot. Identify mistakes and track improvement for faster learning progress.
Step 8: Use Simple Editing Workflow
Start with basic edits like exposure, contrast, white balance, and cropping. Keep edits natural and avoid over-processing images.
Photography: Introducing the Basic Concepts for Beginners
The basic concepts for beginners in photography cover camera types, lens options, lighting styles, exposure, focus, composition, and color control. They describe how you capture photos, assisting in developing technical understanding.
Camera
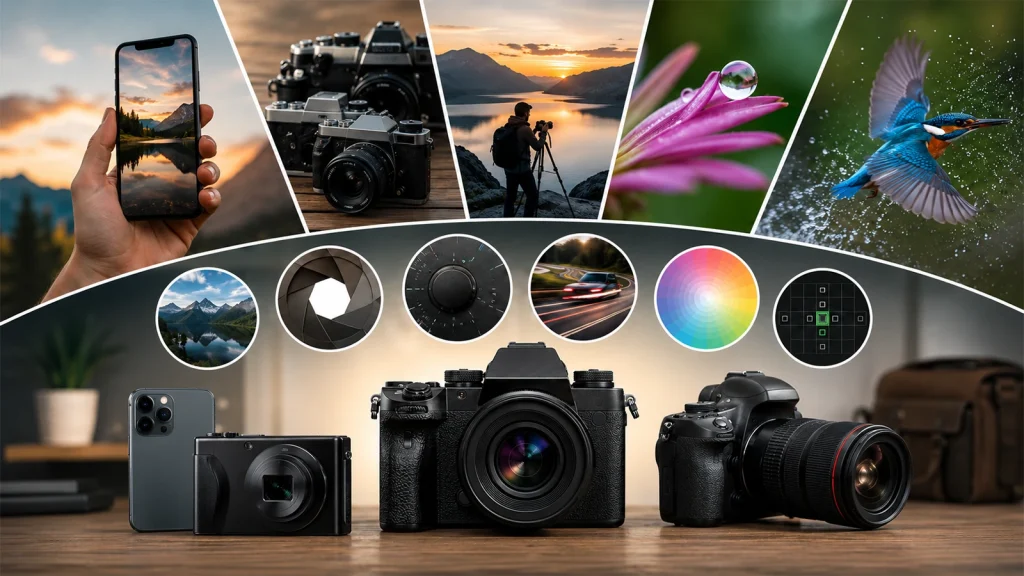
Cameras come in many types, such as smartphones, pre-owned cameras, or brand new cameras. Before buying cameras, learn the following factors.
- Camera type: includes mobile phone, compact, mirrorless, DSLR, etc. Mirrorless or entry-level DSLR cameras are best for beginners, as they offer a balance of ease, flexibility, and hands-on learning with manual settings.
- Camera settings: To learn basic photography, study ISO in photography, aperture in photography, and shutter speed in photography. ISO controls lighting sensitivity, aperture is for depth, and shutter speed is for motion. There is white balance for colors, and focus modes for sharpness.
- Camera modes: The camera has Auto, Program, Aperture Priority, Shutter Priority, and Manual modes. Start in Auto or Aperture Priority and gradually experiment with others to gain control over your images.
- Camera features: Your camera has several key features that affect your photos. Sensor size, for example, full-frame, APS-C, or Micro Four-Thirds, affects light capture and detail. Megapixels determine print size and cropping flexibility, but sensor quality matters more. Viewfinders and LCD screens help compose shots and review images. Connectivity like SD cards, Wi-Fi, or USB ensures easy storage and backup.
Lens
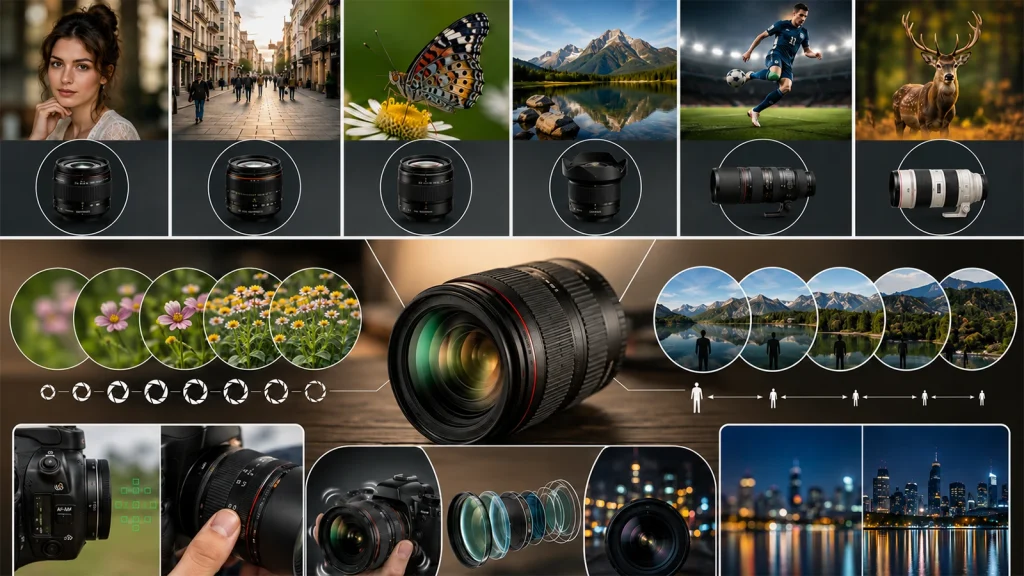
Lenses determine how your photos look and what you can capture. Before choosing a lens, learn the following factors.
- Lens type: Lens types include prime, standard, macro, wide-angle, telephoto, etc. The best lens for beginners would be a 50mm prime lens or a zoom lens, like an 18–55mm kit lens.
- Lens settings: Some lens settings are aperture (f-number) for depth of field, focal length for framing, and zoom levels for perspective. Aperture controls background blur, while focal length changes how much of the scene fits in the frame.
- Focus modes: Lenses offer autofocus and manual focus modes. Autofocus is easier for beginners, helping ensure sharp images quickly. Manual focus allows more precise control, especially for macro or low-light shots.
- Lens features: Modern lenses feature image stabilization to reduce blur, lens coatings to reduce flare, and a maximum aperture for low-light performance. By learning them, you can shoot in different situations, control creative effects, and capture sharper, higher-quality images.
Light in Photography
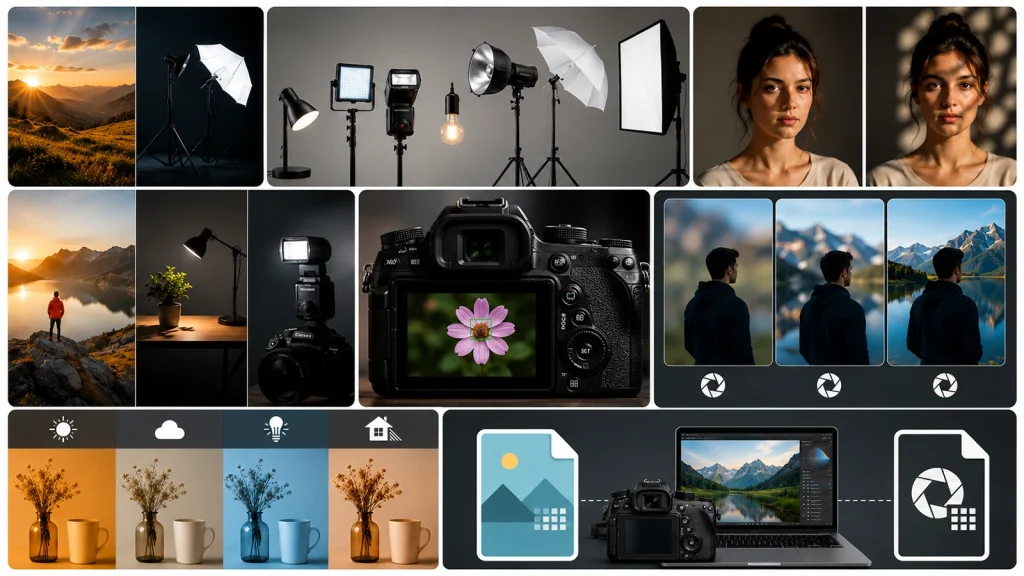
Photography lights define a photo’s look, set the mood, and impact on overall clarity. There are 2 key types of light used in photography: natural and artificial light. The best lighting for beginners is natural light. After understanding how light works and your specific requirements, you can purchase artificial lights.
- Light types: Artificial light is popular for variety, control, portability, and availability. Popular photography lights are lamps, LED panels, flash, ambient, strobe, umbrella, and softbox. Soft light creates gentle shadows and even tones, while hard light produces strong shadows and contrast.
- Light modes: Depending on the scene, use available light, continuous light sources, or flash. Available light relies on natural or existing indoor lighting. Continuous light lets you see effects in real-time, and flash adds extra brightness for low-light situations. Experiment with modes to learn their impact.
Focus and Depth of Field
Learn autofocus modes, focus points, and manual focus control. Aperture affects depth of field, determining background blur. Use single-point autofocus for precision. Beginners should practice focusing on the main subject to ensure sharp images, especially in portraits or close-up photography.
White Balance
White balance is the process of adjusting color temperature for accurate tones. Learn presets like daylight, cloudy, tungsten, and auto. Incorrect white balance creates unnatural color casts. Beginners should test presets in different lighting conditions to maintain realistic colors and improve overall image quality.
File Formats
Know about different file formats; the most popular formats include JPEG and RAW. JPEG files are compressed and ready to use, while RAW files retain more image data. RAW allows better editing flexibility and color correction. You can start with JPEG for simplicity, then switch to RAW when learning post-processing for improved quality.
Understanding the Exposure Triangle
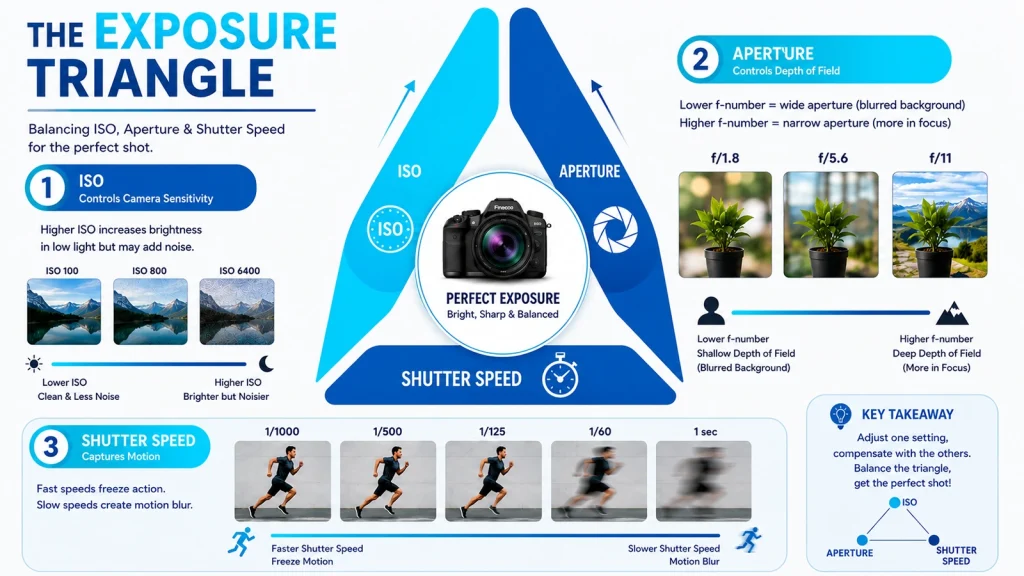
The exposure triangle refers to ISO, aperture, and shutter speed. It explains how these three camera settings work together to control image brightness, motion, and depth of field. Adjusting one setting affects the others, helping photographers achieve balanced and properly exposed images in different lighting conditions.
1. ISO – Controlling Camera Sensitivity
ISO is the camera setting that impacts light and darkness in a photo. It controls how sensitive a camera sensor is to light, affecting the brightness level. ISO in photography is measured in values such as ISO 100, ISO 400, ISO 6400, etc. Lower ISO values (100–200) produce cleaner images in bright light. Higher ISO values (1600 and above) increase brightness in low light but may create grain/noise.
2. Aperture – Controlling Depth of Field
Aperture is the opening inside the lens that controls how much light enters the camera. It also affects how much of the image appears in focus. Aperture in photography is measured in f-numbers such as f/1.8, f/2.8, f/5.6, f/8, and f/11. Lower f-number (f/1.8–f/2.8) refers to a wide aperture as it creates a wider opening and produces a blurred background. Higher f-number (f/8–f/11) refers to a narrow/small aperture, as it creates a smaller opening and keeps more of the scene in focus.
3. Shutter Speed – Capturing Motion
Shutter speed controls how long the camera sensor is exposed to light. It affects motion blur and brightness. Shutter speed in photography is measured in fractions of a second, such as 1/1000, 1/500, 1/125, 1/60, or longer exposures like 1 second. Slow shutter speeds (1/60 or slower) allow motion blur. Fast shutter speeds (1/500 or higher) freeze motion.
Composition Matters in Photography
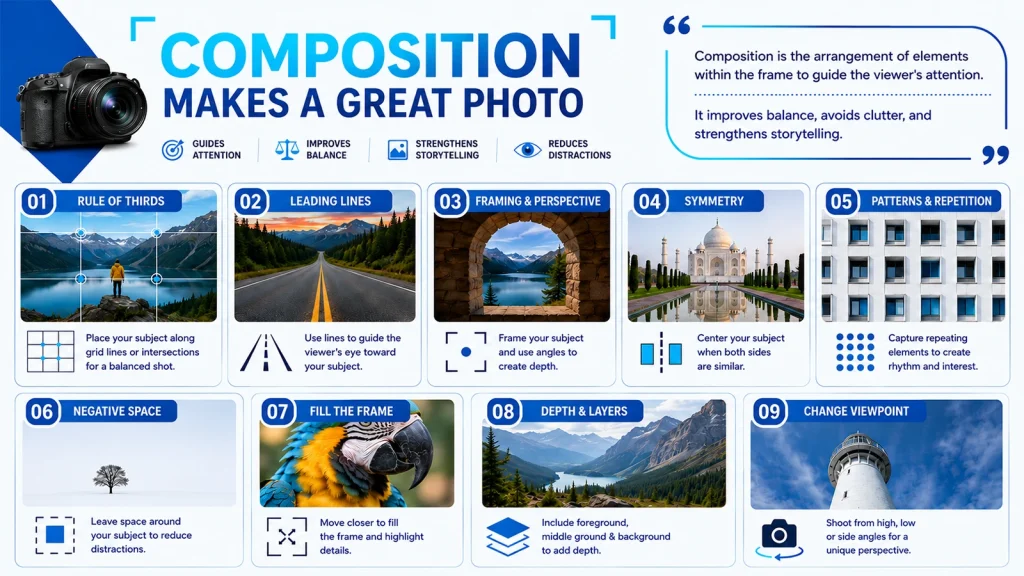
Composition is the arrangement process of elements within the frame to guide the viewer’s attention. Composition helps you avoid cluttering and the strategic positioning of elements. It guides the viewer’s attention, improves balance, and strengthens storytelling.
Here are some popular composition techniques you can start practicing.
- Rule of Thirds: Divide the frame into nine equal sections. Place your subject along grid lines or intersections to create balanced, visually appealing compositions.
- Leading Lines: Use roads, fences, or shadows to guide the viewer’s eye toward your subject, creating depth and stronger visual direction.
- Framing and Perspective: Use windows, doors, or foreground objects to frame subjects. Change shooting angles to create depth and emphasize perspective.
- Symmetry: Center your subject when both sides look similar. Symmetry creates clean, organized photos and works well with architecture and reflections.
- Patterns and Repetition: Capture repeating shapes, colors, or textures. Patterns create visual rhythm, while breaking repetition draws attention to the subject.
- Negative Space: Leave space around the subject. This isolates the subject, reduces distractions, and creates a minimal, clean composition.
- Fill the Frame: Move closer to your subject to remove background distractions and highlight details, textures, and expressions.
- Depth and Layers: Include foreground, middle ground, and background elements to create a sense of distance and a three-dimensional feel.
- Change Viewpoint: Shoot from high, low, or side angles. Different viewpoints make ordinary subjects look more interesting and dynamic.
Practice to Improve Your Photography Skills
To improve photography skills, you need to make consistent practice, structured learning, and use reliable resources. Combining hands-on shooting, free learning materials, and professional classes strengthens technical knowledge, creativity, and workflow efficiency.
Here is a list of 10 methods to help your progression in photography, improve composition, lighting, editing, and overall visual storytelling abilities.
- Daily Photography Practice Ideas
Create daily shooting routines using simple subjects and themes. Regular repetition improves camera familiarity, composition awareness, creativity, and overall consistency.
- Progression Photography: Tracking Your Improvement
Recreate similar shots regularly and compare results. Tracking exposure, composition, and sharpness helps measure improvement and identify weaknesses.
- Practice Different Lighting Conditions
Shoot in the morning, midday, golden hour, and indoor lighting. Practicing varied conditions improves exposure control and adaptability.
- Limit Yourself with Constraints
Use one lens, focal length, or black-and-white mode. Constraints encourage creativity, intentional framing, and stronger composition decisions.
- Recreate Professional Photos
Replicate professional images to study lighting, framing, and styling. This improves observation skills and understanding of professional techniques.
- Free Online Photography Courses
Structured free courses teach exposure, composition, and editing fundamentals. Guided lessons help beginners improve their skills systematically.
- Camera Training Videos and Tutorials
Video tutorials demonstrate camera settings and shooting workflows. Visual explanations accelerate learning and improve technical understanding.
- Photography Communities and Feedback
Sharing photos in communities helps receive critiques. Feedback identifies mistakes and guides improvement through real-world perspectives.
- Photography Classes for Beginners
Beginner classes build strong foundations in camera settings, lighting, and composition, improving confidence through guided practice.
- Advanced and Commercial Photography Courses
Advanced and commercial courses refine lighting, storytelling, and client-based shooting, improving professional-level photography and career-focused skills.
10 Types of Photography You Can Explore
10 types of photography to explore include fashion, e-commerce products, beauty photo editing, portrait, event, food, real estate, travel, wildlife, and lifestyle as they offer diverse creative opportunities, steady commercial demand, and skill development across industries requiring professional visual content.

- Fashion Photography
Professional product photography is essential for converting browsers into buyers. Brands and retailers rely on these optimized, high-detail images to build trust and drive sales across e-commerce platforms.
- E-commerce Product Photography
E-commerce photography uses clean, detailed shots to show off a product’s features and colors. Because every online seller needs high-quality listings, this niche offers massive, global demand.
- Beauty/Glamour Photography
Beauty photography highlights skin, makeup, and features to create a polished yet natural look. It is a high-stakes niche driven by constant demand from cosmetic brands and modeling agencies.
- Portrait Photography
Portrait photography is taking photos of individuals or groups. It focuses on people’s expressions and personality. So photographers use creative lighting to bring out the best look. Its is a high-demand niche, offering steady work for everything from corporate headshots to family sessions.
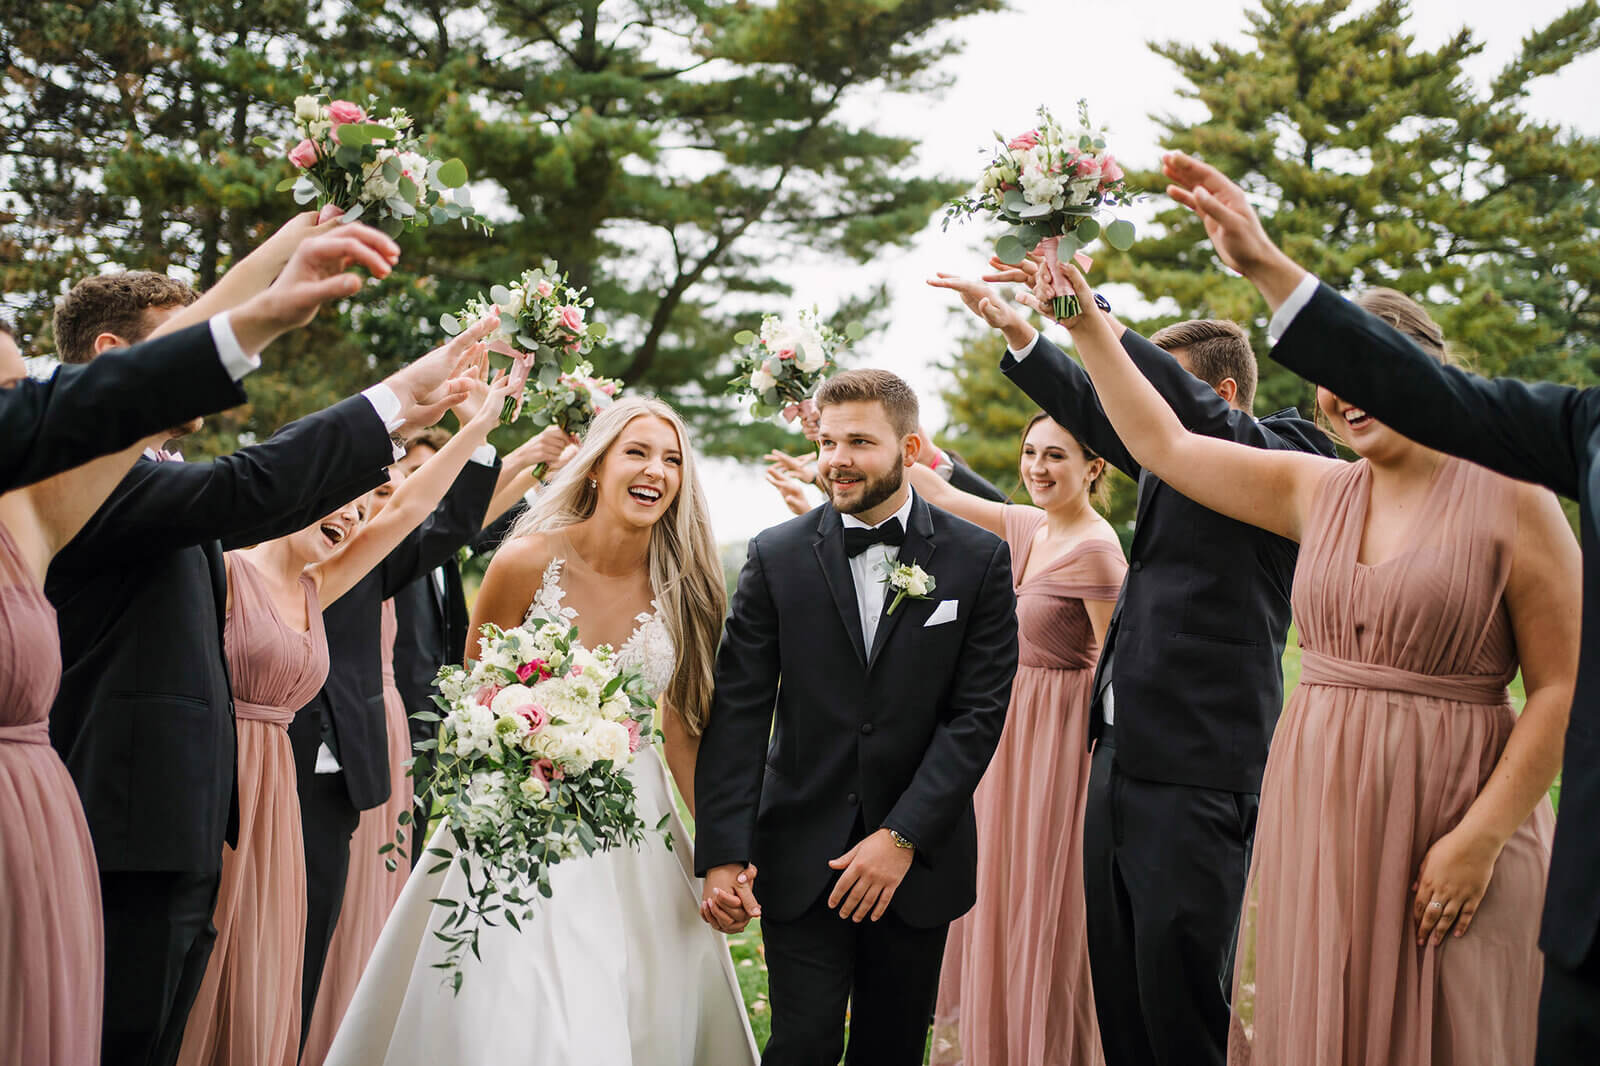
- Event Photography
Event photography refers to shots of programs, events, celebrations, etc. Photographers capture candid moments, key highlights, and storytelling sequences. This photography is in high demand because people want to record events.
- Food Photography
Food photography displays food items, beverages, menus, and dishes. Photographers use artistic composition, lighting, and unique styling to capture it. Restaurants and brands use high-quality food photos to update menus, publish blogs, and attract customers.
- Real Estate Photography
Real estate photography refers to the photographs of interiors and exteriors of properties. It is captured in wide angles and balanced lighting to highlight space and features. Due to the growing demand, property images are growing and are used in property listings, brochures, and websites for realtors.
- Lifestyle Photography
Lifestyle photography covers real-life situations naturally. It focuses on daily activities, emotions, and relatable storytelling for brands and audiences. You can explore it for its popularity in brand marketing. Lifestyle photography is used in social media, advertising, and websites.
- Travel Photography
Travel photography involves taking shots of landscapes, cultures, and destinations. It emphasizes storytelling, environment, and unique visual experiences from different locations. Explore it to learn and understand a creative and versatile niche. This photography is used in tourism campaigns, blogs, and magazines.
- Wildlife Photography
Wildlife photography refers to taking shots of animals in natural habitats. It requires patience, telephoto lenses, and an understanding of behavior and environment. Explore it to build skills on unique visuals. It is needed in documentaries, publications, and conservation for media, NGOs, and publishers.
How to Challenge Yourself to Maximize Your Photography Abilities?
To keep learning new photography skills, explore ideas, and challenge yourself. Check peer photographers’ shots, exploring unfamiliar subjects, shoot themed projects, practice specific techniques, and review results. Limit choices, work outside your comfort zone, and track improvements. This is how you can build momentum and improve your new photography skills.
- Shoot with creative constraints: Limit choices to boost creativity. Use one prime lens, shoot black and white, or restrict frame count. Constraints improve composition, sharpen exposure decisions, and make every shot more intentional.
- Capture shots of unfamiliar subjects: Switch genres to leave your comfort zone. Try landscapes instead of portraits or black and white instead of color. New subjects improve adaptability, observation, and creative thinking.
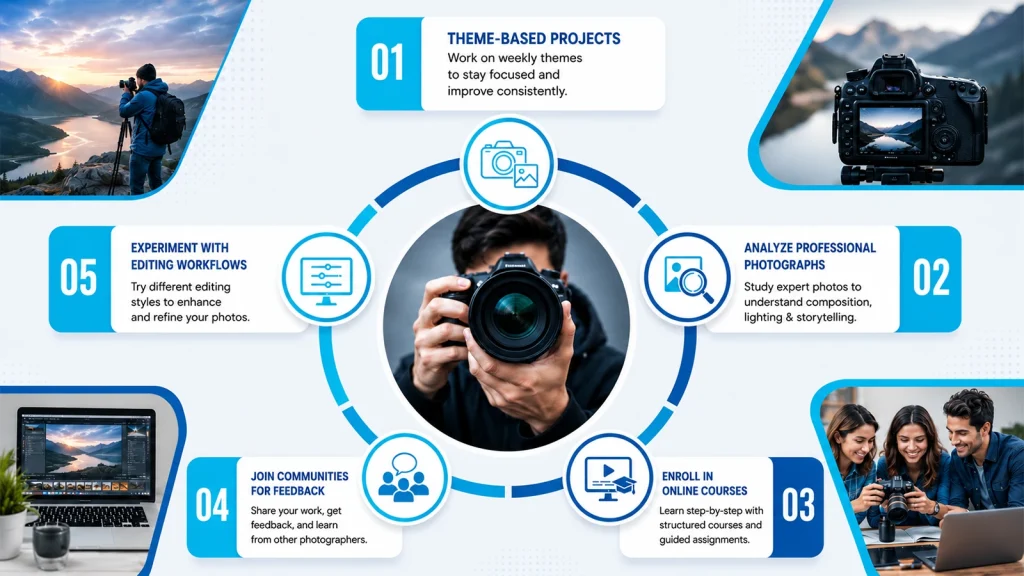
- Work in theme-based projects and assignments: Use structured challenges like a 30-day project or photo essay. Focus on themes such as shadows or colors. Themed work builds consistency and strengthens storytelling.
- Prioritize practicing specific techniques: Set focused goals like long exposure, backlighting, or motion capture. Targeted practice improves technical control, identifies weaknesses, and accelerates learning.
How Do You Keep Learning New Photography Skills?
To keep learning photography, study new techniques, do daily practice, review results, gather feedback, and refine your approach. Set measurable goals, experiment with lighting and composition, and track improvements. Repeat learning and work on feedback; these will help you expand creativity, strengthen fundamentals, and build confidence over time.
Continue learning photography skills following the 5 methods as follows.
- Practice theme-based photo projects
Create weekly themed projects to build consistency. Focus on one technique at a time and evaluate results. This method helps you start strong by focusing on one goal at a time. It’s the best way to experiment, learn from your mistakes, and see yourself getting better every week.
- Analyze professional photographs
Study professional images to understand composition, lighting, and storytelling choices. Break down framing, color use, and subject placement. Recreate similar shots to identify technique gaps and improve observation skills.
- Enroll in structured online courses
Attend beginner-friendly courses to be around like-minded people. Courses provide step-by-step guidance and eliminate random learning. Those include assignments, helping learners practice concepts and develop basic photography skills under structure guideline.
- Join photography communities for feedback
Share photos in photography groups or forums to receive constructive feedback. Critiques highlight mistakes, suggest improvements, and expose new techniques. Learning from others accelerates growth, builds confidence, and improves photography skills.
- Experiment with editing workflows
Practice editing using consistent workflows such as exposure correction, color adjustment, and cropping. Experimenting with different editing styles improves visual consistency and enhances the final output. Regular editing practice helps you refine images and develop a polished style.
What are the Common Challenges When Getting Started in Photography?
Common challenges that beginners face while starting photography include understanding exposure settings, weak composition skills, poor lighting control, blurry or out-of-focus images, overediting or no editing, gear confusion, inconsistent practice, and choosing a photography niche, among others.
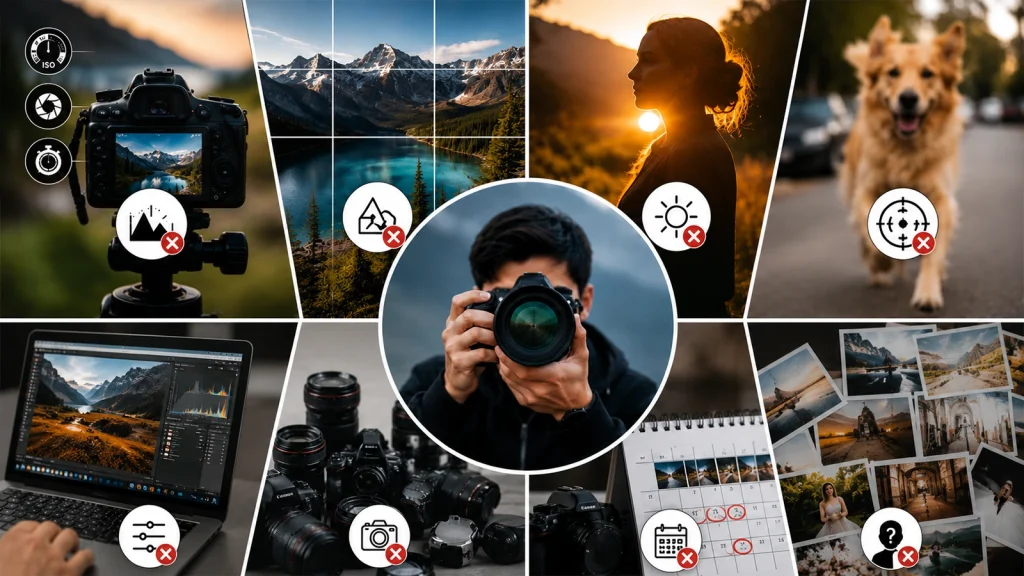
Challenge 1: Understanding Exposure Settings
Learning ISO, aperture, and shutter speed is hard at first. You will face inconsistent exposure. Automatic mode dependency limits learning. Manual adjustments feel confusing, resulting in overexposed, underexposed, or balanced images.
- How to overcome: Learn exposure triangle basics. Practice manual mode daily, adjust one setting at a time. Also, review the histogram for balanced exposure control.
Challenge 2: Weak Composition Skills
Mismatching composition leads to cluttered frames, distracting backgrounds, and weak subject emphasis. New photographers tend to put everything in the middle. It clutters the frame, and the image doesn’t convey any story.
- How to overcome: Follow professionals who apply the rule of thirds. Simplify backgrounds, use leading lines, and practice framing subjects for story development.
Challenge 3: Poor Lighting Control
Inconsistent lighting creates harsh shadows, blown highlights, or dull images. Shooting at any time without checking the light creates messy results.
- How to overcome: Stick to soft light and use tools like reflectors to control your shots. Watching your light direction and white balance ensures consistent quality every time.
Challenge 4: Capturing Blurry Images
Blurry photos happen when you miss the focus or use a slow shutter. Most beginners struggle to keep the camera steady, which makes their work look unprofessional.
- How to overcome: Use faster shutter speeds, select an appropriate autofocus mode. Stabilize the camera, and practice focusing techniques for sharper images in different situations.
Challenge 5: Overediting or No Editing
Poor editing ruins image quality. Beginners often use too many filters or none at all, leading to unnatural colors and flat tones that look inconsistent.
- How to overcome: Learn basic editing workflow. Adjust exposure, contrast, and color to maintain a natural look in the car images.
Challenge 6: Confusion on Gear
Gear confusion makes beginners believe expensive equipment guarantees better photos. You don’t need a new camera to get better. Prioritizing gears rather than learning how to use them is a trap. It slows down the learning process.
- How to overcome: Master existing gear, learn manual settings, focus on composition, and upgrade only after understanding limitations and needs for better decisions.
Challenge 7: Inconsistent Practice
Inconsistent practice slows improvement and prevents skill retention. Beginners shoot irregularly, forget techniques, and fail to review work, leading to repeated mistakes and limited creative development over time without progress.
- How to overcome: Create a weekly shooting schedule, set small projects. Review photos regularly, and track improvement to build consistent skills over time effectively.
Challenge 8: Having No Specific Niche
Difficulty choosing a photography niche creates confusion and scattered learning. Beginners try everything without direction. It weakens portfolio focus, so clients feel confused.
How to overcome: Experiment with different genres, but concentrate on your interests. Analyze strengths, and gradually focus on one niche to build expertise.
FAQ’s
How do I teach myself to be a photographer?
Teach yourself to be a photographer by familiarizing yourself with camera basics. Practice daily, studying composition, and analyzing professional images. Start with exposure settings (ISO, aperture, shutter speed). Use free online tutorials, experiment with lighting, and review your photos critically. Follow renowned photographers on YouTube or online course platforms.
Can I learn photography by myself?
Yes, you can learn photography by yourself with available free resources and online tutorials. Modern cameras and smartphones allow hands-on learning. Learn exposure, composition, lighting, and editing. Keep practicing, and do self-review. Join a community and ask fellow photographers to analyze your work. Polishing the mistakes is the way to master the photography skill.
What are the 4 C’s of photography?
The 4 C’s of photography are color, composition, contrast, and clarity. Color influences mood. Composition organizes visual elements. Contrast adds depth between highlights and shadows. Clarity improves sharpness and detail. Photographers create visually balanced and appealing photos by using these 4Cs.
What does 4K mean in photos?
4K in photos means image resolution around 3840 × 2160 pixels, matching Ultra HD display quality. It indicates high detail, sharpness, and better cropping flexibility. 4K photos are suitable for digital displays, presentations, and moderate-size prints without losing visual quality.
Take the First Step to Becoming a Pro Photographer!
Learning photography is an exciting journey of capturing moments and mastering light. But as your skills grow, so will your camera roll.
Whether you are building your first portfolio, opening an online clothing store, or shooting for clients, managing bulk images can become overwhelming. That’s where Offshore Clipping Path comes in. We take care of the heavy lifting—from flawless background removal to high-end retouching—so you can spend more time behind the lens and less time at the editing desk.