Most skin retouching fails before the filter is even applied. Not because of bad technique. But because photographers and editors skip the fundamentals, rush the process, and deliver images that look edited rather than polished. You lose clients because of this difference in portrait, beauty, and commercial photography.
Skin smoothing is one of the most requested and most mishandled steps in post-processing. The quality of your skin retouching directly reflects the quality of your work. It doesn’t matter if you are working on a fashion campaign or a beauty brand preparing product visuals.
Whether you are a freelance portrait photographer delivering a client gallery, a studio retoucher working on a fashion campaign, or a beauty brand preparing product visuals, the quality of your skin retouching directly reflects the quality of your work.
Photoshop gives you the tools to do it right. This guide covers everything from quick AI-powered filters to professional-grade frequency separation. You’re going to know every method for how to smooth skin in Photoshop. You would be able to retouch faster, cleaner, and with results that hold up at any resolution.
What Is Skin Smoothing in Photoshop?
Skin smoothing in Photoshop is the process of reducing blemishes, visible pores, uneven skin texture, and tonal inconsistencies – and keeping the subject looking natural and real.
This doesn’t mean to erase every imperfection. Real skin has grain, texture, and subtle variation. A professional retouch presents the skin at its best. You can define it as the difference between a polished and an over-processed result.
In terms of high-stakes work, this distinction matters most. A cosmetic brand running a product campaign, a fashion photographer delivering editorial selects, or a commercial studio handling catalog photography – all of them need skin retouching. This would provide clean, consistent, and natural-looking images at full resolution.
Understanding how to smooth skin texture on a face properly starts with knowing which tool fits which situation. Photoshop gives you several approaches. The right one depends on your project, your deadline, and how much control you need.
Best Tools and Techniques for Skin Smoothing in Photoshop
You want to smooth in Photoshop, but don’t know what tool to use! That’s a bit frustrating. Understanding the necessary Photoshop tools helps you in editing. Tools and techniques you need while retouching skin:
- Spot Healing Brush Tool: This tool removes isolated blemishes and spots instantly. The first tool you reach for before any smoothing begins.
- Healing Brush Tool: It helps to blend skin texture from a manually sampled source area. More controlled than the Spot Healing Brush for complex areas.
- Clone Stamp Tool: Copies pixels directly from one area to another. This tool is useful for covering larger skin problem zones.
- Patch Tool: The Patch tool selects and replaces a region using surrounding skin as the reference source.
- Neural Filters: Neural Filters are AI-powered skin-smoothing tools built into Photoshop. The fastest way to smooth face skin without manual layer work is
- Gaussian Blur: The foundation of the manual blur technique. Creates a soft, diffused skin layer that works in combination with a mask.
- High Pass Filter: Preserves fine skin detail while allowing tonal smoothing. Used in both the High Pass and Frequency Separation methods.
- Frequency Separation Technique: The professional standard for high-end skin retouching. Separates color and texture into independent layers for full editorial control.
How to Smooth Skin in Photoshop
There are four primary methods for skin smoothing in Photoshop. Each suits a different skill level and type of project. Start with Method 1 if you are new to retouching. Work toward Method 4 as your skills and client expectations grow.
Method 1: Smooth Skin Using Neural Filters
Neural Filters is a built-in AI feature in Photoshop that makes it possible to smooth skin texture on a face in minutes. You don’t need manual masking or complex layer setups.
For photographers or content teams who need a fast, presentable result, this is the most efficient starting point.
How to use it:
- Open your portrait image in Photoshop.
- Go to Filter > Neural Filters.
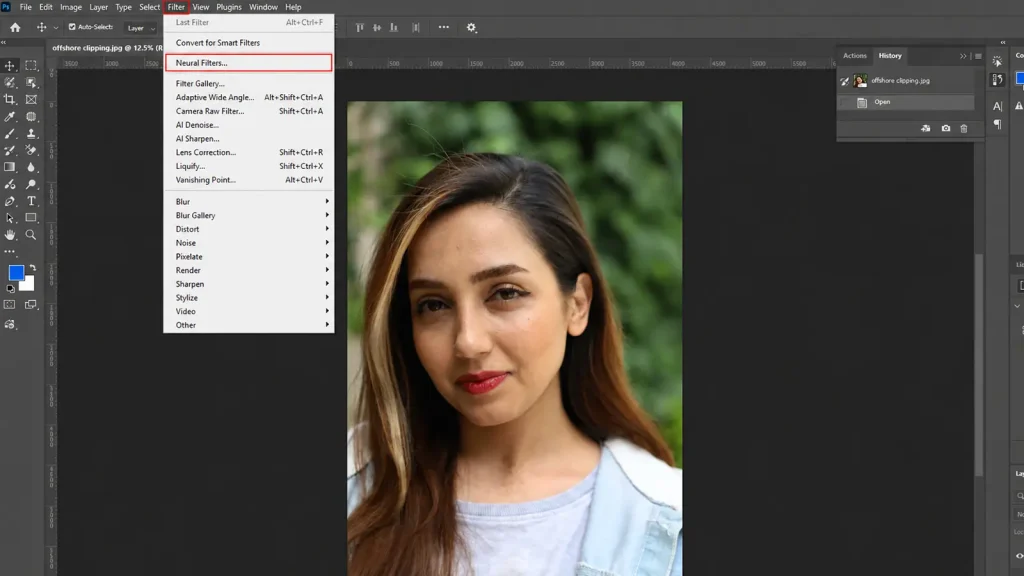
- Enable the Skin Smoothing filter from the panel.
- Adjust the Blur and Smoothness sliders. Keep both values below 60 to preserve natural-looking skin.
- Set the output to New Layer and click OK.
- Add a layer mask to limit the effect to skin areas only if needed.
Note: Neural Filters work well on clean, evenly lit portraits. For complex lighting, heavily textured skin, or high-resolution editorial work, Method 3 or 4 will give you significantly better control.
Method 2: Basic Skin Smoothing (Blur Technique)
This is the most accessible manual method for smoothing face skin in Photoshop. It uses a Gaussian Blur layer combined with a layer mask. This selectively softens skin without affecting the rest of the image.
Step-by-step:
- Duplicate your background layer (Ctrl/Cmd + J).
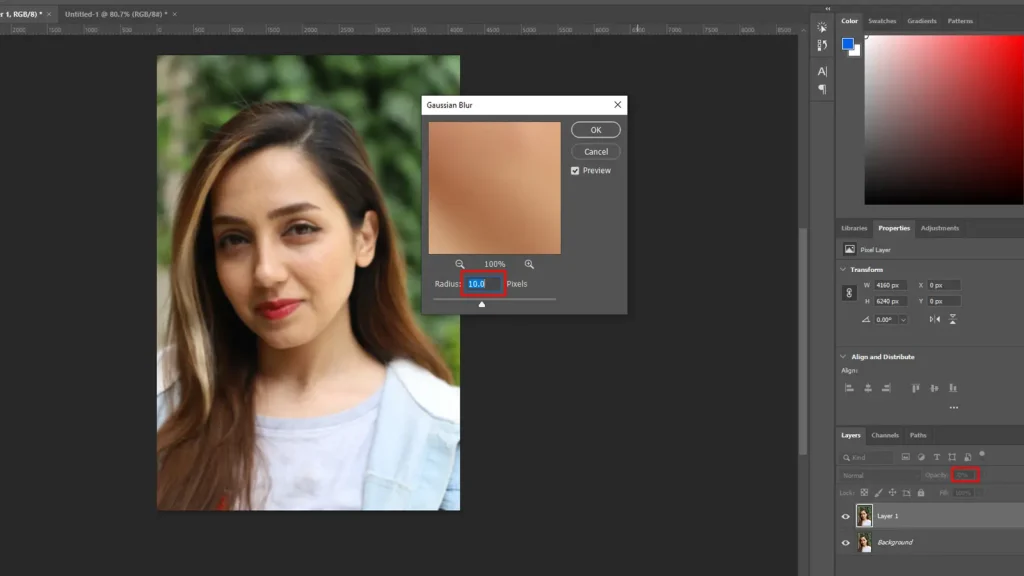
- Go to Filter > Blur > Gaussian Blur. Set the radius within 4 to 10 pixels, depending on image resolution.
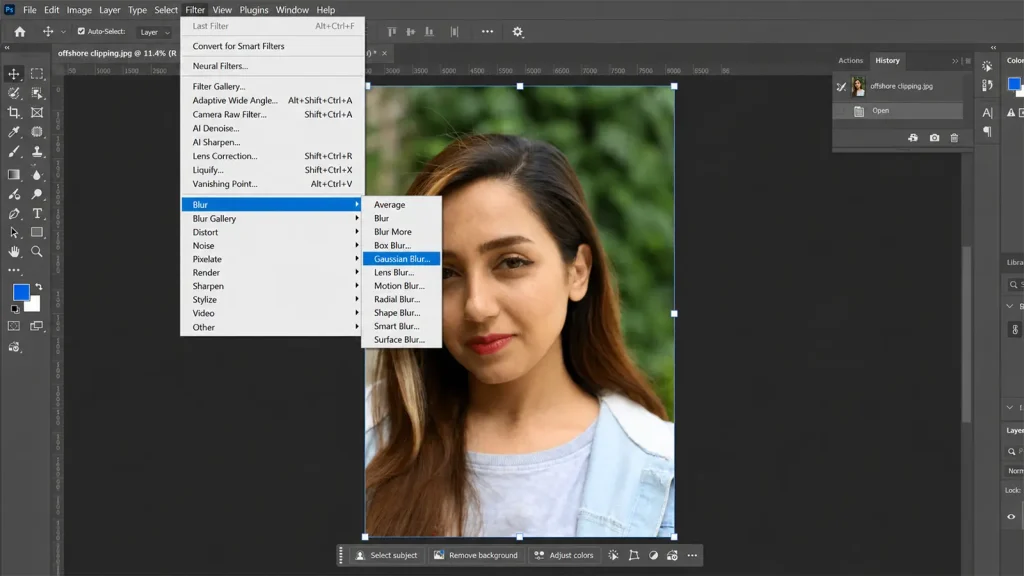
- Lower the layer opacity to 60–75% to retain some natural skin texture.
- Add a black layer mask (Alt + click the mask icon) to hide the blur entirely.
- Select a soft white brush at 70–80% opacity and paint the blur back over skin areas only.
- Avoid the eyes, lips, eyebrows, hairline, and any sharp-edged areas.
Method 3: High-End Skin Smoothing (High Pass Technique)
The High Pass technique takes the Gaussian Blur method further. It softens skin tones while preserving sharp edges, fine detail, and natural texture. This makes it a reliable method for higher-quality portrait retouching work.
How to do it:
- Duplicate your background layer twice.
- On the top layer, go to Filter > Other > High Pass. Set the radius to 10–24 pixels.
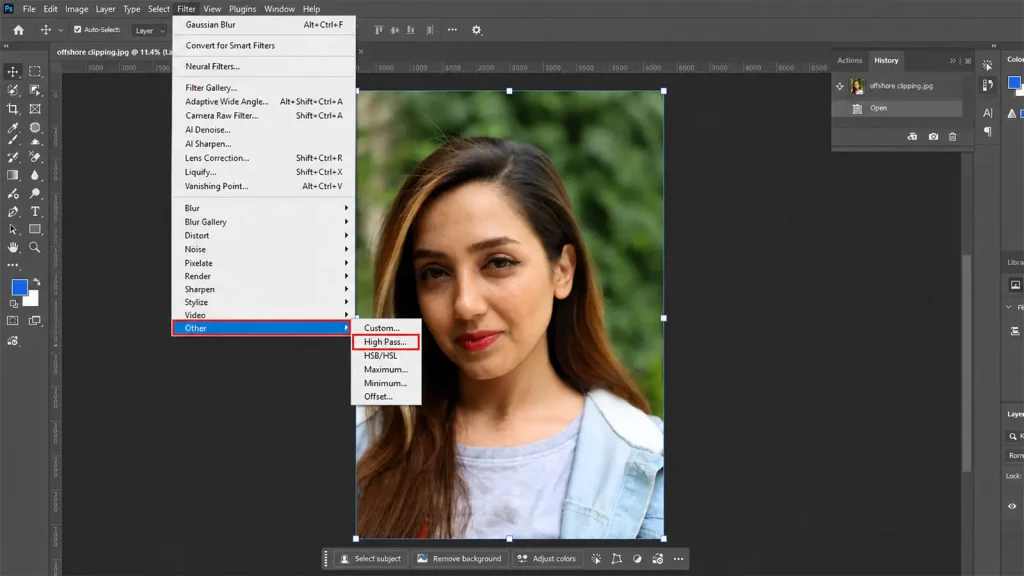
- Change the blending mode of this layer to Linear Light.
- Invert the layer (Ctrl/Cmd + I), and the skin will immediately appear smoother.
- Apply a Gaussian Blur to this inverted layer using the same pixel radius as your High Pass value.
- Lower the layer opacity to 50–70%.
- Add a black mask and paint the smoothing effect back onto skin areas only.
Method 4: Frequency Separation (Professional Technique)
Frequency separation is the industry standard for professional skin retouching in Photoshop. It splits the image into two layers. One for color and tone, one for surface texture and detail. So you can edit each independently without one affecting the other.
This is how retouchers working on editorial campaigns, cosmetic brand imagery, and high-fashion catalogs approach skin smoothing at the highest professional level.
Setting it up:
- Duplicate the background layer twice. Name the bottom copy “Color” and the top copy “Texture”.
- Select the Color layer. Go to Filter > Blur > Gaussian Blur. Apply at 4–8 pixels to remove all surface texture from this layer.
- Select the Texture layer. Go to Image > Apply Image.
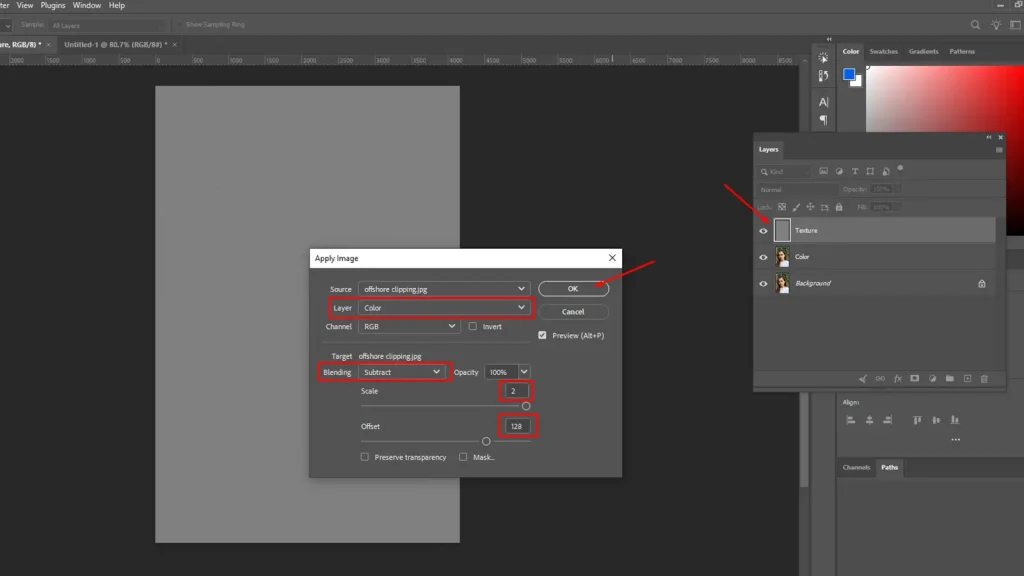
- In the dialog set: Layer → Color, Blending → Subtract, Scale → 2, Offset → 128. Click OK.
- Change the Texture layer blending mode to Linear Light.
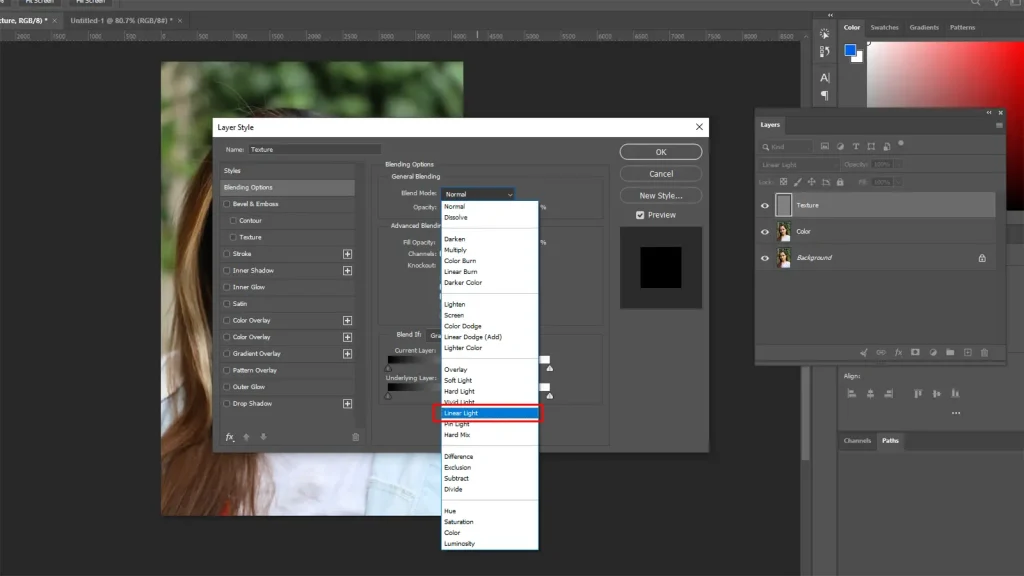
What you can now do independently:
- On the Color layer: Use the Lasso Tool with a feathered selection and a light Gaussian Blur to blend uneven skin tones, redness, or discoloration without touching texture.
- On the Texture layer: Use the Clone Stamp or Healing Brush to remove blemishes or repair texture issues without disturbing the underlying color.
Which Skin Smoothing Method Is Right for You?
| Methods | Neural Filters | Blur Technique | High Pass | Frequency Separation |
|---|---|---|---|---|
| Skill Level | Beginner | Beginner–Intermediate | Intermediate | Advanced/Professional |
| Speed | Fastest | Fast | Moderate | Time-intensive |
| Quality Output | Good | Good | Very Good | Professional Grade |
| Texture Preservation | Low | Low–Medium | High | Highest |
| Non-destructive | Yes | Yes | Yes | Yes |
| Best Shooting Context | Social media, lifestyle, e-commerce | Weddings, portraits, events | Studio portraits, fashion | Beauty, editorial, commercial campaigns |
| Best User | Content creators, influencers, e-commerce teams | Freelance photographers, event studios | Studio photographers, boutique studios | Beauty retouchers, fashion photographers, agencies |
| Ideal Delivery Format | Web, social, digital | Client galleries, digital delivery | High-res digital, print | Print, brand campaigns, publications |
| Recommended When | Speed matters more than precision | Fast turnaround with clean results | Quality needed without complexity | Highest quality is non-negotiable. |
5 Steps Used by Professionals
You know the methods, but don’t know where to start and how to maintain the flow! Knowing the sequences of how to smooth skin in Photoshop builds a reliable and repeatable workflow. Here are the 5 steps professional retouchers follow on every image
Step 1: Remove Blemishes — Healing Brush
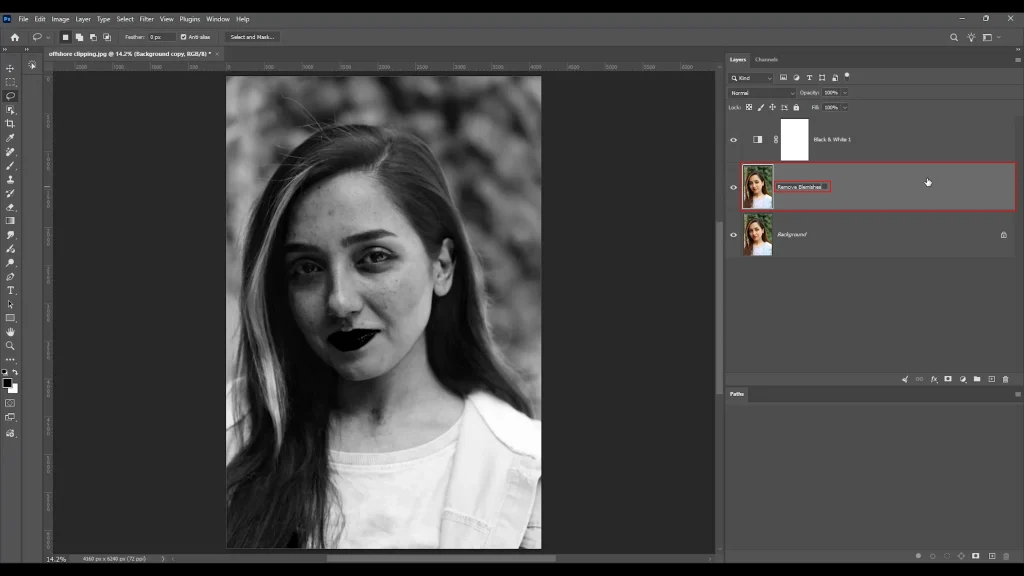
Never apply skin smoothing over unclean skin. Smoothing a blemish blends and spreads it; it does not remove it.
Start with the Spot Healing Brush (J) for small isolated spots. Switch to the Healing Brush for larger or more complex areas where you need to control the sample source manually.
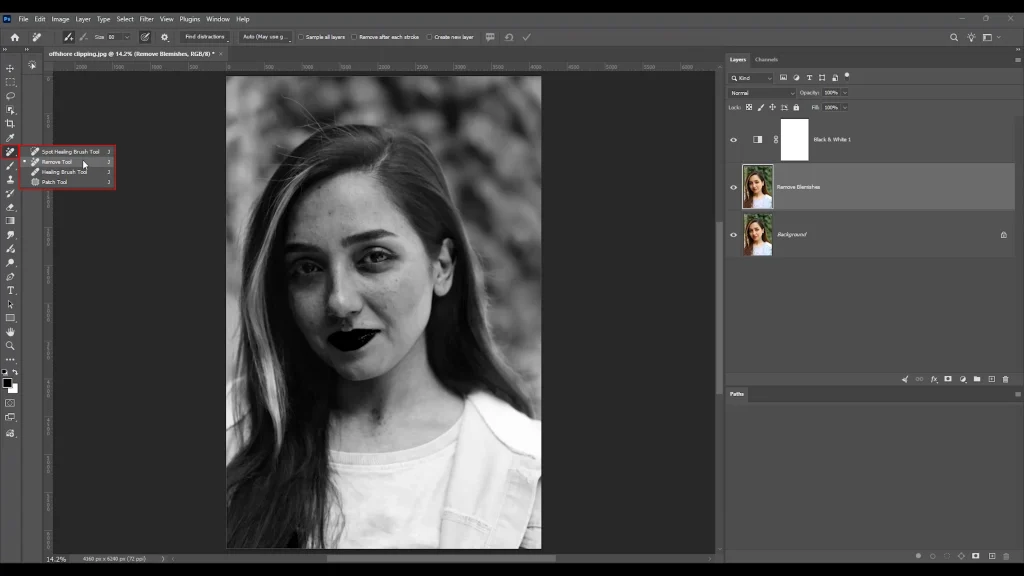
Always work on a separate empty layer set to “Current & Below” to keep every blemish removal non-destructive and fully reversible. This is the foundation of clean and professional blemish removal in Photoshop.
Step 2: Fix Uneven Skin Tones
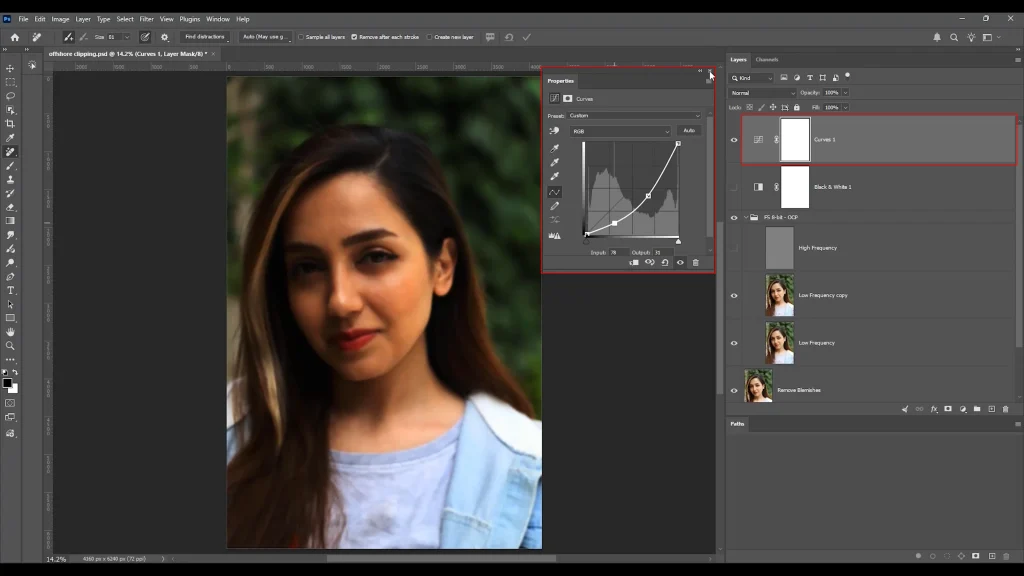
Any smoothing treatment applied to uneven or patchy skin, such as redness, dark circles, or patchy discoloration, will show up. You have to fix the tone first.
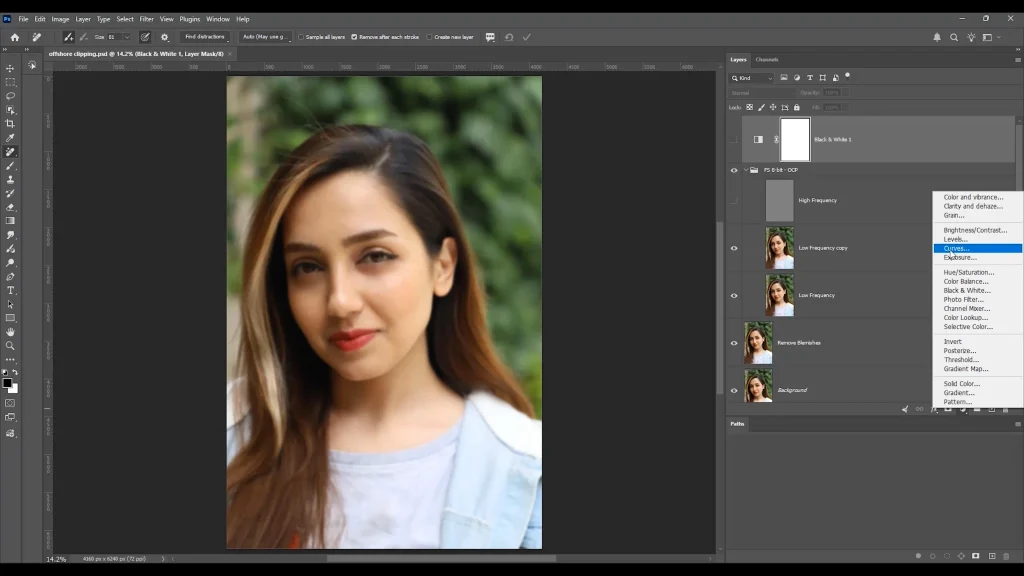
Using the Lasso Tool with a 20–40 pixel feather, select the problem area on your Color layer and apply a light Gaussian Blur to blend it into the surrounding skin. For broader tonal issues, a Hue/Saturation or Curves adjustment layer with a targeted mask handles color correction without affecting the rest of the image.
Step 3: Apply Your Smoothing Technique
With clean skin and corrected tones as your base, apply the smoothing method that fits the image in front of you. Not sure which one to use? Let the image tell you.
- If the skin is relatively clean with minor texture issues, the Blur method gets the job done efficiently.
- If you are working on a close-up beauty shot or a high-resolution portrait where every pore is visible, go straight to Frequency Separation.
- If the deadline is tight and the output is digital, Neural Filters are a practical choice.
For editorial and beauty work, Frequency Separation delivers the best result. For faster commercial or social content, the Blur method or Neural Filters handle the job efficiently. Always apply smoothing on a separate layer with a mask. Never apply directly to the background image.
Step 4: Use Masks for Precise Control
A layer mask separates a natural-looking retouch from an over-processed one. Without masking, skin smoothing spreads to areas it shouldn’t, such as eyes, hair, clothing, or background edges. The result looks artificial immediately.
Use a black mask and paint back the effect with a soft white brush. Keep brush opacity within 50–70% over general skin areas. Drop to 20–30% near feature borders around the eyes, lips, hairline, and nostrils. Non-destructive editing through proper masking is the habit that makes professional retouching consistent.
Step 5: Final Touch-Ups and Review
Zoom out to 50% to evaluate the full result. At 100%, you are too close and will over-retouch. At 50%, you see what the viewer actually sees.
Check for flat areas where texture has been lost. Add a subtle Dodge and Burn layer to restore dimension to the skin highlights and shadows. Toggle your retouching layers on and off to compare against the original. Export only when the retouched image looks like a better version of reality.
Best Settings for Natural Skin Retouching
Do you know the biggest reason for the retouching results variation? It is inconsistent settings. Having a reliable set of starting values keeps your workflow predictable. It saves time across high-volume shoots. Also, it ensures every deliverable meets the same quality standard.
| Setting | Recommended Value | Applies To |
|---|---|---|
| Gaussian Blur Radius | 4 to 8 px at 300 DPI; 2 to 4 px for web-resolution images | Method–2, 3, 4 |
| Neural Filter Smoothness | 40 to 55; never exceed 70 | Method–1 |
| High Pass Filter Radius | 10 to 24 px; match to your Gaussian Blur value | Method–3 |
| Healing Brush Sample Mode | Current & Below; always non-destructive | All Methods |
| Blur Layer Opacity | 60 to 80%; full opacity always looks unnatural | Method–2, 3 |
| Brush Opacity for Masking | 50 to 70% on skin; 20-30% near facial edges | All Methods |
| Lasso Feather for Tone Blending | 20 to 40 px, depending on the area size | Method–4 |
How to Avoid Over-Smoothing Skin
Over-smoothing is the most visible and most common mistake in skin retouching. These habits will keep your work on the right side of natural.
- Work at 50% zoom: Editing at 100% magnifies every pore and imperfection beyond what any viewer would see. At 50%, you are evaluating the image the way it will actually be seen.
- Keep pores and micro-texture visible: Skin without pores looks synthetic. Preserve some grain and natural surface variation, especially in close-up beauty and portrait work where the skin fills the frame.
- Protect micro-contrast: The subtle play of light and shadow across skin gives it depth and three-dimensionality. Flatten that entirely, and the face looks like a mask.
- Lower layer opacity before masking Use layer opacity before reaching for the brush. If the smoothing looks too heavy, reduce the layer opacity first. Dropping from 100% to 65% often resolves the problem without any additional masking work.
- Compare constantly with the original: Toggle your editing layers on and off every few minutes. Extended retouching sessions cause eye fatigue — what looks natural after 90 minutes may look over-processed with fresh eyes.
- Take a break before your final review: Step away for 10 minutes before exporting. A fresh look catches over-smoothing faster than any zoom level or tool.
When to Use Photoshop vs Lightroom for Skin Editing
Photoshop and Lightroom handle aspects of skin editing. But in a professional post-production workflow, they serve different roles. If you understand when to use each one, it could save time and help you produce better results.
Use Lightroom when:
- You need to batch-process a full shoot quickly. Weddings, events, and commercial location jobs where volume matters more than surgical precision.
- Global skin tone adjustments using the HSL panel or the Texture and Clarity sliders are sufficient for the deliverable.
Use Photoshop when:
- The image requires localized, precise retouching on individual skin areas or features.
- You are delivering to editorial, beauty, or commercial clients where quality is non-negotiable.
Photoshop vs Lightroom: At a Glance
| Key Factor | Photoshop | Lightroom |
|---|---|---|
| Best For | Precise, localized skin retouching | Global skin tone adjustments, batch processing |
| Skin Smoothing | Full manual control on layers, masks, frequency separation | Limited to Texture and Clarity sliders |
| Blemish Removal | Full – Healing Brush, Clone Stamp, Patch tool | Basic spot removal only |
| Speed | Slower– detail focused | Faster– volume focused |
| Skill Level | Intermediate to Advanced | Beginner to Intermediate |
| Ideal For | Beauty, editorial, commercial, fashion | Wedding, events, travel, high-volume portrait |
| Workflow Role | Hero image retouching | Full shoot processing and color grading |
Most commercial studios and freelance retouchers use both tools. They gradually integrate these into their professional workflows. Lightroom handles culling, exposure, and color grading across the full shoot. Photoshop handles precision skin retouching on hero images and key selects. This keeps the overall workflow fast while maintaining professional quality where it counts.
Want a detailed breakdown of which tool you need the most while editing images? Our complete guide to Photoshop vs. Lightroom covers everything you need to know.
Skin Retouching Across Different Photography Contexts
You have to understand the photography context first. Different photography contexts require different retouching standards. For instance, the actual level of smoothing for a wedding portrait is not the same as what a cosmetic campaign demands.
- Portrait Photography: The goal is flattering and natural skin. Clients want to look like themselves on a better day. Try to keep the smoothing subtle. The Blur method, or Frequency Separation at a conservative opacity level, works well.
- Fashion and Editorial Photography: Standards are higher and more deliberate. Skin needs to hold up at large print sizes under scrutiny. Frequency separation in Photoshop is the standard. Retouching is more detailed and time-intensive.
- Beauty and Cosmetic Photography: The skin is often the subject itself, directly adjacent to the product being sold. Every texture detail is evaluated. Frequency Separation combined with careful Dodge and Burn is the professional expectation for this category.
- E-commerce and Catalog Photography: The large volume of work is the main challenge. Fashion brands and apparel retailers need a fast, consistent, and smooth-skinned photo editing solution to process a large number of SKUs per shoot. Blur techniques, or neural filters applied via a saved Photoshop action, handle this task well while maintaining acceptable quality.
- Social Media and Content Creation: Perfection is the enemy of speed and consistency. For this use case, most influencers and creators will do well with a saved Blur action or Neural Filters with a mask preset.
Common Mistakes to Avoid
Some mistakes can cost you drastically. To elevate your photo editing, focus on subtlety and precision. And avoid these deeds:
- Smoothing before cleaning: Applying a blur over blemishes spreads and embeds them further. Always complete your Healing Brush work first, then smooth.
- Applying smoothing to the full image: Skin smoothing belongs only on skin. When it spreads to the eyes, hair, clothing, or background, the entire image loses sharpness, and the retouch becomes visible.
- Working destructively: Never apply filters directly to your background layer. Always duplicate first. Every stage of your edit should be revisable at any point.
- Using identical settings across every image: Skin tone, lighting, image resolution, and skin type all affect how much smoothing is appropriate. If you apply the same values to every image, it will produce inconsistent results across a shoot or client delivery.
- Leaving the eyes unprotected: Every viewer notices the eyes first. Any smoothing that softens the eyes or lash detail destroys the image’s impact immediately. Mask carefully around them every time.
- Over-relying on Neural Filters for professional work: AI-driven skin smoothing is a useful tool for low-stakes and high-volume work. For editorial clients, brand campaigns, or any image going to print, manual techniques—particularly frequency separation — are the professional standard.
Before and After: What Good Skin Retouching Looks Like
The clearest marker of a professional retouch is not what was done to the image. It is something that cannot be seen. Well-executed skin smoothing produces these visible improvements:
- Cheeks and forehead: Smoothing reduces pores and surface roughness while keeping the natural skin grain intact. The skin looks refined, not synthetic.
- Under-eye area: Retouching lifts darkness and reduces puffiness without touching the natural crease, shadow depth, or lash detail. The eye stays sharp and alive.
- Skin tone: Color correction blends redness, patches, and blotchy discoloration into a consistent, even tone. The skin reads as real, just healthier.
- Blemishes: The Healing Brush removes individual marks cleanly and rebuilds the texture around them. No flat patches, no visible erasure.
- Overall dimension: Good retouching preserves the highlights and shadows that give the face its three-dimensional structure. Depth stays. The face does not flatten
Apply this standard to every image you deliver. If a viewer notices the retouching, the retouching failed. The goal is invisible improvement of skin that looks naturally excellent.
Frequently Asked Questions
How do I smooth skin in Photoshop without blur?
Use the Frequency Separation method. It separates color and texture into independent layers and allows you to retouch skin tone and surface detail without applying Gaussian Blur. The Healing Brush and Clone Stamp on the texture layer handle blemishes and imperfections cleanly.
What is the best method for skin retouching?
Frequency Separation is the industry standard for skin retouching in Photoshop. It provides you with complete independent control over color and texture. For professional results, Frequency Separation is best.
Can beginners smooth skin in Photoshop?
Yes. Method 1 (Neural Filters) and Method 2 (Gaussian Blur with layer mask) are both accessible to beginners and require no advanced Photoshop knowledge.
What tool is best for removing blemishes in Photoshop?
The Spot Healing Brush is the fastest option for small and isolated blemishes. For larger or more complex areas, the Healing Brush gives you manual control over the sample source, resulting in a cleaner, more precise blend.
How do professionals smooth skin in Photoshop?
Most professional retouchers use frequency separation for high-end beauty and commercial work. The process starts with Healing Brush blemish removal on a separate layer, and tonal correction on the color layer. Then, texture refinement on the texture layer using the Clone Stamp.
How long does skin retouching take in Photoshop?
It depends on the method. Neural Filters take around 5–15 minutes on a clean portrait. A full Frequency Separation retouch on beauty or editorial work runs 30–90 minutes, depending on the image. High-volume work — catalogs, e-commerce SKUs, is best handled through saved Photoshop Actions or a professional retouching team.
Does skin smoothing in Photoshop work across all skin tones?
Yes, but settings need adjusting per image. Deeper skin tones carry different tonal variation patterns than lighter skin. Frequency separation works well across all skin tones precisely because it handles color and texture independently.
What is the difference between skin smoothing and skin retouching?
Skin smoothing is about reducing surface texture, pores, and roughness. Skin retouching is the broader process. It includes blemish removal, tonal correction, Dodge and Burn contouring, color correction, and smoothing as part of a complete workflow.
Should I retouch skin before or after color grading?
After. Complete your RAW conversion, color grading, and exposure work in Lightroom or Camera Raw first. Then bring the developed image into Photoshop for skin retouching.
Can skin smoothing be done non-destructively in Photoshop?
Yes, and it should always be done that way. Work on duplicate layers, apply smoothing through masked layers, keep Healing Brush work on a separate empty layer, and use Smart Filters wherever possible.
Conclusion
Skin smoothing in Photoshop is a skill that rewards process and discipline more than speed. The photographers and retouchers who consistently deliver natural, polished results are following a better workflow, besides using better tools.
The right method depends on your skill level, your turnaround time, and what the project demands. Beginners should start with the Gaussian Blur technique to build a practical understanding of layers and masks. As confidence develops, the High Pass method and frequency separation Photoshop workflow open up a level of control.
The standard stays the same, whatever method you use. The skin shouldn’t look processed, artificially perfect, or smoothed. It should look naturally excellent. Clean, polished, and healthy in a way that holds up on any screen, at any size, and in front of any client.