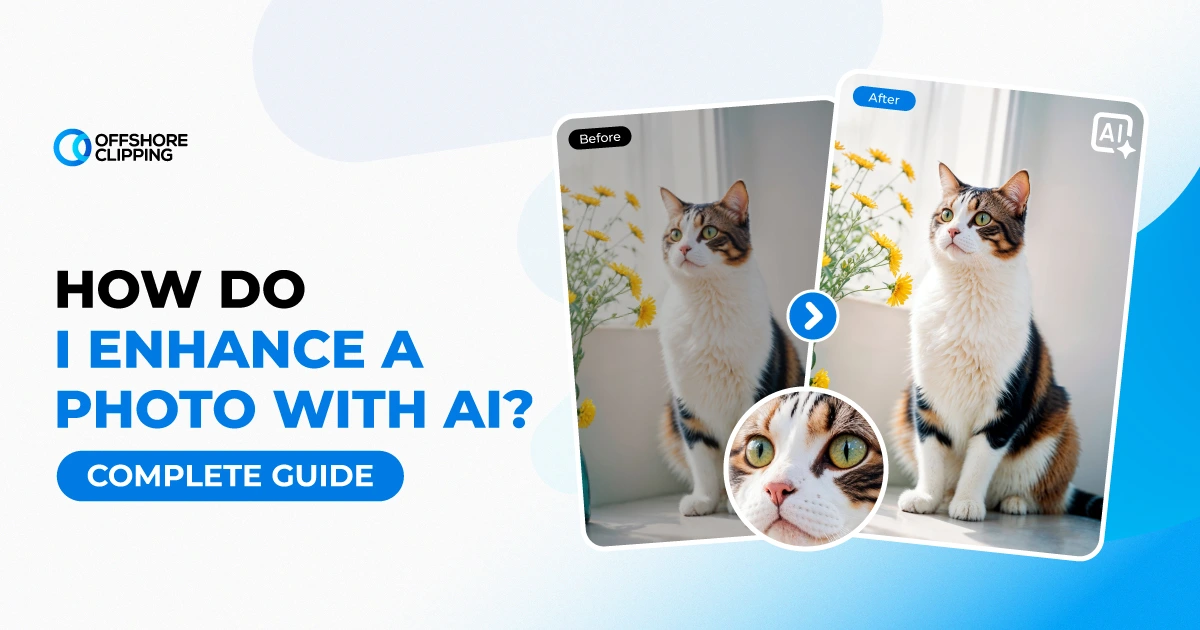
To enhance a photo with AI, upload it to a tool such as Adobe Lightroom, Topaz Photo AI, Google Photos, or Remini. Let the model sharpen, denoise, upscale, and correct color automatically. Then export the result. Most photos are done in under a minute; no editing background required.
A blurry product shot. A grainy influencer post. A decade-old family photo that deserves better than a shoebox. Every one of these used to mean hours in Photoshop or a call to a professional retoucher. Now a few taps fix most of it.
Here you will be walked through exactly how to enhance a picture using AI, from free mobile apps to Adobe-grade desktop software. And just as important, when an automated fix hits its ceiling, a human editor is the smarter move. Whether you’re polishing a single portrait or prepping a full product catalog, the steps below apply the same way.
Key Takeaways
- AI photo enhancement uses trained machine learning models to upscale, sharpen, denoise, and color-correct images in seconds.
- Free tools like Google Photos and Snapseed cover most everyday fixes; paid tools like Topaz and Adobe add batch power and print-grade precision.
- Desktop apps give more control for bulk or brand-critical work; mobile apps win on speed and convenience.
- AI can over-enhance a photo. Watch for waxy skin, halo edges, and invented detail around hands, jewelry, or text
- For damaged, historical, or high-volume brand photography, a human-guided restoration or retouching service still outperforms a fully automated tool.
What Is AI Photo Enhancement, and How Does It Work?
AI photo enhancement is the process of using a trained machine learning model, instead of manual sliders, to fix resolution, noise, color, and lighting in an image automatically. Under the hood, most tools rely on a neural network trained on millions of image pairs. A low-quality version and its high-quality match. So, the model learns what “better” looks like and applies that pattern to a new photo.
Some tools go further and use generative models. This doesn’t just clean up existing pixels; it predicts and fills in detail that was never captured in the original shot. For a broader walkthrough of how these engines compare, see our complete guide to image enhancers.
Super-Resolution & Upscaling Explained
Super-resolution is the technique that lets AI increase a photo’s pixel count without turning it to mush. The model studies the existing pixel pattern and predicts what the missing detail probably looked like, rather than just stretching and blurring the file. This is how a phone screenshot or a small product photo can be blown up to a full-page print without falling apart.
Denoising and Sharpening
Noise, the grainy speckling common in low-light or high-ISO shots, and softness from motion blur are two of the most common reasons a photo looks unusable. AI denoising models separate real detail from random pixel noise. Then a sharpening pass restores edge contrast without amplifying the grain back in. If blur is the core issue you’re fighting, our guide on how to fix blurry photos digs deeper into targeted fixes for that specific problem.
AI Color & Lighting Correction
Color and lighting correction models analyze exposure, white balance, and tonal range, then rebalance them against what a “normal” well-lit photo typically looks like. It’s fast and usually accurate for a single image. For campaign batches where every product shot needs to match exactly, many teams still pair AI correction with a proper photo color correction service to guarantee consistent tones across the whole set.
Generative Reconstruction (Where AI “Guesses” Missing Detail)
This is the most powerful and the most risky part of modern AI enhancement. When a section of a photo is too damaged, too low-resolution, or simply missing, generative models will reconstruct it based on patterns learned from other images. It works impressively well on skin texture, foliage, or fabric. It works less well on hands, jewelry, small text, and faces the model doesn’t recognize well. This is exactly why a quick quality check matters before you publish anything.
Why Use AI Image Enhancers?
AI enhancement changes the economics of image production. A task that once needed a trained retoucher and a billable hour now runs in the background while you do something else. This matters whether you’re managing one photo or ten thousand.
What AI Photo Enhancement Actually Does
In practical terms, a good AI image enhancer will lift resolution for print or zoom-heavy use, pull detail out of noisy or dim shots, correct flat or off-color lighting, and smooth small imperfections. It won’t replace deliberate creative direction. But it removes the technical grunt work that used to eat up most of an editing session.
Who Needs This (Sellers, Agents, Creators, Everyday Users)
Online sellers use it to make product photos look catalog-ready before a listing goes live. For full-catalog volume, an e-commerce image editing service picks up where the automated tool leaves off. Real estate agents lean on it to brighten listing photos between showings. Course creators and coaches use it to clean up thumbnails and cover images fast. Photography studios run it as a first pass before a human retoucher fine-tunes the hero shots. Marketing teams and agencies use it to keep campaign visuals consistent across a fast content calendar.
Plenty of everyday users just want to enhance a photo with AI before posting it, with no software to learn. If the photos are for a storefront, pairing AI fixes with these product photography tips tends to convert better than either approach alone.
Best AI Photo Enhancer Tools for Desktop
Desktop tools trade a little convenience for a lot more control. Larger batch runs, finer sliders, and export settings built for print or high-resolution web use. Here’s what each one actually does once you open it, tool by tool, not just the marketing pitch.
Microsoft Photos (Windows)
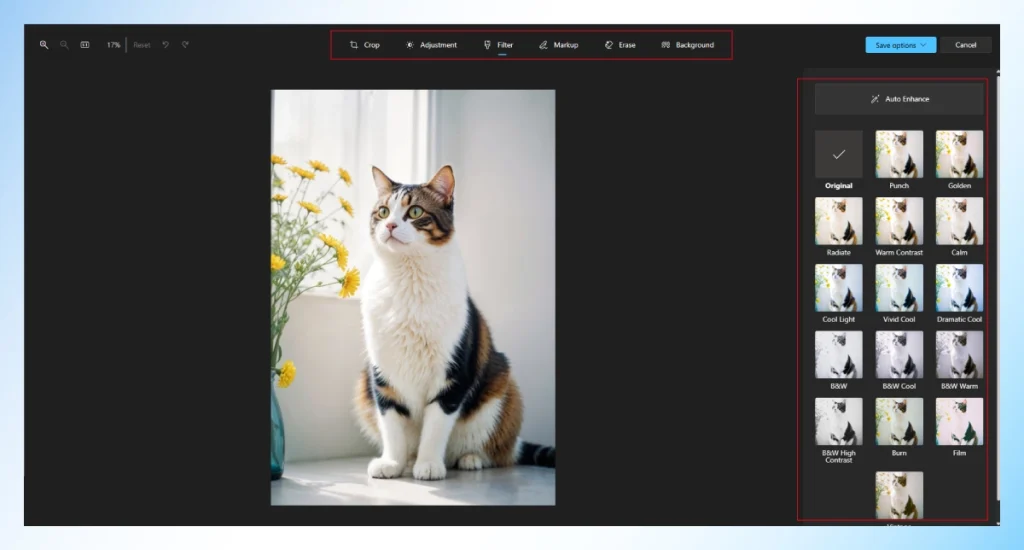
Windows 11’s redesigned Photos app has a one-tap fix built right into the editor. It’s genuinely the fastest way to enhance a picture on a Windows PC without installing anything. But the trade-off is control: you get one intensity slider, not individual sliders for noise, sharpness, or color.
How it actually works:
- Open the photo in the Photos app and select Edit
- Go to the Adjustments tab and toggle “Enhance your photo”
- Drag the intensity slider until the correction looks right, not maxed out
- Choose Save a Copy so the original file stays untouched
Microsoft Designer
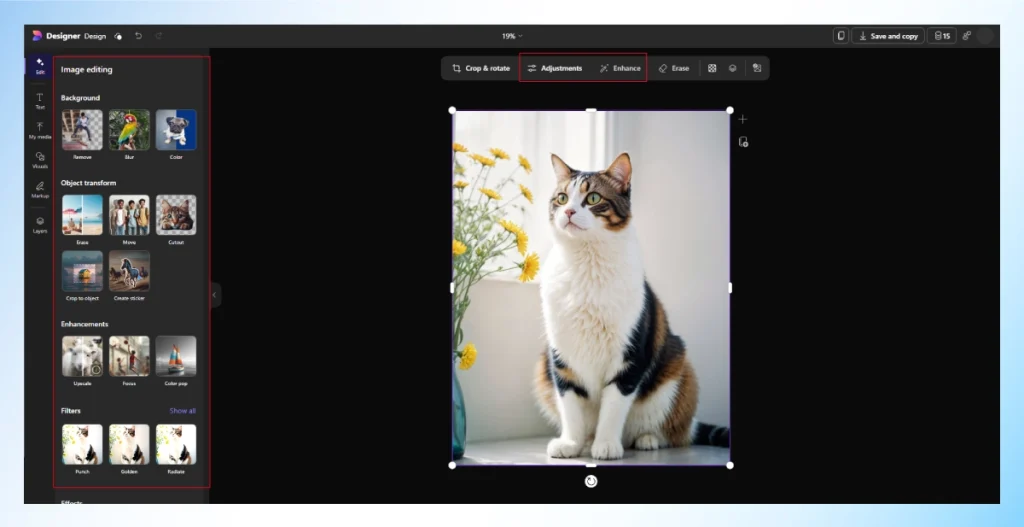
Designer is a different animal from Photos. It’s Microsoft’s generative image tool, built around an Erase feature and an Image Creator panel. It’s less about polishing an existing photo and more about restyling or cleaning one up before it goes into a design.
How it actually works:
- Import the photo into Designer and select the Erase tool
- Brush over the object or background element to remove
- Let the AI generate a fill based on the surrounding context
- Regenerate if the first fill looks off, then export the design
Adobe Photoshop
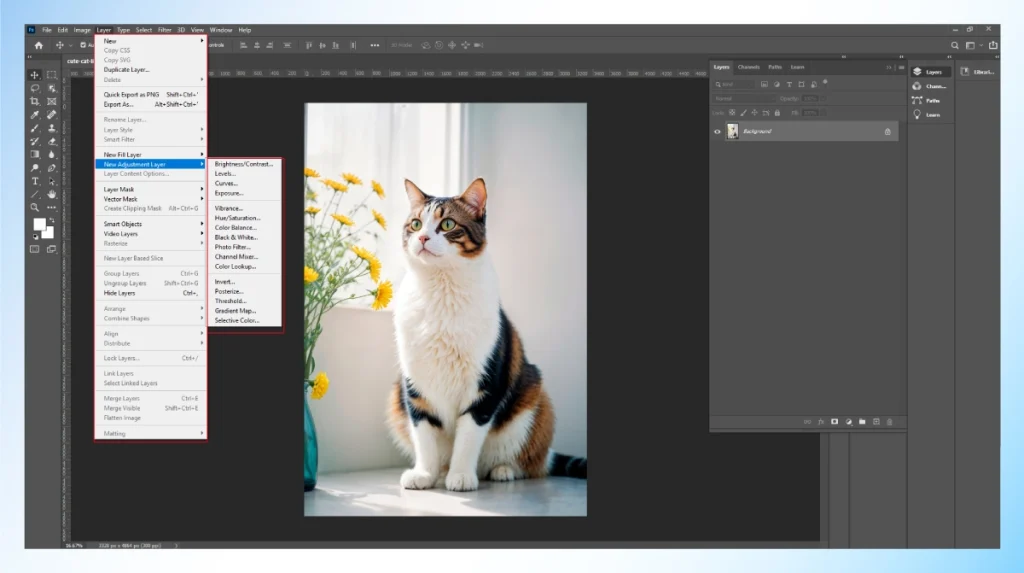
Photoshop actually runs two separate AI systems, and knowing which one to reach for matters: Camera Raw’s Enhance dialog for technical fixes, and Generative Fill for creative ones.
How it actually works:
- Open the file through Camera Raw Filter for technical issues
- Select Enhance, then enable Denoise for noisy or high-ISO shots
- Let the diffusion model render. This can take 30 to 90 seconds per RAW file
- Switch to the main canvas and select an area with the lasso or Object Selection tool for creative changes
- Open Generative Fill and type a prompt describing what should appear there
- Pick the best of the three generated variations and export the final file
Adobe Lightroom
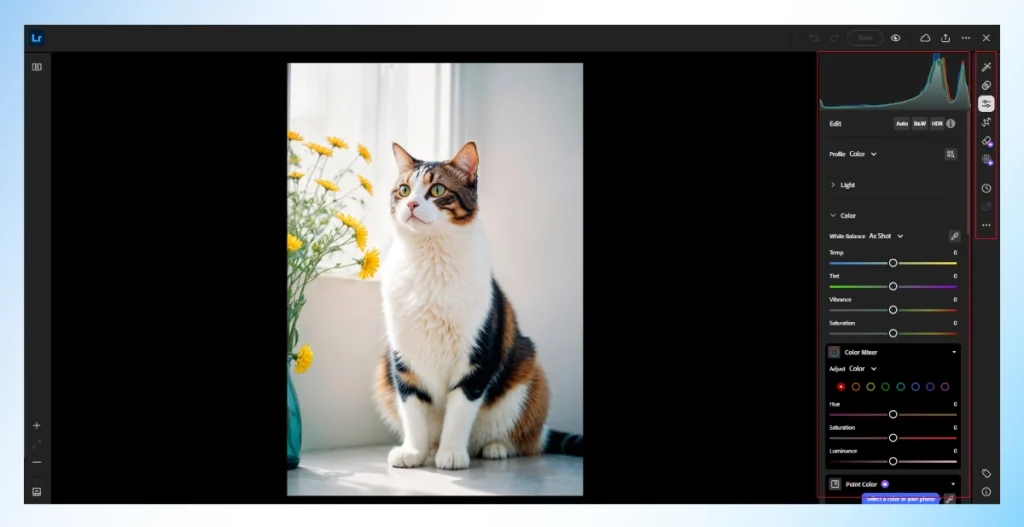
Lightroom’s version of the same idea lives under Photo > Enhance. It offers AI Denoise and Super Resolution instead of Photoshop’s canvas-based tools.
How it actually works:
- Import the RAW files and cull the shoot down to the real keepers first
- Right-click a keeper and choose Enhance
- Enable Denoise and Super Resolution too if the file needs upscaling
- Let Lightroom render the enhanced DNG in the background
- Apply color and exposure adjustments after enhancement, not before, since it can shift how they read
- Export in the resolution and format the project calls for
Adobe Firefly
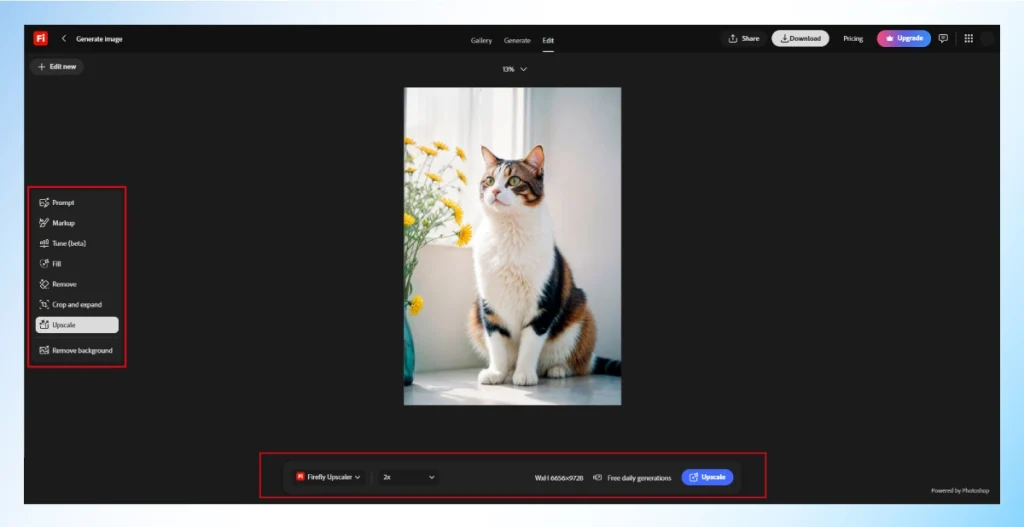
Firefly is Adobe’s generative engine. It runs as its own browser-based app while also powering Generative Fill and Expand inside Photoshop. It’s the tool of choice when a photo needs to be extended into a new aspect ratio rather than simply stretched.
How it actually works:
- Upload the reference photo at firefly.adobe.com
- Choose Generative Fill or Generative Expand depending on the goal
- Describe the change or extension in the prompt box
- Review the generated variations and select the closest match
- Download the result, or send it into Photoshop for further edits
Topaz Photo AI
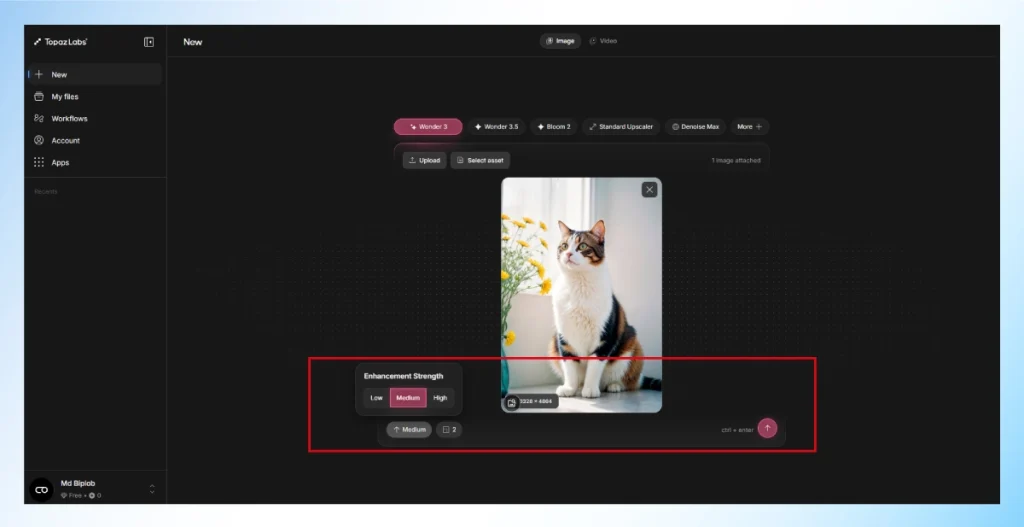
Topaz builds nothing but enhancement models, and Photo AI’s real strength is Autopilot. It scans an image first and applies a different model depending on whether the problem is blur, noise, or low resolution. For a broader comparison across tools and use cases, our roundup of the best AI for editing photos covers where Topaz fits versus the alternatives.
How it actually works:
- Drop a single image or a full folder into Photo AI
- Let Autopilot scan and flag the issue automatically
- Review which model it selected and adjust the strength if it looks too aggressive
- Check Face Recovery results manually on any portraits before accepting
- Batch export the finished set in one pass
Topaz Gigapixel AI
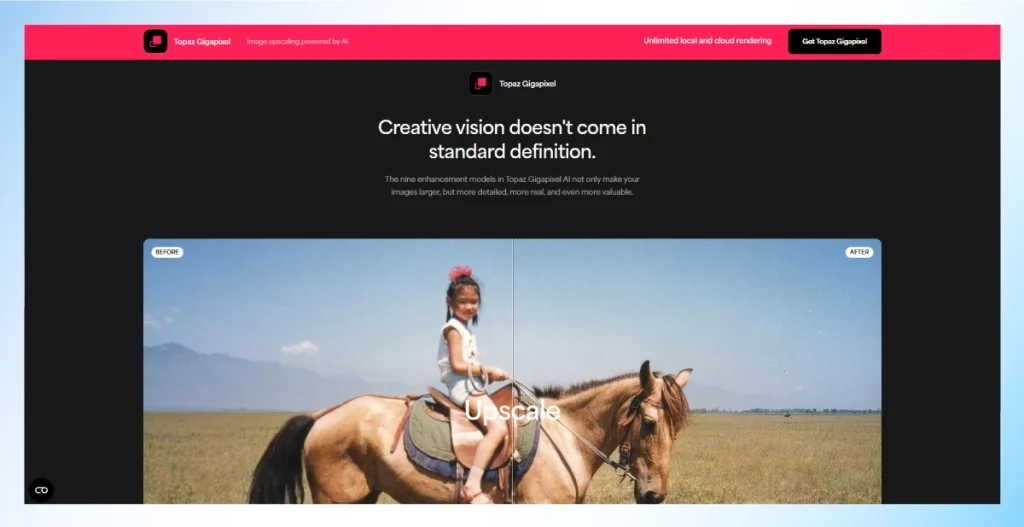
Gigapixel is Topaz’s dedicated upscaler, separate from Photo AI, and getting a clean result depends on picking the right model for the source file rather than following one fixed process.
How it actually works:
- Import the image and choose a model based on the source quality. Standard for normal photos, High Fidelity for already-decent files, Low Resolution for heavily compressed images, Text & Shapes to keep logos and typography legible, or Redefine for severely degraded sources that need generative reconstruction
- Set the target scale at 2x, 4x, or 6x
- Preview the result at 100% zoom before committing to the full batch
- Export at the upscaled resolution
Canva Desktop
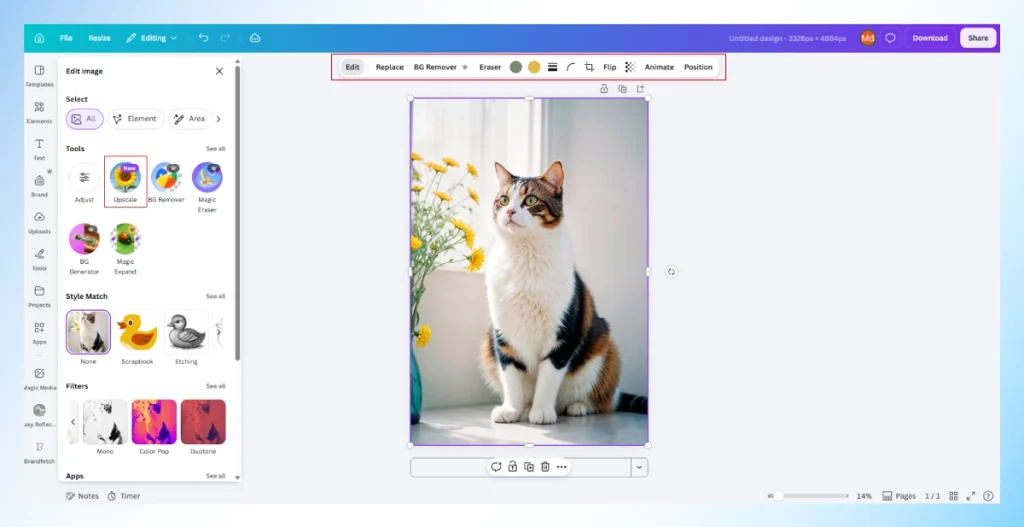
Canva’s Magic Studio bundles several AI tools under one roof rather than a single “enhance” button. This makes the workflow more about picking the right tool for the actual problem.
How it actually works:
- Upload the photo into a Canva design
- Select the image and choose Edit Photo from the toolbar
- Use Magic Edit for a prompt-based fix, or Magic Eraser to remove an object
- Apply Magic Expand if the canvas needs to extend beyond the original frame
- Download at the size the platform needs
Luminar Neo
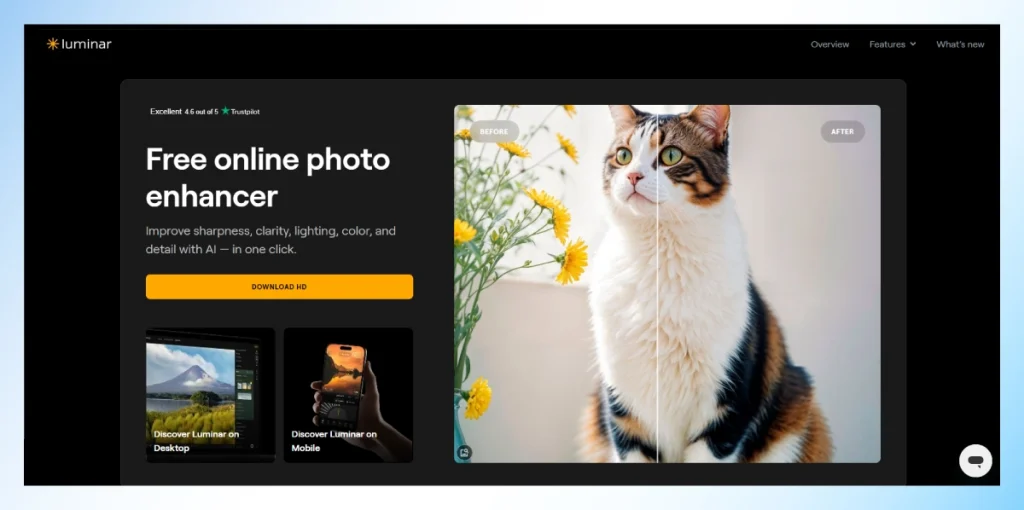
Luminar Neo works in non-destructive Genius Layers rather than one flat edit. This is built for landscape and lifestyle photographers who want scene-level mood changes, not pixel-level correction.
How it actually works:
- Open the image and add a Genius Layer
- Apply Structure AI, Sky AI, or Skin AI depending on the fix needed
- Adjust each layer’s opacity so the effect blends instead of overpowering the shot
- Stack additional layers if more than one fix is needed
- Export the finished file
ON1 Photo RAW
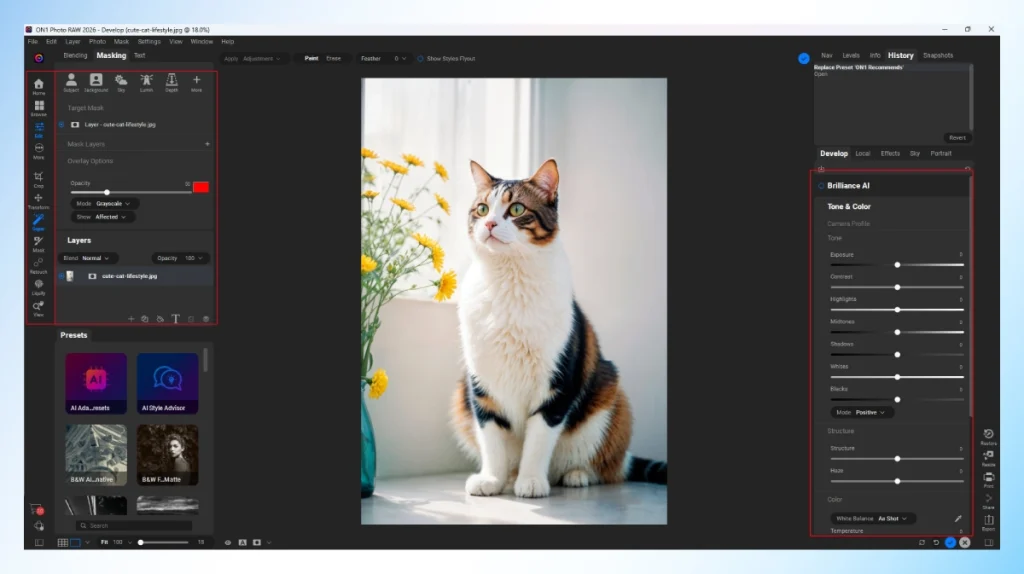
ON1 pairs two distinct engines inside its RAW browser. NoNoise AI for denoising and Resize AI for upscaling. But the feature that sets it apart is AI Match. This studies one reference photo and reapplies its tone across an entire batch.
How it actually works:
- Import the RAW files into the catalog
- Pick one correctly graded reference photo from the shoot
- Run AI Match on that reference image
- Apply the matched tone automatically across the rest of the batch
- Run NoNoise AI or Resize AI on individual files that still need it
- Export the batch in the delivery format needed
Upscayl
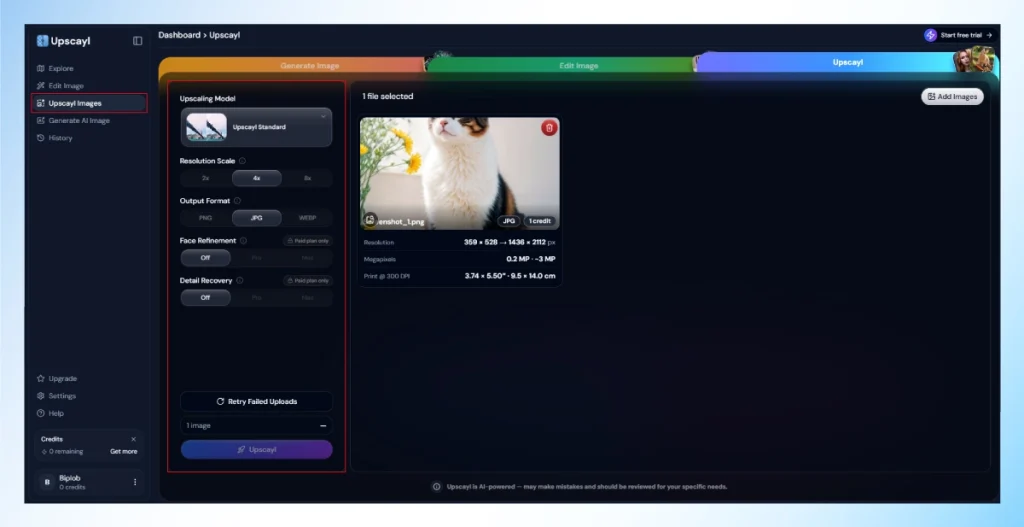
Upscayl is free, open-source, and processes everything locally on the GPU. So, nothing leaves the machine. This is a solid pick for anyone who wants resolution gains without a cloud upload.
How it actually works:
- Install Upscayl on Windows, Mac, or Linux
- Drag in a single image or a full folder
- Choose a model based on the source. Real-ESRGAN for general photos, Ultrasharp for architecture or product shots, Ultramix Balanced to avoid over-sharpening skin or fabric, or Remacri for noisier images
- Set the scale factor and run the batch
- Export locally; no internet connection required
Magnific AI
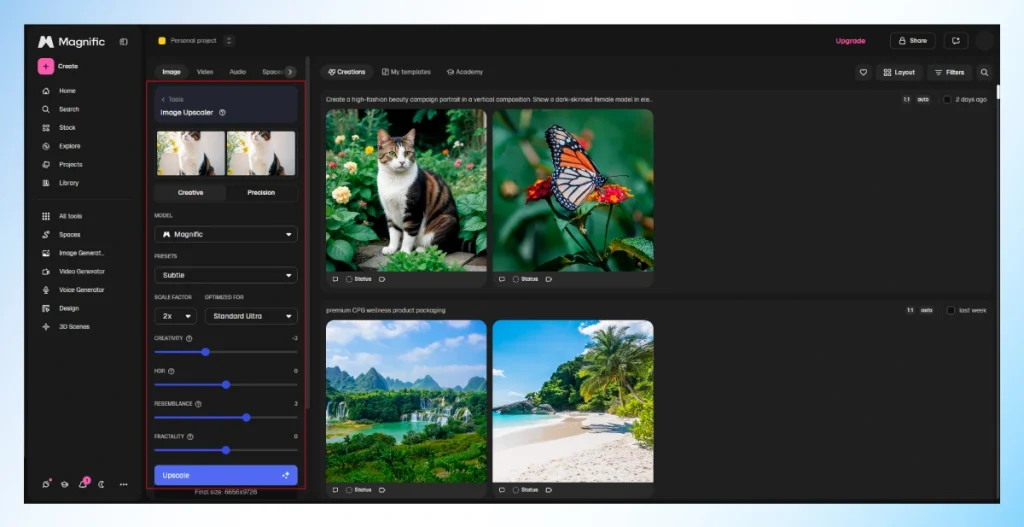
Magnific runs in the browser rather than as an installed app. What sets it apart from a standard upscaler is that it’s explicitly generative. It can invent new textures, not just enlarge existing pixels.
How it actually works:
- Upload the source image in the browser
- Set the Creativity, HDR, and Resemblance sliders based on how much the image is allowed to change
- Preview the generated texture pass before committing
- Export at the target print or web resolution
Need this level of polish across a whole photo library? Our editors handle the batches that AI tools start but can’t finish consistently
Edit My Photos!
Best AI Photo Enhancer Tools for Mobile (iOS & Android)
Mobile enhancement apps trade some of that fine control for speed. Most fixes take under thirty seconds, right from the camera roll. These seven cover the range from built-in OS tools to dedicated photo enhancer AI apps.
Google Photos Magic Editor
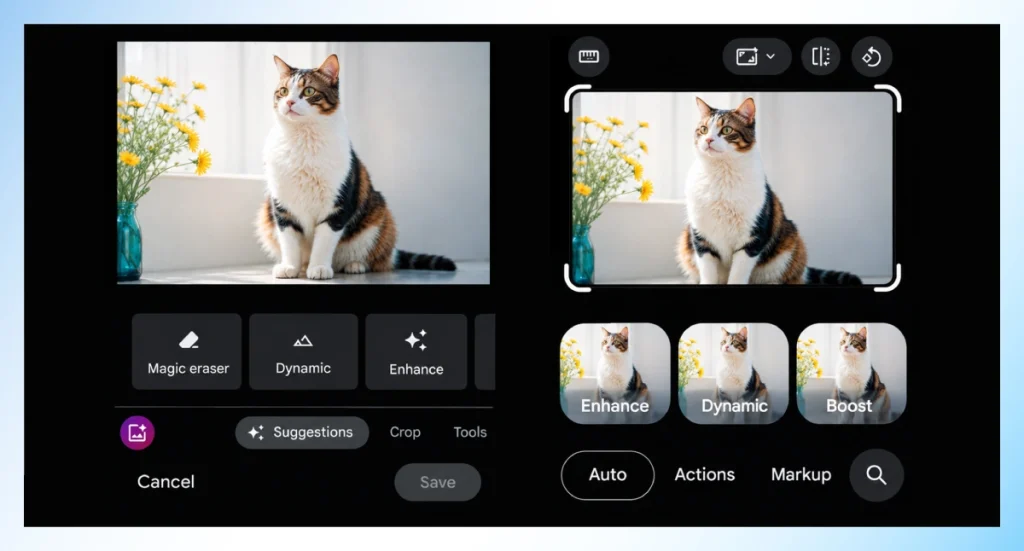
This tool is built directly into the Google Photos app. Magic Editor uses generative AI to reposition subjects, remove distracting objects, and auto-correct lighting and color on a phone.
How it actually works:
- Open the photo and tap Edit
- Select Magic Editor
- Tap Enhance, or make manual object edits
- Save the result to your library
Apple Photos Clean Up (Apple Intelligence)
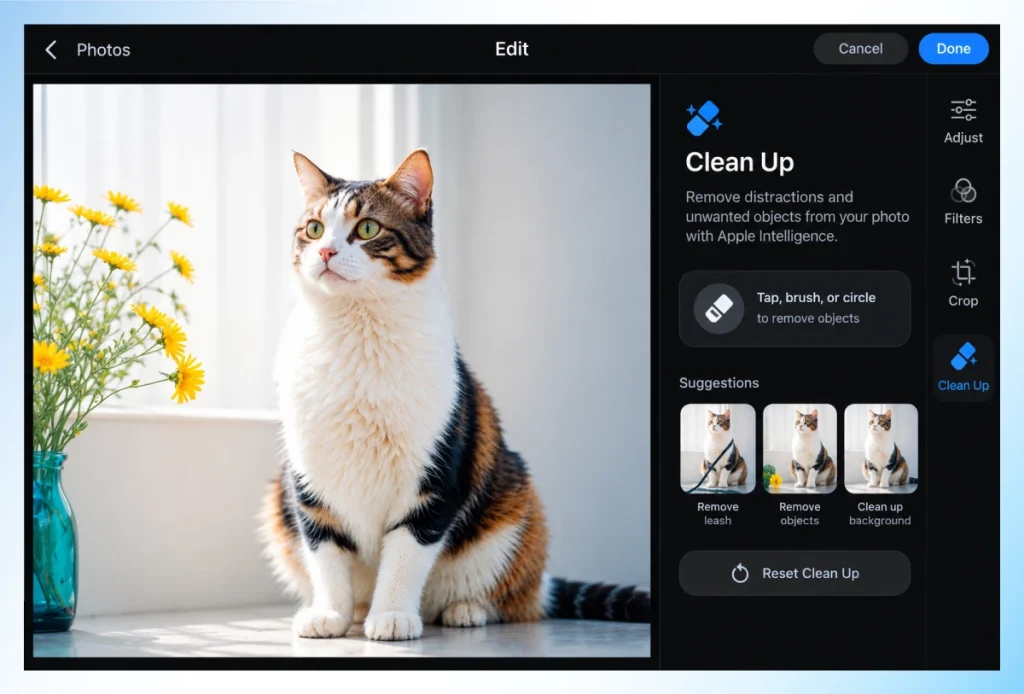
Apple’s Clean Up tool identifies distracting objects and background clutter. Then uses on-device AI to remove and fill the space naturally. Processing stays on the phone rather than the cloud.
How it actually works:
- Open the photo in the Photos app
- Tap Edit, then select Clean Up
- Circle or tap the object to remove
- Save the enhanced photo
Picsart
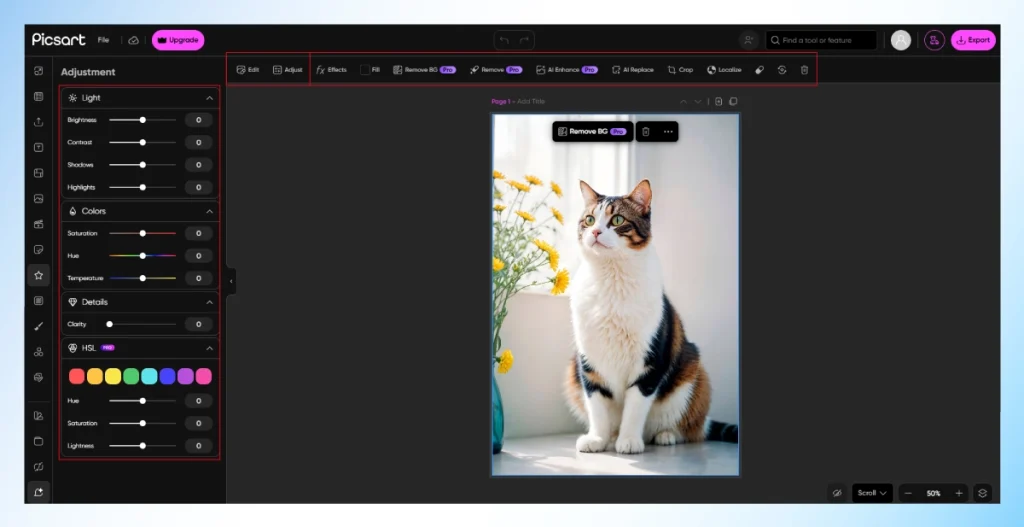
Picsart bundles one-tap AI enhancement with creative extras like background replacement and AI avatars. This makes it popular with social content creators who need a polished post fast.
How it actually works:
- Import the photo into Picsart
- Tap Effects, then AI Enhance
- Layer in additional edits if the post needs them
- Export directly to the social platform
Remini
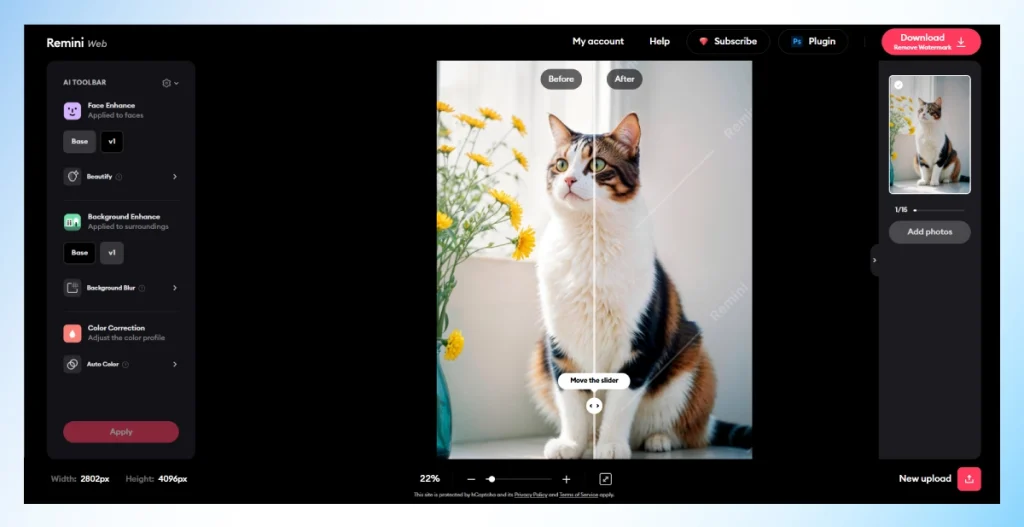
Remini built its reputation on turning low-resolution, blurry, or old photos into sharp, high-definition images through generative face and detail restoration. It’s especially strong on portraits.
How it actually works:
- Upload the photo to Remini
- Select the Enhance or HD Quality mode
- Compare the result with the before/after slider
- Save or share the enhanced version
YouCam Enhance
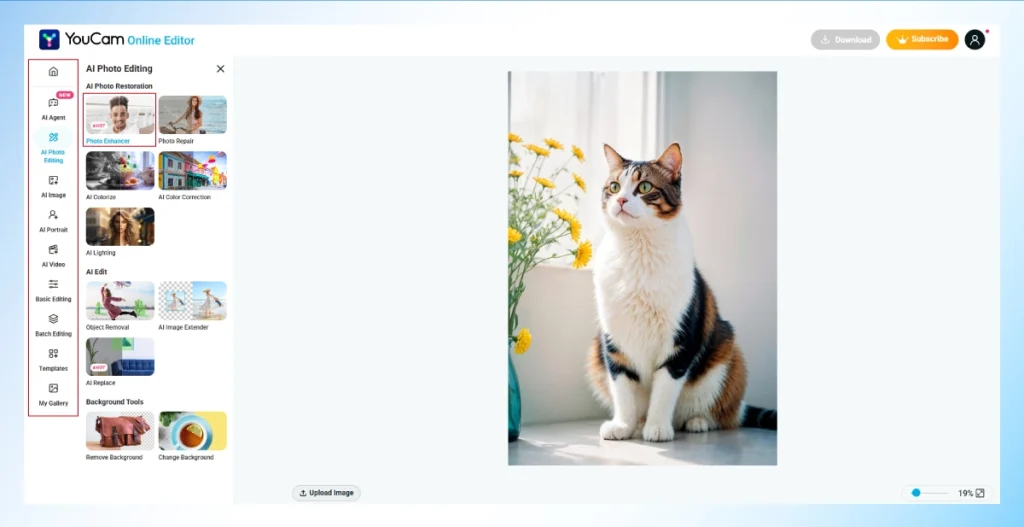
YouCam Enhance is built portrait-first. Skin retouching, lighting balance, and detail recovery are aimed at beauty, wellness, and influencer content. For faces that need more deliberate retouching, our photo retouching service is the manual step up from an automated pass.
How it actually works:
- Open the portrait photo in the app
- Apply AI Enhance for a global correction
- Fine-tune skin, eyes, or lighting manually
- Export at full resolution
Adobe Lightroom Mobile
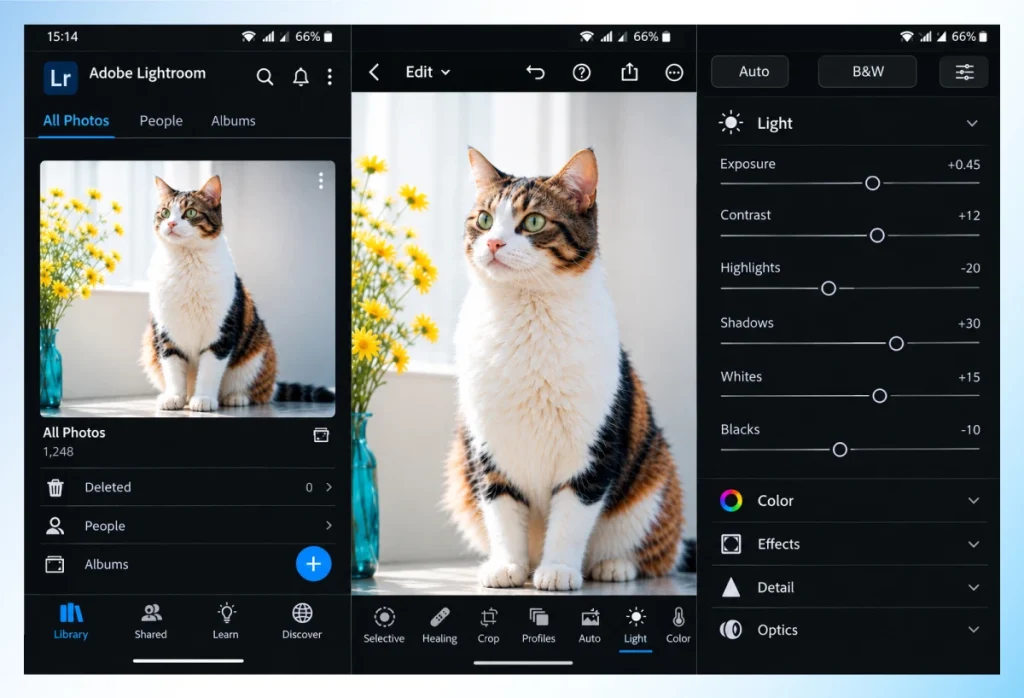
The mobile counterpart to desktop Lightroom brings AI Denoise and one-tap Auto correction to a phone. This also offers edits synced across devices for creators who shoot and edit on the move.
How it actually works:
- Import the photo into Lightroom Mobile
- Tap Auto for an AI-based baseline edit
- Apply Denoise for low-light shots
- Sync and export the final file
Snapseed
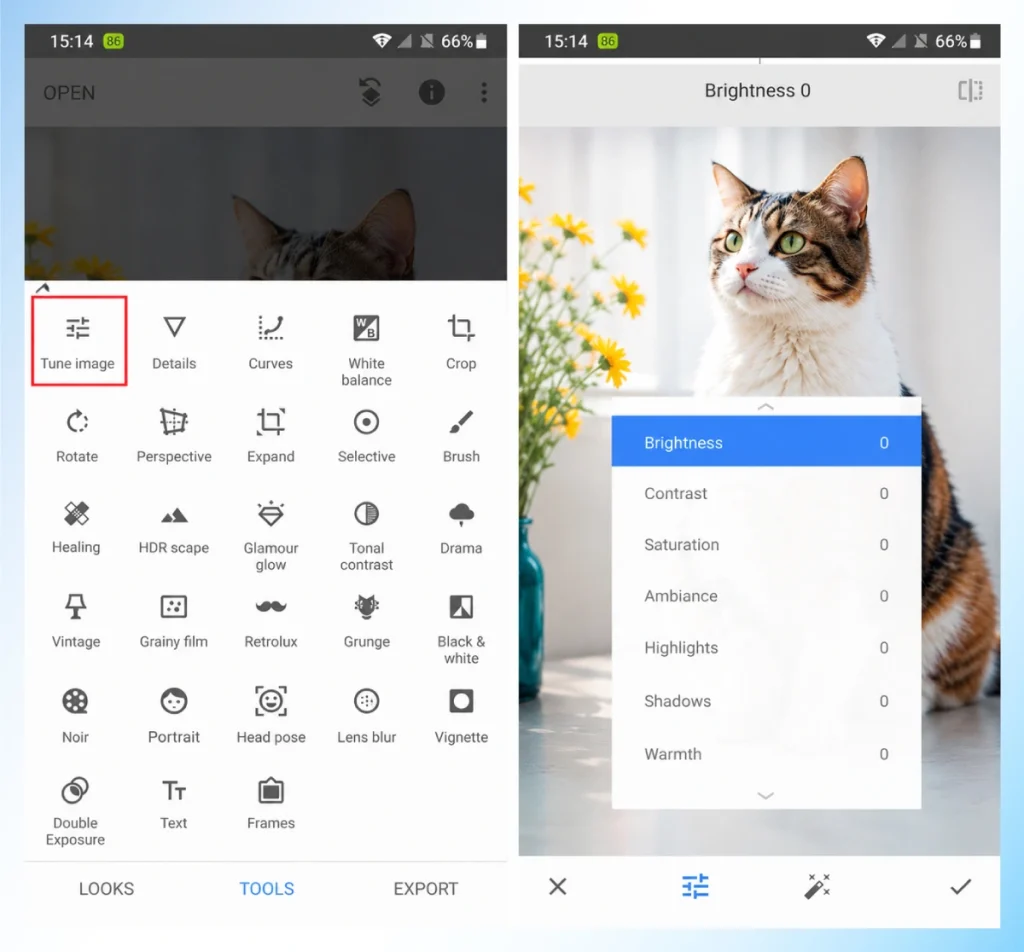
Snapseed remains a favorite for manual precision layered with AI-assisted tools like Healing and Auto adjustments, and it’s completely free with no subscription.
How it actually works:
- Open the image in Snapseed
- Tap Tools, then Tune Image for auto-correction
- Use Healing to remove blemishes or spots
- Export the finished photo
Free vs. Paid AI Photo Enhancers: Which Should You Use?
Free tools are enough for most people who just want to enhance a photo with AI occasionally. This can be a social post, a family photo, or a quick listing fix. The moment volume, resolution, or brand consistency enters the picture, a paid plan usually pays for itself.
What Free Tools Do Well
A free AI photo enhancer like Google Photos, Snapseed, or Upscayl comfortably handles everyday brightness, contrast, and light sharpening fixes and gets a photo social-ready in seconds. For casual use, testing a handful of listings, or a one-off personal photo, free tools cover the job well. When the priority is manual retouching rather than automated upscaling, it’s also worth browsing these online photo retouching sites.
When You Need a Paid Plan
Paid tools earn their keep when you’re batch-processing hundreds of SKUs, upscaling for large-format print, or need generative reconstruction for a marketing hero image. They also tend to skip watermarks and processing queues. If AI enhancement is only one stage in a larger workflow, folding it into a full post-processing routine keeps every image consistent from edit to export.
Best Free Picks vs. Best Paid Picks
| Tool | Type | Best For |
|---|---|---|
| Google Photos Magic Editor | Free | Quick everyday touch-ups |
| Snapseed | Free | Manual precision control on mobile |
| Upscayl | Free/open-source | Offline batch upscaling |
| Remini | Freemium | Face and portrait clarity |
| Topaz Photo AI | Paid | Print-ready upscaling and denoising |
| Adobe Lightroom / Photoshop | Paid subscription | Professional, brand-consistent workflows |
| Magnific AI | Paid | High-impact marketing visuals |
How to Tell If AI Over-Enhanced Your Photo
Knowing when AI has gone too far matters just as much as knowing how to enhance a picture in the first place. Over-processing is easy to miss at thumbnail size and obvious the moment someone zooms in.
Signs of Over-Processing
- Skin looks waxy, plastic, or unnaturally smooth
- Faint halos or glowing outlines appear around high-contrast edges
- Sharpening has turned fine grain into a crunchy, artificial texture
- Colors look oversaturated compared with the original lighting
- Small details, such as hands, jewelry, text, or logos, look warped or duplicated
Quick Before/After Checklist
- Zoom to 100% and compare the enhanced version against the original
- Check that skin and fabric texture are retained, not smoothed away
- Look at edges for glowing halos or over-sharpened outlines
- Confirm text, logos, and jewelry are still legible and accurate
- Compare color against the original lighting conditions, not just the preview thumbnail
When to Use Restoration Instead of Enhancement
AI enhancement assumes most of the original detail is still there to recover. Torn, faded, or heavily damaged photos usually don’t meet that bar, and generative models tend to hallucinate detail that was never in the shot. For those cases, an old photo restoration that reconstructs missing sections by hand is the safer route than letting an algorithm guess.
Frequently Asked Questions
Is There a Free AI Photo Enhancer?
Yes. Apps like Google Photos, Snapseed, and Upscayl let anyone enhance a photo with AI at zero cost. These cover brightness, sharpening, and light upscaling for everyday use.
Can AI Enhance a Blurry Photo?
Generally, yes. AI denoise and deblur models can recover real detail from motion blur or low-light noise, though results depend on how much original information survived in the file to begin with.
Does AI Photo Enhancement Work on Old or Damaged Photos?
Partially. AI can sharpen faded colors and reduce grain, but heavy tears, missing sections, or severe water damage are better handled through manual restoration, since automated tools tend to guess at what’s missing rather than reconstruct it accurately.
How Do I Enhance an Image with AI on My Phone for Free?
Open Google Photos or Snapseed, tap the auto-enhance option, and adjust the intensity slider. Most fixes take under thirty seconds, and neither app requires a subscription for basic corrections.
Is It Safe to Upload Personal Photos to AI Enhancer Tools?
It depends on the tool’s privacy policy and where processing happens. On-device options like Apple’s Clean Up, or offline apps like Upscale, avoid cloud upload entirely. It is worth choosing when the photos are sensitive or personal.
Conclusion
Now you know exactly how to enhance a photo with AI. It learned which free app to open for a quick fix, which paid tool to reach for at scale, and how to spot the moment an algorithm has gone a step too far. For a single photo, any of the apps above will do the job in under a minute. For a whole catalog, a consistent brand look, or a photo that’s simply too damaged for software to guess at, that’s where a human editor still earns their place.