If you asked what belongs in my kitbag, I would not begin with a camera model. I would ask what we are shooting, how the clothes should feel, whether the model will move, who needs to review the frames, and where the final images will appear. Those answers shape the kit long before a brand name does.
That is the difficult part of choosing fashion photography equipment. A beautiful editorial, a fast runway, and a repeatable ecommerce catalogue may feature the same garment, yet they ask for very different lenses, lighting, support, and working speed. Buying everything at once usually creates a heavier bag, not stronger photographs.
I guess not all photographers start their journey with a handsome budget to fill their kit bags. Therefore, I’ve thought of sharing the list of the most essential list of equipment for your upcoming fashion shoot.
CAPTURED THE LOOK BUT STILL FACING A LONG EDIT?
Keep creative control while experienced editors handle skin, fabric, color, and background refinement through our professional photo retouching service.
What Equipment Do You Actually Need for Fashion Photography?
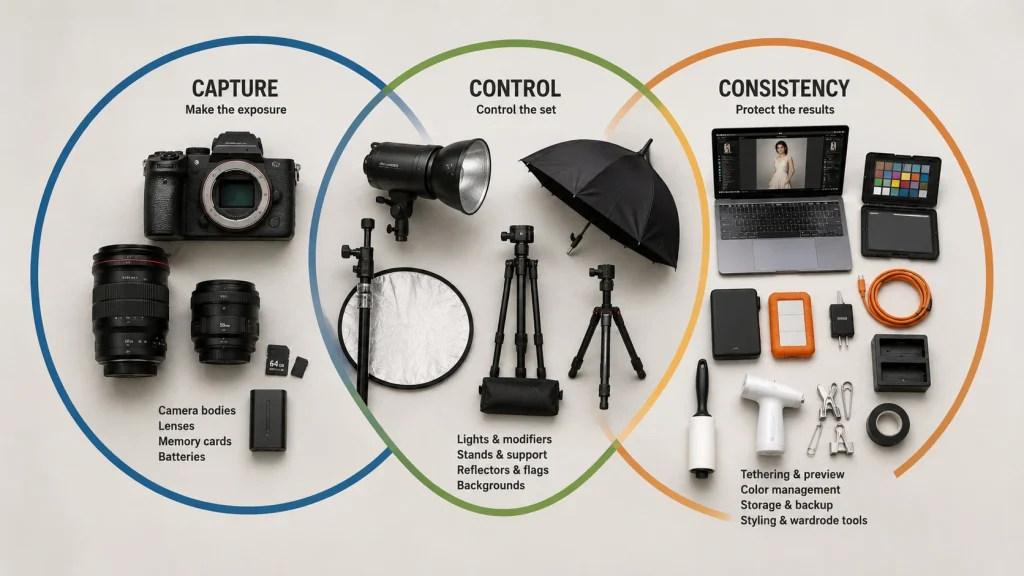
The equipment needed for fashion photography starts with a dependable camera, a lens suited to the framing, and a light source you can control. Add stable stands, a background when the location does not provide one, spare power and storage, and a small wardrobe kit. Tethering and color tools become increasingly important when clients, stylists, or ecommerce teams need to approve details during the shoot.
Think of fashion photography basic equipment in three layers: the tools that make the exposure, the tools that control the set, and the tools that protect consistency. The third layer is easy to overlook, but missed focus, shifting color, a loose stand, or a full memory card can end a paid session faster than an ordinary camera body ever will.
| Category | Start with | Add when the assignment requires it |
|---|---|---|
| Capture | Reliable body and standard zoom or normal prime | Backup body, telephoto, wide prime, or macro |
| Light | Window light plus reflector, or one controllable light | Extra heads, specialty modifiers, flags, and gels |
| Support | Stable stand, sandbag, and camera strap | C-stands, boom, tripod, tether table, and rolling case |
| Set | Clean location or simple seamless background | Canvas, fabric, collapsible backgrounds, props, and floor protection |
| Workflow | Spare batteries, cards, and card reader | Tethering, color target, calibrated display, and redundant storage |
| Styling | Steamer, lint roller, clips, pins, and fashion tape | Sewing kit, tack, tissue, fishing line, and product supports |
Choose Equipment Based on the Fashion Shoot
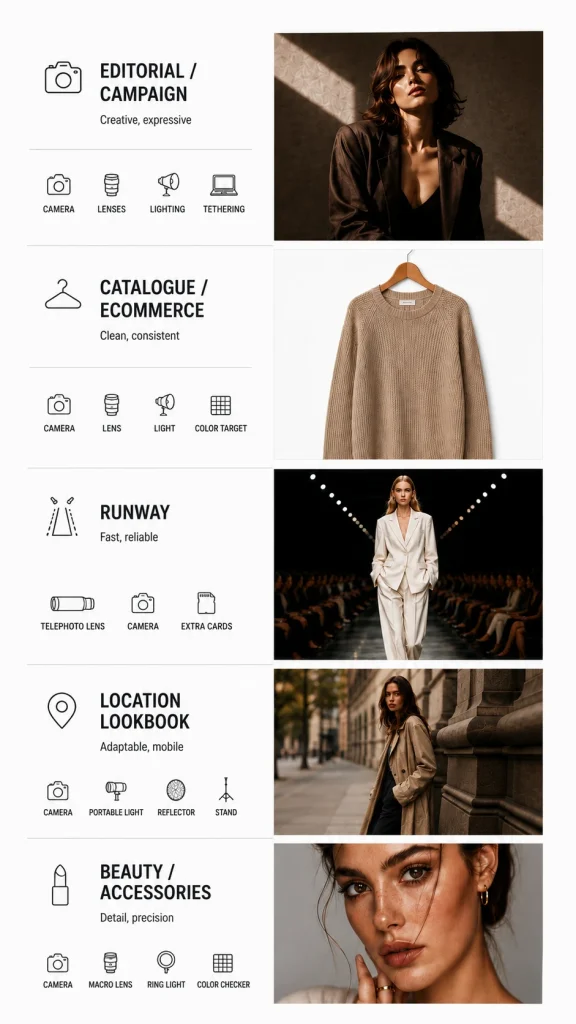
The equipment used in fashion photography changes with the final image. Editorial work can trade technical perfection for mood. Catalogue work needs repeatability. Runway work rewards reach, autofocus, and buffer depth.
| Shoot | Main pressure | Equipment priority |
|---|---|---|
| Editorial or campaign | Mood, set changes, and visual character | Flexible lens set, deliberate modifiers, tethering, styling kit |
| Catalogue or ecommerce | Color, framing, and batch consistency | Tripod, standard lens, repeatable light, color target, tethering |
| Runway | Distance, motion, low light, and no second take | Telephoto zoom, strong AF, deep buffer, spare body and cards |
| Location lookbook | Changing light, weather, and mobility | Portable body, battery light, reflector, compact stands, rain cover |
| Beauty or accessories | Skin, makeup, texture, and small details | High resolution, close-focusing lens, beauty light, precise color |
The table is a starting point, not a rulebook. A raw streetwear editorial may be intentionally photographed with direct flash and a compact camera. A luxury campaign may arrive with a truck of lighting. What matters is whether the kit supports the visual language and the delivery requirements without slowing the team.
Camera Equipment for Fashion Photography
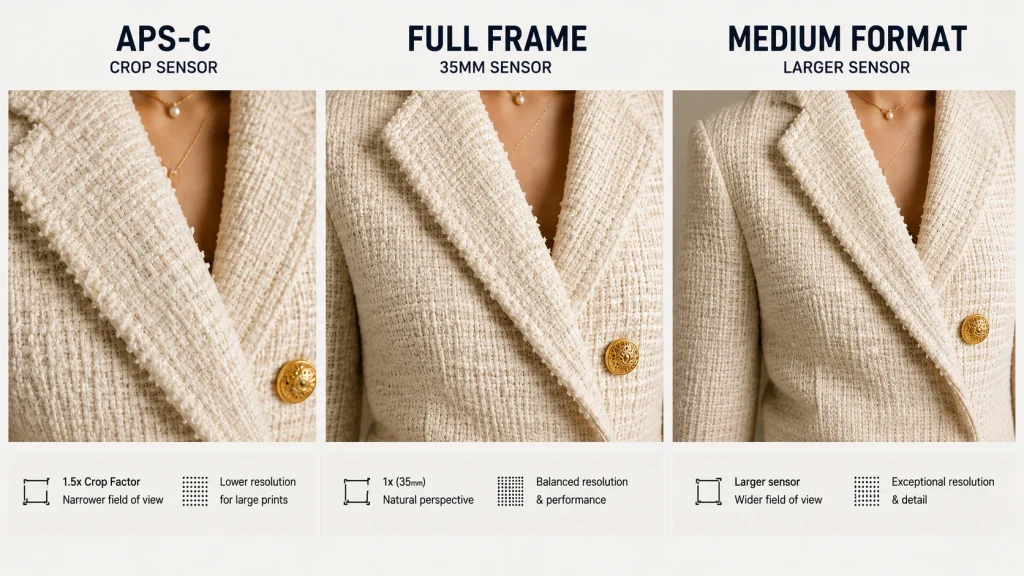
APS-C, Full Frame, or Medium Format?
A capable APS-C body is enough to learn, build a portfolio, and complete many paid sessions. Full-frame gives broader lens choices, stronger high-ISO performance in many systems, and easier control over shallow depth of field. Medium format offers exceptional resolution and tonal detail, but its cost, file size, and slower handling make rental sensible for occasional high-end campaigns.
Do not buy a sensor format because it sounds professional. Consider the space you shoot in, the size of the final output, the speed of the subject, and the lenses you can afford. A modern smaller-sensor camera with good light and disciplined color can produce a more convincing fashion image than an expensive body used without control.
Features That Matter More Than the Badge
For moving models and runway work, reliable face and eye autofocus, burst speed, and buffer depth protect the decisive frame. In studio, resolution, dynamic range, tethering support, flash compatibility, and clean RAW files often matter more. Dual card slots, weather sealing, battery life, and comfortable controls become valuable when the session cannot stop for troubleshooting.
- Resolution: Useful for fabric detail, close crops, large print, and controlled commercial work.
- Autofocus and buffer: Critical when the garment, model, or photographer is moving.
- Tethering and ports: Check compatibility with the computer, cable, and software before the job.
- Redundancy: A second body becomes essential when equipment failure would compromise a paid production.
Which Lenses Do Fashion Photographers Need?
Standard Zooms for Full Looks and Fast Changes
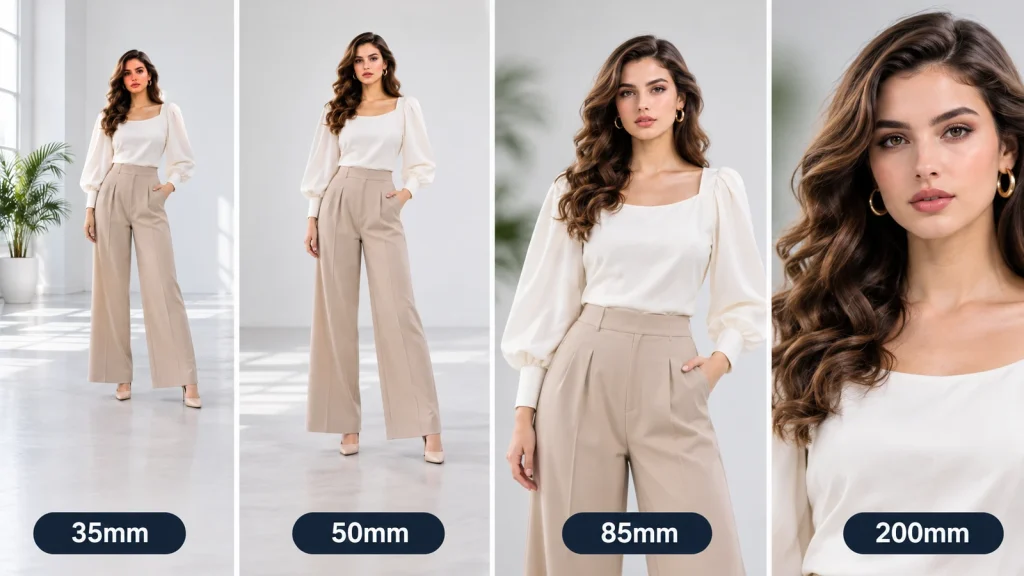
A 24-70mm full-frame equivalent is the sensible first answer for many shoots. It moves from an environmental frame to a three-quarter portrait without breaking the rhythm between photographer and model. In a small studio, however, the wide end can stretch limbs and garments near the frame edge, so keep perspective in mind.
Prime Lenses for a More Deliberate Look
A 35mm prime places fashion inside an environment. A 50mm feels natural and works well for full-length and mid-length frames. An 85mm gives flattering compression and clean subject separation when you have enough working distance. The widest aperture is not always the goal. At close range, an extremely shallow focus plane may leave important garment detail soft.
Telephoto and Macro Lenses
A 70-200mm zoom earns its space at runway shows, outdoor campaigns, and any location where you cannot step closer. A macro or close-focusing lens is more useful for beauty, jewelry, embroidery, stitching, and accessory details. On APS-C cameras, remember the crop factor before copying a full-frame focal-length recommendation.
KITBAG RULE: Buy focal lengths for the frames you repeatedly make. A beautifully reviewed lens that forces you against the studio wall is still the wrong lens.
Fashion Photography Lighting Equipment
Natural Light, Speedlight, Strobe, or Continuous LED?
Natural light can be broad, graceful, and free, but it moves in direction, intensity, and color. A speedlight is compact and surprisingly capable off-camera. A studio strobe provides the output and short flash duration needed for low ISO, smaller apertures, and movement. Continuous LED shows the effect before capture and makes hybrid photo-video production easier.
| Source | Strength | Trade-off | Best fit |
|---|---|---|---|
| Window or daylight | Soft, natural character | Changes through the session | Lifestyle and simple location work |
| Speedlight | Portable and affordable | Limited output and modeling light | Street, small setups, and travel |
| Studio strobe | High output and motion control | Requires triggering and test frames | Catalogue, editorial, and studio movement |
| Continuous LED | Live preview and video use | May need higher ISO or wider aperture | Hybrid content, beauty, and learning light |
Modifiers Shape the Photograph
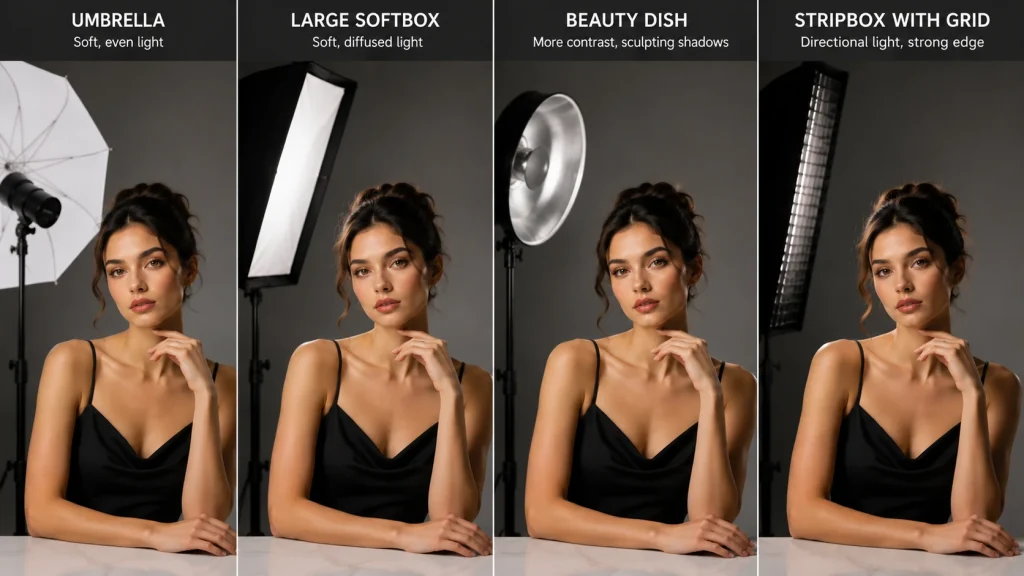
The light head supplies energy. The modifier gives it character. A large softbox or octabox wraps the model and smooths shadow transitions. A beauty dish adds a crisp, sculpted quality to the face. A stripbox draws a clean rim along a shoulder or garment edge. Grids, flags, and V-flats decide where light is allowed to travel.
For garment-only work, the reflection and texture principles in our product photography lighting guide help you choose between broad diffusion, directional texture, edge light, and negative fill without copying a setup blindly.
Grip and Safety Belong in the Lighting Plan
Reliable light stands, C-stands, booms, clamps, triggers, extension cables, and sandbags are part of fashion photography studio equipment, not background clutter. Sandbag every raised stand, counterweight a boom, route cables away from the model’s path, and test the trigger before the set becomes busy. A falling modifier can injure someone and stop the production.
Backdrops, Support, and On-Set Accessories
Choose a Background That Serves the Clothes
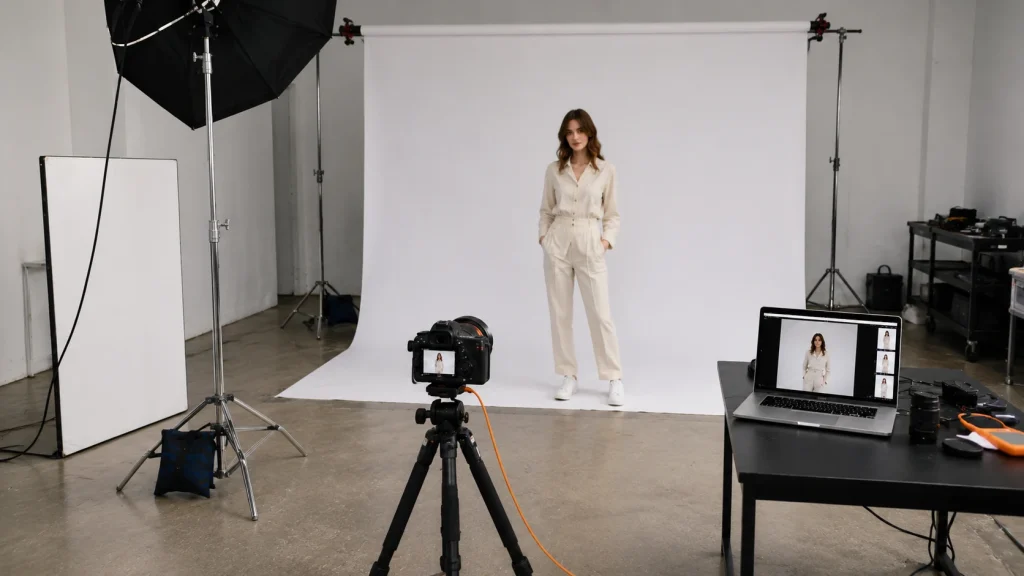
Seamless paper is affordable, clean, and easy to trim when it becomes marked. Muslin packs well but needs careful steaming. Painted canvas adds depth and atmosphere. Collapsible backgrounds travel easily but suit tighter frames. The background should support the palette and silhouette without competing with the garment.
Tripod, Tethering, and Color Control
A tripod is not essential for every fashion session, but it is valuable for repeatable catalogue framing, composites, and matched looks. Tethering lets the photographer, stylist, client, and digital technician inspect focus, fabric, pose, and exposure on a larger screen. Confirm the camera, cable, port, and software combination before arriving on set.
Add a gray card or color target when garment color matters. A light meter is optional for simple setups but useful when you need repeatable ratios or several lights. Gaffer tape, clamps, multi-tools, rain protection, lens cloths, spare cables, batteries, memory cards, and a fast reader complete the less glamorous side of fashion photography equipment and accessories.
Protect the Files Before You Pack the Lights
Use more card capacity than the shot list appears to need, and avoid keeping the only copy on a card after the session. Transfer to a fast SSD, verify the files, and create another copy before formatting anything. High-resolution RAW files make storage disappear quickly, especially when a campaign includes motion and repeated looks.
The Fashion Styling and Set-Rescue Kit
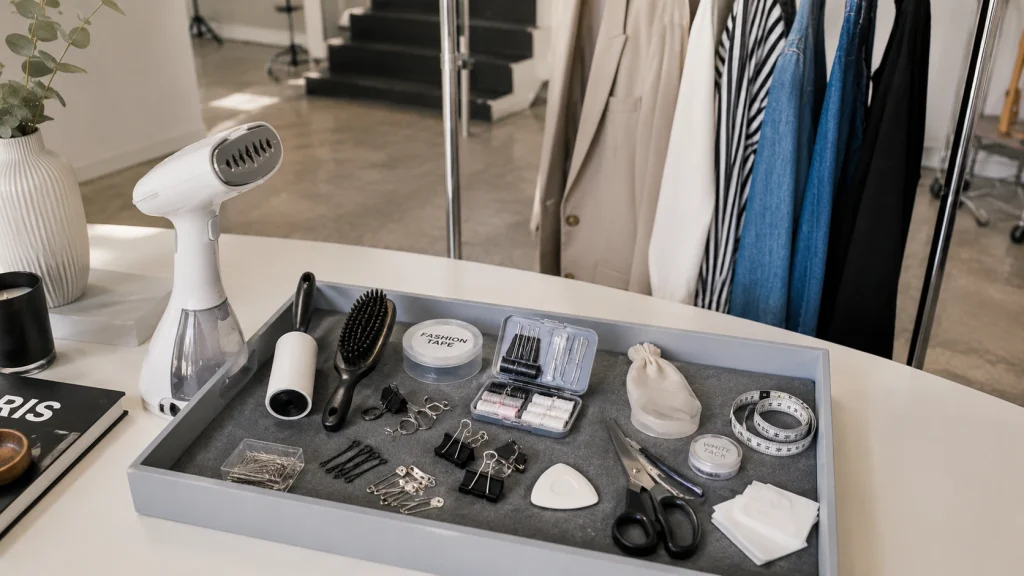
A fashion photograph can be technically perfect and still fail because the collar twists, the fabric carries lint, or the garment hangs without shape. Keep a steamer, lint roller, fabric brush, fashion tape, safety pins, bobby pins, clips, a small sewing kit, sharp scissors, neutral hangers, cleaning cloths, and shoe-sole protection within reach.
For mannequin, flat-lay, or suspended garments, add white tack, tissue paper, fishing line, small weights, and a measuring tape. Test any adhesive on an unseen area first, because saving five minutes is not worth damaging a sample garment.
The stylist usually owns the wardrobe decisions, but a photographer who carries a small rescue kit keeps the session moving. That is the difference between owning gear and understanding the set around it.
Smartphone Equipment for Fashion Photography
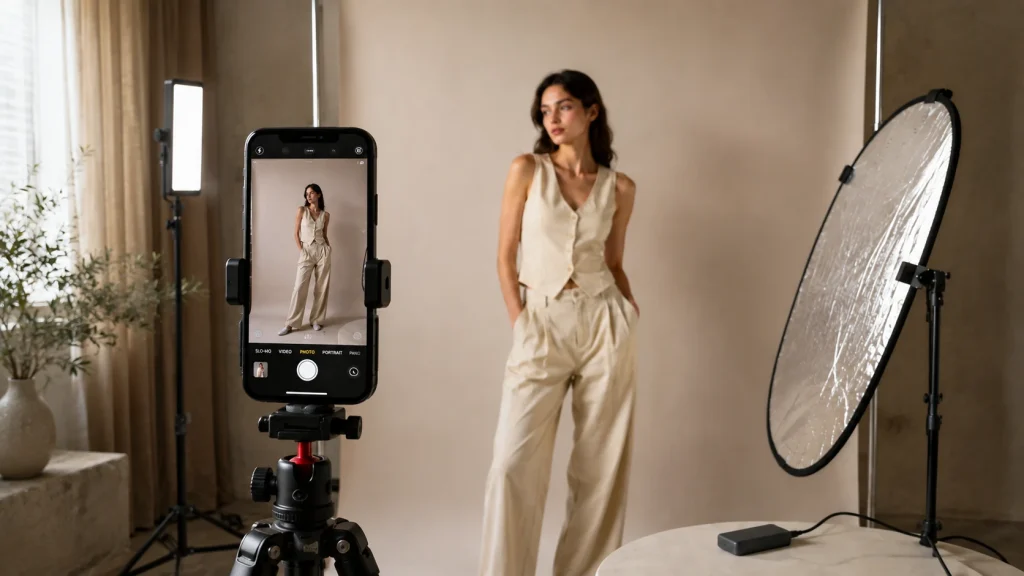
A current smartphone can be a serious practice camera, a behind-the-scenes tool, or the right choice for social-first fashion content. Look for dependable main and telephoto cameras, RAW capture, manual exposure control, enough storage, and stable color. Avoid switching between phone lenses mid-series unless their color and rendering match closely.
Useful equipment for fashion photography on a phone includes a rigid mount, small tripod, Bluetooth shutter, compact LED, diffuser, reflector, lens cloth, and power bank. A stabilizer helps with motion clips, while a collapsible background can turn a small room into a clean content corner. Cheap clip-on lenses may soften detail or distort garment proportions, so test them before client work.
The phone does not remove the need for lighting, styling, or color discipline. It simply places the capture device inside a smaller workflow. For quick lookbooks and reels, that can be liberating. For large print, precise catalogue matching, or demanding retouching, a dedicated camera still gives more control.
Post-Production Equipment, Tools, and Software
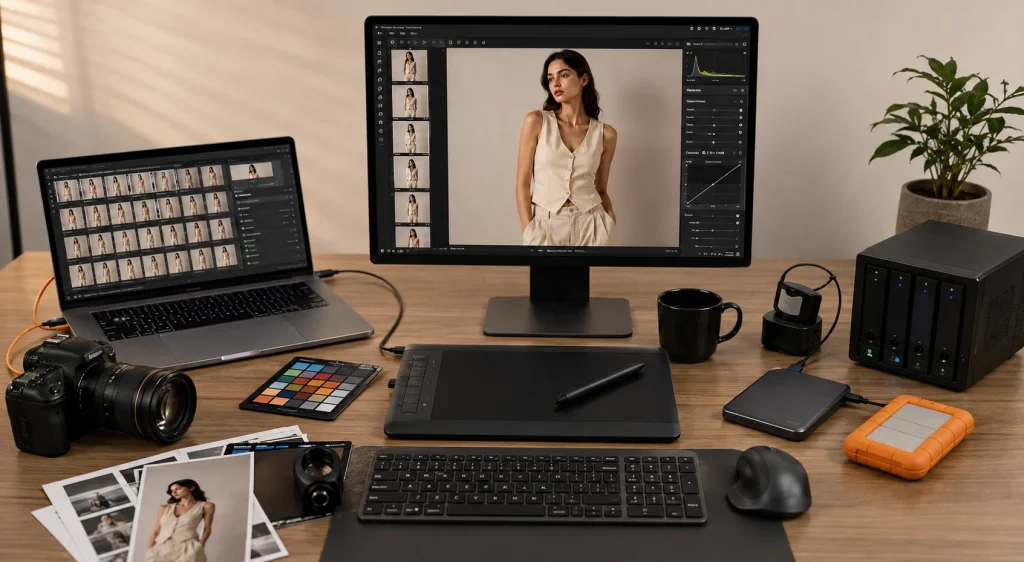
Workstation, Display, and Input Tools
Post-production is part of the fashion photography equipment needed for professional delivery. A laptop is convenient for tethering and location work, while a desktop often offers more sustained performance and easier upgrades. Prioritize sufficient memory, a modern processor and GPU, fast internal storage, reliable ports, and a display you can calibrate.
Requirements change as software and file sizes grow. A pen tablet is not mandatory, but it gives finer control over masks, dodge and burn, hair edges, skin work, and fabric cleanup than a mouse.
RAW Processing, Retouching, and Batch Tools
Capture One and Lightroom handle tethering, culling, RAW development, color, and batch adjustments. Photoshop remains the flexible choice for layered retouching, compositing, precise masks, and garment cleanup. AI tools can speed up culling, subject selection, noise reduction, dust removal, and repetitive masking, but they still need human review.
A good fashion photo editing workflow protects skin texture, fabric construction, logos, and real garment color while developing the intended mood. When color must remain consistent from capture to export, Adobe’s Photoshop color management guidance explains why profiles and a controlled viewing environment matter.
Storage, Calibration, and Professional Handoff
Use a calibrated monitor, a dependable card reader, fast SSD working storage, and a separate archive or backup destination. Record the approved color reference and export requirements. When a fabric shifts under mixed lighting, a specialist photo color correction service can align the final files without flattening texture or turning every shade into the same generic tone.
Complex hair, fur, lace, and translucent fabric often need more than a rough automated selection. Professional image masking becomes useful when the edge must survive a background change. If volume, deadlines, or batch consistency begin to overtake shooting time, broader photo editing services can extend the workflow without removing the photographer from creative approval.
Three Practical Fashion Photography Equipment Lists
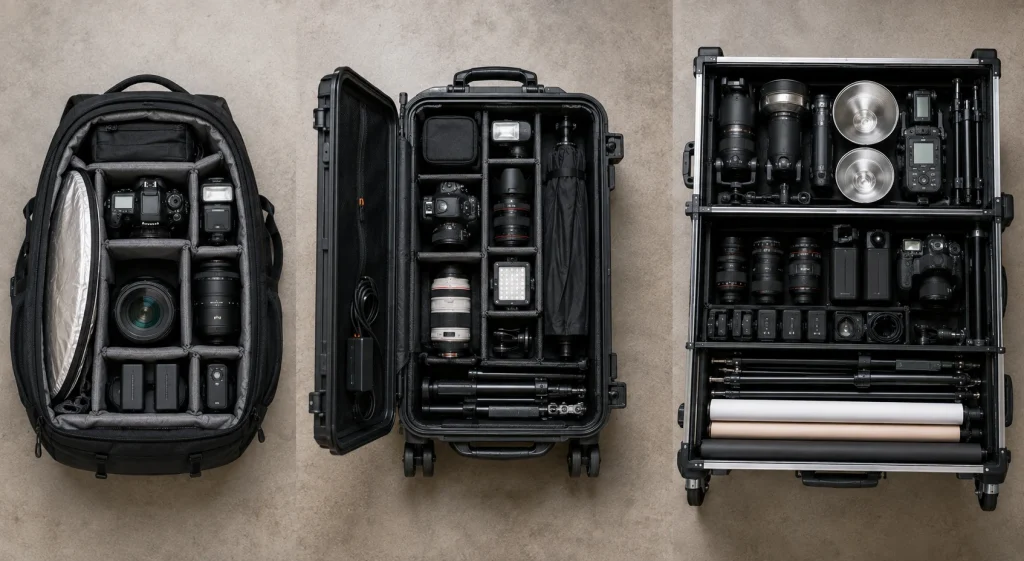
A useful fashion photography equipment list should describe a working system, not a wish list. Build one of these cores, then add specialty equipment only when the brief creates a real need.
| Kit | Core equipment | Best for |
|---|---|---|
| Lean starter | One reliable body, standard lens, reflector or one light, modifier, stand, sandbag, spare battery and cards, basic styling kit | Portfolio tests, simple editorials, and small paid sessions |
| Mobile location | Starter kit plus battery light or speedlight, compact stand, rain cover, power bank, telephoto or wide option, rolling case | Lookbooks, street fashion, and outdoor campaigns |
| Commercial studio | Backup body, flexible lens set, multiple lights, modifiers, grip, backdrop system, tether station, color target, redundant storage | Catalogue, campaign, beauty, and client-attended production |
The lean kit is not lesser. It is a focused one. If you understand the lens, light, and background, one body and one light can create a complete visual language. Expansion should buy reliability, speed, or a new creative possibility, not simply fill empty compartments.
What Should You Buy, Rent, or Postpone?
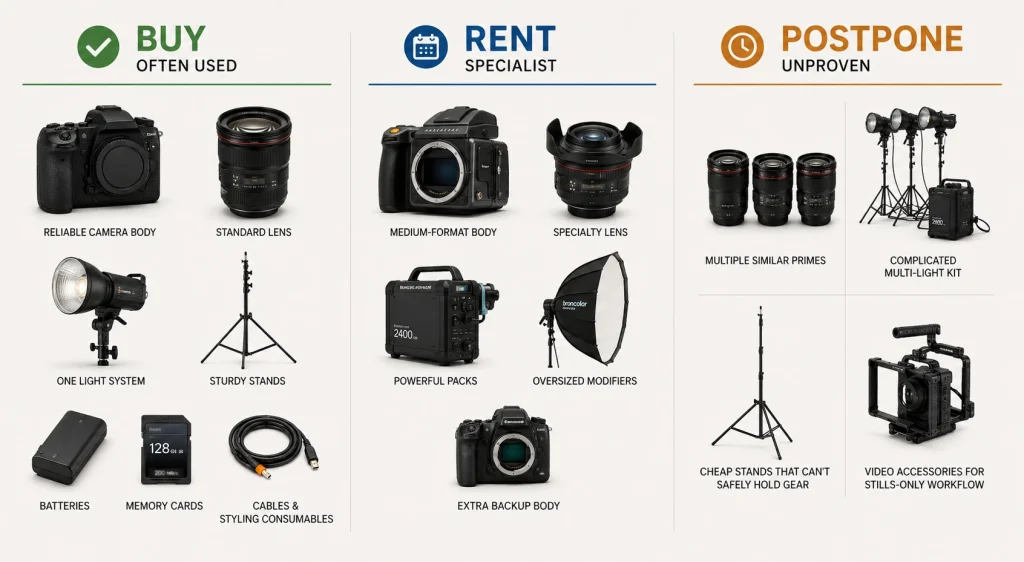
Buy the tools you use on nearly every session: a dependable body, your most useful lens, one lighting ecosystem, safe stands, batteries, cards, cables, and styling consumables. Rent medium-format systems, specialty lenses, powerful packs, oversized modifiers, and extra backup bodies when the job pays for the capability.
Postpone equipment that does not solve a repeated problem. That includes several similar primes, a complicated multi-light kit before you can shape one light, cheap stands that cannot safely hold the modifier, and video accessories for a stills-only workflow. The right fashion photography equipment needed today may be very different from the kit you need after ten paid shoots.
BEFORE YOU BUY: Ask which missed frame, slow step, safety risk, or creative limit this item will remove. If the answer is vague, rent it first or leave it on the shelf.
Frequently Asked Questions
What fashion photography equipment should a beginner buy first?
Start with a camera you can operate confidently, one versatile lens, a reflector or one controllable light, a safe stand and sandbag, spare batteries and cards, and a small styling kit. Learn to create several looks with that setup before adding more lights or lenses.
Do I need a full-frame camera for fashion photography?
No. APS-C, full-frame, and medium-format cameras can all produce professional work. Full-frame may provide useful lens, depth-of-field, and low-light options, but lighting, direction, styling, color, and consistency have greater influence than sensor size alone.
What is the best first lens for fashion photography?
A standard zoom is the most flexible first choice. A 50mm-equivalent prime is a strong alternative when you prefer a lighter kit and a more deliberate way of framing. Choose by studio space, sensor format, and the distance needed for your usual full-length and portrait compositions.
Are strobes or continuous lights better for fashion shoots?
Strobes offer greater output, stronger ambient control, and short flash durations. Continuous LEDs provide a live preview and serve both stills and video. Choose strobes for controlled studio power and movement, LEDs for hybrid production and visible lighting adjustments, or use both when their color matches.
Is a tripod necessary for fashion photography?
Not for every shoot. Handheld work encourages movement and connection with the model. A tripod becomes valuable for catalogue consistency, repeated framing, composites, self-portraits, and any setup where the camera position must stay locked.
In Fine: Build the Kit Around the Photograph
The best fashion photography equipment is not the most impressive collection in the room. It is the kit that lets the model move, the clothes read correctly, the light hold its character, and the team makes decisions without unnecessary friction.
Begin with the photograph you need to deliver. Choose the camera and lens for framing, the lighting for texture and mood, the support gear for safety, the styling tools for polish, and the post-production system for consistency. When every item has a clear job, the kitbag becomes lighter, and the work becomes stronger.