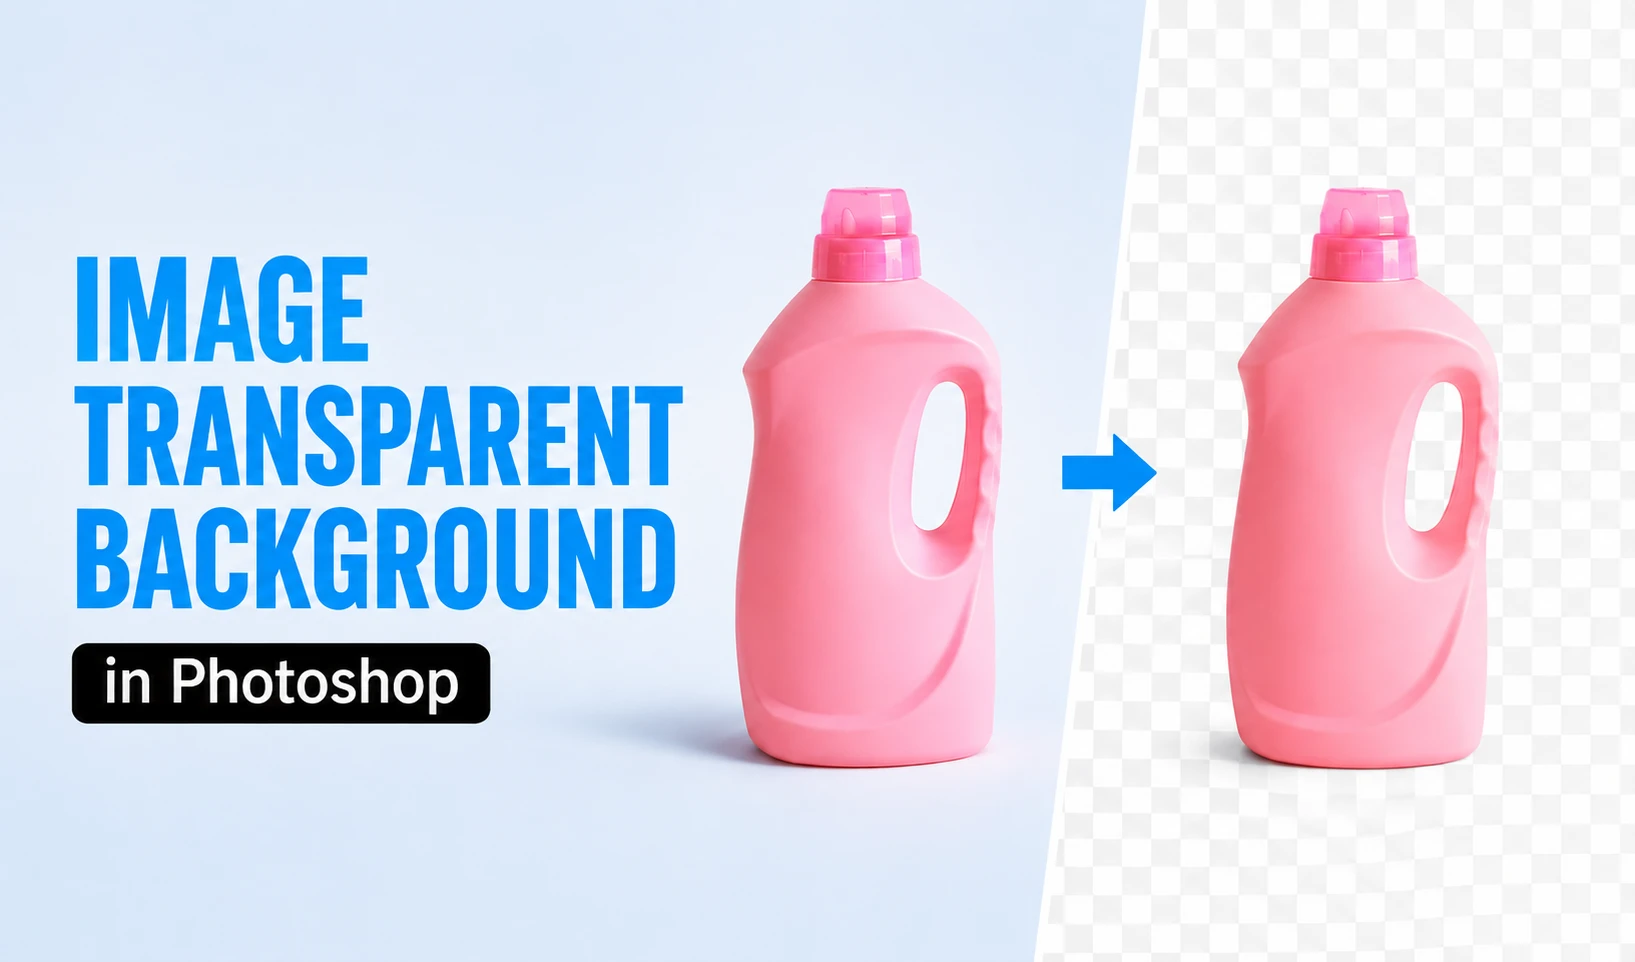
To make an image transparent background in Photoshop, open the image, duplicate the layer, and use the Remove Background tool in the Properties panel for a fast AI cutout. Or Select Subject plus a Layer Mask for more control. Refine tricky edges like hair in the Select and Mask workspace, then export the file as a PNG with Transparency enabled.
Your product shot looks perfect. Then it gets rejected by Amazon for the wrong background, clashes with your storefront, or turns your logo into a sticker with a visible white box around it.
Photoshop fixes that in minutes. A transparent background strips away everything except the subject, so the same file works on any page, any platform, any brand color — no reshoot required.
I built this guide through Photoshop 2026, so every method reflects the current tools, panels, and AI behavior. This includes the on-device selection engine that now handles hair, fur, and fine edges noticeably better than older versions.
I will inform and clarify for you five ways to make image transparent in Photoshop, from one-click AI removal to precise manual masking for tricky edges. You’ll also get the export settings that actually keep the canvas transparency intact, so your PNG doesn’t quietly turn white the moment you save it.
What Does a Transparent Background Mean?
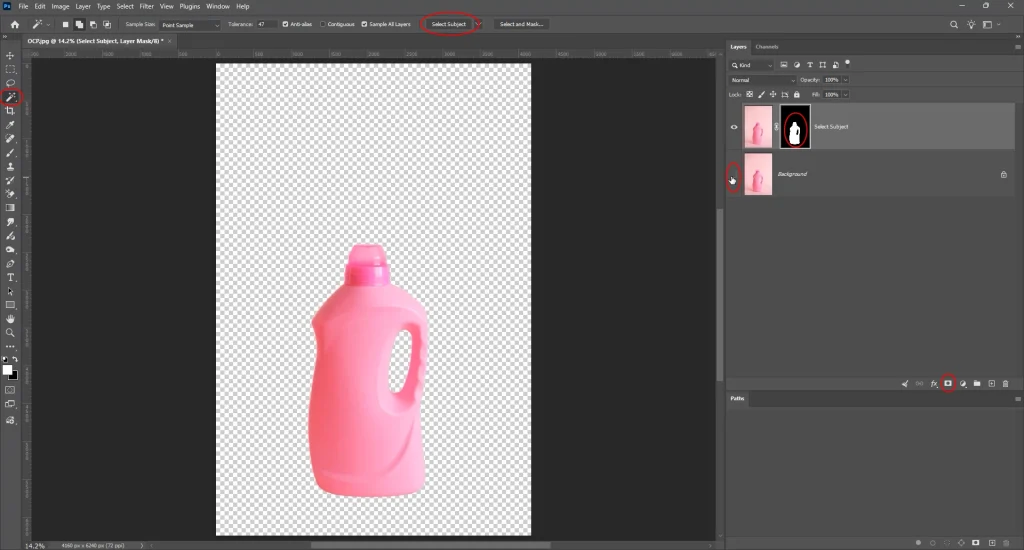
A transparent background is an empty space. It’s not a color at all. Photoshop tracks that empty space using an alpha channel, a hidden layer of data that tells the file which pixels are fully visible, which are see-through, and which fall somewhere in between.
On screen, transparency shows up as a gray-and-white checkerboard. That pattern isn’t part of your image; it’s just Photoshop’s shorthand for “nothing is here.”
A white background and a transparent background can look identical at a glance, but they behave very differently once you place the image somewhere else. White is still a color, and it clashes the second you drop it onto a colored page or a dark theme. Transparent adapts to whatever sits behind it.
This is also why file format matters more than it seems. JPEG can’t store transparency — it always fills empty space with a solid color. PNG and PSD can, which is why they’re the standard formats for background-free images.
Why Use Transparent Background Images?
Transparent PNGs solve real production problems across almost every visual industry, not just design. Here’s where they earn their keep in day-to-day work.
For E-commerce Product Listings
Marketplaces like Amazon, Etsy, and Walmart often require pure white (RGB 255,255,255) or fully transparent product backgrounds before a listing goes live, and getting rejected over a background technicality costs real time.
E-commerce brand owners and catalog managers rely on transparent PNGs to drop the same product shot into different templates, marketplaces, and ad formats without booking a new photoshoot for every channel.
Fashion and apparel brands running invisible mannequin shots can hand that off directly through the ghost mannequin service.
Graphic Design
Designers layer transparent cutouts into posters, ads, and social templates so the subject sits directly on the layout instead of dragging a background box along with it. That flexibility is what makes a composite look intentional rather than pasted together at the last minute.
Website Design
Transparent images blend into any page, light mode or dark, with no visible edge, box, or color mismatch trailing behind them. That matters even more now that most brands run both a light and dark version of their site and can’t afford product shots that only work on one.
Social Media Graphics
Content creators and influencers use clean cutouts to build graphics that don’t look boxed in or obviously pasted on, whether that’s a product callout, a portrait overlay, or a branded template reused across dozens of posts. A transparent subject also makes it easier to keep a consistent visual style across an entire feed.
Marketing Materials
Brochures, email banners, and ad creatives need product or people cutouts that sit naturally next to text and other graphics instead of fighting the layout around them. Marketing managers pushing out campaigns across multiple formats lean on the same transparent asset instead of re-editing a new version for every placement.
Logo Design
A logo with a white box behind it looks unfinished on anything but a white page, and it’s one of the fastest ways to make a brand look unpolished in a header or footer. Transparent PNG logos are the standard for website headers, email signatures, merchandise mockups, and partner co-branding, where the logo has to sit cleanly on backgrounds you don’t control.
Method at a Glance
Five ways to get there, ranked by how they trade off speed against precision.
| Method | Best For | Difficulty | Speed |
|---|---|---|---|
| Remove Background (AI) | Simple product photos | Beginner | Fastest |
| Select Subject + Layer Mask | People, fashion, animals | Beginner–Intermediate | Fast |
| Pen Tool | Jewelry, electronics, precision work | Advanced | Slowest, most accurate |
| Background Eraser | Simple, single-color backgrounds | Intermediate | Moderate |
| Magic Wand | Flat, solid-color backgrounds | Beginner | Fast on simple images only |
Before You Start
A few basics to check before you open any tool. None of these take long, and skipping them is where most rough edges and wasted redos come from.
- Photoshop version: This guide follows Photoshop 2026, where Remove Background and Select Subject run on an improved on-device AI model. You can toggle between Device and Cloud processing under Preferences > Image Processing, with Device now the default for faster, more private results.
- Image quality: Start with the highest-resolution image available. Low-resolution files give the AI less edge data to work with, so selections come out softer and need more manual cleanup.
- Object complexity: Get a realistic read on the subject before you commit to a method. A box-shaped product is a five-minute job on any tool; a windblown hairstyle or a piece of lace fabric is going to need extra time no matter which method you pick.
- Background color: A background with strong contrast against the subject, like plain white or a solid color, is far easier for both AI and manual tools to separate cleanly than a busy, textured, or similarly colored one.
- Recommended workspace: Switch to the Photography or Essentials workspace so the Layers, Properties, and Select and Mask panels are all visible without digging through menus mid-edit.
- Duplicate your original layer: Do this before touching anything. Every method in this guide should be applied to a duplicate, never the original, so you always have an untouched version to fall back on.
- Save a working PSD: Save your file as a PSD before you start editing. It’s the only format here that keeps every layer, mask, and adjustment fully reversible if a client or platform asks for a change later.
Method 1: Make an Image Transparent Using Remove Background (Fastest Method)
Photoshop’s one-click, AI-powered option is the fastest route to a transparent PNG, and it’s the first thing worth trying on any straightforward image.
In Photoshop 2026, this tool runs on an upgraded on-device model. So, it now reads fine details like stray hair or a soft fabric edge. This is noticeably better than it did in older versions, and it no longer needs to send your image to the cloud to do it.
- Open your image in Photoshop: Any standard format works — JPEG, PNG, TIFF, or a camera RAW file opened through Camera Raw first.
- Duplicate the layer: Duplicate the layer with Ctrl/Cmd + J so the original stays untouched underneath while you work on the copy.
- Open the Properties panel: Open through Window > Properties, or open the Discover panel and go to Browse > Quick Actions if you prefer a guided version of the same tool.
- Click Remove Background: Photoshop analyzes the image and isolates the subject in a couple of seconds, using on-device processing by default.
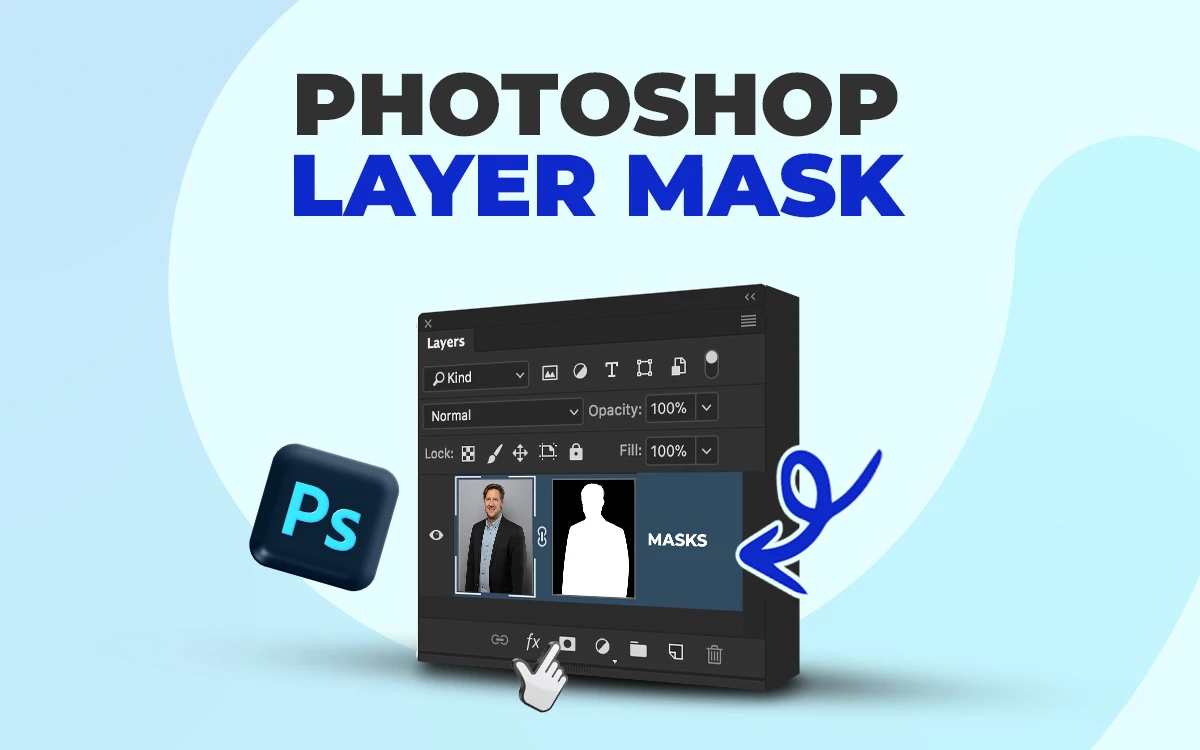
- Layer Mask: Photoshop generates a layer mask automatically, which means the background is hidden, not deleted. You can always paint it back in if the result needs adjusting.
- Zoom in and inspect the edges: Especially around hair, fingers, or any thin detail, since that’s where an automatic pass is most likely to miss something.
- Clean up any rough spots: Clean with a soft black or white brush directly on the mask until the edge looks natural at 100% zoom.
Advantages: Takes seconds, needs no selection skills, and handles simple product shots and plain backgrounds with almost no manual work.
Limitations: Still not perfect on very fine hair, transparent or reflective objects, and busy backgrounds. It makes its best guess, and that guess sometimes needs a manual fix.
Method 2: Create a Transparent Background Using Select Subject + Layer Mask
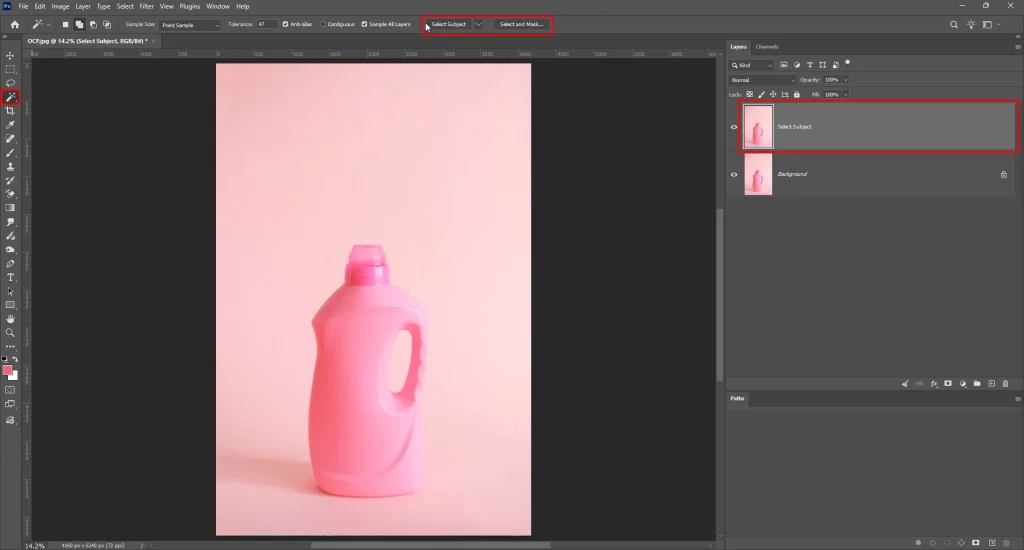
Select Subject uses AI to detect the main object in the frame and draw an initial selection around it in a single click. It’s less automated than Remove Background.
But that’s exactly what makes it more reliable on people, apparel, and anything with edge detail worth preserving. You get an AI head start, then refine it by hand instead of trusting the AI to make every call.
- Go to Select > Subject to generate an initial selection around the detected object. Photoshop 2026’s improved detection handles clothing folds and overlapping limbs better than earlier releases.
- Open Select and Mask and adjust the Feather, Contrast, and Smooth until the outline looks clean against both a light and a dark preview background.
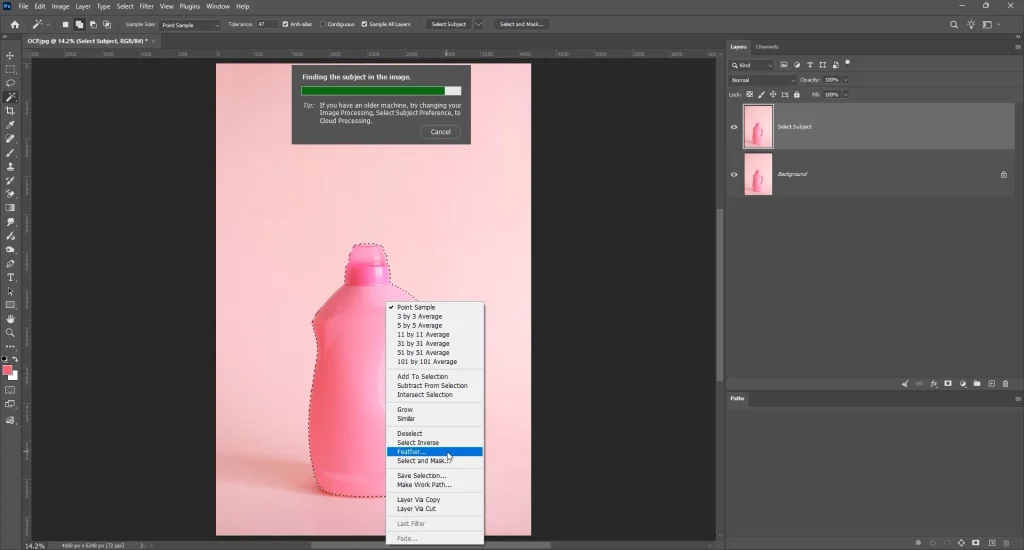
- Click OK to output as a Layer Mask, not a deletion, so the selection becomes fully reversible and nothing outside the frame is permanently lost.
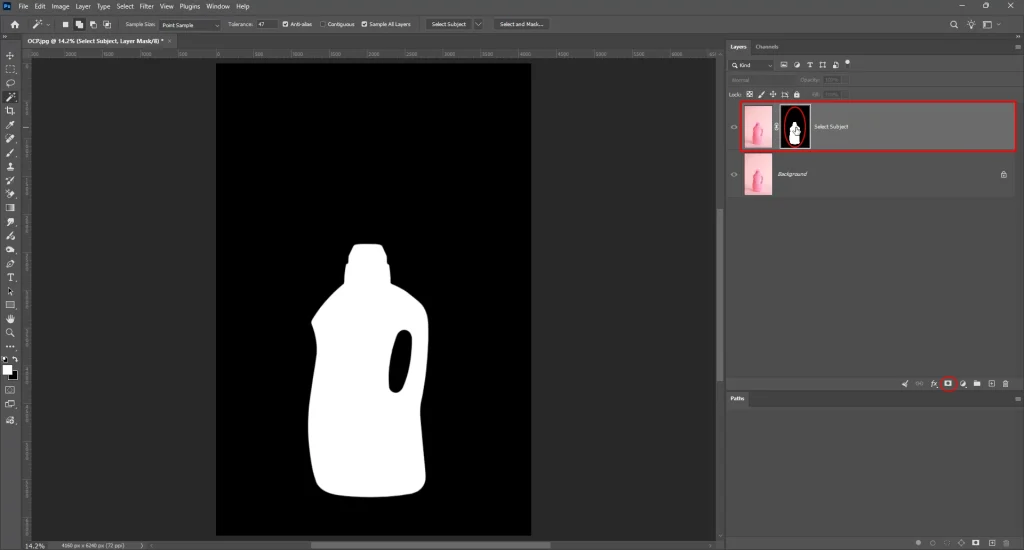
- Fine-tune with a brush directly on the mask, painting with black to hide areas and white to reveal them, until every edge holds up at a closer zoom.
This method holds up especially well for apparel, portraits, and product photography, where the subject has a reasonably defined edge.
Method 3: Remove Background Manually with the Pen Tool
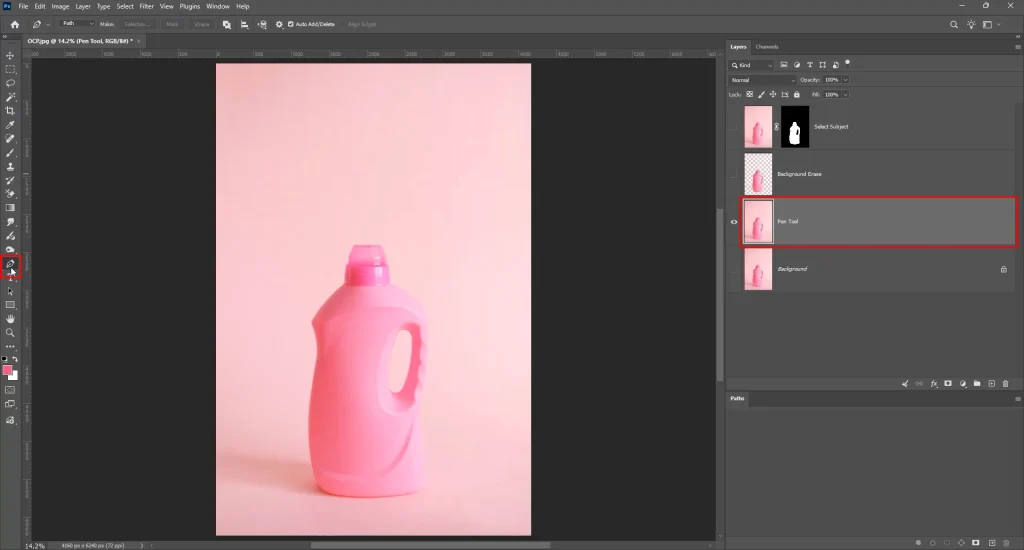
For hard-edged, high-value products — rings, watches, electronics, anything with a sharp, defined silhouette — the Pen Tool from the Photoshop toolbar and tools is still the industry standard, even with how far AI selection has come in Photoshop 2026. AI is fast, but it still rounds corners slightly and can misjudge fine detail in a way a trained eye simply won’t.
- Select the Pen Tool and set the mode to Path in the options bar, then zoom in to 200–300% so you can place anchor points accurately along every edge and corner.
- Trace the outline point by point, clicking and dragging to create curved segments that follow the contour, and adjusting each anchor as you go rather than fixing everything at the end.
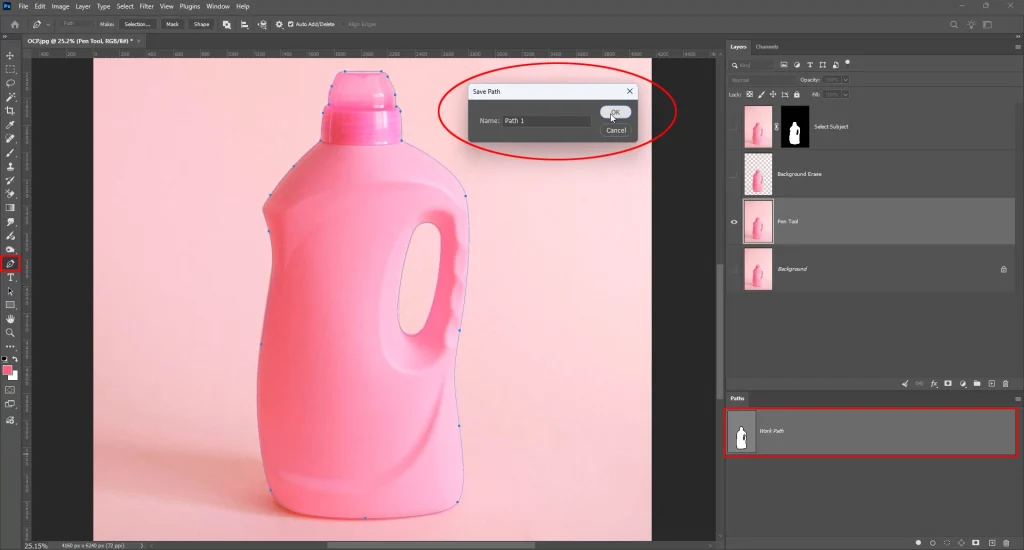
- Close the path back at your starting point, you’ll see a small circle appear next to the cursor when you’re hovering over that first anchor, confirming the path is ready to close.
- Right-click the path and choose Make Selection, adjusting the feather radius slightly if the subject needs a touch of edge softness.
- Apply the selection as a Layer Mask so the cutout stays fully editable and the underlying pixels remain untouched for future revisions.
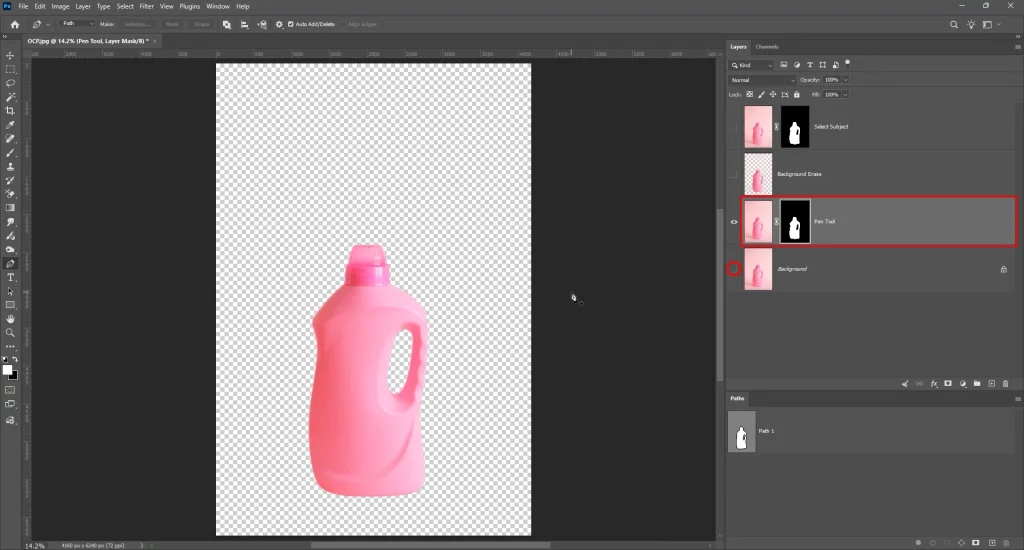
Pen Tool paths are vector-based, so edges stay crisp and mathematically clean with no soft, feathered artifacts, and they scale to any resolution without degrading. That precision is exactly why commercial product photography, catalog work, and print packaging almost always route through pen-tool clipping paths.
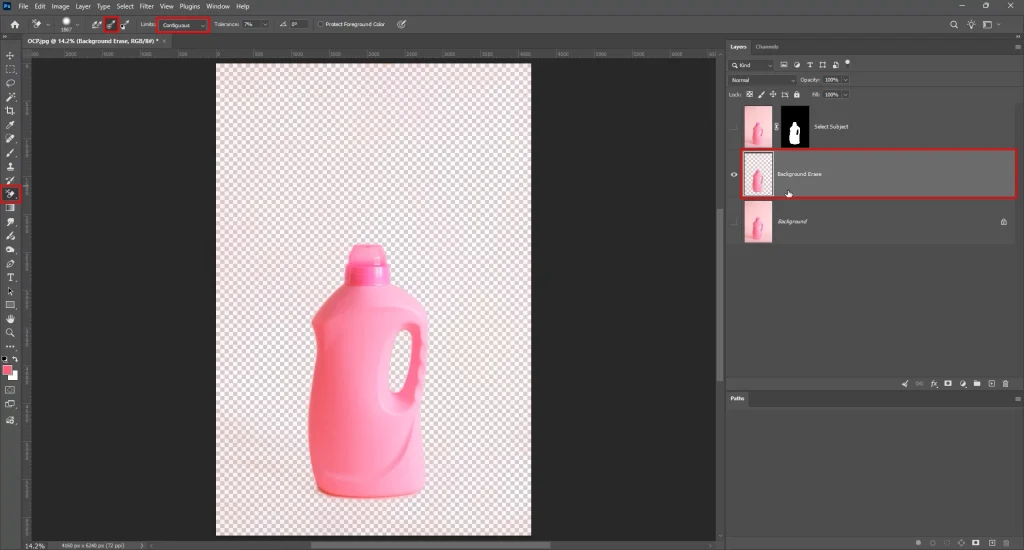
Method 4: Using the Background Eraser Tool
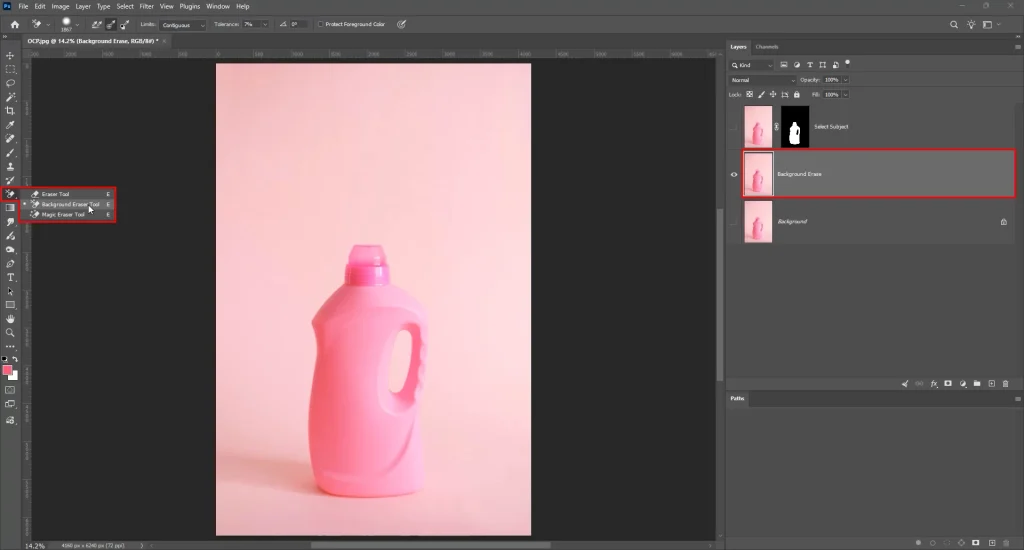
The Background Eraser samples the color directly under your brush and erases matching pixels in real time as you drag across the image. Four settings control how it behaves:
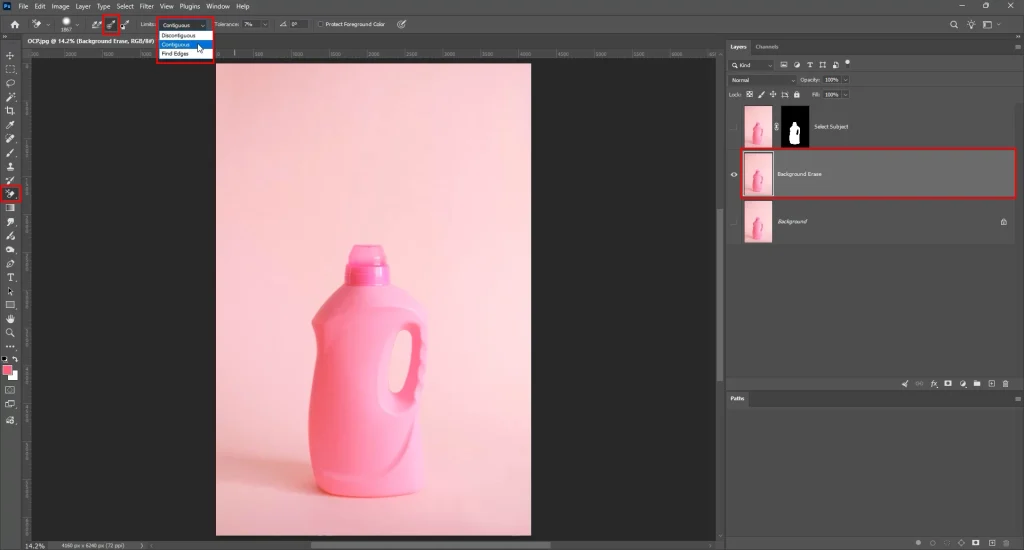
- Brush Size sets the working area you’re erasing within on each stroke.
- Tolerance deciders how close a pixel’s color needs to be to the sampled color before it gets erased.
- Sampling determines whether the tool reads color continuously as you drag or locks onto a single fixed point.
- Protect Foreground Color keeps a chosen color from being erased by mistake, which is useful when the subject shares a similar tone with the background.
Best for: Simple, single-color backgrounds where the subject and backdrop have clearly different colors and no overlapping detail.
Not recommended for: Hair, fur, or transparent objects. This tool erases pixels permanently rather than masking them, so there’s no clean way to recover detail later without starting the image over.
Method 5: Magic Wand Tool for Solid Backgrounds
The Magic Wand selects pixels of similar color in a single click, based on three settings worth understanding before you use it:
- Tolerance controls how wide a color range gets included – raise it to grab more of the background, or lower it for a tighter, more precise selection.
- Contiguous limits the selection to connected pixels only. Turn it off if the same background color appears in separate, disconnected areas of the photo, like a gap between someone’s arm and their side.
- Add/Subtract selection lets you hold Shift to add more areas to the current selection, or Alt/Option to remove a section from it – useful for picking up small background patches the first click missed.
Pros: Extremely fast on flat, single-color backgrounds, and one of the quickest tools in Photoshop when the conditions are right.
Cons: Falls apart quickly on gradients, shadows, or textured backgrounds, where you’ll end up spending more time cleaning up a messy selection than the tool saved you.
Don’t have enough time to make image transparent on your own?
We offer professional background removal services!
How to Refine Hair and Complex Edges
Hair, fur, and wispy fabric are where most background removals fall apart, and it’s the single biggest quality gap between an amateur cutout and a professional one.
Photoshop’s Select and Mask workspace has a dedicated Refine Hair button that detects individual strands and rebuilds the edge around them automatically, and in Photoshop 2026 it does a noticeably better job separating fine strands from a busy or similarly colored backdrop than earlier versions did.
A few settings worth knowing before you rely on it:
- Feather softens the mask edge by a small amount, so the transition between subject and background doesn’t look like it was cut out with scissors.
- Shift Edge pushes the entire selection boundary slightly in or out, which is useful for catching stray pixels the initial detection missed along the hairline.
- Contrast and Smooth clean up jagged or noisy selections by tightening the edge and reducing small, uneven bumps along the outline.
- Decontaminate Colors strips leftover background color that clings to edge pixels after masking — this is exactly what stops hair or fabric from carrying a faint white or gray halo once it’s placed on a new background
This is also the step where photography studios and freelance photographers lose the most time on portrait and wedding work. Since every strand of hair adds a few extra seconds of manual cleanup.
At scale, that adds up fast — which is usually where outsourcing bulk edits starts to pencil out better than doing it in-house, one photo at a time.
How to Export an Image with a Transparent Background
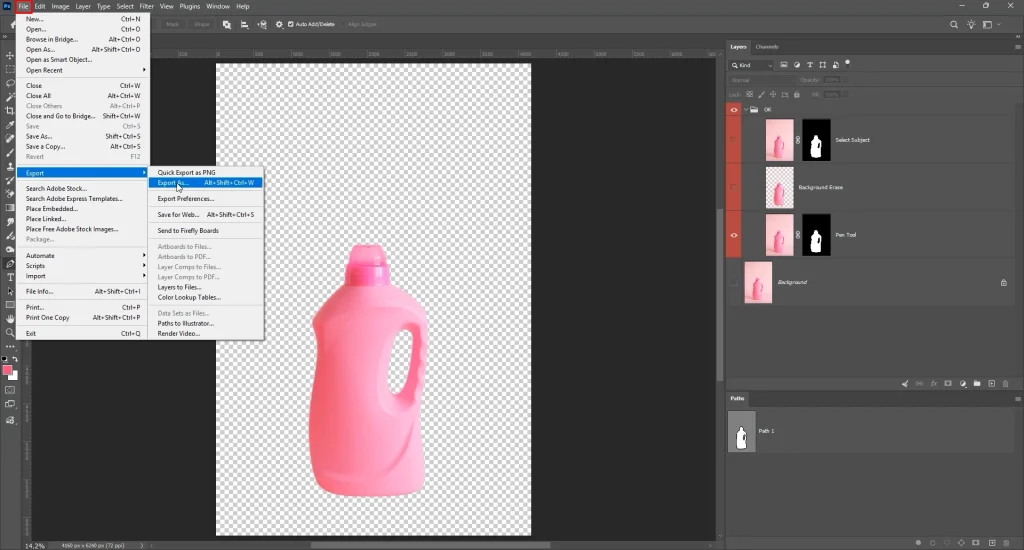
Once the mask is done, export matters just as much as the masking itself. The wrong format, or one unchecked box in the export dialog, will quietly flatten your canvas transparency into a solid white background. There are some key differences between JPG, JPEG, PNG, RAW, PSD, TIFF files. It’s an easy mistake to miss until the file is already live somewhere.
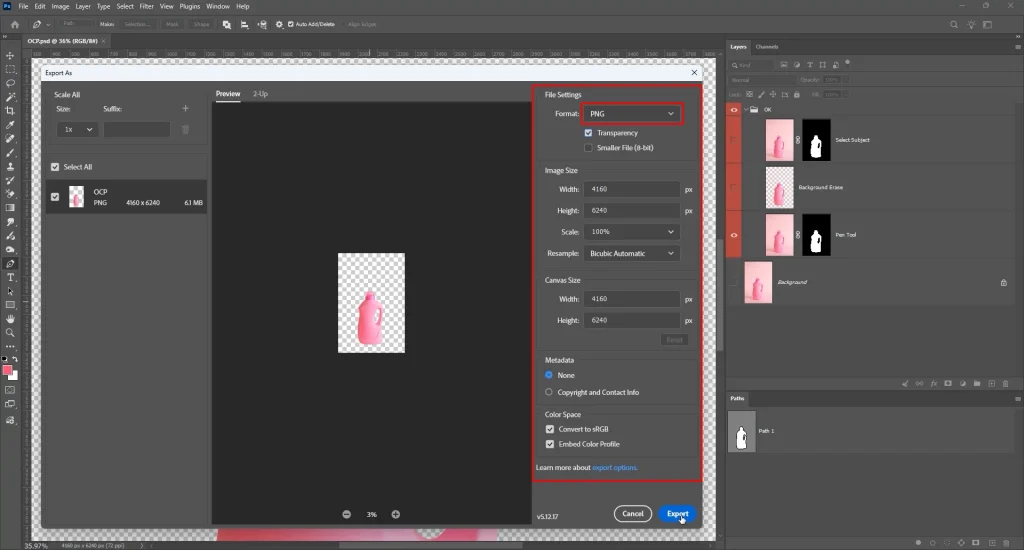
- PNG: The standard format for transparent images online. Go to File > Export As > PNG, or File > Export > Quick Export as PNG, and confirm the Transparency box is checked before saving.
- PSD: Keeps every layer, mask, and adjustment fully intact, which makes it the right choice any time the file needs further editing later, by you or someone else on the team.
- TIFF: Supports transparency with lossless quality, which is why it’s the common choice for print workflows where file compression can’t afford to soften any detail.
- WebP: Supports canvas transparency at a noticeably smaller file size than PNG, making it a solid pick for websites where page load speed matters as much as image quality.
- JPEG: Never supports transparency, no matter the settings. Export as JPEG and Photoshop automatically fills the empty area with a solid color, usually white, without any warning.
| Format | Supports Transparency | Best Use |
|---|---|---|
| PNG | Yes | Websites |
| PSD | Yes | Editing |
| TIFF | Yes | Printing |
| WebP | Yes | Web performance |
| JPEG | No | Photos |
Amazon rejecting images for poor background?
We provide professional editing!
Pro Tips for Better Transparent Images
- Always mask, never erase. Masks stay fully reversible, while erasing throws pixels away for good. There’s no reason to take the riskier option.
- Zoom to 200% before finalizing any edge, since that’s the zoom level where stray pixels and rough spots actually become visible.
- Use the Pen Tool for hard-edged commercial products where the client or platform expects pixel-perfect precision, not an approximate AI selection.
- Run Refine Hair on any portrait or apparel shot with loose strands, since it’s built specifically for that scenario and consistently outperforms manual brushwork on fine hair.
- Export as PNG-24 for full-quality transparency rather than PNG-8, which compresses color and can introduce banding around soft edges.
- Save an editable PSD alongside your final export, so future revisions take minutes instead of starting the whole process over.
- Keep the original layer untouched, always, no matter which method you use — it’s the one habit that saves the most time when something needs to be redone.
Common Mistakes to Avoid
While removing white background or making an image transparent background, you should avoid some mistakes that are mentioned below:
- Saving as JPG and losing canvas transparency without realizing it until the file is already uploaded somewhere. And the background has quietly turned white.
- Deleting pixels instead of masking them, which throws away image data permanently. If a client or platform asks for a change later, there’s nothing left to recover.
- Skipping edge refinement, which leaves a faint outline, jagged edge, or halo around the subject that’s easy to miss at a glance but obvious once the image is placed on a new background.
- Not zooming in before calling it finished, since problems around hair, fingers, and fine detail hide comfortably at 100% zoom but become obvious at 200%.
- Working from a low-resolution image and expecting clean edges anyway — there simply isn’t enough pixel data for the AI or a manual selection to work with.
- Ignoring color fringing, where leftover background color clings faintly to the subject’s edge and shows up as an odd tint once the image sits on a different background.
- Not preserving a PSD, which means starting over from scratch, mask and all, for every single revision request instead of opening a saved file and adjusting it.
When Photoshop Isn’t Enough
Manual masking works fine for one image. It gets a lot less practical at 50, 500, or 5,000. Which is the reality for e-commerce brand owners, retail catalogs, and fashion labels shipping a new collection every season.
A few situations where doing it in-house stops making sense:
- Bulk product catalogs that need identical, consistent backgrounds across every SKU — a look that’s hard to maintain image by image when a whole team is editing on tight deadlines.
- Complex hair or fur masking on portrait and wedding sets, where Refine Hair helps but a trained retoucher still needs to check and correct every image individually.
- Jewelry and reflective products, where Pen Tool precision takes real, unavoidable time per image and doesn’t compress well no matter how efficient the editor is.
- Ghost mannequin work for apparel brands, combining multiple shots of the same garment into one seamless, invisible-mannequin image.
- Ongoing content pipelines for marketing teams and agencies that can’t spare a designer for repetitive cutout work every single week on top of everything else on their plate.
This is the exact gap professional image editing services fill. Offshore Clipping’s Photoshop background removal and image masking teams handle both the fast, simple cutouts and the painstaking hair-and-fabric work by hand, so catalog managers and studio owners don’t have to trade speed for accuracy.
Prepping a full product catalog for launch? The e-commerce image editing service is built specifically around bulk, marketplace-ready output.
Frequently Asked Questions
How do I make an image background transparent in Photoshop?
Open your image, duplicate the layer, and use Remove Background in the Properties panel for a quick AI cutout, or Select Subject plus a Layer Mask for more control. Refine the edges in Select and Mask.
Can I make a white background transparent?
Yes. Select the white area with the Magic Wand or Select Subject, invert the selection if needed, and mask it out. Photoshop’s checkerboard pattern confirms the area is now transparent instead of solid white.
Why is my transparent background showing white?
This usually happens when you export as JPEG, which can’t store transparency, or when the Transparency checkbox is unchecked during PNG export. Confirm the layer thumbnail shows a checkerboard.
Should I save as PNG or JPG?
Save as PNG if you need a transparent background. JPG doesn’t support transparency and fills empty areas with solid color. PNG also preserves sharper edges around fine detail like hair or text.
Does Photoshop Express support transparent backgrounds?
Photoshop Express has limited background removal tools with less control over export transparency. For reliable, professional-grade transparent PNGs, the desktop version with Layer Masks and PNG export is the more dependable option.
Which Photoshop tool is best for removing backgrounds?
It depends on the image. Remove Background is fastest for simple product shots, Select Subject plus a Layer Mask works well for people and apparel; and the Pen Tool remains the most precise choice for hard-edged products like jewelry and electronics.
How do I make a logo transparent?
Open the logo file, select the background with the Magic Wand or Select Subject tool, then mask that area out. Export as PNG-24 with transparency enabled so the logo drops cleanly onto any background color with no visible box around it.
Can I create transparent images on Photoshop for ecommerce?
Yes, and it’s one of the most common uses of transparent PNGs. Many marketplaces require white or transparent product backgrounds, so masking each product and exporting as PNG keeps listings consistent and compliant.
Why does my exported PNG still have a white background?
This typically means a white background layer beneath the subject wasn’t deleted, or transparency wasn’t checked during export. Confirm the layer panel shows a checkerboard pattern.
What file format keeps transparency?
PNG, PSD, TIFF, and WebP all support transparency. PNG is the standard for web and marketplace use, PSD keeps every editable layer for future revisions, TIFF suits print workflows, and WebP offers transparency with smaller file sizes.
Conclusion
Every method here gets you to the same place: a clean, background-free image. Which one to use depends on the subject and how much time you have. Remove Background handles simple product shots in seconds. Select Subject plus a mask covers most people and apparel photos. The Pen Tool is still the most reliable choice for jewelry, electronics, and any image where the edge has to be exact.
Whichever method you use, keep it non-destructive — mask instead of erase, and always keep an editable PSD. That’s what makes revisions painless later.