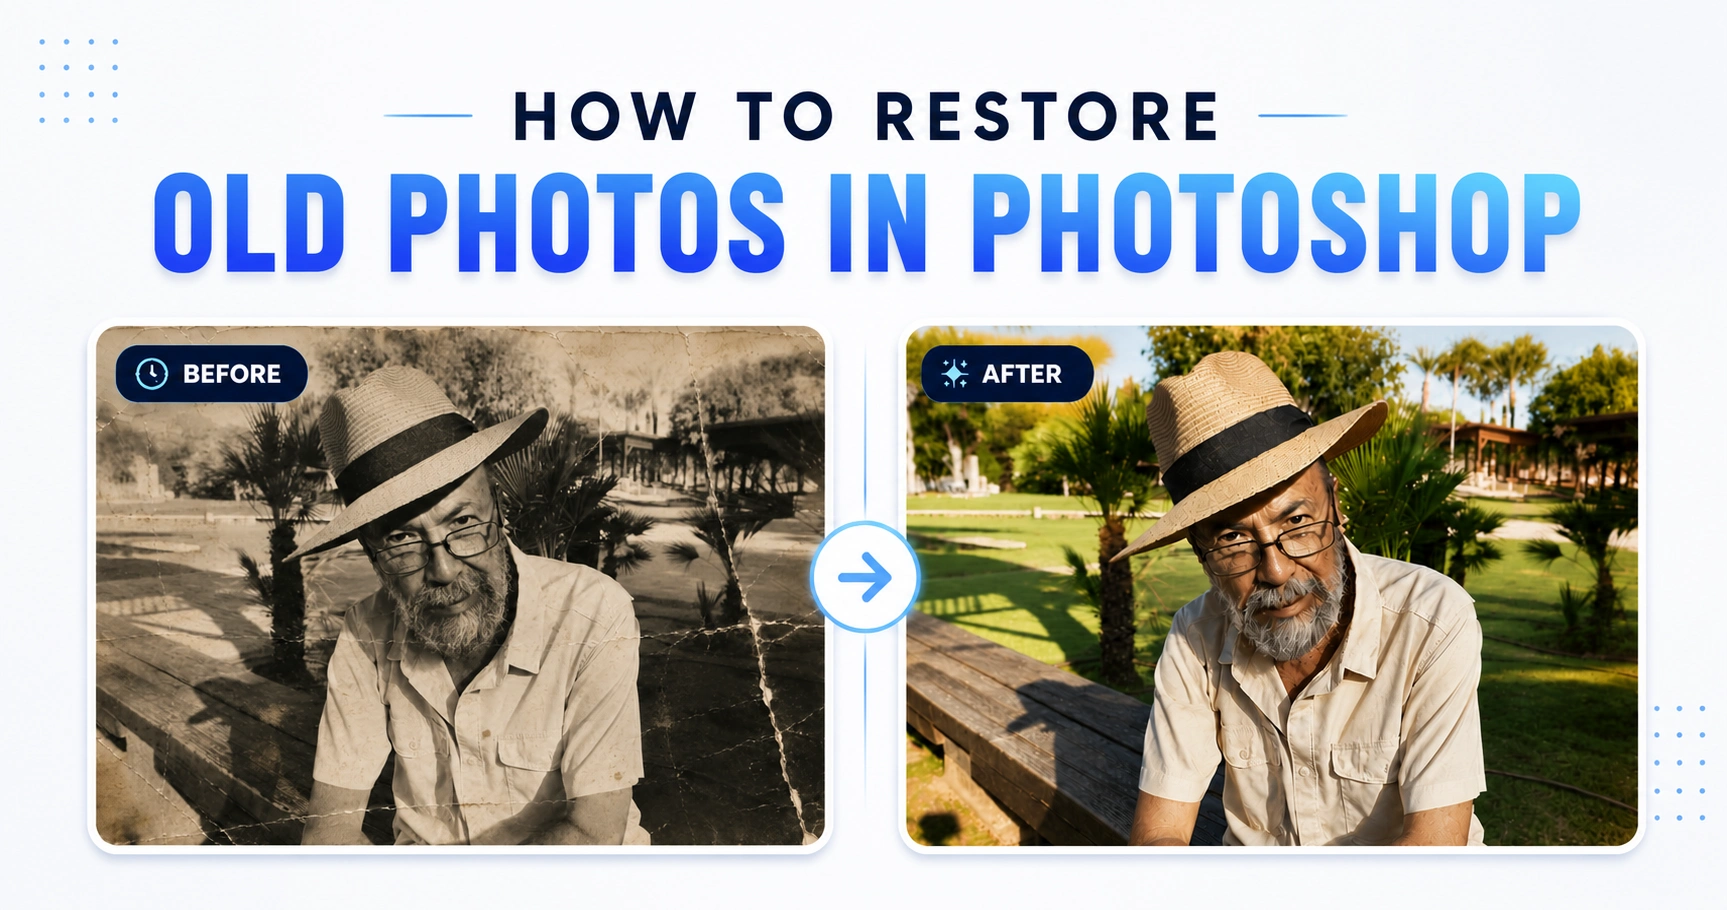
You can restore old photos in Photoshop by following a simple workflow. Start with a high-resolution scan, repair damage using the right restoration tools, adjust tones and colors, then export the restored image. You don’t need advanced Photoshop skills. You only need the right process.
If you’re new to Photoshop, it’s easy to feel confused. One tutorial recommends AI, while another suggests doing everything manually. A wrong edit can also damage a family photo you may never replace.
The relieving thing is that photo restoration is easier than it looks. Once you know which tool to use and when to use it, the process becomes much simpler.
This step-by-step guide shows you how to repair scratches, remove stains, fix fading, and restore old photos with confidence, even if you’ve never tried to restore old photos before.
What Is Photo Restoration?
Photo restoration in Photoshop repairs old or damaged photos while preserving their original appearance. Instead of fixing everything at once, you repair each type of damage with the right Photoshop tools. This approach produces cleaner, more natural results.
By following a step-by-step approach, you better control and help preserve the original details. That’s why it is one of the most trusted tools for restoring family photos, vintage portraits, and printed photographs.
Before You Start: Preparing Your Old Photo
A good restoration starts with a good scan. Preparing your photo correctly helps Photoshop preserve more detail and makes every repair step easier.
Scanning at the Right Resolution
Your restoration can only be as good as your scan. If the scanner doesn’t capture enough detail, Photoshop can’t recover information that isn’t there. That’s why choosing the right resolution is the first step.
For most printed photos, scan at 600 DPI. If the photo is very small or you plan to enlarge and print it later, choose 1200 DPI. Higher-resolution scans preserve fine details, making it easier to repair scratches, faded faces, and small damaged areas.
Cleaning the Physical Photo Before Scanning
Dust sitting on the photo often becomes part of the scanned image. That means you’ll spend extra time removing spots that weren’t actually part of the original damage. Cleaning the photo first makes restoration faster and more accurate.
Use a clean microfiber cloth or a soft anti-static brush to remove loose dust. Never use water, household cleaners, or tissues, as they may scratch or permanently damage old photo prints.
File Format Matters: TIFF vs JPEG vs PNG
The file format you choose affects how much image detail Photoshop can preserve while you edit. Starting with the right format helps maintain quality throughout the restoration process.
- TIFF – Best for photo restoration because it keeps the highest image quality.
- PNG – A good choice if TIFF isn’t available.
- JPEG – Best used only for sharing the final photo, not for restoration, because it compresses the image and removes fine details.
Common Beginner Mistake: Low-Resolution Scans Ruin Restoration
Many beginners scan old photos at a low resolution because the image looks clear on the screen. However, once you start restoring the photo, missing details become impossible to recover.
Avoid this mistake by following these tips:
- Scan old photos at 600 DPI or higher whenever possible.
- Use 1200 DPI for small photos or future enlargements.
- Always keep the original high-resolution scan as a backup.
Do the colors still look faded after restoration? Our Photo Color Correction Services restore natural color, improve contrast, and give your old photos a more lifelike appearance.
Why Editing Directly on the Background Layer Is a Mistake
Editing the Background layer breaks a non-destructive workflow because every change is applied to the original image. Always keep the original photo untouched while restoring.
Avoid this mistake by following these tips:
- Duplicate the Background layer before making any edits.
- Lock the original layer to prevent accidental changes.
- Delete or adjust the edited layer anytime without affecting the original photo.
Next, let’s look at the Photoshop tools you’ll use throughout the restoration process.
Photoshop Tools You’ll Use During Restoration
Each tool repairs a different type of damage. Learn what each tool does before you start so you can choose the right one for every repair.
Throughout this guide, you’ll use a small set of tools, and each one has a specific job.
Spot Healing Brush
Use the spot healing brush to remove dust, tiny scratches, and small spots before repairing larger damage. It gives you a clean starting point for the restoration process.
Clone Stamp Tool
Use the clone stamp tool after removing small defects. It repairs large scratches, cracks, and missing areas that automatic tools can’t fix accurately.
Patch Tool
Use the patch tool when stains or worn areas cover a larger section of the photo. It blends clean texture into the damaged area for a natural repair.
Remove Tool
Use the remove tool early in the restoration process to erase dust, spots, and small distractions before repairing larger damage.
Neural Filters
Use neural filters to speed up scratch removal, facial enhancement, or photo colorization. Always review the AI result before moving to manual repairs.
Generative Fill
Use generative fill after repairing the main damage. It works best for rebuilding simple backgrounds or missing corners, not faces.
Curves
Use curves after repairing physical damage to restore contrast and make faded photos look more natural.
Levels
Use levels to correct faded shadows, highlights, and midtones before making final color adjustments.
Camera Raw Filter
Use the Camera Raw Filter to make small adjustments to exposure, color, texture, and sharpness. It helps improve the overall appearance of your photo.
What Version of Photoshop Do You Need?
If you’re not sure which version to use, here’s a simple breakdown:
- Best choice: Photoshop 2024 or newer. This version includes modern tools like Neural Filters and Generative Fill, which can speed up photo restoration and make complex repairs easier.
- Good alternative: Photoshop CC (older versions). You can still restore photos with tools like Clone Stamp, Healing Brush, Patch Tool, Curves, and Levels, but you won’t have access to the newer AI features.
- Basic option: Photoshop Elements. This is suitable for simple fixes like removing dust, scratches, and adjusting brightness or contrast, but it lacks advanced tools and AI features, so more complex restoration can be harder.
A useful stat: Adobe’s current Photoshop plan starts at US$22.99 per month for the annually billed monthly option, which can help readers compare the cost of upgrading.
In short, if you want the easiest and most efficient workflow, use Photoshop 2024 or later. If you’re using an older version, you can still follow this guide, but you’ll rely more on manual techniques.
Now that you know what each tool is designed to do, you’re ready to use them in the correct order. In the next section, we’ll restore an old photo step by step using the workflow professionals follow.
Restored the photo but still not happy with the background? Our Image Background Removal Services create clean, distraction-free images for printing, framing, or online use.
Step-by-Step: How to Restore Old Photos in Photoshop
Now it’s time to restore your old photo in Photoshop. Follow these eight steps in order. Each step prepares your photo for the next one. A simple workflow to restore damaged old photos and add realistic colors using Photoshop’s Neural Filters and retouching tools. Let’s start.
Step 1: Open Your Photo and Create a Safe Copy
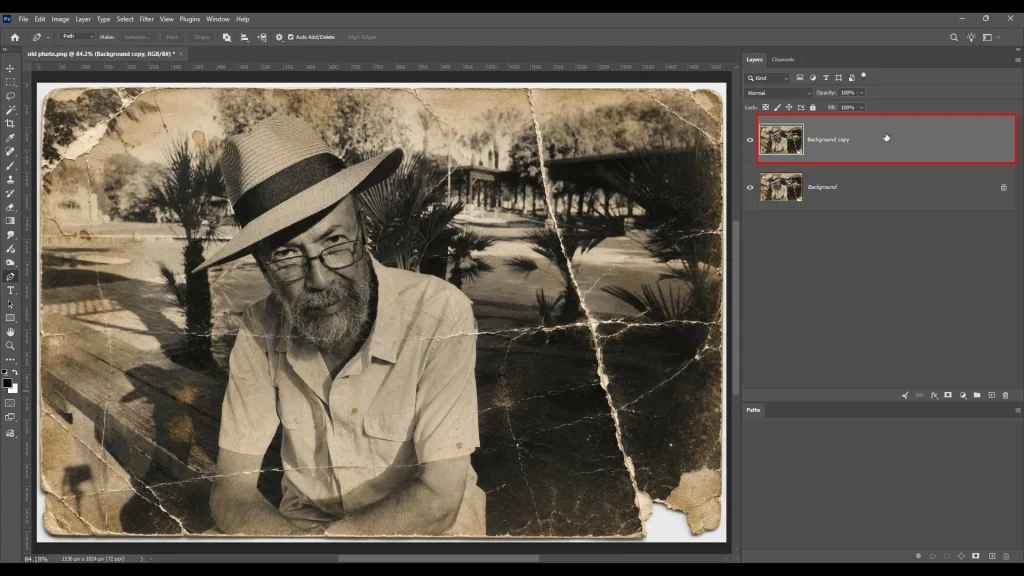
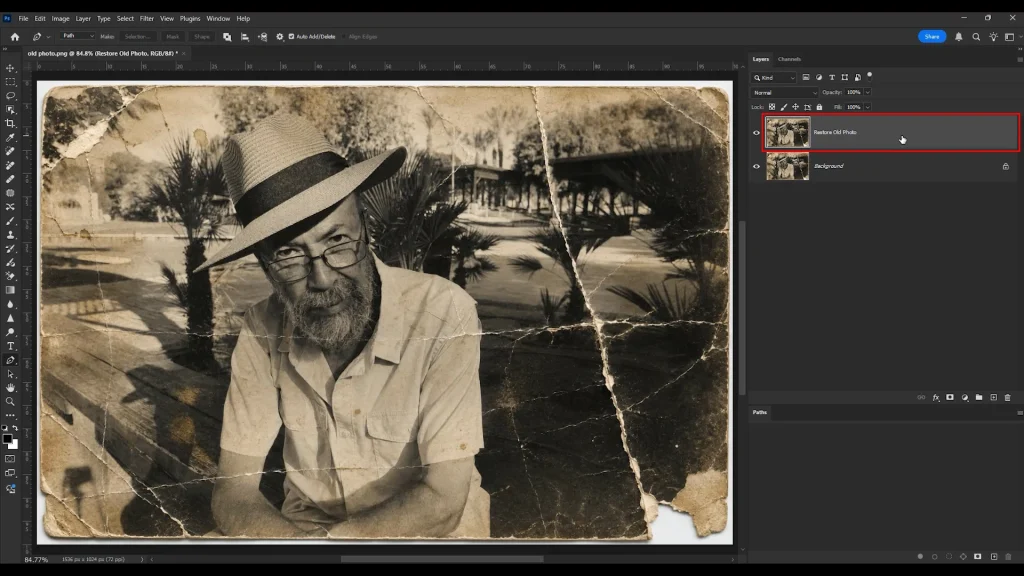
Before making any edits, create a backup so your original scan stays untouched.
How to do it:
- Go to File → Open and select your scanned photo.
- Press Ctrl + J (Windows) or Cmd + J (Mac) to duplicate the Background layer.
- Rename the new layer Restoration and make all your edits on this copy.
- Leave the original Background layer untouched as your backup.
Step 2: Crop the Photo and Improve the Exposure
Crop the photo first so you can focus on the damaged areas. Then adjust the exposure to make scratches, stains, and tears easier to see.
How to do it:
- Select the Crop Tool (C) and remove torn edges, blank borders, or unwanted scanner marks.
- If the scan is tilted, use the Straighten option in the top toolbar.
- Go to Layer → New Adjustment Layer → Levels.
- Drag the black slider slightly to the right to restore shadow detail, then move the white slider slightly to the left to brighten faded highlights.
- Adjust the gray (midtone) slider until the photo looks balanced and natural.
Pro Tip: Avoid pushing the sliders too far. If the brightest areas lose detail or the shadows become solid black, reduce the adjustment.
Step 3: Remove Dust and Small Scratches
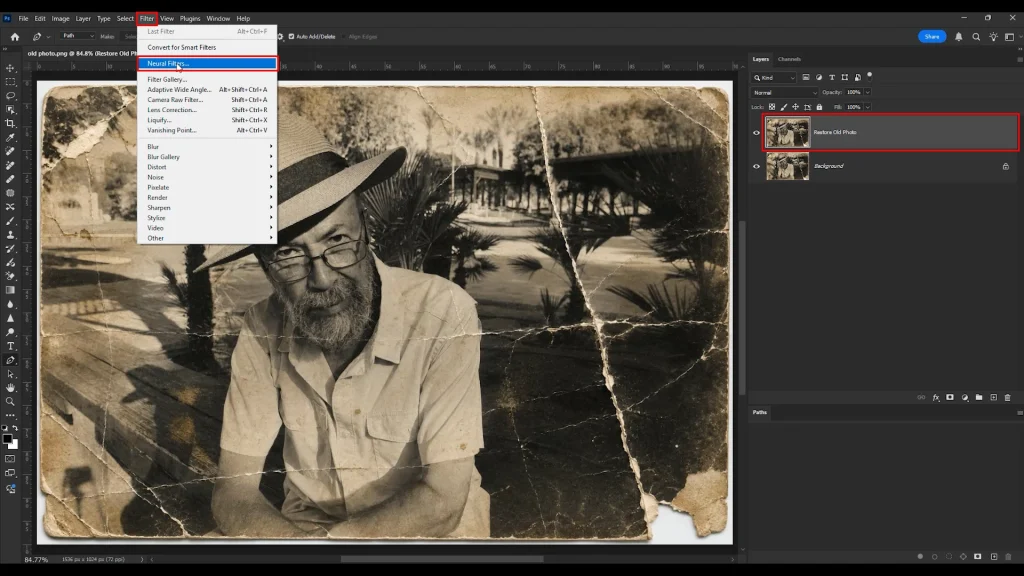
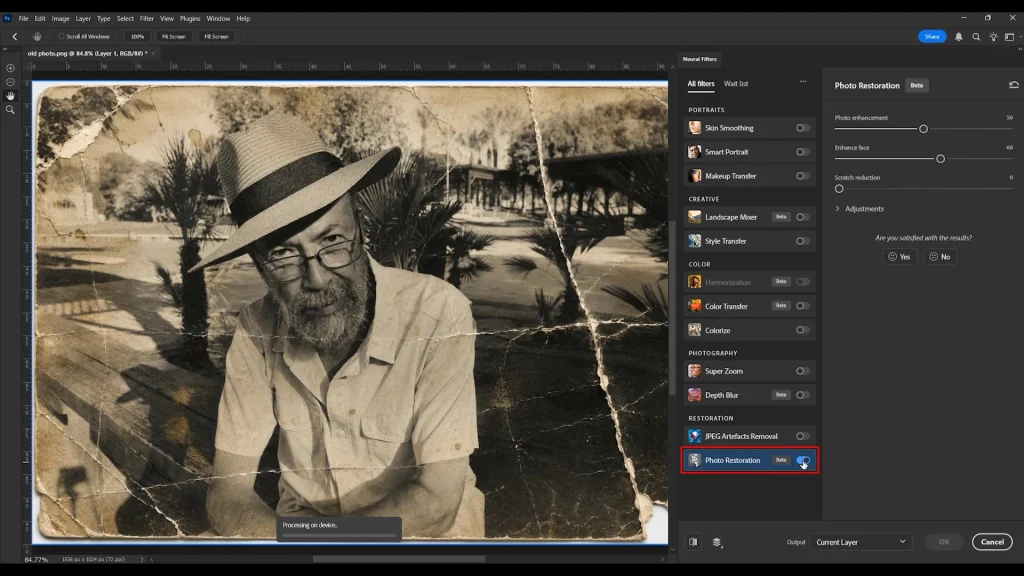
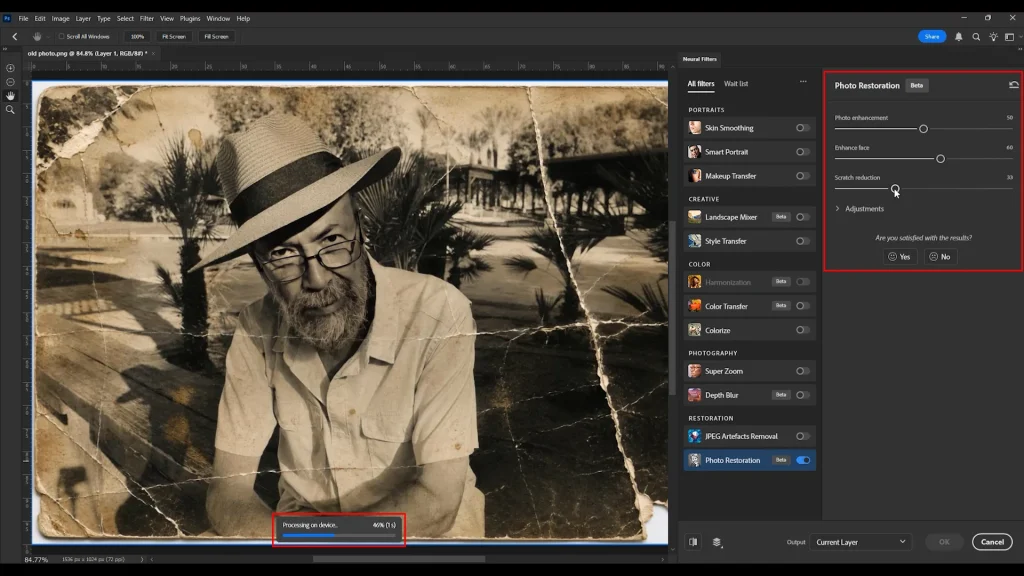
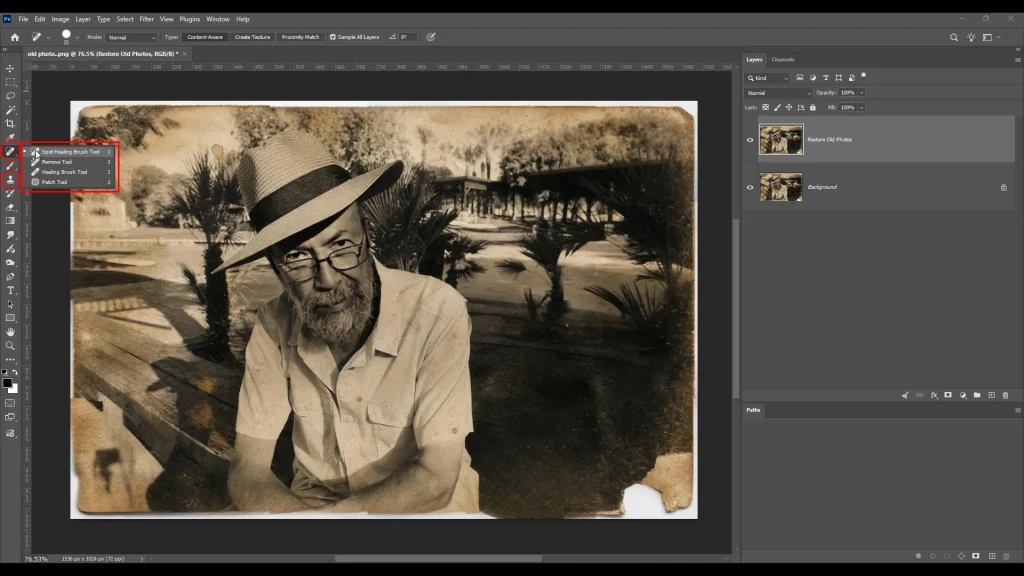
Remove dust and small scratches before repairing larger damage. This prevents small imperfections from affecting later edits.
How to do it:
- Go to Filter → Neural Filters → Photo Restoration.
- Turn on the filter and adjust the Scratch Reduction slider gradually until light scratches fade while fine details remain clear.
- If the photo contains people, turn on Enhance Face to improve soft or slightly blurred facial features.
- Set Output to New Layer, then click OK to keep the original image untouched.
- Select the Spot Healing Brush Tool (J) and use a brush slightly larger than each scratch. Paint over any remaining dust spots or small marks.
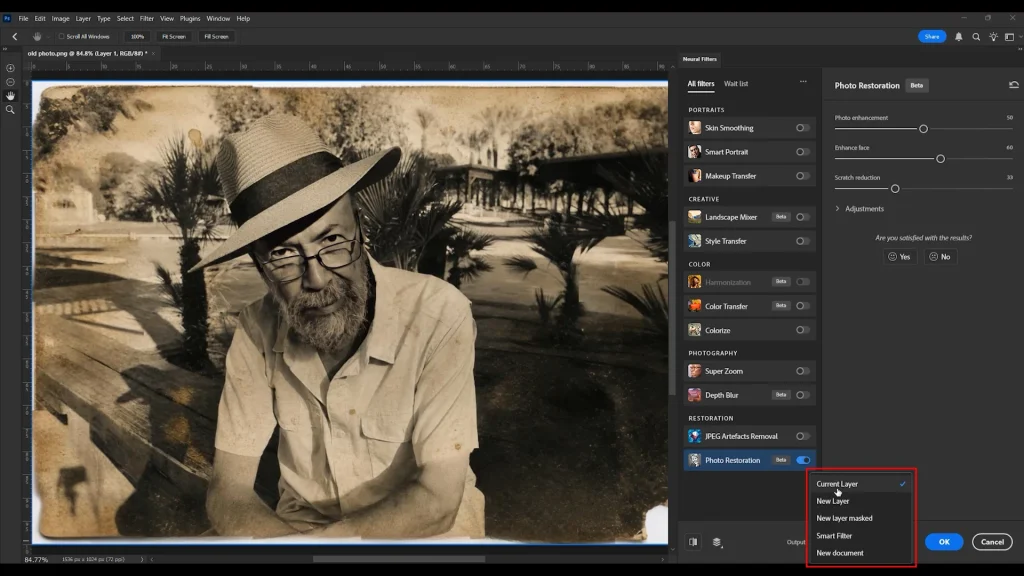
Pro Tip: Use short brush strokes instead of one long stroke. This produces cleaner repairs and prevents you from blending the wrong textures.
Step 4: Repair Tears and Missing Areas
After removing small defects, repair tears, cracks, and missing areas. Working in this order helps the repairs blend more naturally.
How to do it:
- Select the Clone Stamp Tool (S).
- Hold Alt (Option on Mac) and click a clean area close to the damage to sample a similar texture.
- Set the brush Hardness to around 0–30%, then paint over tears or cracks using short strokes. Sample nearby areas often to keep the repair looking natural.
- For larger damaged sections, switch to the Patch Tool and drag the selection to a clean area with a similar texture.
- If a simple background corner is missing, go to Edit → Generative Fill and use a short prompt if needed to match the surrounding background. Compare the result with the original before applying it.
Pro Tip: Avoid using Generative Fill on faces or important details. Manual tools usually produce a more accurate and natural-looking restoration.
Step 5: Restore Brightness, Contrast, and Color
After repairing the damage, restore the photo’s brightness, contrast, and color. Small adjustments usually produce the most natural result.
How to do it:
- Go to Layer → New Adjustment Layer → Levels and restore the overall brightness.
- Next, go to Layer → New Adjustment Layer → Curves and improve the contrast if the photo still looks flat.
- If the image has a yellow, blue, or sepia tint, add Layer → New Adjustment Layer → Color Balance and make small adjustments until the colors look natural.
- (Optional) Use the White Point Picker in the Levels panel and click on a clean white area to help Photoshop correct the overall color balance automatically.
Pro Tip: Make small adjustments and compare them with the original photo.
Step 6: Colorize a Black-and-White Photo
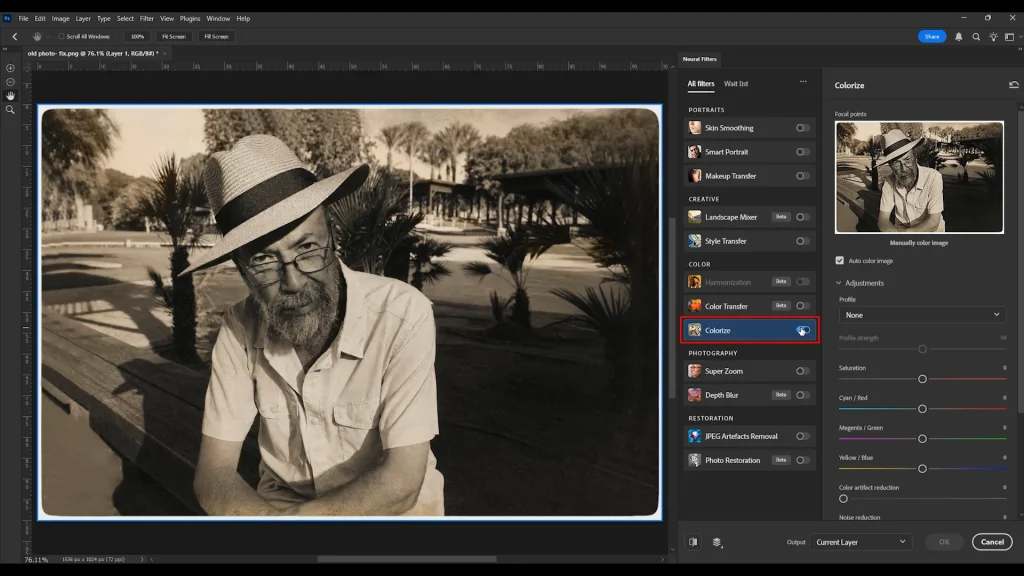
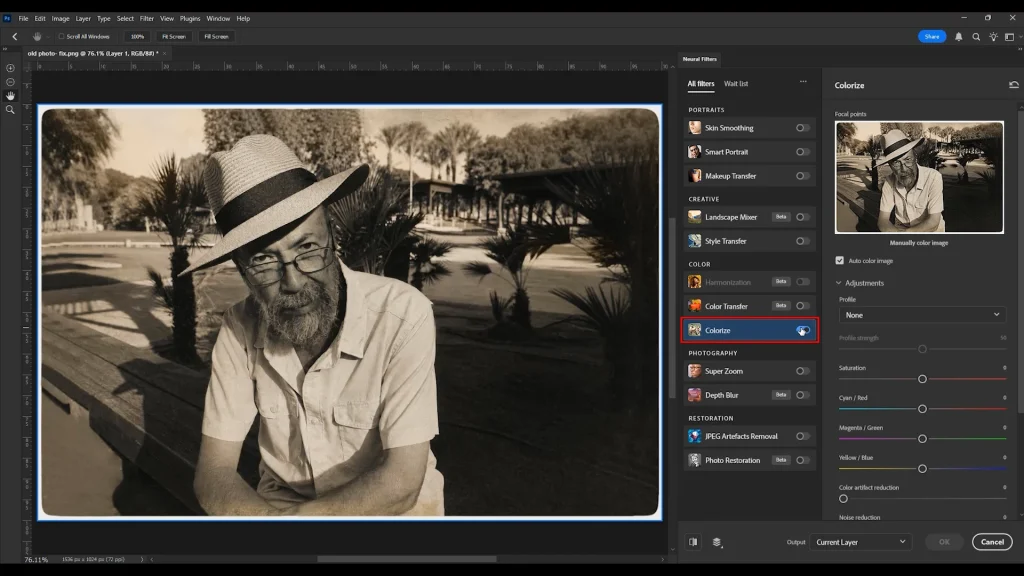
Use this step only for black-and-white photos. Photoshop AI creates a good starting point, but you may need to adjust the colors manually.
How to do it:
- Go to Filter → Neural Filters → Colorize.
- If prompted, click Download to install the filter.
- Turn on Colorize and let Photoshop generate the initial colors.
- Reduce Global Saturation if the colors look too strong, or increase it slightly if they appear dull.
- Increase Color Artifact Reduction only until unwanted color bleeding disappears.
- If AI assigns the wrong color to clothing, hair, or objects, use Focus Color to correct them.
- For more precise edits, sample the correct color with the Eyedropper Tool (I) and paint over the area using the Brush Tool (B) on a separate color layer.
- Set Output to New Color Layer, then click OK.
Step 7: Add the Final Touches
Check the restored photo carefully before saving. Small corrections now can greatly improve the final result.
How to do it:
- Go to Filter → Camera Raw Filter.
- Increase Texture slightly (around +5 to +15) to recover fine details. Add a small amount of Clarity only if the photo still looks soft.
- Zoom to 100%, then 200%, and inspect the image for repeated Clone Stamp patterns, missed scratches, or remaining dust spots.
- Clean any remaining imperfections with the Spot Healing Brush Tool (J).
- (Optional) Go to Filter → Noise → Dust & Scratches, set the Radius to 1 pixel, preview the result, and click OK only if it smooths tiny imperfections without blurring important details.
Step 8: Save and Export Your Restored Photo
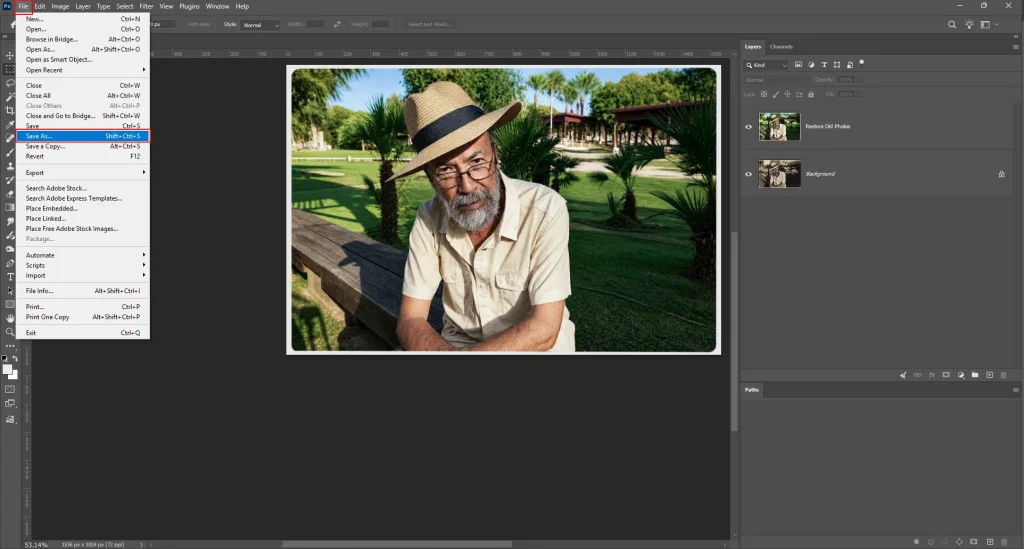
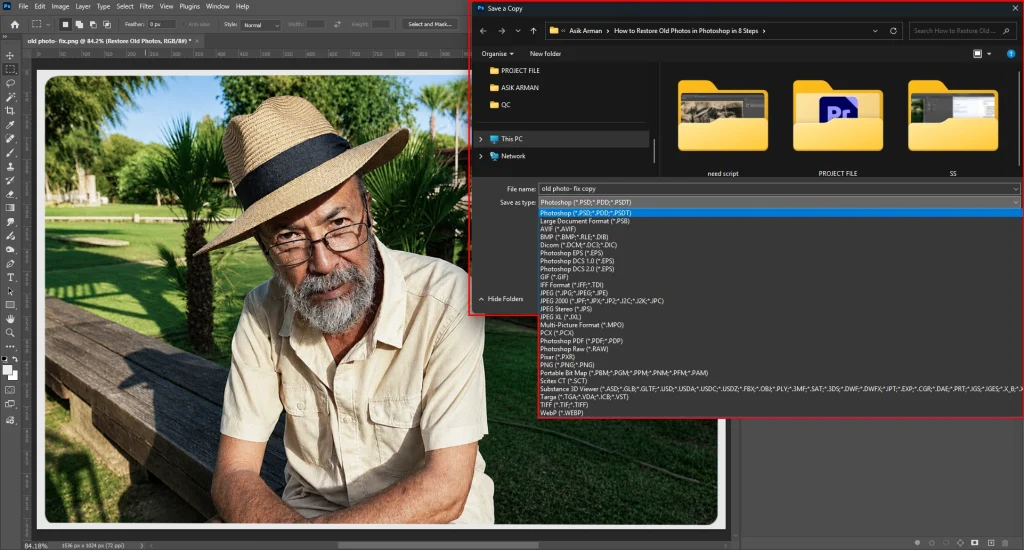
Save both an editable copy and a final export. This lets you make changes later without restoring the photo.
How to do it:
- Go to File → Save As and save a PSD copy to preserve all your layers.
- Go to File → Export → Export As and save a JPEG copy for sharing online.
- If you plan to print the photo, save an additional TIFF copy for the highest image quality.
- Store your original scan, PSD, and exported files in separate folders so you always have a clean backup.
Your photo is almost ready. Before exporting, review it carefully for missed damage, cloning artifacts, and color inconsistencies. The next section shows you how to perform a final quality check.
How to Check Your Restoration Quality Before Finishing
Before exporting, quickly verify your restoration at different zoom levels and on different displays. This step helps you catch leftover scratches, cloning artifacts, color issues, or unnatural textures while your PSD is still editable.
Use this checklist before saving the final version:
| Check | Why It Matters |
|---|---|
| ✔ Zoom to 100% | Check if scratches, dust spots, or repair marks are still visible. |
| ✔ Zoom to 200% | Look for repeated Clone Stamp patterns, rough edges, or unnatural textures. |
| ✔ Compare the Before and After | Make sure you’ve restored the photo without removing important details. |
| ✔ Check skin tones | Faces should look natural without excessive smoothing or unrealistic colors. |
| ✔ Review the edges | Look for missed tears, rough selections, or visible repair lines around the borders. |
| ✔ Preview for printing | Make sure brightness, contrast, and sharpness still look natural at full size. |
| ✔ View on another screen | Different displays can reveal color casts or brightness issues you didn’t notice before. |
If everything looks natural at normal viewing size and close inspection, your restoration is ready to save, print, or share. If you still notice small issues, fix them now while your layered PSD file is still available.
Restored the photo but still not happy with the background? Our Image Background Removal Services create clean, distraction-free images for printing, framing, or online use.
Photo Restoration Limitations
Not every damaged photo can be fully restored. Before you start editing, understand what the restoration software can and can’t repair.
Let’s first look at the types of photo damage Adobe’s editing software can’t fully restore, then compare them with the damage it can repair successfully.
| Types of Damaged Photos Photoshop Can’t Fully Restore | Types of Old Photo Damage Photoshop Can Repair |
|---|---|
| Missing faces or facial features | Light to deep scratches |
| Extremely blurry or low-resolution scans | Dust, dirt, and surface spots |
| Destroyed image information | Faded colors and low contrast |
| Large missing areas with no reference | Yellowing and discoloration |
| Completely burned or water-damaged sections | Creases, fold marks, and tears |
| Original colors with no visual reference | Small missing corners, stains, and light mold spots |
Common Mistakes Beginners Make While Restoring Old Photos
Small mistakes can reduce the quality of your restoration. Learn what to avoid before you start to achieve cleaner, more natural results.
Here are the most common mistakes beginners make during photo restoration:
- Scanning at a low resolution: A low-quality scan loses image details that Adobe’s editing software can’t restore. Scan your photo at 600 DPI or higher.
- Skipping a non-destructive workflow: Editing the original image instead of a duplicate layer makes mistakes harder to fix. Always restore photos on a separate layer.
- Over-applying Scratch Reduction: A high scratch reduction setting can blur faces and fine details. Start at about 5% and increase it only if needed.
- Using a brush that’s too large: Large spot healing brush or clone stamp brushes often create blurry or obvious repairs. Keep the brush just slightly larger than the damaged area.
- Overusing Generative Fill: AI can create inaccurate faces and important details. Use it for simple backgrounds or missing borders only.
- Over-saturating AI colorization: Strong colors can make an old photo look unrealistic. Keep the colors natural and adjust the saturation gradually.
- Using the wrong export format: Save a PSD for future edits, JPEG for sharing, and TIFF for high-quality printing.
Avoiding these mistakes will help you restore old photos more naturally and with fewer corrections. Next, let’s compare Photoshop AI with manual restoration to see when each approach works best.
Should You Use Photoshop AI or Restore Photos Manually?
Both methods have different strengths. Choose Photoshop AI for speed and manual tools for accuracy based on the type of damage you’re repairing.
Here is a quick comparison:
Photoshop AI
Choose Photoshop AI when you need to restore light to moderate damage quickly. It works best for repetitive repairs but may not restore important details accurately.
Tools: Photo Restoration Neural Filter, Colorize Neural Filter, and Generative Fill.
Pros: Fast, beginner-friendly, and ideal for light scratches, dust, fading, colorization, and simple background repairs.
Cons: May generate incorrect faces, colors, or missing details.
Best when: Your photo has light to moderate damage, and you want to save time.
Manual Restoration
Choose manual restoration when accuracy matters more than speed. It gives you full control over important details that AI may change or miss.
Tools: Spot Healing Brush, Clone Stamp, Patch Tool, Levels, and Curves.
Pros: Full control, higher accuracy, and more natural results.
Cons: Slower and requires more editing time.
Best when: Your photo contains faces, tears, stains, creases, or other important details.
Verdict: Use Photoshop AI to speed up simple repairs, then switch to manual tools for faces, tears, and other important details. This workflow gives you the best balance of speed, accuracy, and natural-looking results.
DIY vs. Professional Photo Restoration: When Should You Hire an Expert?
Some photos are easy to restore yourself, while others need professional help. Compare both options to choose the right approach for your photo.
The comparison below can help you decide which option is right for your photo:
| DIY Photo Restoration | Professional Photo Restoration |
|---|---|
| Best for light scratches, dust, fading, and minor color correction. | Best for severe damage, missing areas, and complex restoration. |
| Requires basic Adobe image editor knowledge and time to learn. | Completed by experienced photo restoration specialists. |
| Good for restoring one or two personal photos. | Better for large photo collections or bulk restoration projects. |
| Results depend on your editing skills. | Delivers consistent, print-ready, high-quality results. |
| Lower cost but takes more time. | Costs more but saves time and reduces the risk of mistakes. |
In the next section, we’ll show you how Offshore Clipping restores old photos and what you can expect from our photo restoration service.
Get Your Old Photos Professionally Restored by Offshore Clipping
Some old photos can’t be replaced. If you’re worried about damaging a precious memory, let Offshore Clipping’s photo restoration service handle it with care and precision.
Our photo restoration services include:
- Scratch and tear repair
- Color restoration and correction
- Stain and discoloration removal
- Missing area reconstruction
- Black-and-white photo colorization
See our quality before you commit. Start your Free Trial today.
Old Photo Restoration FAQs
How long does it take to restore an old photo in Photoshop?
A simple restoration may take 10–30 minutes, while heavily damaged photos can take several hours. The time depends on the photo’s condition and your Photoshop experience.
Do I need Photoshop CC, or does Photoshop Elements work too?
Photoshop CC or Photoshop 2024+ offers the most restoration tools, including Neural Filters. Photoshop Elements works for basic repairs but has fewer advanced restoration features.
Can I restore old photos without Photoshop?
Yes. You can use free photo editing software or AI restoration tools, but Photoshop provides better control, higher accuracy, and more natural-looking results for complex restorations.
Will restoration remove the vintage or authentic look I want to keep?
No. If done correctly, restoration removes damage while preserving the photo’s original character. You can also keep natural grain, tones, and other vintage details if desired.
What if I don’t have the original photo, only a low-quality digital copy?
You can still improve a low-quality digital copy by reducing scratches, adjusting colors, and enhancing clarity. However, Photoshop can’t recover image details that are already missing.