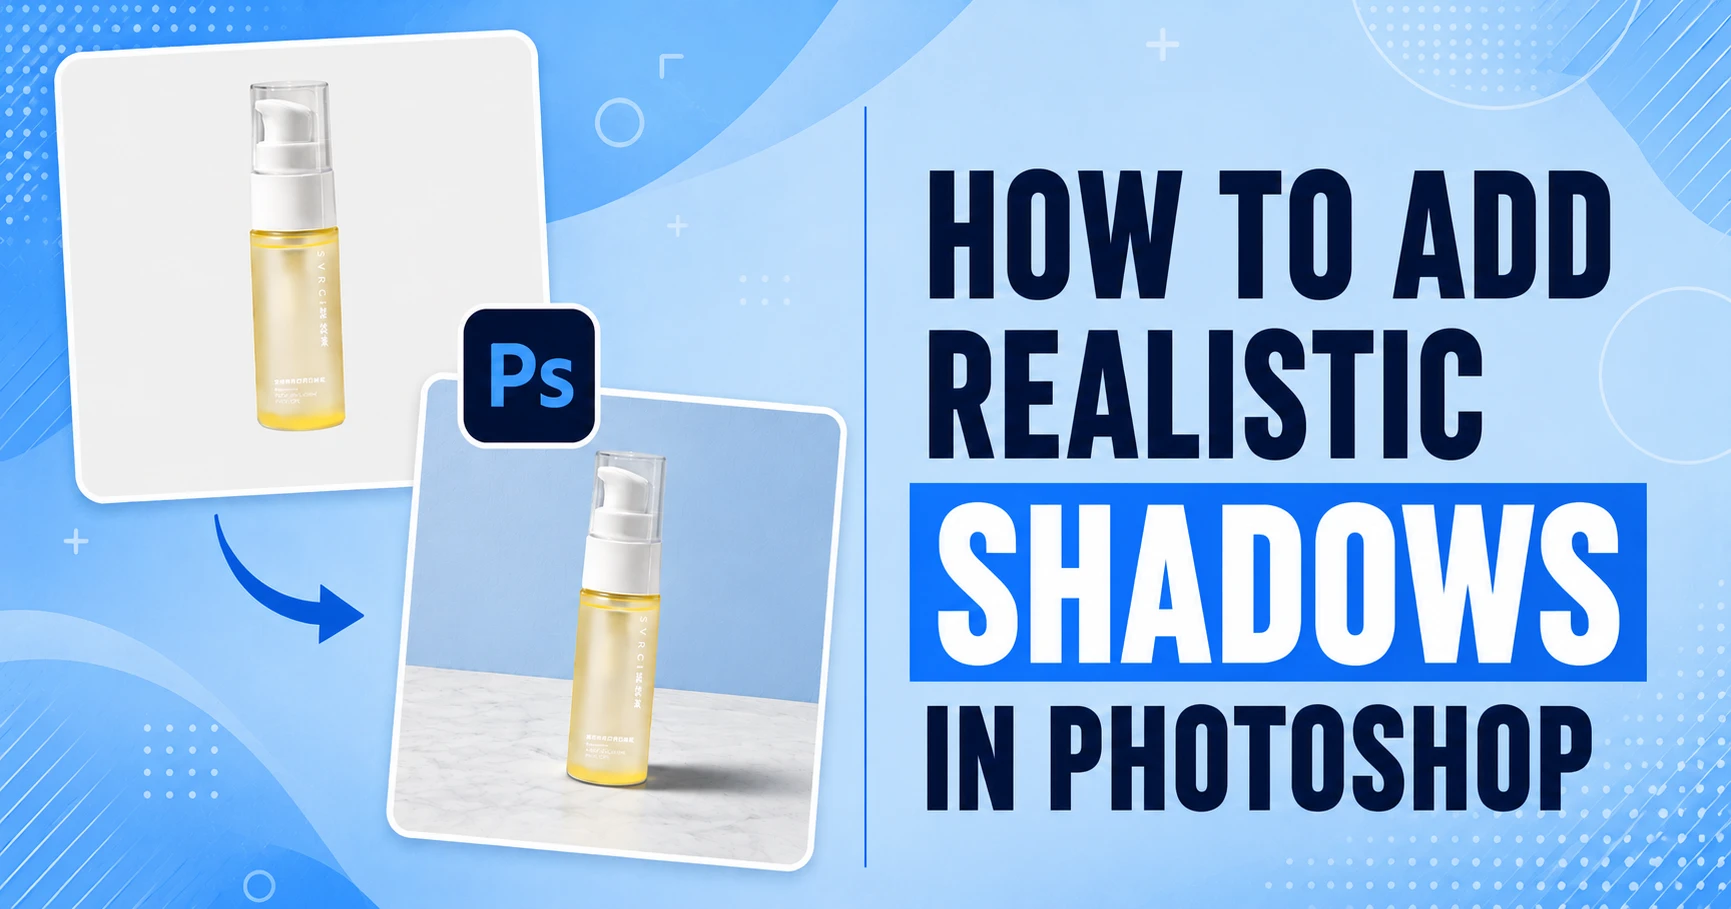
Realistic shadows are what ground an object, add depth, and make a composite believable at a glance. Photoshop’s built-in Drop Shadow effect handles simple cases well enough, but for product catalogs, fashion shoots, and marketing composites, a manually built shadow reads as far more convincing.
To add a realistic shadow in Photoshop, isolate your subject on its own layer, duplicate it to build a shadow shape, and transform it to match your light source. Fill it with a soft dark tone (not pure black), apply Gaussian Blur, lower the opacity, then add a tighter contact shadow where the object meets the surface.
The difference shows up fastest in the images that get the closest scrutiny: hero product shots, fashion listings, and anything sitting next to a competitor’s photo in a browser tab.
Key Takeaways
Before diving into the full workflow, here are the core principles worth keeping in mind. They solve most shadow problems on their own, even before you touch a single tool.
- Match the shadow’s angle and length to your actual light source, not a default preset.
- Build contact shadows and cast shadows as two separate layers for better control.
- Blur increases with distance from the object — shadows aren’t blurred evenly.
- Avoid pure black; a soft, colored dark tone reads more naturally.
- Work non-destructively with layer masks so every edit stays reversible.
Know What Type of Shadow Suits Your Object
Not every image needs the same shadow style. Picking the wrong one is a common reason edits look slightly off. Before opening Photoshop, it’s worth spending a moment to identify which type of shadow best fits the object and the surface it’s resting on.
- Contact Shadow – a tight, soft shadow directly beneath the object where it touches the surface. This is the shadow that does the most work convincing a viewer that the object is actually sitting there.
- Cast Shadow – the longer shadow thrown by an object away from its light source, useful for communicating direction, time of day, and depth in a scene.
- Natural Shadow – a soft-edged shadow that mimics diffused daylight or studio lighting, common in lifestyle and apparel photography.
- Drop Shadow – Photoshop’s built-in layer effect; fast to apply, but flatter and less convincing than a hand-built shadow.
- Reflection Shadow – a mirrored, faded reflection used for glossy or reflective surfaces like glass, metal, and polished floors.
| Shadow Type | Best For | Difficulty | Realism | Recommended Use |
|---|---|---|---|---|
| Contact Shadow | All product types | Easy | High | Base layer on every composite |
| Cast Shadow | Directional lighting | Medium | High | Lifestyle & outdoor composites |
| Natural Shadow | Soft studio lighting | Medium | High | Apparel, portraits, lifestyle |
| Drop Shadow | Icons, text, graphics | Easy | Medium | UI elements, quick mockups |
| Reflection Shadow | Glossy surfaces | Hard | High | Jewelry, glass, footwear, bottles |
Before You Start: Prepare Your Image
Shadow quality is only ever as good as the cutout underneath it. A shadow built on a rough or fringed edge will inherit every flaw, and no amount of blurring will hide it once the shadow is in place.
A few minutes of prep at this stage saves a lot of rework later, especially if the image is heading into a catalog where dozens of similar shots need to match.
- Remove the background cleanly – stray pixels or soft fringing will show up as noise once a shadow sits beneath them.
- Refine the object’s edges with Select and Mask, so the silhouette used for the shadow is accurate.
- Convert the layer to a Smart Object before transforming, so you can resize later without losing quality.
- Identify your light source – check the original photo or decide on a direction for a full composite.
- Choose a background that suits a shadow – a subtle gradient or textured surface sells realism better than flat white.
Pro Tip:
Clean object cutouts are essential for believable shadows. If a cutout has ragged edges or leftover fringing, the shadow inherits every flaw. For a deeper look at getting this step right, you need to learn background removal in Photoshop first.
Photoshop Tools You’ll Use
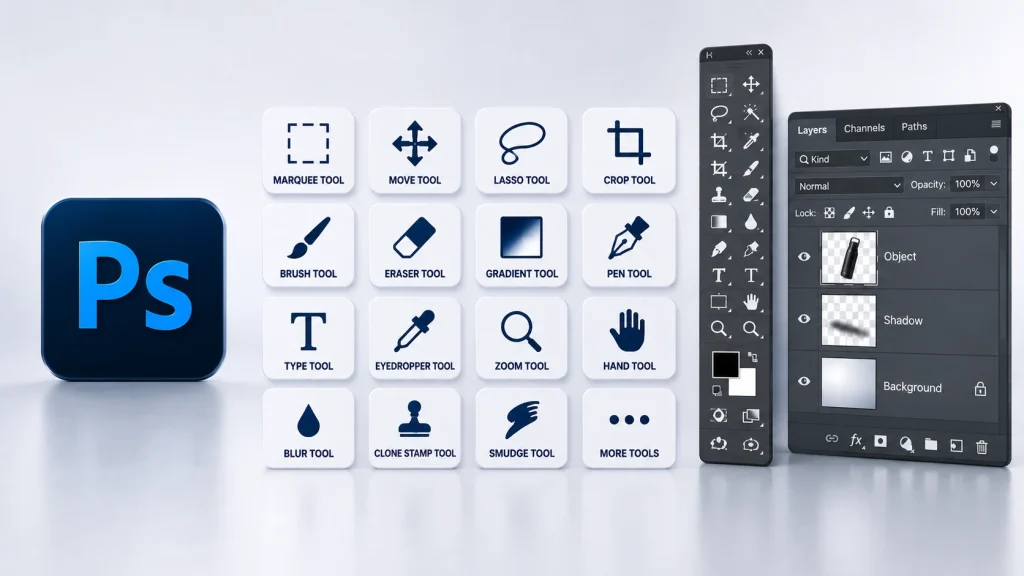
None of these single tools produces a realistic shadow on its own. The effect comes from combining them in sequence. It helps to know what each one contributes before starting the workflow, so the reasoning behind each step in the next section makes sense as you go.
- Free Transform (Ctrl/Cmd+T) — resize and reshape the shadow layer
- Warp — bend the shadow to follow uneven or curved surfaces
- Perspective Transform — angle the shadow to match camera perspective
- Gaussian Blur — soften shadow edges based on distance from the object
- Motion Blur — simulate directional light spread for select shadow styles
- Layer Masks — hide parts of the shadow without deleting pixels
- Brush Tool — paint opacity variations directly onto the shadow layer
- Blend Modes — Multiply keeps shadows from washing out the background
- Opacity — control shadow intensity independent of color
- Smart Objects — keep transforms and blurs editable at any point
New to the Photoshop toolbar and tools themselves? Photoshop Toolbar & Tools 2026 guide covers every tool referenced above in more depth, with shortcuts and use cases.
How to Add Realistic Shadows in Photoshop
Here are the twelve steps that take an isolated object from a flat cutout to a fully grounded, shadowed composite. Each step builds on the last, so it’s worth following them in order the first few times, even if some feel like they could be skipped.
The shortcuts that seem to save time early usually cost more time later, when the shadow needs to be redone.
Step 1: Isolate the Subject
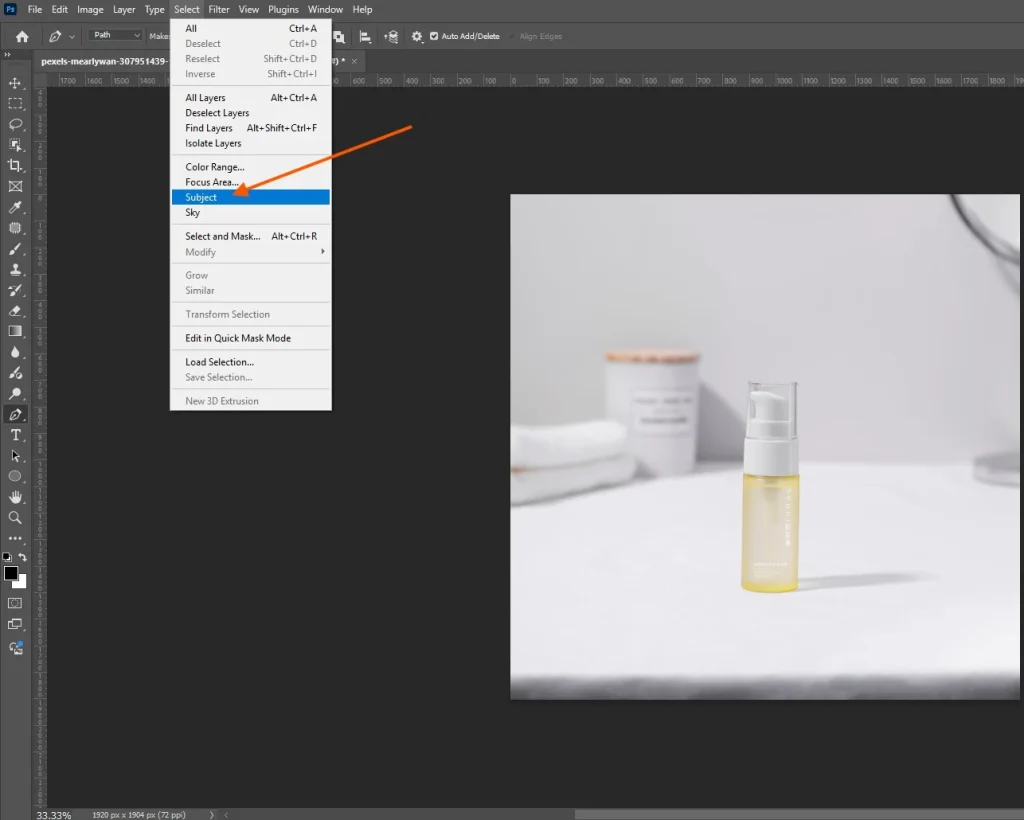
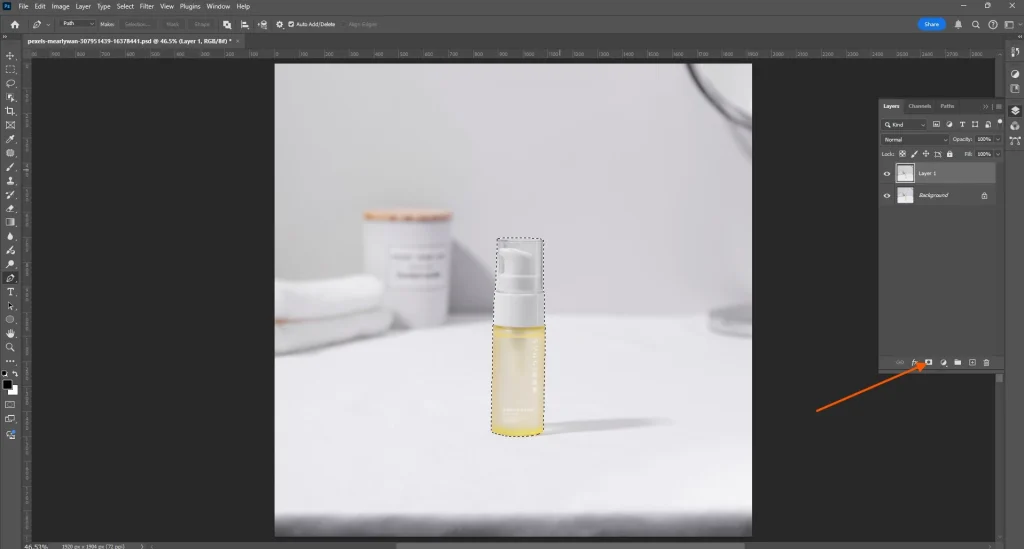
Use Select Subject or your saved clipping path to separate the object from its background. Then place it on its own layer. Photoshop 2026’s edge detection handles fine details like fabric texture and jewelry prongs noticeably better than earlier versions, so it’s worth running first before falling back on manual masking.
Step 2: Duplicate the Object
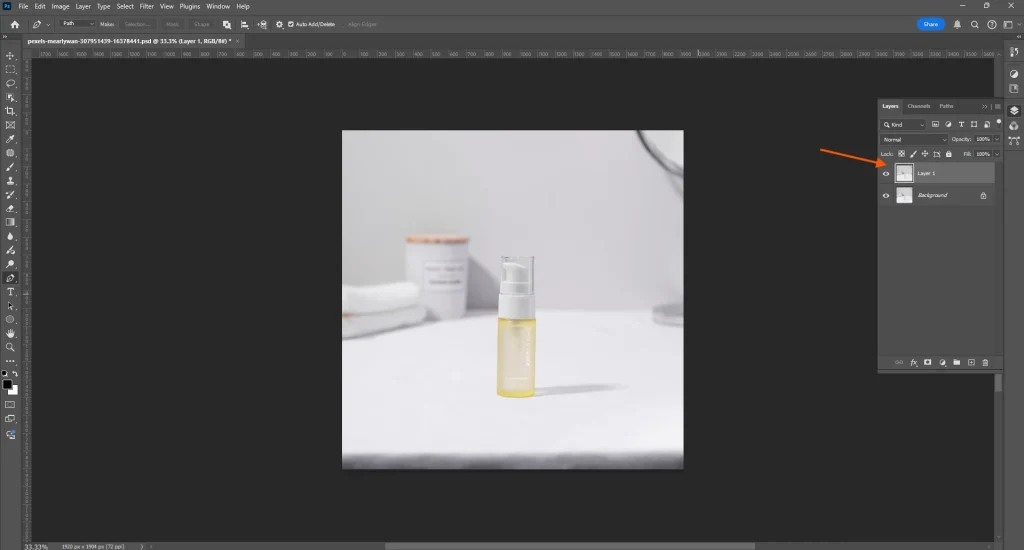
Duplicate the isolated object layer (Ctrl + J / Cmd + J) and rename it “Shadow.” This duplicate becomes your shadow shape, so keep the original object layer untouched above it. It is needed later for contact shadow blending and for comparing the finished shadow against the real object.
Step 3: Create a Shadow Silhouette
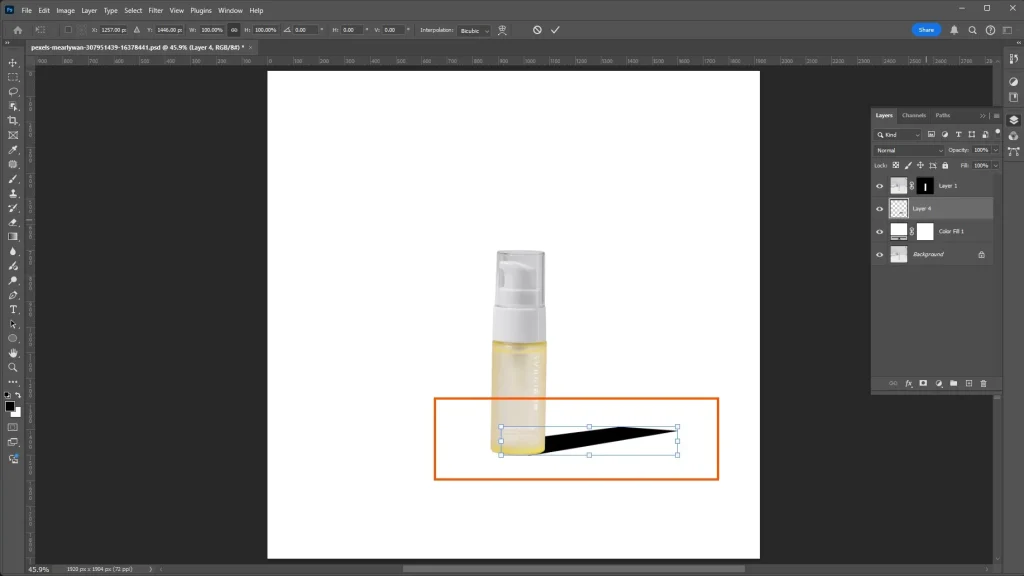
Fill the duplicated layer with a solid dark tone using Lock Transparent Pixels, so only the object’s shape fills in rather than the whole canvas.
Avoid pure black; a dark gray or a darker version of the surrounding color reads more naturally and avoids the flat, cut-out look that pure black produces.
Step 4: Position the Shadow
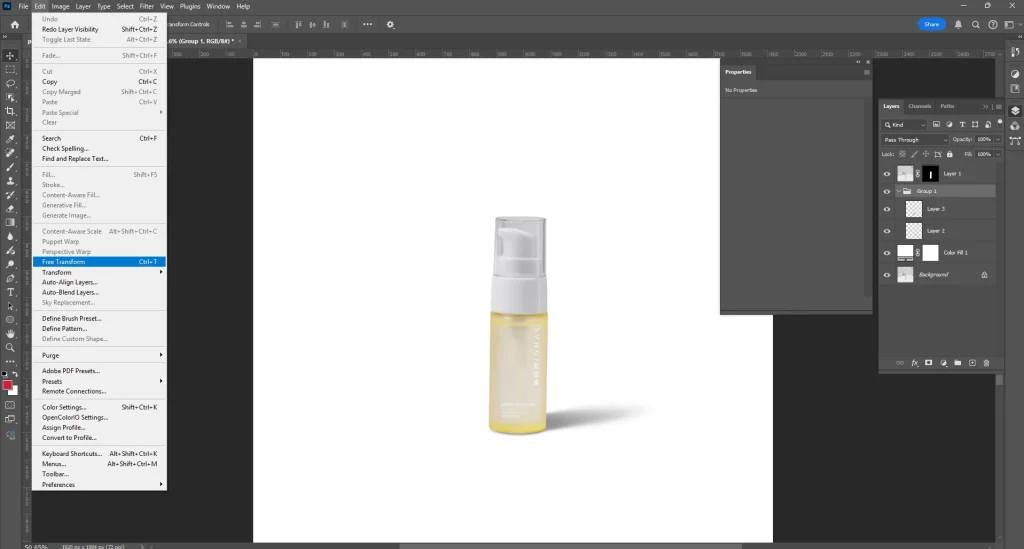
Move the shadow layer beneath the object layer, then drag it into a rough position based on where the light source would push it. Treat this as a placeholder position. The exact angle gets refined in the next step, so there’s no need to get it perfect yet.
Step 5: Match the Light Angle
Study the light source in the original photo, or decide on one for a full composite, then rotate the shadow layer with Free Transform. So it points a way from the light at a matching angle.
A low, side-angled light produces a long shadow; an overhead light produces a short one directly beneath the object.
Step 6: Transform Perspective
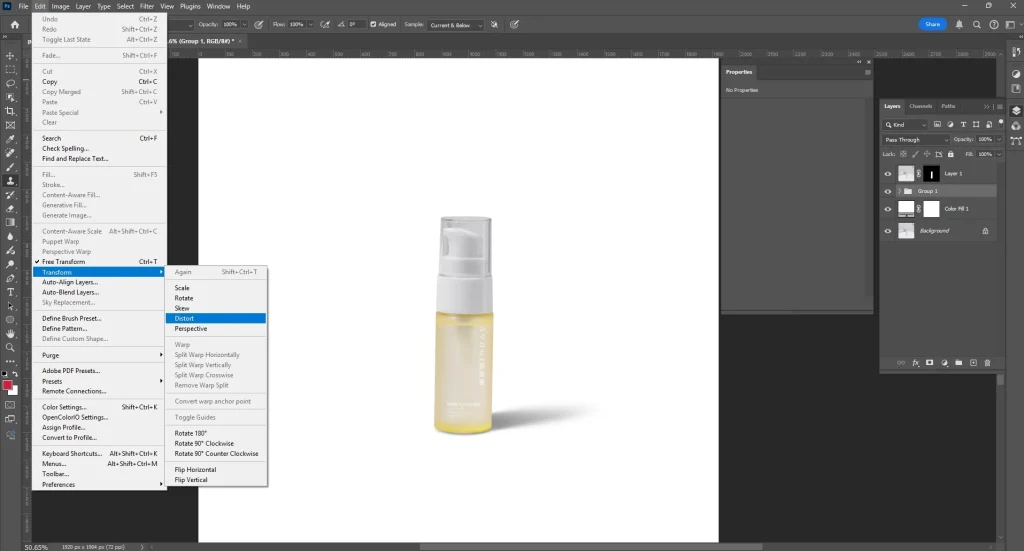
Use Edit > Transform > Perspective (or Distort) to stretch the shadow along the ground plane so it matches the camera’s viewing angle. Flat, straight-on product shots need less perspective distortion than angled lifestyle shots, so adjust the intensity based on the framing.
Step 7: Refine Using Warp
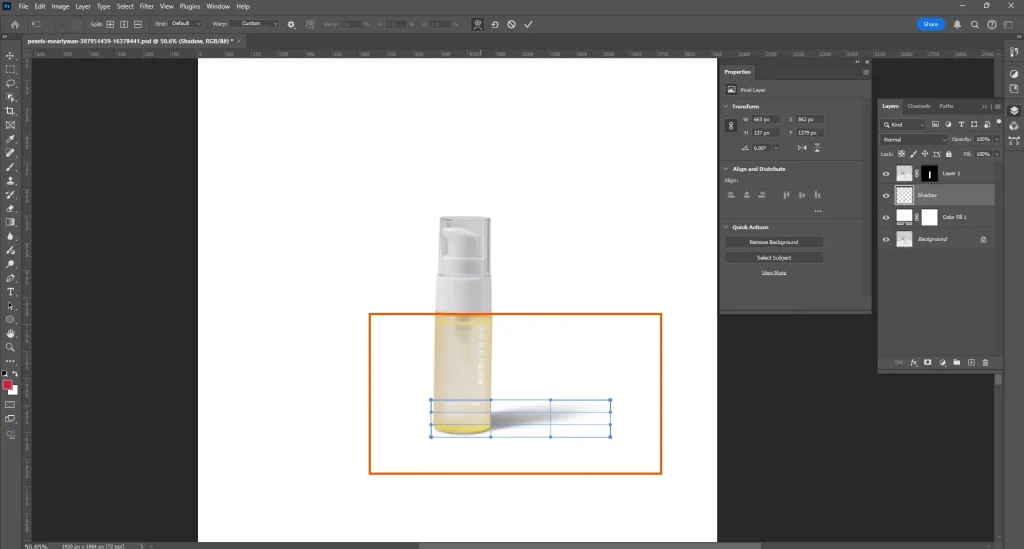
For uneven surfaces, such as folded fabric, textured backgrounds, curved shelves, etc. switch to Warp mode and adjust the mesh so the shadow follows the surface contour instead of sitting on a flat plane. This step matters most for lifestyle shots where the surface itself has visible texture.
Step 8: Apply Gaussian Blur
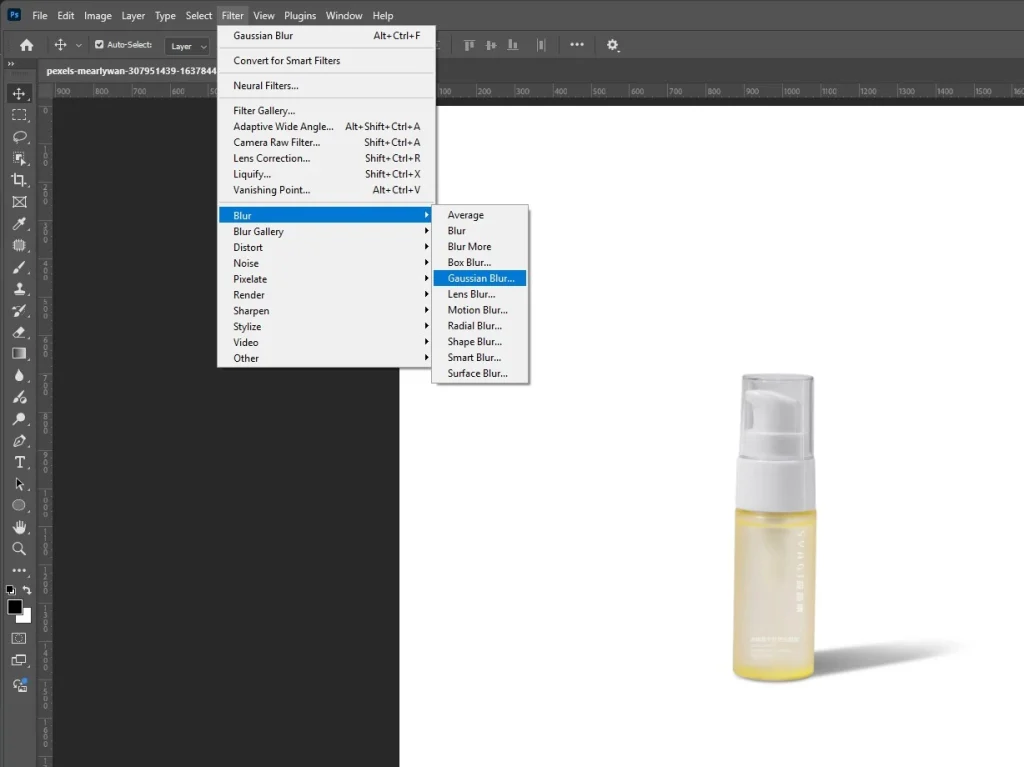
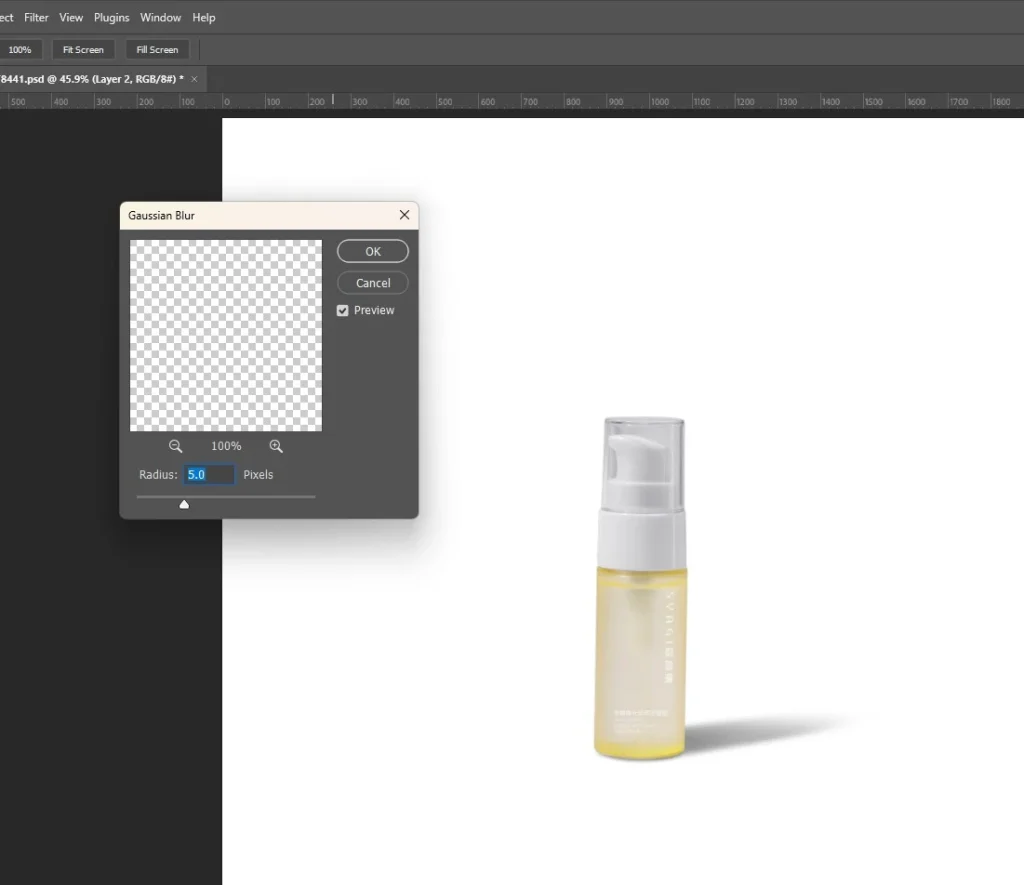
Apply Gaussian Blur to soften the shadow’s edges. Keep the blur lighter near the object, where contact shadows should stay crisp, and heavier toward the tip of the shadow, matching how real light naturally diffuses over distance.
Step 9: Reduce Opacity
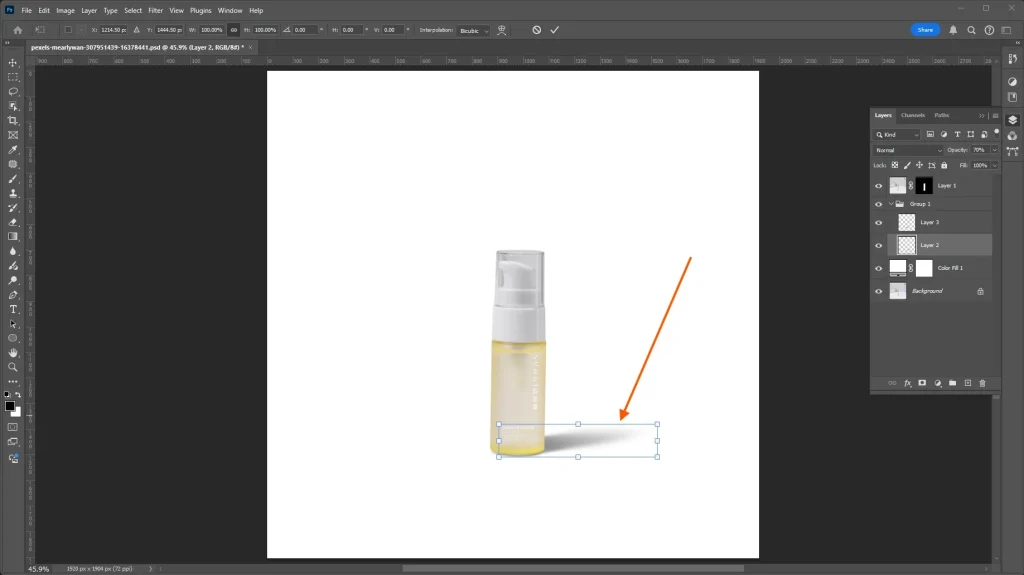
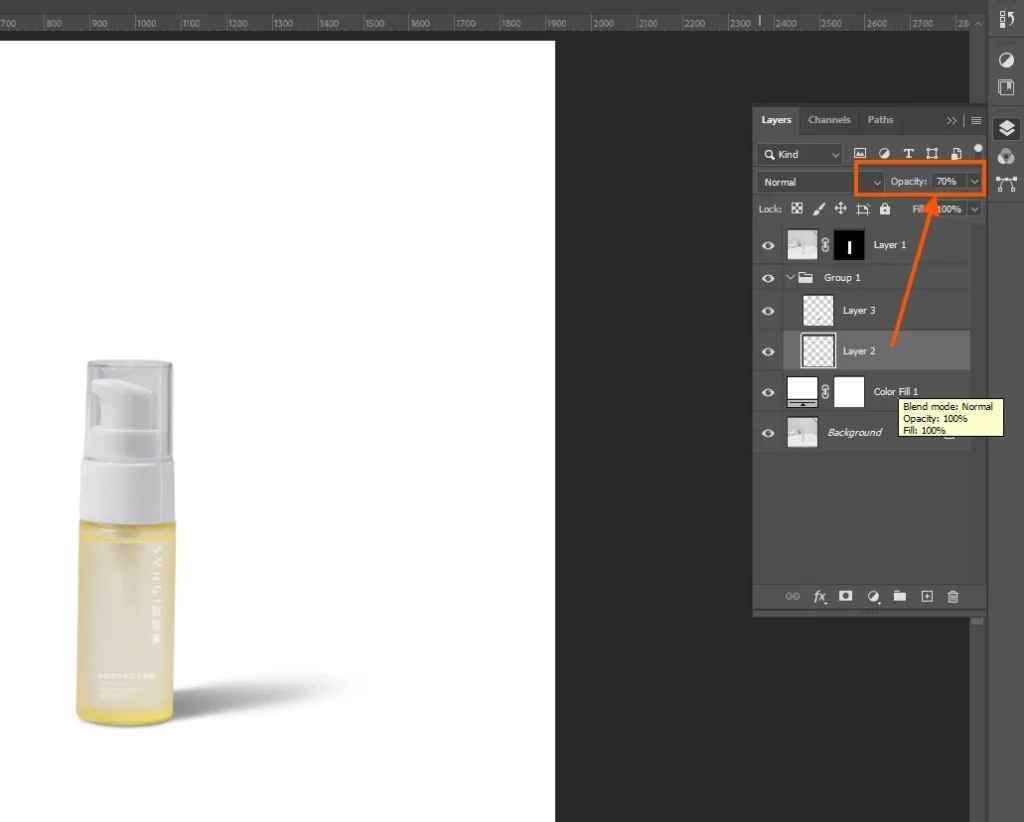
Lower the shadow layer’s opacity, typically somewhere between 40–70%, so the surface beneath still shows through. Full opacity almost always looks pasted-on, since real shadows rarely block 100% of ambient light.
Step 10: Blend With the Environment
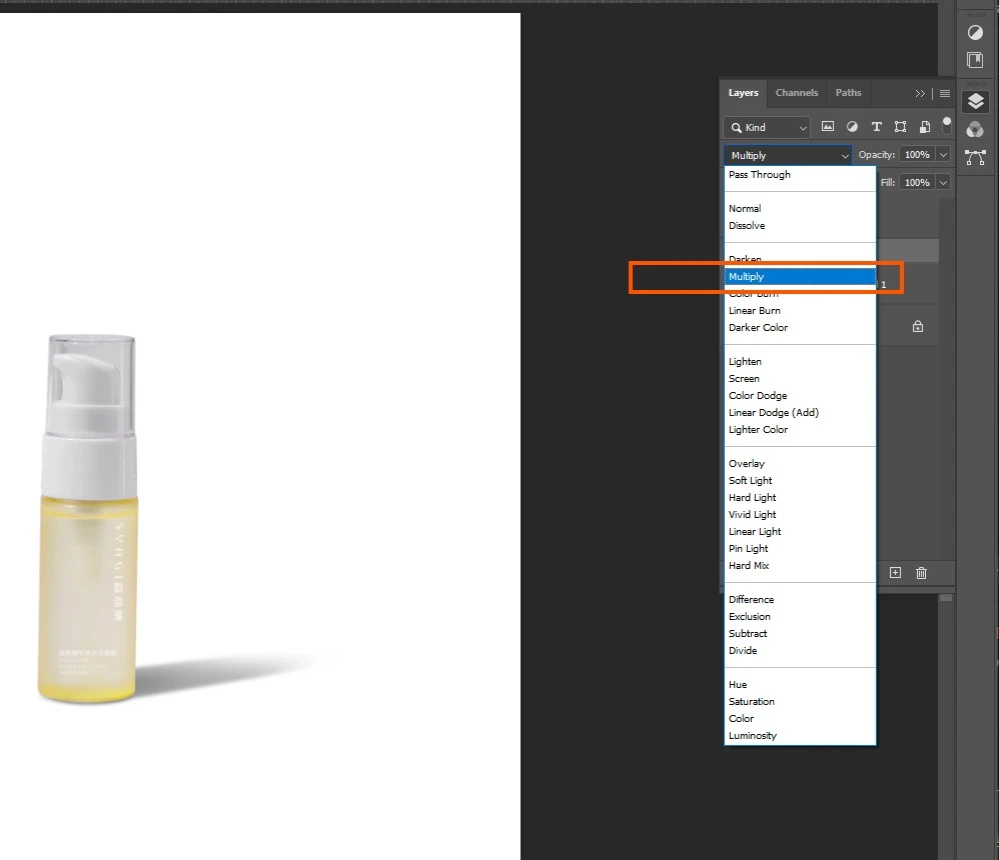
Switch the shadow layer’s blend mode to Multiply so it darkens the background naturally instead of sitting as a flat gray shape on top of it. Fine-tune further with a layer mask if parts of the shadow need to fade out toward the edges.
Step 11: Create a Contact Shadow
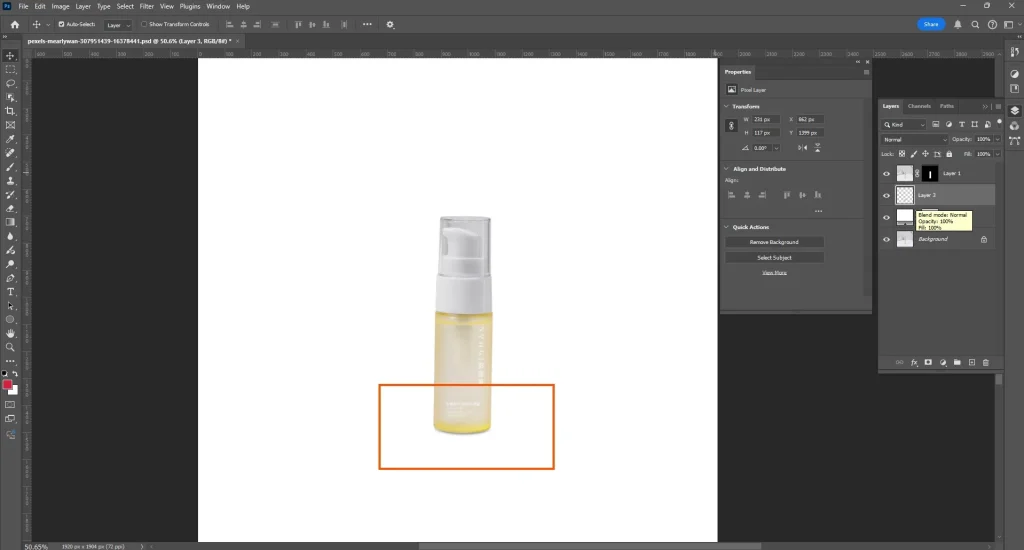
Add a second, tighter shadow layer directly beneath the object where it meets the surface. Keep this one small, dark, and only slightly blurred. It’s the single detail that most reliably prevents the object from reading as if it’s floating.
Step 12: Final Adjustments and Export
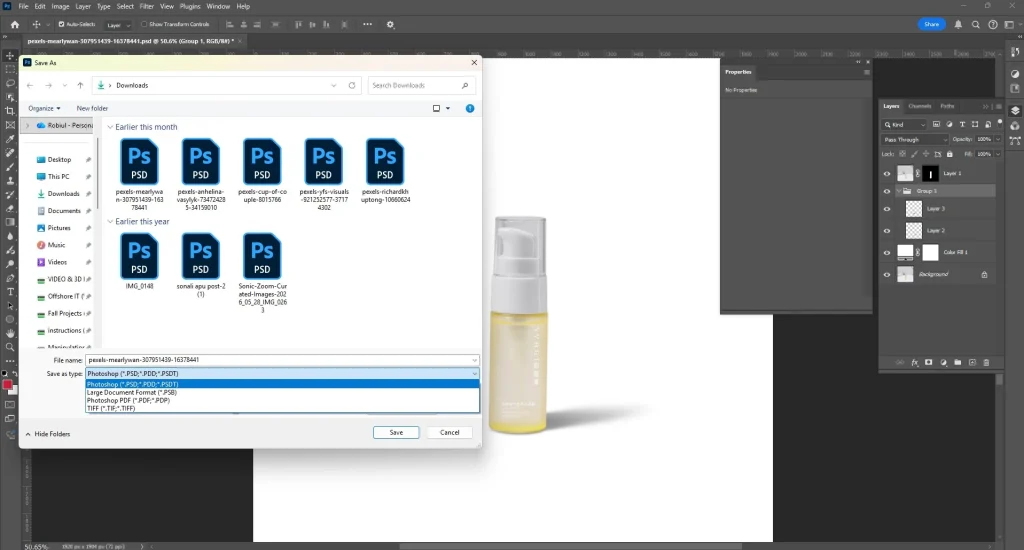
Zoom in and compare the shadow against the rest of the composite at full size. Since flaws that are invisible at 100% zoom often show up at full resolution. Adjust color balance so the shadow picks up a touch of the surrounding environment’s tone, then export at the resolution your platform requires.
Let a professional team handle the cutout
Clean, consistent cutouts are the foundation of every shadow in this guide — and they’re the part most teams outsource first. Offshore Clipping’s Photoshop services cover background removal, clipping path, and masking, so shadow work always starts from a clean base.
Why Realistic Shadows Matter
It’s easy to treat shadows as a finishing touch, but they carry more weight in a composite than almost any other single detail. A missing or unconvincing shadow is often the first thing a trained eye or a skeptical online shopper notices. Even if they can’t immediately say what’s wrong with the image.
- Add depth and dimension so flat cutouts read as three-dimensional objects
- Prevent the “floating” look that instantly signals a rushed edit
- Increase buyer trust in eCommerce, where shoppers rely on visual cues to judge quality
- Improve composite realism across lifestyle and marketing images
- Create visual consistency across product catalogs, so every listing feels shot under the same conditions
Match Shadows to the Existing Light Source
Every convincing shadow starts with an honest reading of the light in the scene. Getting this analysis right before touching Free Transform saves several rounds of repositioning later, and it’s usually the difference between a shadow that looks placed and one that looks natural.
- Light direction determines which way the shadow falls.
- Light height determines shadow length. Low light produces long shadows; high light produces short ones.
- Shadow length should scale consistently with how far the object sits from the surface.
- Shadow softness increases with distance from a diffused source and decreases under harsh, direct light.
- Multiple light sources can produce overlapping shadows, each fainter than a single-source shadow.
Create Different Shadow Styles
The twelve-step workflow above is the foundation, but the exact execution shifts depending on the subject and surface. Here’s how the core technique adapts across the three styles that come up most often in product and lifestyle work.
Natural Shadow
- Best use cases: lifestyle shots, apparel on models, and softly lit product photography.
- Key adjustments: wider blur radius, lower opacity, subtle color tinting.
- Common mistakes: shadows too sharp for the lighting style, or blurred too uniformly across the whole shape.
Drop Shadow
- Layer Style method: Photoshop’s built-in Layer Style > Drop Shadow. This is fast, but with limited shape control.
- Manual method: Build the shape by hand for full control over angle and perspective.
- When to use each: Layer styles for icons and quick drafts, and manuals for product and composite photography.
Reflection Shadow
- Best use cases: Jewelry, glassware, glossy footwear, bottles.
- Workflow summary: Duplicate and flip the object vertically, reduce opacity, then apply a gradient mask to fade it out.
- Tips for glossy surfaces: Keep the reflection sharper near the object and fade it faster than a standard shadow would.
Scaling shadow work across a full catalog
Consistency across dozens or hundreds of SKUs is where manual shadow work gets time-consuming fast. Offshore Clipping’s e-commerce image editing services include hand-painted shadow creation matched to each product’s lighting, so an entire catalog reads as one consistent shoot.
Manual Shadows vs. Photoshop Drop Shadow
Both approaches have a place, but they solve different problems. The table below is a quick way to decide which one a given project actually needs, rather than defaulting to whichever is faster.
| Feature | Manual Shadow | Photoshop Drop Shadow |
|---|---|---|
| Realism | ★★★★★ | ★★★ |
| Control | High | Medium |
| Speed | Medium | Fast |
| Best For | Product & composite images | UI, graphics, text |
Professional Techniques Used by Retouchers
These are the smaller habits that separate a shadow that looks fine from one that looks genuinely convincing. None of them requires advanced tools. They’re mostly about attention to detail and being willing to build a shadow in layers instead of one flat pass.
- Use multiple shadow layers to build up depth instead of relying on one flat shape
- Add a touch of color instead of pure black, picked from the surrounding environment
- Keep contact and cast shadows on separate layers for independent control
- Blur more as distance from the object increases, rather than one uniform blur
- Sample the background’s lighting to match the shadow’s undertone
- Use layer masks instead of the eraser, so nothing is permanently lost
These habits echo the same standards used in professional retouching workflows — see What is Product Photo Retouching for how shadow creation fits into a full product editing pipeline.
Why Do My Shadows Look Fake?
Most “fake-looking” shadows come down to a small, repeating set of mistakes rather than a fundamental skill gap. Running through this list before exporting catches the majority of issues before they make it into a final image.
- Shadow pointing the wrong direction relative to the light source
- Uniform blur applied across the whole shadow instead of varying by distance
- Pure black fill, which reads as flat and artificial
- Missing contact shadow, leaving the object looking like it’s floating
- Hard, unblurred edges that don’t match the softness of the actual lighting
- Incorrect perspective, so the shadow doesn’t sit on the ground plane correctly
- Over-relying on the Photoshop Drop Shadow effect for images that need a hand-built shadow
Checklist: review before exporting:
Light direction, shadow length, blur falloff, opacity, contact shadow, and color tone. Professional Drop Shadow service perfectly maintains this checklist.
Troubleshooting Guide
A quick-reference table for the most common problems that show up during shadow work, along with the fastest fix for each.
| Problem | Cause | Solution |
|---|---|---|
| Shadow looks fake | Incorrect perspective | Use Warp and Perspective Transform to align with the ground plane |
| Shadow too dark | Opacity too high | Lower opacity and switch to Multiply blend mode |
| Object appears to float | Missing contact shadow | Add a tight, soft contact shadow beneath the object |
| Shadow edges look harsh | No blur applied | Apply Gaussian Blur with gradual intensity, edge to tip |
Photoshop AI vs. Manual Shadow Creation
Generative AI has become a genuine part of the shadow-creation conversation. It’s worth knowing exactly where it helps and where it still falls short, especially for teams deciding how much of this workflow to automate.
Can Photoshop AI generate realistic shadows?
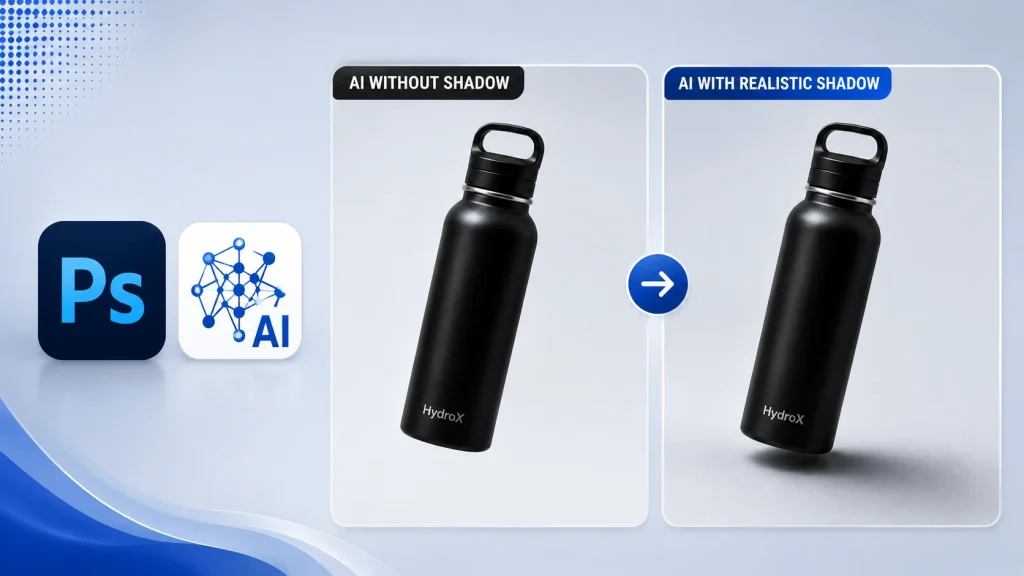
Photoshop 2026’s Generative Fill can rough out a plausible shadow shape in seconds, and it’s genuinely useful for quick concepts or low-stakes drafts where speed matters more than precision.
Generative Fill for shadow creation
It works best as a starting point. Describe the lighting, and it will cast a shadow at an angle. Perspective often still needs manual correction before the result holds up next to the rest of a composite.
Benefits of manual editing
Full control over angle, softness, and color matters most for catalog work, where consistency across dozens or hundreds of images is the actual goal rather than any single perfect shadow.
When AI still needs human refinement
Perspective accuracy, matching an existing photo’s exact light source, and consistency across a batch of images still benefit from manual review, even when AI generates the starting point.
Best Practices for Different Image Types
The core workflow holds steady across categories, but a few adjustments per image type make the difference between a shadow that’s technically correct and one that actually fits the product.
- Product photography: keep shadows tight and consistent across the full catalog so every listing feels shot under the same conditions.
- Fashion apparel: soften shadows on ghost mannequin shots so the garment stays the visual focus.
- Furniture: Use longer cast shadows to communicate scale and room placement.
- Shoes: pay close attention to contact shadow shape, since uneven soles create irregular contact points.
- Jewelry: lean on subtle reflection shadows for metal and gemstone pieces.
- Food photography: warmer-toned, softer shadows suit the diffused lighting most food shoots use.
- Portrait composites: match shadow direction precisely to the original portrait’s lighting, or the composite reads as fake instantly.
For apparel specifically, shadow work usually pairs with portrait composites. Wedding Photo Editing guide covers matching light and tone across a full gallery.
Apparel shadows, done for you
Ghost mannequin shots need shadow work that stays subtle enough not to compete with the garment. Offshore Clipping’s ghost mannequin services pair mannequin removal with matched, hand-painted shadows for a natural, floor-grounded result.
Expert Tips from Professional Retouchers
A few closing habits that come up repeatedly in professional retouching workflows are small enough to feel optional, but they add up over a full project.
- Zoom out periodically. Shadows that look right at 100% can look wrong at full image size.
- Sample shadow color from the surface it falls on, not from a generic gray.
- Keep a reference photo of real shadows nearby when working on tricky lighting setups.
- Build a shadow “template” for recurring product angles to speed up catalog work.
- Never skip the contact shadow, even on backgrounds where it’s barely visible.
- Test shadow settings on one image before applying them across a full SKU set.
- Save shadow layers as a Smart Object group so proportions scale cleanly on resize.
- Cross-check perspective against any grid lines or edges already in the scene.
- When in doubt, slightly underdo the shadow. Subtle reads better than exaggerated.
Frequently Asked Questions
Quick answers to the questions that come up most often around Photoshop shadow work.
What’s the difference between a contact shadow and a cast shadow?
A contact shadow sits directly beneath an object where it touches a surface and stays tight and dark. A cast shadow extends further, showing the direction and length of the light source.
Which Photoshop tool is best for creating shadows?
There’s no single tool. Realistic shadows combine Free Transform, Warp, Perspective, Gaussian Blur, and layer masks together rather than relying on one feature alone.
Can I create realistic shadows using only the Drop Shadow effect?
The Drop Shadow layer style suits simple graphics and UI elements, but it produces flatter results than a manually built shadow, which is why product and composite images usually need the manual method.
Why do my Photoshop shadows look fake?
The most common causes are pure black fill, uniform blur, wrong light direction, or a missing contact shadow. Any one of these breaks the illusion.
How do I match the shadow direction to my light source?
Study where highlights and existing shadows fall in the original photo, then rotate the shadow layer so it points directly away from that light source.
Which blur works best for realistic shadows?
Gaussian Blur is the standard choice, applied more heavily toward the tip of the shadow and lighter near the object, matching how light naturally diffuses with distance.
Can Photoshop AI create realistic shadows automatically?
Photoshop 2026’s Generative Fill can generate a rough shadow quickly, but angle, perspective, and consistency across multiple images usually still need manual refinement.
Conclusion
Realistic shadows come down to observation more than any single tool. Matching light direction, varying blur by distance, and avoiding pure black solve most of the “fake” look on their own, and every technique in this guide builds on those three habits. The workflow above works whether it’s one hero image or a full catalog. The more you practice reading real-world light, the faster it becomes second nature.