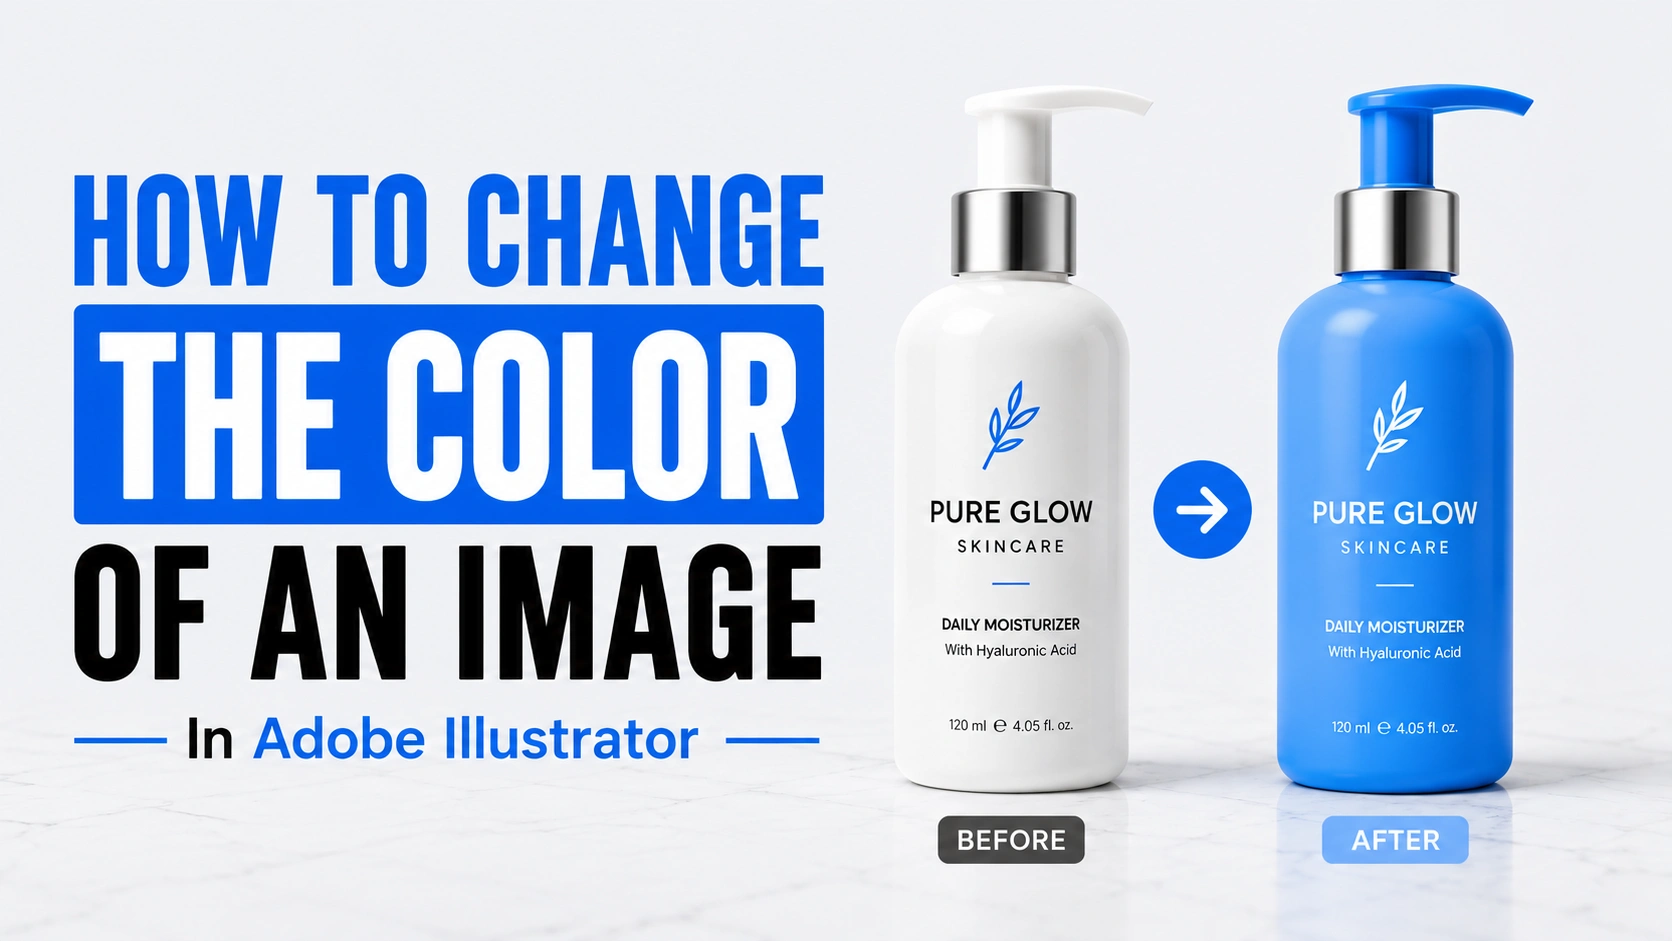
The success of any recoloring workflow in Illustrator depends on how the image stores color. Vector graphics use editable fills and strokes, while PNG and JPEG files store color in pixels. Identifying that difference first helps you choose the correct tool and avoid inaccurate colors, excessive vector paths, or lost image details.
In reality, each image type requires a different approach for clean, accurate results. This guide explains how to change the color of an image in Illustrator step by step. You will learn how to recolor vector artwork, process raster images, choose the right Illustrator tools, and maintain clean, accurate results.
Product image backlogs can delay listings and weaken brand consistency. Outsource your photo editing to Offshore Clipping for polished, market-ready images delivered on schedule.
Illustrator Tools Used for Replacing Image Colors
Adobe Illustrator offers several tools for changing image colors, each designed for a different task. While Statista reports that Illustrator holds about 12% of the global graphics software market, the best tool depends on your image type and editing goal.
Professional designers first identify whether the artwork is vector or raster, then choose the right tool. Following the same workflow helps you edit colors faster and more accurately.
Recolor Artwork
Recolor Artwork is the quickest way to replace one or multiple colors in vector artwork. Instead of selecting individual objects, it remaps the colors used throughout the selected artwork while keeping every path, shape, and effect intact. Recolor Artwork is best for logos, icons, vector illustrations, and brand color updates.
Use it when you need to:
- Replace multiple colors at once.
- Test different color variations.
- Update an existing color palette.
Edit Colors
Edit Colors lets you adjust existing colors rather than replace them entirely. You can modify hue, saturation, brightness, or manually shift selected colors to create a new look while preserving the original artwork.
Best for:
- Vector illustrations
- Marketing graphics
- Artwork that needs subtle color adjustments
Adjust Artwork colors
Illustrator doesn’t have a dedicated Color Balance tool like Illustrator. Instead, color adjustments are made through Edit Colors, Recolor Artwork, and color mode settings.
These tools let you refine color values, improve consistency, or prepare artwork for print without changing the design itself.
Use it when you want to:
- Fine-tune existing colors.
- Match brand colors.
- Prepare artwork for digital or print output.
Image Trace
Image Trace converts a PNG, JPEG, or scanned artwork into editable vector paths. After expanding the traced result, you can recolor each object using Illustrator’s vector editing tools instead of editing the original pixels.
Best for:
- Raster logos
- Icons
- Signatures
- Flat-color artwork
Avoid using Image Trace for detailed photographs, as it creates complex paths that are difficult to edit and rarely produce accurate color results.
Global Colors and Swatches
Global Colors link the same color across multiple objects. Edit the swatch once, and every object using that color updates automatically. This eliminates repetitive photo editing and keeps brand colors consistent throughout the artwork.
Best for:
- Brand identity projects
- UI design
- Large illustrations
- Marketing materials
Color Guide
The Color Guide helps you build color palettes by suggesting complementary, analogous, monochromatic, and other color harmonies based on your selected color. It’s a planning tool that makes it easier to choose colors that work well together before applying them.
Use Color Guide when you need to:
- Create a balanced color palette.
- Explore color combinations.
- Maintain visual consistency across a design.
How to Change the Color of an Image in Illustrator:
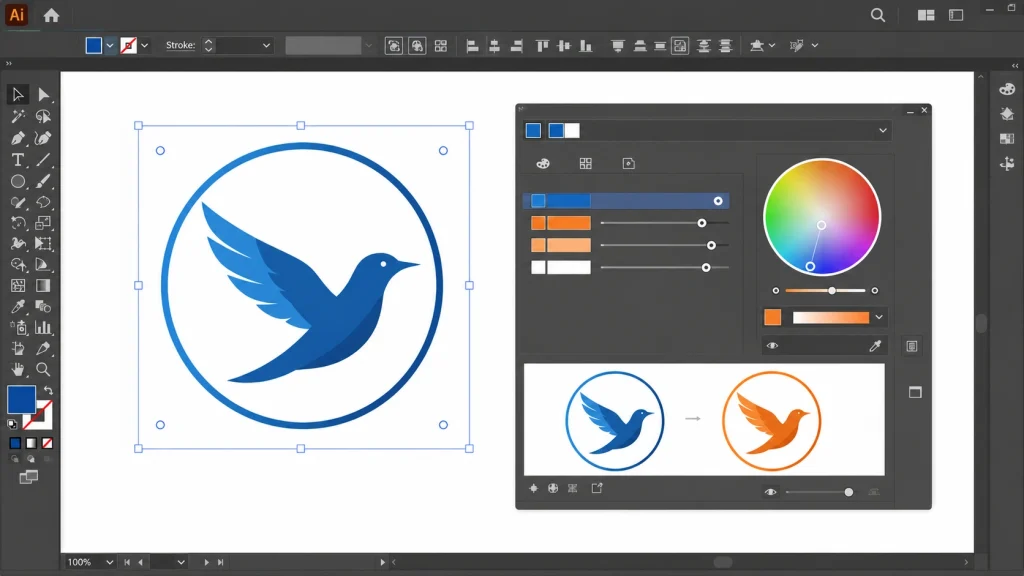
This method is useful when you need to change the colors of an existing image such as a PNG, JPEG, logo, or icon in Adobe Illustrator.
It works by converting the image into editable vector shapes using Image Trace, allowing you to adjust and replace colors easily.
Once traced and expanded, you can refine the artwork and apply new color values to achieve a clean and consistent result before exporting.
Step 1: Place the Image
- Open Illustrator.
- Go to File > Place. A file browser will open from where you can choose the image you want to work with.
- Select the PNG or JPEG.
- Click Place.
- Click the artboard to insert the image or click and drag if you want to control the size.
Select the image with the Selection Tool (V). A rectangular bounding box should appear around the entire image. Once the image appears on the artboard, you can resize it using a corner handle if needed.
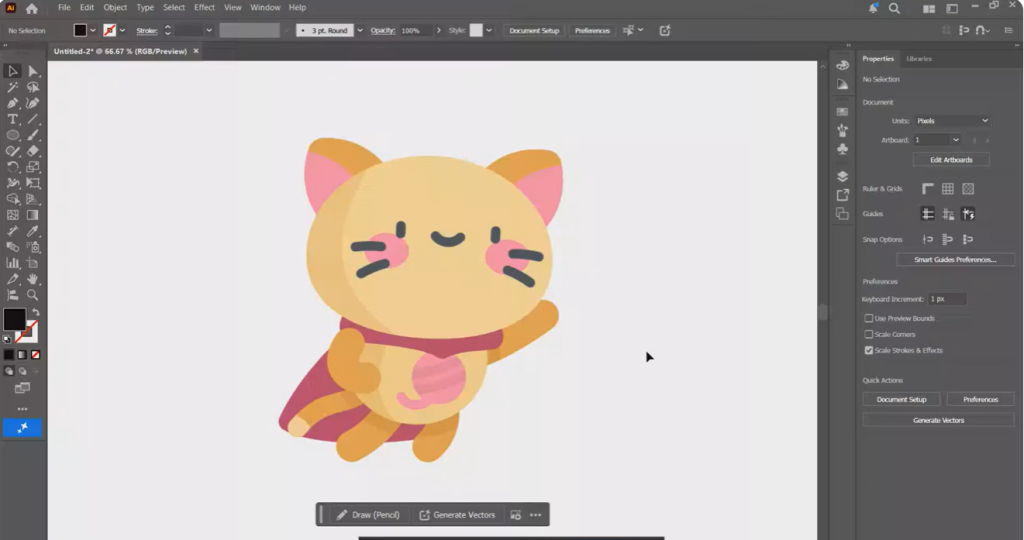
Since this is a regular raster image, that means you can’t edit directly inside Illustrator. That’s why we now convert the image into vector artwork using “Image Trace features”.
Step 2: Apply Image Trace
- “Click” the image to select.
- Go to the top control panel > Image Trace.
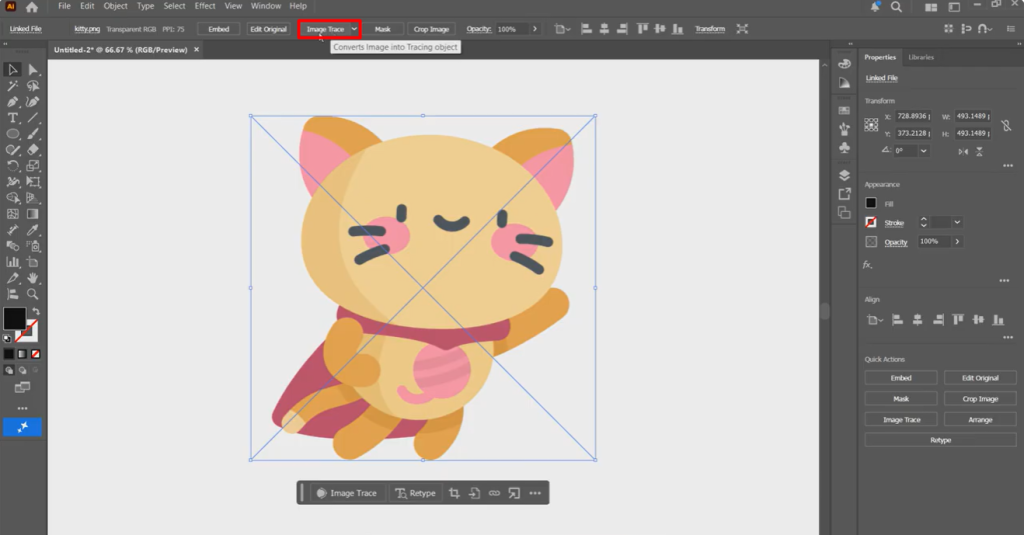
Illustrator will automatically begin tracing the image and convert it into a vector shape. There are several preset options, which you can use depending on the type of image.
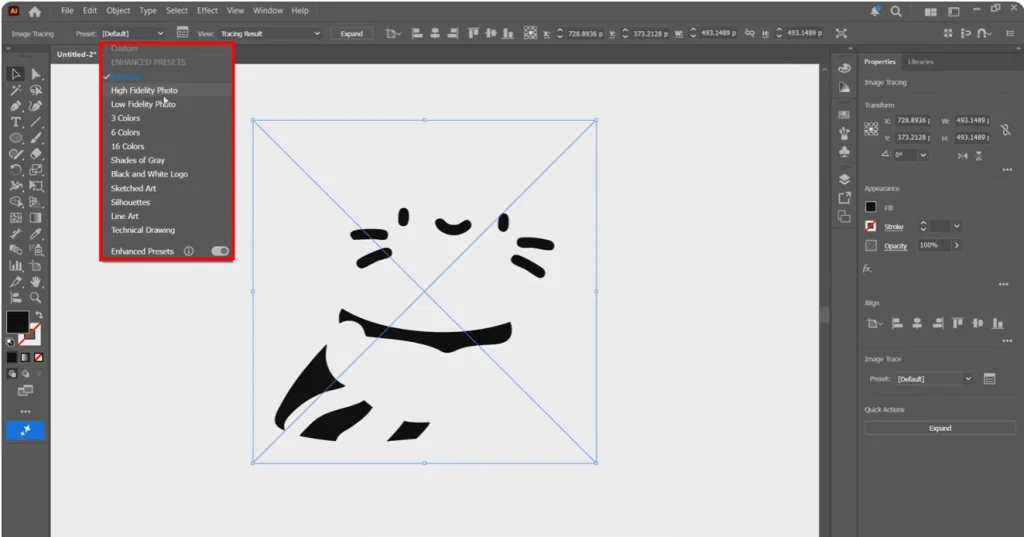
Set Mode to Color. Then choose a preset based on the artwork:
- Use 3 Colors or 6 Colors for simple logos and icons.
- Use Low Fidelity Photo for illustrations with moderate color variation.
- Use High Fidelity Photo only when the artwork contains many colors and small details.
The main goal is to convert the pixels into editable vector shapes, so that it becomes easy to change the color. After you are done tracing the image, the next step is to expand it.
Step 3: Expand the Trace
With the trace image still selected
- Click Expand in the top toolbar.
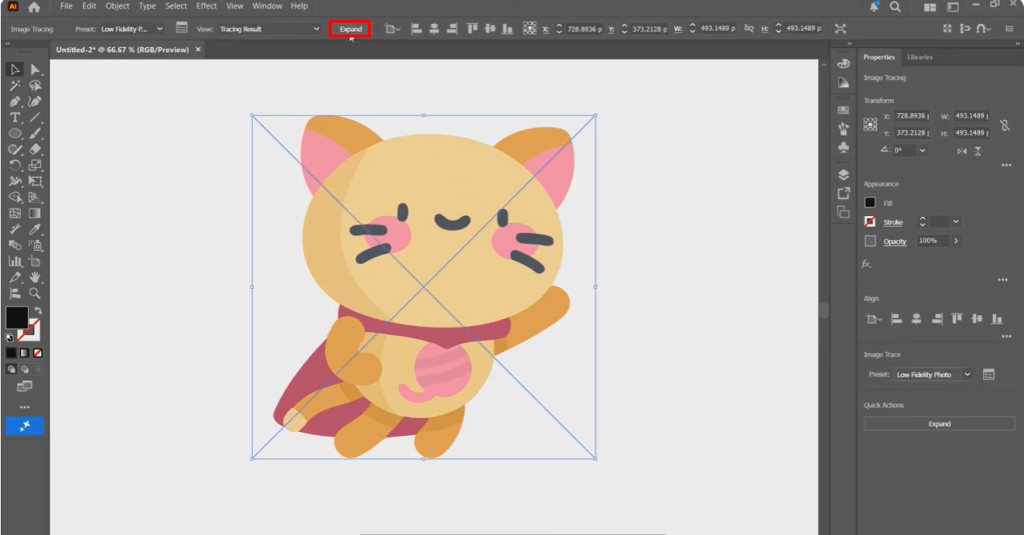
It will now transform the trace result into actual vector paths and shapes. This also indicates the image is no longer a single object; it’s a group of color vector pieces that Illustrator can edit individually. Now you can recolor, modify shapes, and scale it without losing quality.
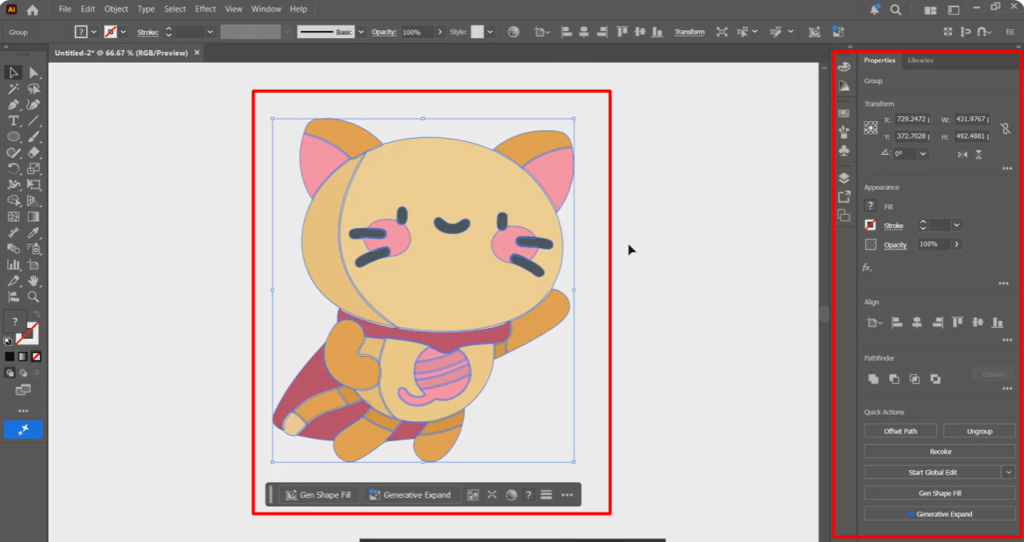
Step 4: Replace the Colors
- Select all traced artwork.
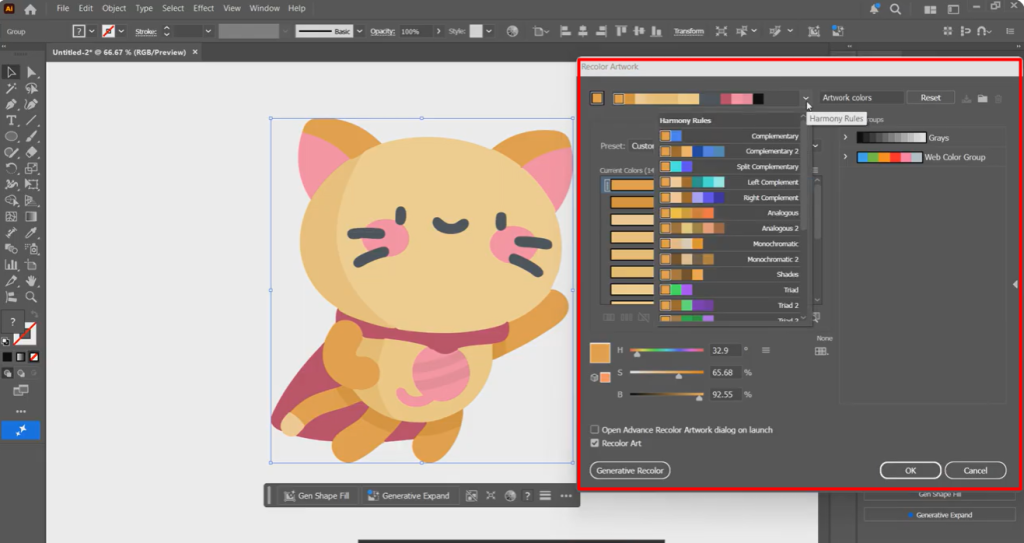
- Go to the top toolbar>Recolor Artwork icon.
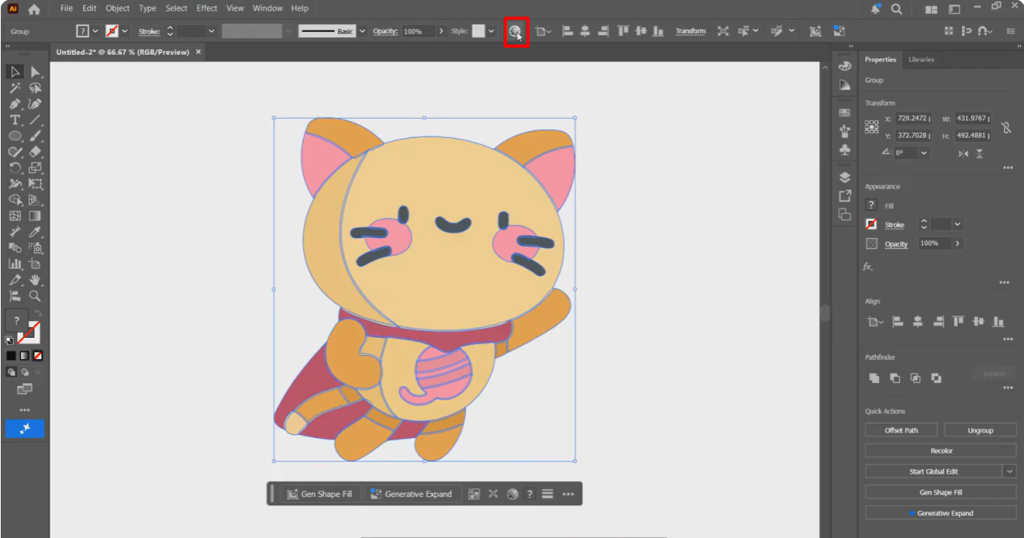
After clicking the “Recolor Artwork ” icon, you’ll get a color wheel. By clicking it, you can unlock the Illustrator panel. Now you can adjust and replace colors according to need. With a color wheel, you can drag colors around, assign new colors, apply color themes, and completely change the color palette of an image.
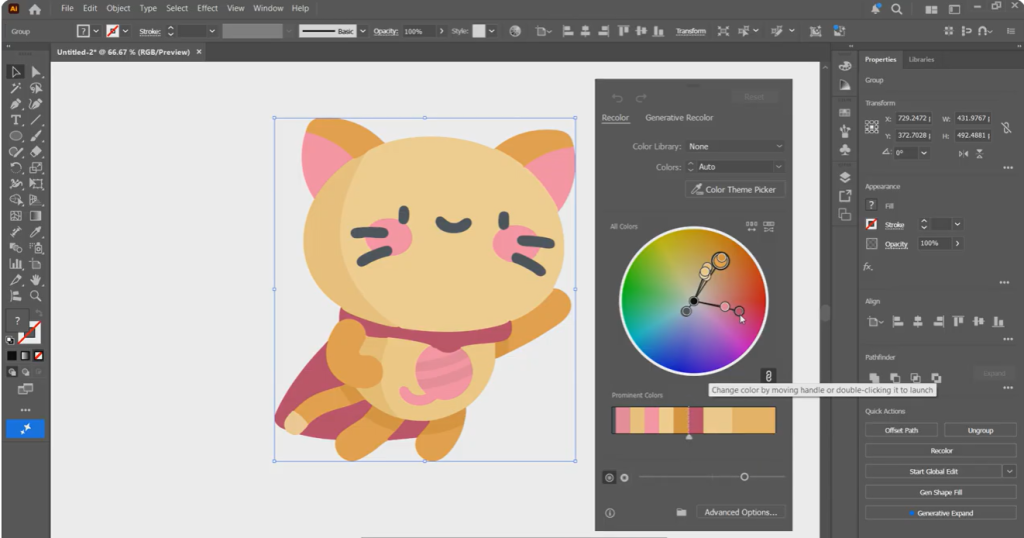
With the help of a color wheel, you can test different color combinations. Now you can transform a multi-color illustration into monochrome style, apply preferable brand color, or create several variations of the same image within a few seconds.
Save the editable file through File > Save As > Adobe Illustrator (.AI). Export PNG or SVG for digital use and PDF or EPS for print.
Why Are Vector Images Easier to Recolor?
Vector images are easier to recolor because Illustrator edits the fill and stroke of each object instead of changing pixels. This allows you to replace a single color across an entire logo or illustration without affecting image quality. It’s the fastest and most accurate method for editing logos, icons, illustrations, and other vector artwork.
Vector images are ideal when you need to:
- Change a single object’s color.
- Replace multiple colors at once.
- Update brand colors across an entire design.
- Resize artwork without losing color quality or sharpness.
Limitations of Changing the Color of Raster Images
A raster image is treated as one pixel-based object. Illustrator can recolor raster images using Edit Colors, Recolor Artwork, opacity masks, blend modes, and color overlays.
However, these methods adjust pixel-based colors or masked areas rather than providing the direct path-level control available with vector artwork.
While you can apply limited color adjustments, editing a specific object inside a PNG or JPEG usually requires Image Trace or pixel editing in Illustrator.
Some common limitations include:
- Recolor Artwork samples dominant colors from raster images, so subtle gradients and photographic colors may not be fully represented.
- Individual objects can’t be selected because the image is a single bitmap.
- Complex gradients, shadows, and textures are difficult to recolor accurately.
- Image quality may decrease when Image Trace is applied to a low-resolution file.
Understanding these limitations helps you choose a workflow that produces cleaner and more predictable results.
When to Use Image Trace
Use Image Trace when you need to convert a simple raster image into editable vector artwork. It works best for logos, icons, signatures, and flat-color illustrations with clean edges.
Avoid using it on detailed photographs, as tracing creates unnecessary anchor points and makes recoloring less accurate.
Image Trace works best for:
- Logos
- Icons
- Simple illustrations
- Flat-color graphics
- High-contrast artwork
It is not the best option for detailed photographs or images with soft shadows, skin tones, or realistic textures, as tracing can create thousands of unnecessary anchor points and reduce editing accuracy.
Illustrator vs Photoshop for Recoloring Images
Both Illustrator and Photoshop can fix image colors. Each is designed for a different type of artwork. Illustrator is designed for vector artwork, while Photoshop provides much better control over pixel-based images such as photographs and product images.
| Feature | Adobe Illustrator | Adobe Photoshop |
|---|---|---|
| Best for | Vector artwork, logos, icons | Photos, PNGs, JPEGs |
| Editing method | Editable paths and objects | Pixel-based editing |
| Recolor accuracy | Excellent for vector graphics | Excellent for photographs |
| Image quality | Stays sharp at any size | Depends on image resolution |
| Ideal workflow | Brand colors, illustrations, print graphics | Photo retouching, Image color correction, realistic recoloring |
Perfect colours deserve a perfect finish. Let Offshore Clipping’s Photo Retouching Service remove distractions and refine every detail without the extra editing time.
Vector vs Raster Images in Illustrator
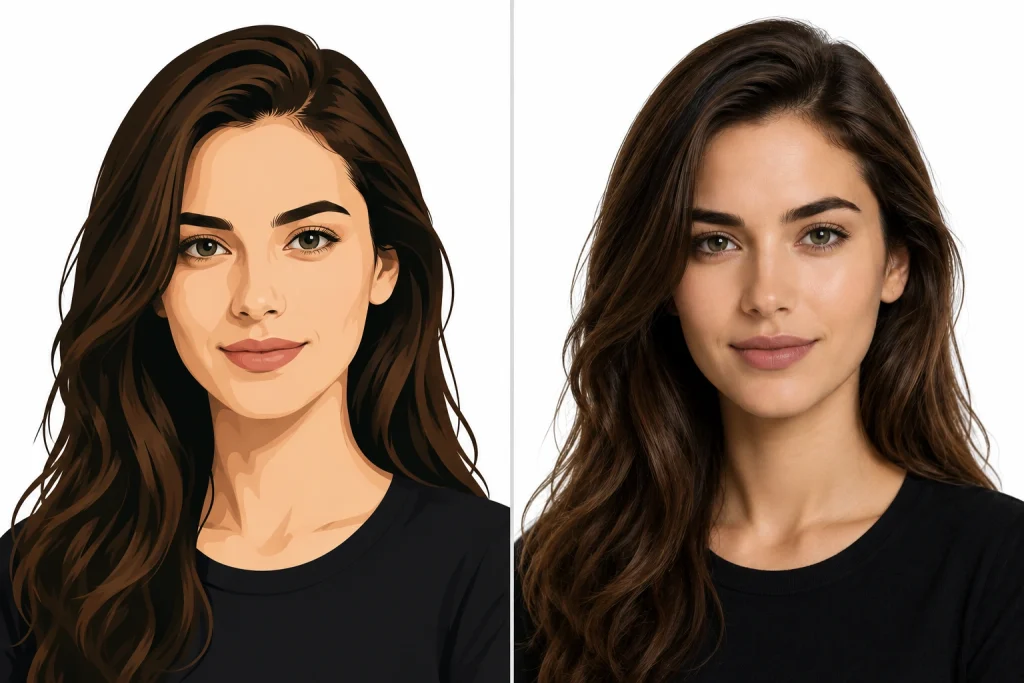
Vector and raster images may look similar, but Illustrator edits them in different ways. A vector image uses paths, while a raster image uses pixels. Knowing the difference helps you choose the right color-editing method and avoid unnecessary quality loss.
What Is a Vector Image?
A vector image is artwork made from paths, shapes, and anchor points in Illustrator. Since it isn’t made of pixels, you can resize it and change its colors without reducing quality.
What Is a Raster Image?
A raster image is made from pixels. Photos and scanned images are common examples. You can adjust its colors, but changing individual objects usually requires pixel-based editing.
How to Determine Whether an Image Is Vector or Raster
Before changing colors, identify whether the image is vector or raster. Illustrator provides a few visual clues that make this easy.
- Select the image. If you can select individual shapes and see anchor points, it is a vector image.
- Zoom in closely. If the edges stay smooth at any zoom level, it is vector. If the edges become pixelated, it is raster.
- Use the Direct Selection Tool (A). If you can move or edit individual paths, the image is vector.
- Check the Links panel. Most linked photos are raster images, while logos and illustrations are often vector artwork.
These checks help you identify the image type before choosing a color-editing method.
Perfect colours deserve a perfect finish. Let Offshore Clipping’s Photo Retouching Service remove distractions and refine every detail without the extra editing time.
Why the Image Type Determines the Color-Editing Method
Vector and raster images store color information differently, so Illustrator uses different editing methods for each one.
- Vector images store colors as fills and strokes, so you can change them directly with Recolor Artwork or the Fill and Stroke tools.
- Raster images store colors as pixels, so changing one color usually means editing the pixels instead of individual objects.
- Using the correct method gives cleaner results and helps prevent unwanted changes to the artwork.
Linked vs Embedded Images in Illustrator
Illustrator lets you place images as linked or embedded. Both display inside your document, but they store image data differently. Understanding this difference helps you edit colors without breaking your workflow.
What Is an Embedded Image?
An embedded image is stored inside the Illustrator (.AI) file. The document keeps its own copy of the image, so you don’t need the original file to open or edit it.
What Is a Linked Image?
A linked image stays in its original location outside the Illustrator file. Illustrator displays the image by referencing that file instead of storing it in the document.
How to Edit an Embedded Image
An embedded image is stored inside the Illustrator file, so you can edit it without managing an external file. This workflow is useful when all image assets need to stay within a single document.
- Select the embedded image.
- Open the Control or Properties panel.
- Choose Edit Original if advanced editing is required, or use the available Illustrator editing options.
- Make your color changes.
- Save the changes to update the artwork.
How to Edit and Relink a Linked Image
A linked image remains connected to its original file. Any color changes should be made to that source file so Illustrator can display the latest version automatically.
- Select the linked image.
- Click Edit Original to open the source file.
- Edit the image and save it.
- Return to Illustrator. The linked image updates automatically.
- If the update does not appear, open the Links panel and click Relink to reconnect the correct file.
How Linking and Embedding Affect Color Editing
The way you store an image also changes how you manage its colors in Illustrator. An embedded image stays inside the Illustrator file, so any color changes affect only that document. This works well when different projects need different color versions.
If the same image appears in multiple Illustrator files, a linked image is the better choice. The image stays connected to its original file, so editing the source updates every linked document. This helps you keep the same colors across all projects without editing each file separately.
Recolor Artwork vs Edit Colors

Both Recolor Artwork and Edit Colors help you change colors in Illustrator, but they serve different purposes. Recolor Artwork replaces or remaps colors across vector artwork, while Edit Colors lets you fine-tune existing colors by adjusting their hue, saturation, or brightness. Choosing the right tool depends on whether you want to replace colors or refine them.
What Is Recolor Artwork?
Recolor Artwork is an Illustrator feature that replaces or remaps colors in vector artwork. It lets you update multiple colors at once without editing each object individually, making it ideal for logos, icons, illustrations, and brand color updates.
What Is Editing Colors?
Edit Colors is an Illustrator feature that adjusts the existing colors in selected vector artwork. Instead of replacing colors completely, it lets you modify hue, saturation, brightness, or manually shift colors while preserving the overall design.
When to Use Recolor Artwork
Use Recolor Artwork when you need to replace or remap colors across vector artwork.
It works best when you need to:
- Change a logo to match new brand colors.
- Replace an entire color palette.
- Create multiple color variations.
- Update the same color across several vector objects.
When to Use Edit Colors
Use Edit Colors when the existing colors are close to what you need but require small adjustments.
It works best when you need to:
- Adjust hue or saturation.
- Brighten or darken existing colors.
- Refine brand colors.
- Create subtle color variations without replacing the entire palette.
Which Tool Gives Better Results?
Neither tool is better in every situation. The right choice depends on your editing goal.
| Editing Task | Best Tool | Why It Works Better |
|---|---|---|
| Replace logo colors | Recolor Artwork | Changes multiple fills and strokes at once. |
| Replace an entire color palette | Recolor Artwork | Remaps all selected colors efficiently. |
| Fine-tune existing colors | Edit Colors | Adjusts hue, saturation, and brightness without replacing colors. |
| Create subtle color variations | Edit Colors | Preserves the original design while refining colors. |
| Generate multiple color versions | Recolor Artwork | Quickly applies different color schemes to the same artwork. |
Verdict: Use Recolor Artwork when you want to replace colors throughout vector artwork. Choose Edit Colors when you only need to refine or adjust the existing colors without changing the overall palette.
RGB vs CMYK for color Editing in Illustrator
RGB and CMYK use different color models, so they produce different results. RGB is designed for screens, while CMYK is designed for print. Choosing the correct document color mode before editing helps you keep colors accurate from start to finish.
Use RGB for Websites and Digital Content
Choose RGB when the final image will be viewed on a screen, such as a website, social media post, email, or mobile app. Before you start editing colors, switch the document to RGB Color, so Illustrator displays colors for digital devices instead of print.
To use RGB in Illustrator:
- Open the Illustrator file.
- Go to File > Document Color Mode > RGB Color.
- Edit the artwork using RGB colors.
- Preview the colors on screen as you work.
- Export the file as PNG, JPG, or SVG for digital use.
Using RGB from the beginning helps the exported image look closer to what you see in Illustrator.
Use CMYK for Printed Materials
Choose CMYK when the artwork will be printed, such as a business card, brochure, poster, label, or product packaging. Set the document to CMYK Color before editing so you can adjust colors for the printing process instead of a digital screen.
To use CMYK in Illustrator:
- Open the Illustrator file.
- Go to File > Document Color Mode > CMYK Color.
- Edit the colors while working in CMYK mode.
- Review the artwork before exporting.
- Save or export the file using a print-ready format, such as PDF or EPS.
Working in CMYK before printing helps reduce unexpected color shifts in the final print.
How to Check the Document Color Mode
Before changing colors, check whether the document is using RGB or CMYK. Illustrator shows the active color mode in the Document Color Mode menu.
To check the color mode:
- Open your Illustrator document.
- Click File on the top menu.
- Select Document Color Mode.
- Look for the option with the check mark.
- If RGB Color is checked, the document uses RGB. If CMYK Color is checked, it uses CMYK.
This tells you which color mode Illustrator is using before you start editing.
How to Change Between RGB and CMYK
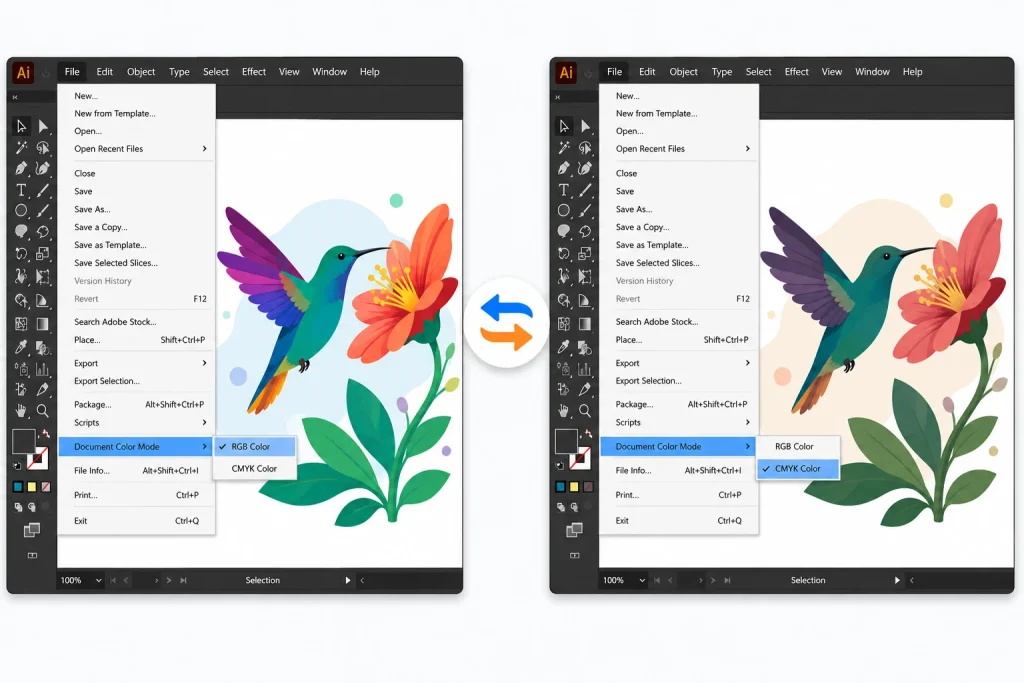
If the current color mode does not match your final output, change it before editing the artwork. Illustrator lets you switch between RGB and CMYK at any time.
To change the document color mode:
- Open the Illustrator document.
- Go to File > Document Color Mode.
- Click RGB Color or CMYK Color, depending on your project.
- Wait for Illustrator to convert the document.
- Check the artwork and adjust any colors that look different after the conversion.
Changing the color mode first helps you edit colors for the correct output and reduces color changes during export.
Problems When Replacing Image Colors in Illustrator
Changing an image’s color in Illustrator does not always go as planned. Some problems come from the image type, while others come from document settings or editing tools. Knowing the cause helps you fix the problem faster and choose the right editing method.
The sections below cover the most common color-editing problems, why they happen, and how to fix them.
Recolor Artwork Is Greyed Out
If Recolor Artwork is unavailable, Illustrator cannot apply the tool to the selected object. This usually happens when the artwork is not editable as a vector or the object cannot be modified.
Check the following:
- Make sure a vector object is selected.
- Unlock the object or its layer.
- If you selected a raster image, convert it with Image Trace before using Recolor Artwork.
The Image Cannot Be Selected or Recolored
If you cannot select or recolor the image, Illustrator is blocking the edit. The object may be locked, hidden, or placed on a locked layer.
Unlock the object and its layer first. If the image is hidden, make it visible. Once the artwork becomes selectable, you can apply color changes normally.
Recolor Artwork Does Not Work on a Raster Image
Recolor Artwork only works with vector objects because it edits fills and strokes, not pixels. If the selected image is a photo or another raster image, the tool cannot replace its colors.
You have two options:
- Edit the image in Photoshop.
- Convert the image into vector artwork with Image Trace, then use Recolor Artwork.
A Linked Image Does Not Update After Editing
A linked image updates only when Illustrator can find the original file. If the file has moved, been renamed, or was not saved after editing, the updated colors will not appear.
To fix the problem:
- Save the edited source image.
- Return to Illustrator.
- Open the Links panel.
- Update or relink the missing file if needed.
Image Trace Produces Poor or Inaccurate Results
Image Trace creates vector paths from pixels, so the final result depends on the quality of the original image. A blurry or low-resolution image often produces rough edges, extra anchor points, or missing details.
For better results:
- Start with a high-quality image.
- Adjust the Image Trace settings before clicking Expand.
- Remove unwanted paths after tracing if necessary.
Colors Look Different After Exporting
If the exported image does not match what you saw in Illustrator, the document color mode or export settings may not match the final output. This is one of the most common color-editing problems.
Before exporting:
- Use RGB for websites and digital graphics.
- Use CMYK for printed materials.
- Check the export settings before saving the final file.
Best Practices and Tips for Better Color Editing
Good color editing is not only about choosing the right tool. It also depends on how you prepare, organise, and save your artwork. Following these best practices helps you make accurate color changes, keep colors consistent, and avoid common editing mistakes.
Keep a Copy of the Original Image
Always keep a copy of the original artwork before changing any colors. If the new colors do not look right or you need to restore the original design, you can return to the backup without starting over.
Use Global Colors for Bulk Color Updates
Use Global Colors when the same color appears in multiple objects. Changing one Global Color updates every linked object at the same time, so you do not have to edit each object separately.
This works best for:
- Logos
- Icons
- Brand illustrations
- Marketing graphics
Prepare Brand Color Swatches
Create your brand color swatches before you begin editing. Using saved swatches keeps every design consistent and helps you avoid using different shades of the same brand color.
Use the Appearance Panel for Non-Destructive Editing
Use the Appearance panel when you want to test color changes without changing the original artwork. It lets you edit fills, strokes, and effects while keeping the object fully editable.
Organise the Artwork with Layers
Separate logos, icons, text, and graphics into different layers before editing colors. This makes it easier to find the correct object and reduces the chance of changing the wrong part of the artwork.
A well-organised file also helps when working on large or complex Illustrator projects.
Use Live Preview Before Applying Changes
Turn on Live Preview before applying color changes. It lets you compare the original and updated colors, making it easier to spot unwanted changes before you apply them.
Save the File as AI Before Exporting
Save an editable AI file before exporting your artwork. The AI file keeps all layers, paths, swatches, and editing settings, so you can make color changes later without rebuilding the design.
Use RGB or CMYK According to the Final Output
Choose the document color mode before you start editing. This helps Illustrator display and export colors for the correct output.
- Use RGB for websites, social media, apps, and other digital content.
- Use CMYK for brochures, business cards, packaging, posters, and other printed materials.
Save Multiple Color Versions
Save each color variation as a separate file instead of replacing the previous version. This makes it easier to compare color options, share different versions with clients, or return to an earlier design if needed.
Common Mistakes to Avoid When Changing Image Colors
A small mistake can lead to poor color results or extra editing work. Most color-editing problems happen because the wrong workflow or document settings are used. Avoiding the mistakes below helps you edit colors more accurately and finish your work faster.
Editing a Raster Image Like a Vector Image
A raster image stores colors as pixels, while a vector image stores colors as editable paths. Trying to use vector editing tools on a raster image often leads to failed edits or limited results.
Forgetting to Expand an Image Trace
After running Image Trace, the artwork is not fully editable until you click Expand. Skipping this step prevents you from editing individual shapes and changing their colors.
Overwriting the Original Image
Replacing the original file removes your backup and makes it difficult to restore the first version. Save a copy before editing so you can compare results or recover the original artwork if needed.
Using a Low-Resolution Image for Image Trace
Image Trace follows the details in the original image. If the image is blurry or low-resolution, the traced artwork may contain rough edges, extra paths, or missing details.
Working in the Wrong Document Color Mode
Using the wrong color mode can change how colors appear after export or printing. Set the document to RGB for digital content and CMYK for printed materials before you start editing.
Applying color Changes to the Wrong Layer or Object
Editing the wrong layer or object changes artwork you did not intend to modify. Before applying any color changes, confirm that you selected the correct object or unlocked the correct layer.
Frequently Asked Questions
How Can I Change the Color of an Object in Illustrator?
Select the object, then use Recolor Artwork, Edit Colors, or change the Fill and Stroke colors from the toolbar or the Properties panel.
Can I change the color of a PNG or JPEG in Illustrator?
Yes, but only to a limited extent. For full color editing, convert the image into vector artwork with Image Trace or edit the original image in Photoshop.
How Do I Replace One Color with Another in Illustrator?
Use the Recolor Artwork tool to replace one color with another in vector artwork. It lets you swap colors across multiple objects in a few clicks.
Can I Change Multiple Colors at the Same Time?
Yes. The Recolor Artwork tool can update multiple colors in a single operation, making it ideal for changing color palettes or applying new brand colors.
Can I Recolor Only One Part of an Image?
Yes, if that part is a separate vector object or selection. Raster images require masking or editing in Photoshop before changing a specific area.
Does Image Trace Reduce Image Quality?
No. Image Trace converts pixels into vector paths instead of reducing quality. However, a low-resolution source image can produce inaccurate shapes and rough vector edges.
Why Do Colors Change When I Export My Illustrator File?
Colors usually change because the document uses the wrong color mode or export settings. Match RGB for digital output and CMYK for print before exporting.
Is Illustrator Better Than Photoshop for Recoloring Images?
It depends on the image type. Illustrator works best for vector artwork, while Photoshop provides better control for editing colors in raster images like PNGs, JPEGs, and photos.
Conclusion
Changing an image’s color in Illustrator is easier when you follow the right steps. First, find out whether your image is vector or raster. Then, choose the right tool and color mode before you start editing. This simple workflow helps you keep image quality, save time, and get better results.
Professional designers follow the same process on every project. It helps them create consistent colors for logos, illustrations, marketing graphics, and print materials. With practice, you’ll edit colors faster and choose the right Illustrator tool with confidence.